在 Spring Boot 项目中使用 Swagger 文档
Swagger 又称丝袜哥,号称可以让程序员边写代码边生产接口文档。
添加 Swagger 2 依赖
在 pom.xml 中添加 Swagger 2 所需依赖:
<dependency>
  <groupId>io.springfox</groupId>
  <artifactId>springfox-swagger2</artifactId>
  <version>2.9.2</version>
</dependency>
添加 Swagger 的 Java 配置
@Configuration
@EnableSwagger2
public class SwaggerConfig {

  @Bean
  public Docket api() {
    return new Docket(DocumentationType.SWAGGER_2)
      .apiInfo(apiInfo())
      .select()
      .apis(RequestHandlerSelectors.any())
      .paths(PathSelectors.any())
      .build();
  }
}
Swagger 注解说明
Swagger 通过注解表明该接口会生成文档,包括接口名、请求方法、参数、返回信息的等等。
@Api
@ApiOperation
@ApiParam
@ApiModel
@ApiProperty
@ApiResponse
@ApiResponses
@ApiIgnore
@ApiImplicitParam
@ApiImplicitParams
以上这些就是最常用的几个注解了。
具体其他的注解,查看: https://github.com/swagger-ap...
更多请参考 Swagger 注解文档
添加 Controller、Model 来测试效果
@Api(value = "用户管理", description = "用户信息的「增、删、查、改」操作")
@RestController
@RequestMapping(path = "/sample/users")
public class UserController {

  private static Map<Long, UserModel> users = Collections.synchronizedMap(new HashMap<>());

  @ApiOperation(value = "用户列表")
  @GetMapping(path = "/")
  public List<UserModel> getUserList() {
    return new ArrayList<>(users.values());
  }

  @ApiOperation(value = "创建用户", notes = "根据 User 对象创建用户")
  @ApiImplicitParam(name = "user", value = "用户详细实体", required = true, dataTypeClass = UserModel.class)
  @PostMapping(path = "/")
  public UserModel createUser(@RequestBody UserModel user) {
    users.put(user.getId(), user);
    return user;
  }

  @ApiOperation(value = "用户详细信息", notes = "根据 ID 获取用户详细信息")
  @ApiImplicitParam(name = "id", value = "用户 ID", required = true, dataType = "Long")
  @GetMapping(path = "/{id}")
  public UserModel getUser(@PathVariable Long id) {
    return users.get(id);
  }

  @ApiOperation(value = "更新用户详细信息", notes = "根据 ID 指定更新对象, 并根据 User 信息来更新用户详细信息")
  @ApiImplicitParams({
      @ApiImplicitParam(name = "id", value = "用户 ID", required = true, dataTypeClass = Long.class),
      @ApiImplicitParam(name = "user", value = "用户详细实体", required = true, dataTypeClass = UserModel.class)
  })
  @PutMapping(path = "/{id}")
  public UserModel updateUser(@PathVariable Long id, @RequestBody UserModel user) {
    UserModel updateUser = users.get(id);
    updateUser.setName(user.getName());
    updateUser.setAge(user.getAge());
    updateUser.setEmail(user.getEmail());
    users.put(id, updateUser);
    return updateUser;
  }

  @ApiOperation(value = "删除用户", notes = "根据 ID 指定删除对象")
  @ApiImplicitParam(name = "id", value = "用户 ID", required = true, dataType = "Long")
  @DeleteMapping(path = "/{id}")
  public String deleteUser(@PathVariable Long id) {
    users.remove(id);
    return "success";
  }
}
@Data
@ApiModel(value = "用户模型", description = "用户详细信息实体类")
public class UserModel {

  @ApiModelProperty(value = "用户 ID")
  private Long id;

  @ApiModelProperty(value = "名字", allowableValues = "y0ngb1n, tony")
  private String name;

  @ApiModelProperty(value = "年龄", allowableValues = "range[1, 120]")
  private Integer age;

  @ApiModelProperty(value = "邮箱")
  private String email;
}
此时可以启动项目进行验证是否成功集成 Swagger 2 了,启动项目后,在日志中可以看到 Swagger 为我们添加了访问端点 /v2/api-docs :
...
2019-12-28 22:19:53.880  INFO 11935 --- [main] pertySourcedRequestMappingHandlerMapping : Mapped URL path [/v2/api-docs] onto method [public org.springframework.http.ResponseEntity<springfox.documentation.spring.web.json.Json> springfox.documentation.swagger2.web.Swagger2Controller.getDocumentation(java.lang.String,javax.servlet.http.HttpServletRequest)]
...
通过浏览器访问 http://localhost:8080/v2/api-docs ,可以发现返回的结果是一段 JSON 串,可读性非常差。幸运的是 Swagger 2 为我们提供了可视化的交互界面 SwaggerUI,下面我们就一起来试试吧。
添加 Swagger UI 依赖
同上面一样,在 pom.xml 中添加 Swagger UI 所需依赖:
<dependency>
  <groupId>io.springfox</groupId>
  <artifactId>springfox-swagger-ui</artifactId>
  <version>2.9.2</version>
</dependency>
添加完成后,重新启动项目,然后通过浏览器访问 http://localhost:8080/swagger-ui.html ,便以看到下面就效果:
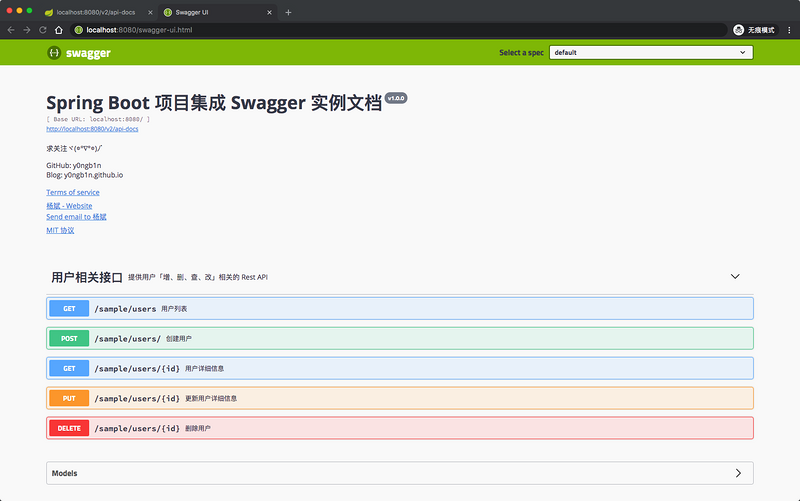
到这里就集成 Swagger 成功了,更多高阶的操作就等继续看文档或下面的参考链接进一步摸索了,祝学习愉快!
:link:️ 参考链接
- https://www.baeldung.com/swag...
- https://www.tutorialspoint.co...
- http://blog.didispace.com/tag...
- https://www.ibm.com/developer...
- https://mp.weixin.qq.com/s/EY...
- https://github.com/dyc87112/s...
- https://github.com/SpringForA...
- https://blog.csdn.net/lilyssh...
感谢您的阅读,本文由 杨斌的博客 版权所有。
如若转载,请注明出处:杨斌的博客( https://y0ngb1n.github.io?utm... )
项目已托管于 GitHub: y0ngb1n/spring-boot-samples ,欢迎 Star, Fork :kissing_heart:
正文到此结束
- 本文标签: 删除 Spring Boot update ip UI 程序员 list http id ssh servlet 配置 App value Collection 2019 java map CTO XML entity IO tag spring mail description 代码 Collections src bean synchronized pom tar GitHub json build Property ArrayList IBM js SDN Select Developer ACE HashMap 测试 https API Document 参数 博客 模型 web git 管理 HTML REST
- 版权声明: 本文为互联网转载文章,出处已在文章中说明(部分除外)。如果侵权,请联系本站长删除,谢谢。
- 本文海报: 生成海报一 生成海报二
热门推荐


相关文章


Loading...
![[HBLOG]公众号](http://www.liuhaihua.cn/img/qrcode_gzh.jpg)

