Spring Boot+CAS 单点登录,如何对接数据库?
松哥给最近连载的 Spring Security 系列也录制了视频教程,感兴趣的小伙伴请戳这里-> Spring Boot+Vue+微人事视频教程 (Spring Boot 第十章就是 Spring Security)。
在前面的两篇文章中,松哥和大家分享了 CAS Server 的搭建以及如何使用 Spring Security 搭建 CAS Client。
但是前面的案例有一个问题,就是登录用户是在 CAS Server 配置文件中写死的,没有对接数据库,实际项目中,这里肯定要对接数据库,所以今天,松哥就来和大家聊一聊 CAS Server 如何对接数据库。
松哥最近和 Spring Security 杠上了,这是 Spring Security 系列的第 25 篇:

- 挖一个大坑,Spring Security 开搞!
- 松哥手把手带你入门 Spring Security,别再问密码怎么解密了
- 手把手教你定制 Spring Security 中的表单登录
- Spring Security 做前后端分离,咱就别做页面跳转了!统统 JSON 交互
- Spring Security 中的授权操作原来这么简单
- Spring Security 如何将用户数据存入数据库?
- Spring Security+Spring Data Jpa 强强联手,安全管理只有更简单!
- Spring Boot + Spring Security 实现自动登录功能
- Spring Boot 自动登录,安全风险要怎么控制?
- 在微服务项目中,Spring Security 比 Shiro 强在哪?
- SpringSecurity 自定义认证逻辑的两种方式(高级玩法)
- Spring Security 中如何快速查看登录用户 IP 地址等信息?
- Spring Security 自动踢掉前一个登录用户,一个配置搞定!
- Spring Boot + Vue 前后端分离项目,如何踢掉已登录用户?
- Spring Security 自带防火墙!你都不知道自己的系统有多安全!
- 什么是会话固定攻击?Spring Boot 中要如何防御会话固定攻击?
- 集群化部署,Spring Security 要如何处理 session 共享?
- 松哥手把手教你在 SpringBoot 中防御 CSRF 攻击!so easy!
- 要学就学透彻!Spring Security 中 CSRF 防御源码解析
- Spring Boot 中密码加密的两种姿势!
- Spring Security 要怎么学?为什么一定要成体系的学习?
- Spring Security 两种资源放行策略,千万别用错了!
- 聊一聊 Spring Boot 中的 CAS 单点登录
- Spring Boot 实现单点登录的第三种方案!
1.整体思路
先来看整体思路。 我们用 CAS Server 做单点登录,CAS Server 主要是负责认证的,也就是它主要解决登录问题。登录成功之后,还有一个权限处理的问题,权限的问题则交由各个 CAS Client 自行处理,并不在 CAS Server 中完成。 在上篇文章中,松哥有教过大家定义 UserDetailsService,不知道大家是否还记得如下代码(忘记了可以参考上篇文章: Spring Boot 实现单点登录的第三种方案! ):@Component
@Primary
public class UserDetailsServiceImpl implements UserDetailsService{
@Override
public UserDetails loadUserByUsername(String s) throws UsernameNotFoundException {
return new User(s, "123", true, true, true, true,
AuthorityUtils.createAuthorityList("ROLE_user"));
}
}
这段代码是在什么时候执行呢?
如果我们没有使用 CAS 这一套的话,这段代码当然是在用户登录的时候执行,用户登录时,从数据库中查询用户的信息,然后做校验(参考本系列前面文章就懂)。
如果我们使用 CAS 这一套,用户登录的校验将在 CAS Server 上执行,CAS Client 就不用做校验工作了,但是为什么我们还需要定义 UserDetailsService 呢?这是为了当用户在 CAS Server 上登录成功之后,拿着用户名回到 CAS Client,然后我们再去数据库中根据用户名获取用户的详细信息,包括用户的角色等,进而在后面的鉴权中用上角色。
好了,这是我们一个大致的思路,接下来我们来看具体实现。
2.具体实现
接下来的配置在 松哥手把手教你入门 Spring Boot + CAS 单点登录 一文的基础上完成,所以还没看前面文章的小伙伴建议先看一下哦。2.1 准备工作
首先我们先在数据库中准备一下用户表、角色表以及用户角色关联表:CREATE TABLE `t_role` ( `id` bigint(20) NOT NULL AUTO_INCREMENT, `name` varchar(255) COLLATE utf8mb4_unicode_ci DEFAULT NULL, `name_zh` varchar(255) COLLATE utf8mb4_unicode_ci DEFAULT NULL, PRIMARY KEY (`id`) ) ENGINE=InnoDB DEFAULT CHARSET=utf8mb4 COLLATE=utf8mb4_unicode_ci; CREATE TABLE `t_user` ( `id` bigint(20) NOT NULL AUTO_INCREMENT, `account_non_expired` bit(1) NOT NULL, `account_non_locked` bit(1) NOT NULL, `credentials_non_expired` bit(1) NOT NULL, `enabled` bit(1) NOT NULL, `password` varchar(255) COLLATE utf8mb4_unicode_ci DEFAULT NULL, `username` varchar(255) COLLATE utf8mb4_unicode_ci DEFAULT NULL, PRIMARY KEY (`id`) ) ENGINE=InnoDB DEFAULT CHARSET=utf8mb4 COLLATE=utf8mb4_unicode_ci; CREATE TABLE `t_user_roles` ( `t_user_id` bigint(20) NOT NULL, `roles_id` bigint(20) NOT NULL, KEY `FKj47yp3hhtsoajht9793tbdrp4` (`roles_id`), KEY `FK7l00c7jb4804xlpmk1k26texy` (`t_user_id`), CONSTRAINT `FK7l00c7jb4804xlpmk1k26texy` FOREIGN KEY (`t_user_id`) REFERENCES `t_user` (`id`), CONSTRAINT `FKj47yp3hhtsoajht9793tbdrp4` FOREIGN KEY (`roles_id`) REFERENCES `t_role` (`id`) ) ENGINE=InnoDB DEFAULT CHARSET=utf8mb4 COLLATE=utf8mb4_unicode_ci; INSERT INTO `t_role` (`id`, `name`, `name_zh`) VALUES (1,'ROLE_admin','管理员'),(2,'ROLE_user','普通用户'); INSERT INTO `t_user` (`id`, `account_non_expired`, `account_non_locked`, `credentials_non_expired`, `enabled`, `password`, `username`) VALUES (1,b'1',b'1',b'1',b'1','123','javaboy'),(2,b'1',b'1',b'1',b'1','123','江南一点雨'); INSERT INTO `t_user_roles` (`t_user_id`, `roles_id`) VALUES (1,1),(2,2);
2.2 CAS Server
然后我们要在 CAS Server 的 pom.xml 文件中添加两个依赖:<dependency>
<groupId>org.apereo.cas</groupId>
<artifactId>cas-server-support-jdbc-drivers</artifactId>
<version>${cas.version}</version>
</dependency>
<dependency>
<groupId>org.apereo.cas</groupId>
<artifactId>cas-server-support-jdbc</artifactId>
<version>${cas.version}</version>
</dependency>
注意这里不用添加数据库驱动,系统会自动解决。
添加完成之后,再在 src/main/resources/application.properties 文件中添加如下配置:
cas.authn.jdbc.query[0].url=jdbc:mysql://127.0.0.1:3306/withjpa?useUnicode=true&characterEncoding=UTF-8&autoReconnect=true&useSSL=false
cas.authn.jdbc.query[0].user=root
cas.authn.jdbc.query[0].password=123
cas.authn.jdbc.query[0].sql=select * from t_user where username=?
cas.authn.jdbc.query[0].fieldPassword=password
cas.authn.jdbc.query[0].driverClass=com.mysql.cj.jdbc.Driver
- 前三行配置是数据库基本连接配置,这个无需我多说。
- 第四行表示配置用户查询 sql,根据用户名查询出用户的所有信息。
- 第五行表示数据库中密码的字段名字是什么。
- 第六行是数据库驱动。
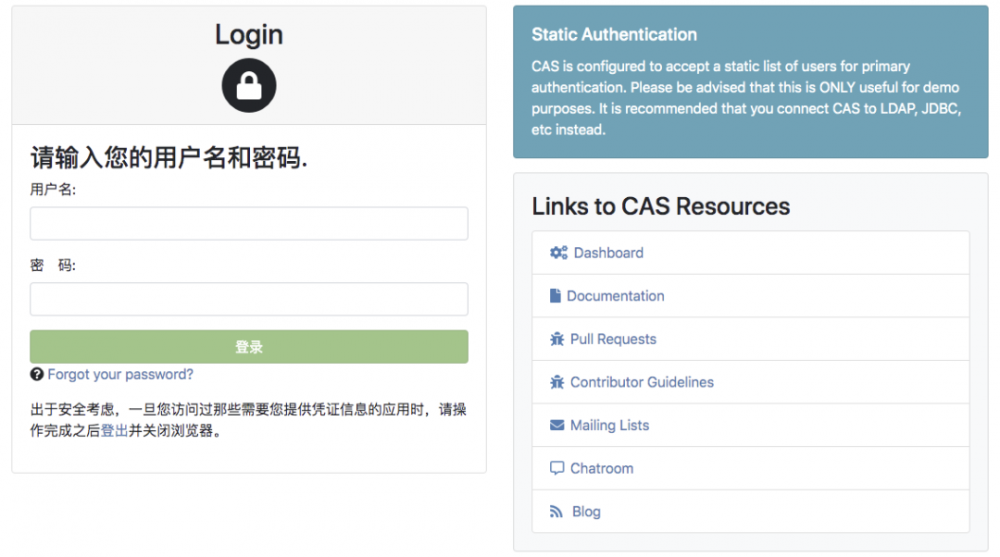
./build.sh run启动成功后,浏览器输入 https://cas.javaboy.org:8443/cas/login 就可以进入登录页面了(注意是 https 哦):

2.3 CAS Client
接下来我们再来看看 CAS Client 要做哪些完善。 接下来的配置在 Spring Boot 实现单点登录的第三种方案! 一文的基础上完成,所以还没看前面文章的小伙伴建议先看一下哦。 同时,为了案例简洁,我这里使用 JPA 来操作数据库,要是大家不熟悉这块的操作,可以参考本系列之前的文章: Spring Security+Spring Data Jpa 强强联手,安全管理只有更简单! 。 CAS Client 中的对接主要是实现 UserDetailsService 接口。这里要用到数据库查询,所以我们首先添加数据库相关依赖:<dependency>
<groupId>mysql</groupId>
<artifactId>mysql-connector-java</artifactId>
</dependency>
<dependency>
<groupId>org.springframework.boot</groupId>
<artifactId>spring-boot-starter-data-jpa</artifactId>
</dependency>
然后在 application.properties 中配置数据库连接信息:
spring.datasource.username=root
spring.datasource.password=123
spring.datasource.url=jdbc:mysql:///withjpa?useUnicode=true&characterEncoding=UTF-8&serverTimezone=Asia/Shanghai

spring.jpa.database=mysql
spring.jpa.database-platform=mysql
spring.jpa.hibernate.ddl-auto=update
spring.jpa.show-sql=true
spring.jpa.properties.hibernate.dialect=org.hibernate.dialect.MySQL8Dialect
都是常规配置,我们就不再重复解释了。 接下来我们创建两个实体类,分别表示用户角色了用户类: 用户角色:
@Entity(name = "t_role")
public class Role {
    @Id
    @GeneratedValue(strategy = GenerationType.IDENTITY)
    private Long id;
    private String name;
    private String nameZh;
    //省略 getter/setter
}
这个实体类用来描述用户角色信息,有角色 id、角色名称(英文、中文),@Entity 表示这是一个实体类,项目启动后,将会根据实体类的属性在数据库中自动创建一个角色表。
用户实体类:
@Entity(name = "t_user")
public class User implements UserDetails {
    @Id
    @GeneratedValue(strategy = GenerationType.IDENTITY)
    private Long id;
    private String username;
    private String password;
    private boolean accountNonExpired;
    private boolean accountNonLocked;
    private boolean credentialsNonExpired;
    private boolean enabled;
    @ManyToMany(fetch = FetchType.EAGER,cascade = CascadeType.PERSIST)
    private List<Role> roles;
    @Override
    public Collection<? extends GrantedAuthority> getAuthorities() {
        List<SimpleGrantedAuthority> authorities = new ArrayList<>();
        for (Role role : getRoles()) {
            authorities.add(new SimpleGrantedAuthority(role.getName()));
        }
        return authorities;
    }
    @Override
    public String getPassword() {
        return password;
    }

    @Override
    public String getUsername() {
        return username;
    }

    @Override
    public boolean isAccountNonExpired() {
        return accountNonExpired;
    }

    @Override
    public boolean isAccountNonLocked() {
        return accountNonLocked;
    }

    @Override
    public boolean isCredentialsNonExpired() {
        return credentialsNonExpired;
    }

    @Override
    public boolean isEnabled() {
        return enabled;
    }
    //省略其他 get/set 方法
}
用户实体类主要需要实现 UserDetails 接口,并实现接口中的方法。
这里的字段基本都好理解,几个特殊的我来稍微说一下:
- accountNonExpired、accountNonLocked、credentialsNonExpired、enabled 这四个属性分别用来描述用户的状态,表示账户是否没有过期、账户是否没有被锁定、密码是否没有过期、以及账户是否可用。
- roles 属性表示用户的角色,User 和 Role 是多对多关系,用一个 @ManyToMany 注解来描述。
- getAuthorities 方法返回用户的角色信息,我们在这个方法中把自己的 Role 稍微转化一下即可。
public interface UserDao extends JpaRepository<User,Long> {
    User findUserByUsername(String username);
}
这里的东西很简单,我们只需要继承 JpaRepository 然后提供一个根据 username 查询 user 的方法即可。如果小伙伴们不熟悉 Spring Data Jpa 的操作,可以在公众号后台回复 springboot 获取松哥手敲的 Spring Boot 教程,里边有 jpa 相关操作,也可以看看松哥录制的视频教程: Spring Boot + Vue 系列视频教程 。
在接下来定义 UserService ,如下:
@Component
@Primary
public class UserDetailsServiceImpl implements UserDetailsService{

    @Autowired
    UserDao userDao;
    @Override
    public UserDetails loadUserByUsername(String username) throws UsernameNotFoundException {
        User user = userDao.findUserByUsername(username);
        if (user == null) {
            throw new UsernameNotFoundException("用户不存在");
        }
        return user;
    }
}
我们自己定义的 UserDetailsServiceImpl 需要实现 UserDetailsService 接口,实现该接口,就要实现接口中的方法,也就是 loadUserByUsername。
OK ,如此之后,我们的 CAS Client 现在就开发完成了,接下来启动 CAS Client,启动成功后,浏览器输入 http://client1.cas.javaboy.org:8080/user/hello 访问 hello 接口,此时会自动跳转到 CAS Server 上登录,登录的用户名密码就是我们存储在数据库中的用户名密码。登录成功之后,经过两个重定向,会重新回到 hello 接口。
hello 接口访问成功之后,再去访问 /user/hello 接口,就会发现权限配置也生效了。
这里比较简单,我就不给大家截图了。
3.小结
好啦,今天主要和小伙伴们分享了一下 Spring Security + CAS 单点登录中,如何使用本地数据库。一个核心的思路是,认证由 CAS Server 来做,权限相关的操作,则还是由 Spring Security 来完成。 好了 ,本文就说到这里,本文相关案例我已经上传到 GitHub ,大家可以自行下载:https://github.com/lenve/spring-security-samples好啦,小伙伴们如果觉得有收获,记得点个在看鼓励下松哥哦~
今日干货


正文到此结束
- 本文标签: key build 数据模型 ORM session 定制 git 安全 GitHub XML autoReconnect=true ACE Service 模型 ssl ip 集群 SOA json autoReconnect Word Security springboot 部署 root cat 管理 Select dataSource http ManyToMany Spring Security tk update pom 数据库 IDE 解析 锁 DDL JPA Spring Boot 加密 java db find 数据 App 开发 entity 免费 id 微服务 spring tab tar UI CTO list src 下载 Collection JDBC mysql 认证 js 配置 value client 文章 IO ArrayList 源码 https sql 代码
- 版权声明: 本文为互联网转载文章,出处已在文章中说明(部分除外)。如果侵权,请联系本站长删除,谢谢。
- 本文海报: 生成海报一 生成海报二
热门推荐
相关文章
Loading...


![[HBLOG]公众号](https://www.liuhaihua.cn/img/qrcode_gzh.jpg)

