【每日一博】在 Eclipse 中利用 XFire 发布 Webservice
一、正所谓“工欲善其事,必先利其器”,下面就先来配置运行环境吧!
-
下载xfire-distribution-1.2.6.zip压缩包到本地,解压后将xfire-all-1.2.6.jar和lib文件夹里面的jar放到同一个文件夹xfirejars中。
-
下载安装tomcat并关联的Eclipse工程中,这个就认为大家都懂,不多说了。
-
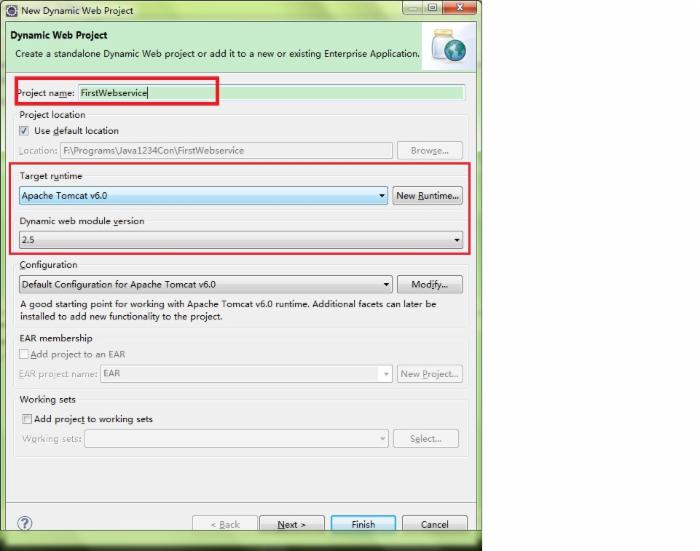
打开eclipse,点击File->New->Dynamic Web Project,新建工程FirstWebService

-
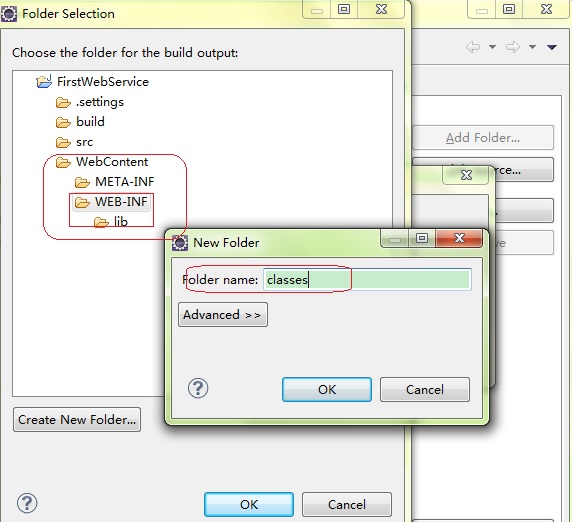
鼠标在FirstWebService上右键设置BuildPath->Configure Build Path设置编译文件classes的存储位置,具体存储位置 FirstWebService/WebContent/WEB-INF/classes。

-
web.xml文件配置,具体代码如下:
<?xml version="1.0" encoding="UTF-8"?> <web-app xmlns:xsi="http://www.w3.org/2001/XMLSchema-instance" xmlns="http://java.sun.com/xml/ns/javaee" xmlns:web="http://java.sun.com/xml/ns/javaee/web-app_2_5.xsd" xsi:schemaLocation="http://java.sun.com/xml/ns/javaee http://java.sun.com/xml/ns/javaee/web-app_2_5.xsd" id="WebApp_ID" version="2.5"> <display-name>FirstWebService</display-name> <welcome-file-list> <welcome-file>index.html</welcome-file> <welcome-file>index.htm</welcome-file> <welcome-file>index.jsp</welcome-file> <welcome-file>default.html</welcome-file> <welcome-file>default.htm</welcome-file> <welcome-file>default.jsp</welcome-file> </welcome-file-list> <servlet> <servlet-name>calculateServlet</servlet-name> <servlet-class>org.codehaus.xfire.transport.http.XFireConfigurableServlet</servlet-class> </servlet> <servlet-mapping> <servlet-name>calculateServlet</servlet-name> <url-pattern>/services/*</url-pattern> </servlet-mapping> </web-app>
主要是设置<servlet></servlet>标签中和<servlet-mapping></servlet-mapping>中的代码。
6.把前面我们下载的xfire压缩包中复制出来的jar包文件全部复制到 FirstWebService/WebContent/WEB-INF/lib文件夹中。
7.接着在FirstWebService/Java Resources/src文件夹中建立包com.calculation.services,其中建立接口类Calculation.java和接口实现类CalculationImpl.java。
具体代码如下:
Calculation.java
package com.calculation.services; public interface Calculation { public int add(int a,int b); public int sub(int a,int b); public int div(int a,int b); public int puls(int a,int b); } CalculationImpl.java
package com.calculation.services; public class CalculationImpl implements Calculation { public int add(int a ,int b){ return a+b; } public int sub(int a,int b){ return a*b; } public int puls(int a,int b){ return a-b; } public int div(int a,int b) { return a/b; } } 8.配置services.xml文件。
在FirstWebService/WebContent/META-INF文件夹下建立xfire文件,再在xfire中建立services.xml文件。最后将整个META-INF文件全部剪切到WEB-INF下的classes文件夹中。
services.xml代码如下:
<?xml version="1.0" encoding="UTF-8"?> <beans xmlns="http://xfire.codehaus.org/config/1.0"> <service> <name>Calculation</name> <namespace>http://com.calculation.services.Calculation</namespace> <serviceClass>com.calculation.services.Calculation</serviceClass> <implementationClass>com.calculation.services.CalculationImpl</implementationClass> </service> </beans>
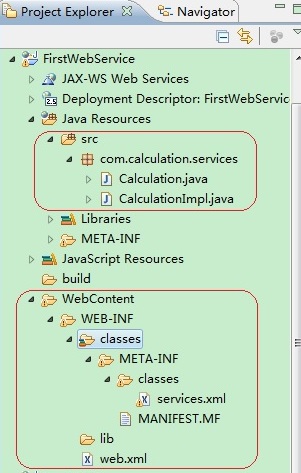
至此,服务端的配置已经完成,具体的文件图结构如下:

然后点击项目,Run As-》Run On Server
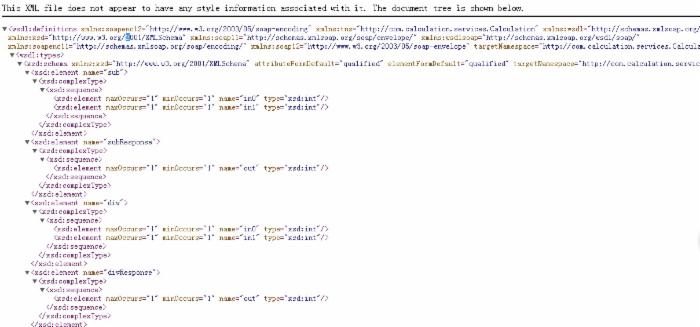
最后在自己的浏览器中输入 http://localhost:8080/FirstWebService/services/Calculation?wsdl 如果有下面的效果怎么服务端OK!

二、客户端编写,建立FirstWebService/Java Resources/src/ com.calculation.services.client 包
客户端CalculationClient.java代码:
package com.calculation.services.client; import java.net.MalformedURLException; import org.codehaus.xfire.XFireFactory; import org.codehaus.xfire.client.XFireProxyFactory; import org.codehaus.xfire.service.Service; import org.codehaus.xfire.service.binding.ObjectServiceFactory; import com.calculation.services.*; public class CalculationClient { public static Calculation calc; public CalculationClient(){}; public static Calculation getCalculate(String url) throws MalformedURLException { if(calc==null) { Service srvcModel = new ObjectServiceFactory().create(Calculation.class); //创建XFire对象 XFireProxyFactory factory = new XFireProxyFactory(XFireFactory.newInstance().getXFire()); //调用Web服务 calc = (Calculation) factory.create(srvcModel, url); } return calc; } public static void main(String[] args) throws MalformedURLException { Calculation service = CalculationClient.getCalculate("http://localhost:8080/FirstWebService/services/Calculation"); int result=service.add(2, 3); int result2=service.div(10, 2); System.out.println(result); System.out.println(result2); } } 运行程序,总体完成!!!!


![[HBLOG]公众号](https://www.liuhaihua.cn/img/qrcode_gzh.jpg)

