我忠诚的猎兔犬会在危险靠近时警告我,对,他的名字叫BBG
This is an IoT demo which we can upload the temperature info. to the network, and we can view the information in real time. When the temperature exceeds the threshold, and lasts for 1 minute, a warning Email will be sent to you.
About this project
Today, I will show you an IoT demo made with BBG, We upload the data to dweet.io and view the information on freeboard.io in real time. The full name of BBG is BeagleBone Green which is designed by SeeedStudio. BeagleBone Green is a low-cost, community-supported development platform for developers and hobbyists. Boot Linux in under 10 seconds and get started on development in less than 5 minutes with just a single USB cable. And more important, it’s compatible with Grove.
By the time you’re done with the demo you will gain the following experience:
1.Be familiar with BBG;
2.Master the dweet.io IoT cloud platform.
3.Master the freeboard.io IoT cloud platform.
Now, let’s get started.
About dweet.io and freeboard.io
Dweet.io doesn't require any setup or sign-up—just publish and go. It's machine-to-machine (M2M) for the Internet Of Things (IOT) the way it was meant to be.
It’s simple publishing and subscribing for machines, sensors, devices, robots, and gadgets (we just call them things). We call published messages ‘dweets’. It’s helpful to think of dweet.io as a Twitter for things, in fact.
Freeboard can ridiculously simple dashboards for your devices. It's simple to build real-time, interactive dashboards and visualizations in minutes using the intuitive drag & drop interface.
Hardware
Ready as shown in the figure below.

Let’s make a Grove cable with two branches as shown in the picture. So we can use the UART interface as two GPIOs.

Attach the BBG I2C interface to the I2C Hub by Grove cable. Then attach the OLED and BMP180 to the I2C Hub.
Attach the Grove-Button and Grove-Led to the BBG UART interface by the Grove cable with two branches. Make sure that the UART2_Txd pin is connected to the Grove-LED, and UART2_RXD is connected to the Grove-Button. Just as shown in the figure below.

Connect the BBG to network with a standard Ethernet cable. Then connect your BBG to the PC with an USB cable.
Hardware is ready now, we need to programming.
Software
You can download the example code by click here . Copy them to your cloud9 compiler. Now, let’s learn the example code together.
There are three Python files here.

bbg_grove_oled.py is used to drive the oled display.
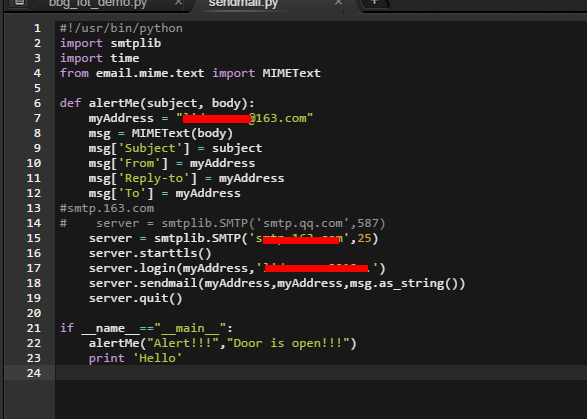
sendmail.py is used to send the alert email. You should change the Email address and the Email password to your own. Just as the picture below shows.

Then save your changes and run the bbg_iot_demo.py file, Then you’ll find the OLED display is lit up.
Workflow
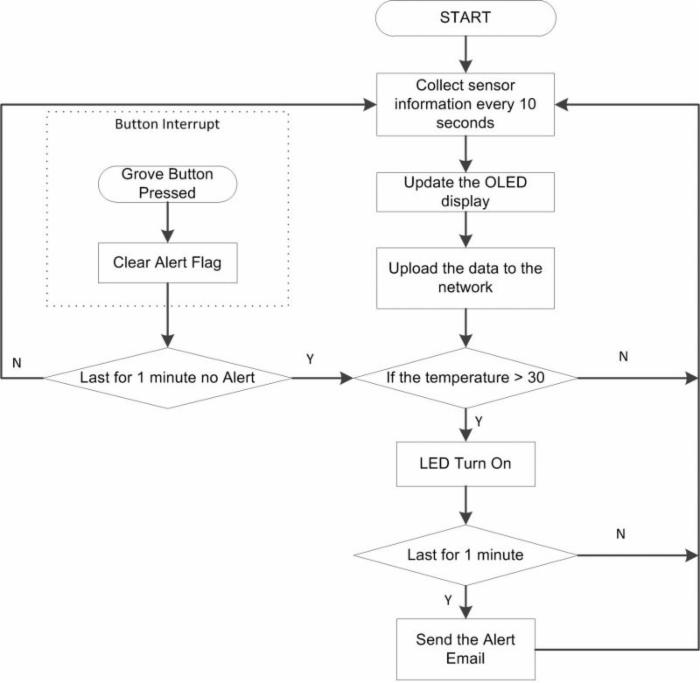
Now let's analyse the device and how does it work. As shown in the figure below.

While the Grove-Button not pressed, if the temperature is above 30 degrees last for about 1 minute, the system will send an Alert Email to you.
When the Grove-Button pressed, the system will clear the Alert Flag and turn off the Grove-LED for 1 minute. After that, if the temperature is still above 30 degrees, the system will turn on the Grove-LED and set the Alert Flag again.
Final Results
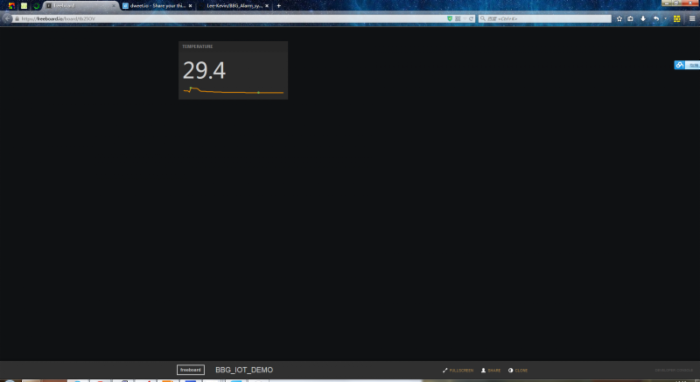
Now, you can clilk here to view the data on dweet.io, just as the picture below shows.

to view the real-time, interactive dashboard of your device.

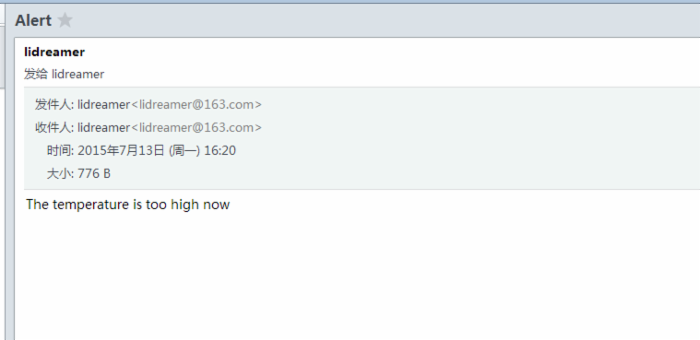
And when the temperature is above 30 degrees, the system will send an Email just as the picture below shows.

The LCD panel will display the information as the picture below shows.

Make. Invent. Do.
This project is made as an Open Source Project. It's a starting point. Let your creativity go wild with the mechanical, electrical and software design. Make the demo your own. Decorate it. Improve the work. No matter what, write a recipe about it.
To share and progress together.


![[HBLOG]公众号](https://www.liuhaihua.cn/img/qrcode_gzh.jpg)

