Hadoop入门进阶课程12--Flume介绍、安装与应用案例
本文版权归作者和博客园共有,欢迎转载,但未经作者同意必须保留此段声明,且在文章页面明显位置给出原文连接,博主为石山园,博客地址为 http://www.cnblogs.com/shishanyuan 。该系列课程是应邀实验楼整理编写的,这里需要赞一下实验楼提供了学习的新方式,可以边看博客边上机实验,课程地址为 https://www.shiyanlou.com/courses/237
【注】该系列所使用到安装包、测试数据和代码均可在百度网盘下载,具体地址为 http://pan.baidu.com/s/10PnDs ,下载该 PDF 文件
1 、 搭建环境
部署节点操作系统为 CentOS ,防火墙和 SElinux 禁用,创建了一个 shiyanlou 用户并在系统根目录下创建 /app 目录,用于存放 Hadoop 等组件运行包。因为该目录用于安装 hadoop 等组件程序,用户对 shiyanlou 必须赋予 rwx 权限(一般做法是 root 用户在根目录下创建 /app 目录,并修改该目录拥有者为 shiyanlou(chown – R shiyanlou:shiyanlou /app )。
Hadoop 搭建环境:
l 虚拟机操作系统: CentOS6.6 64 位,单核, 1G 内存
l JDK : 1.7.0_55 64 位
l Hadoop : 1.1.2
2 、 Flume 介绍
Flume 是 Cloudera 提供的日志收集系统, Flume 支持在日志系统中定制各类数据发送方,用于收集数据;同时, Flume 提供对数据进行简单处理,并写到各种数据接受方(可定制)的能力。 Flume 是一个分布式、可靠和高可用的海量日志采集、聚合和传输的系统。
Flume 具有 Reliability 、 Scalability 、 Manageability 和 Extensibility 特点:
1. Reliability : Flume 提供 3 中数据可靠性选项,包括 End-to-end 、 Store on failure 和 Best effort 。其中 End-to-end 使用了磁盘日志和接受端 Ack 的方式,保证 Flume 接受到的数据会最终到达目的。 Store on failure 在目的不可用的时候,数据会保持在本地硬盘。和 End-to-end 不同的是,如果是进程出现问题, Store on failure 可能会丢失部分数据。 Best effort 不做任何 QoS 保证。
2. Scalability : Flume 的 3 大组件: collector 、 master 和 storage tier 都是可伸缩的。需要注意的是, Flume 中对事件的处理不需要带状态,它的 Scalability 可以很容易实现。
3. Manageability : Flume 利用 ZooKeeper 和 gossip ,保证配置数据的一致性、高可用。同时,多 Master ,保证 Master 可以管理大量的节点。
4. Extensibility :基于 Java ,用户可以为 Flume 添加各种新的功能,如通过继承 Source ,用户可以实现自己的数据接入方式,实现 Sink 的子类,用户可以将数据写往特定目标,同时,通过 SinkDecorator ,用户可以对数据进行一定的预处理。
2.1 Flume 架构
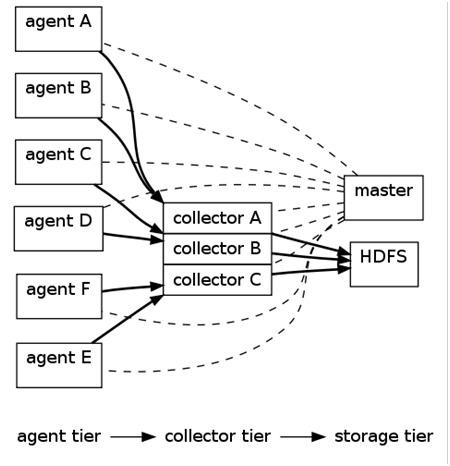
上图的 Flume 的架构中最重要的抽象是 data flow (数据流), data flow 描述了数据从产生,传输、处理并最终写入目标的一条路径(在上图中,实线描述了 data flow )。 Agent 用于采集数据, agent 是 flume 中产生数据流的地方,同时, agent 会将产生的数据流传输到 collector 。对应的, collector 用于对数据进行聚合,往往会产生一个更大的流。
Flume 提供了从 console (控制台)、 RPC ( Thrift-RPC )、 text (文件)、 tail ( UNIX tail )、 syslog ( syslog 日志系统,支持 TCP 和 UDP 等 2 种模式), exec (命令执行)等数据源上收集数据的能力。同时, Flume 的数据接受方,可以是 console (控制台)、 text (文件)、 dfs ( HDFS 文件)、 RPC ( Thrift-RPC )和 syslogTCP ( TCP syslog 日志系统)等。
其中,收集数据有 2 种主要工作模式,如下:
1. Push Sources :外部系统会主动地将数据推送到 Flume 中,如 RPC 、 syslog 。
2. Polling Sources : Flume 到外部系统中获取数据,一般使用轮询的方式,如 text 和 exec 。
注意,在 Flume 中, agent 和 collector 对应,而 source 和 sink 对应。 Source 和 sink 强调发送、接受方的特性(如数据格式、编码等),而 agent 和 collector 关注功能。
2.2 Flume 管理方式
Flume Master 用于管理数据流的配置,如下图。
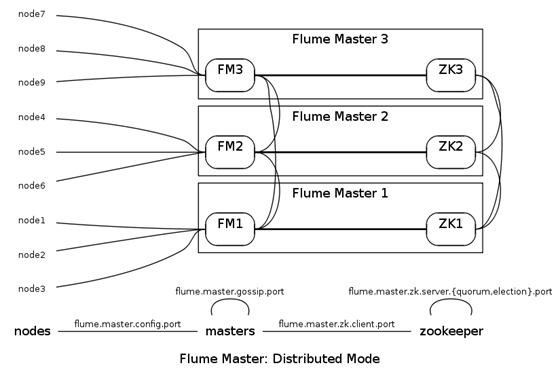
为了保证可扩展性, Flume 采用了多 Master 的方式。为了保证配置数据的一致性, Flume 引入了 ZooKeeper ,用于保存配置数据, ZooKeeper 本身可保证配置数据的一致性和高可用,另外,在配置数据发生变化时, ZooKeeper 可以通知 Flume Master 节点。
Flume Master 间使用 gossip 协议同步数据。
3 、 安装部署 Flume
3.1 Flume 部署过程
3.1.1 下载 Flume
可以到 apache 基金 flume 官网 http://flume.apache.org/download.html ,选择镜像下载地址 http://mirrors.hust.edu.cn/apache/flume/ 下载一个稳定版本,如下图所示下载 flume-1.5.2-bin.tar.gz :

也可以在 /home/shiyanlou/install-pack 目录中找到该安装包,解压该安装包并把该安装包复制到 /app 目录中
cd /home/shiyanlou/install-pack
tar -xzf flume-1.5.2-bin.tar.gz
mv apache-flume-1.5.2-bin /app/flume-1.5.2

3.1.2 设置 /etc/profile 参数
编辑 /etc/profile 文件,声明 flume 的 home 路径和在 path 加入 bin 的路径:
export FLUME_HOME=/app/flume-1.5.2
export FLUME_CONF_DIR=$FLUME_HOME/conf
export PATH=$PATH:$FLUME_HOME/bin

编译配置文件 /etc/profile ,并确认生效
source /etc/profile
echo $PATH
3.1.3 设置 flume-env.sh 配置文件
在 $FLUME_HOME/conf 下复制改名 flume-env.sh.template 为 flume-env.sh ,修改 conf/ flume-env.sh 配置文件
cd /app/flume-1.5.2/conf
cp flume-env.sh.template flume-env.sh
sudo vi flume-env.sh
修改配置文件内容 :
JAVA_HOME= /app/lib/jdk1.7.0_55
JAVA_OPTS="-Xms100m -Xmx200m -Dcom.sun.management.jmxremote"

3.2 部署验证
3.2.1 验证安装
1. 修改 flume-conf 配置文件
在 $FLUME_HOME/conf 目录下修改 flume-conf.properties.template 文件,复制并改名为 flume-conf ,
cd /app/flume-1.5.2/conf
cp flume-conf.properties.template flume-conf.properties
sudo vi flume-conf.properties
修改 flume-conf 配置文件内容
# The configuration file needs to define the sources, the channels and the sinks.
# Sources, channels and sinks are defined per agent, in this case called 'a1'
a1.sources = r1
a1.sinks = k1
a1.channels = c1
# For each one of the sources, the type is defined
a1.sources.r1.type = netcat
a1.sources.r1.bind = localhost
a1.sources.r1.port = 44444
#The channel can be defined as follows.
a1.sources.r1.channels = c1
# Each sink's type must be defined
a1.sinks.k1.type = logger
#Specify the channel the sink should use
a1.sinks.k1.channel = c1
# Each channel's type is defined.
a1.channels.c1.type = memory
# Other config values specific to each type of channel(sink or source)
# can be defined as well
# In this case, it specifies the capacity of the memory channel
a1.channels.c1.capacity = 1000
a1.channels.c1.transactionCapacity = 100
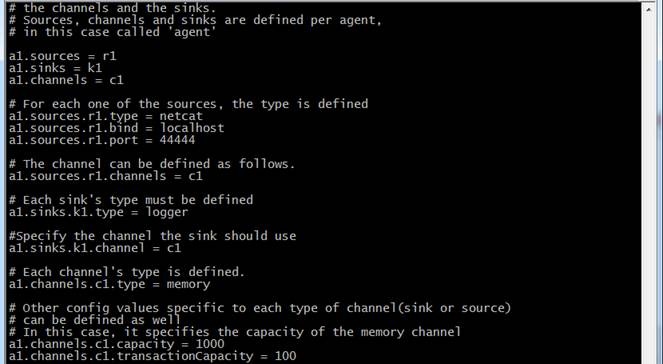
2. 在 flume 的安装目录 /flume-1.5.2 下运行
cd /app/flume-1.5.2
./bin/flume-ng agent --conf ./conf/ --conf-file ./conf/flume-conf.properties --name a1 -Dflume.root.logger=INFO,console

3. 再打开一个终端,输入如下命令:
telnet localhost 44444
hello world

注 :在 CentOS6.5 运行 telnet 提示 "command not found" ,使用 sudo yum install telnet 进行安装
4. 在原来的终端上查看,可以收到来自于 telnet 发出的消息

3.2.2 测试收集日志到 HDFS
1. 在 $FLUME_HOME/conf 目录下修改 flume-conf.properties.template 文件,复制并改名为 flume-conf2.properties
cd /app/flume-1.5.2/conf
cp flume-conf.properties.template flume-conf2.properties
sudo vi flume-conf2.properties

a1.sources = r1
a1.sinks = k1
a1.channels = c1
a1.sources.r1.type = exec
a1.sources.r1.channels = c1
a1.sources.r1.command = tail -F /app/hadoop-1.1.2/logs/hadoop-shiyanlou-namenode-b393a04554e1.log
a1.sinks.k1.type = hdfs
a1.sinks.k1.channel = c1
a1.sinks.k1.hdfs.path = hdfs://hadoop:9000/class12/out_flume
a1.sinks.k1.hdfs.filePrefix = events-
a1.sinks.k1.hdfs.round = true
a1.sinks.k1.hdfs.roundValue = 10
a1.sinks.k1.hdfs.roundUnit = minute
a1.sinks.k1.hdfs.rollSize = 4000000
a1.sinks.k1.hdfs.rollCount = 0
a1.sinks.k1.hdfs.writeFormat = Text
a1.sinks.k1.hdfs.fileType = DataStream
a1.sinks.k1.hdfs.batchSize = 10
a1.channels.c1.type = memory
a1.channels.c1.capacity = 1000
a1.channels.c1.transactionCapacity = 100
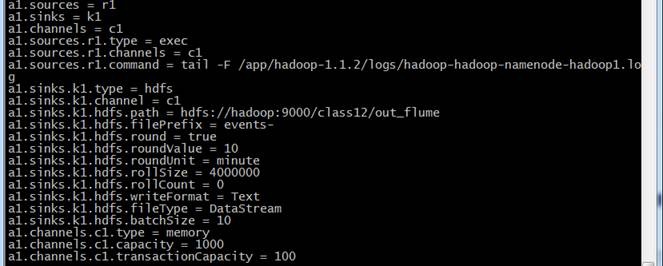
2. 在 flume 的安装目录 /flume-1.5.2 下运行
cd /app/flume-1.5.2
./bin/flume-ng agent --conf ./conf/ --conf-file ./conf/flume-conf2.properties --name a1 -Dflume.root.logger=INFO,console

3. 不断收集 hadoop-hadoop-namenode-hadoop1.log 的数据写入 HDFS 中

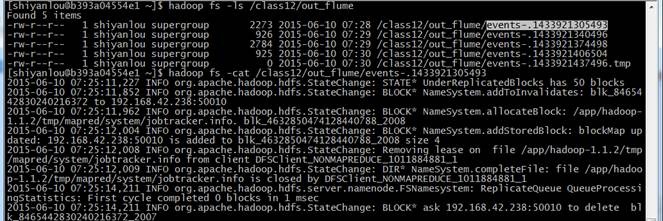
4. 查看 hdfs 中 /class12/out_flume 中的文件
hadoop fs -ls /class12/out_flume
hadoop fs -cat /class12/out_flume/events-.1433921305493


![[HBLOG]公众号](https://www.liuhaihua.cn/img/qrcode_gzh.jpg)

