自己动手打造Fiddler挖洞插件
对于一个Web开发人员来说,Fiddler并不陌生。作为一款Web调试利器,它拥有强大的调试功能,灵活的配置以及丰富的可扩展功能。我在开发工作中,最喜欢的就是它的Inspectors和AutoResponder功能。另外,它可以解密HTTPS数据,支持反向代理,也可用于中间人攻击。

对于一个对代码有洁癖的人来说,不仅在代码格式上有严格的要求,对代码的健壮性,安全性同样苛刻。因此,就连小小的(Full path disclosure)爆物理路径的bug也不容许存在。
当我是coder的时候,我用的工具是Fiddler,当我是一个hacker的时候,我用的是burp suite。由于我对java 没有一点好感,也对它不甚了解。所以我选择开发一个Fiddler插件帮助我检查出web系统中存在的爆路径页面。个人认为, Fiddler比burp suite更”接地气”。
开发的语言我选择的是.NET语言中的C#。原因是Fiddler本身就是用C#编写,它对.NET的扩展有良好的支持。
设计原理与思路
设计这个插件的原理是这样子的:在php中,有这样一些不安全的特性,比如htmlspecialchars这个函数,很多coder喜欢用这个函数来过滤用户的输入,测试代码如下:
<?php echo htmlspecialchars($_GET['param1']); ?>
当我们构造这样一个url时,http://localhost/test.php?param=1就会发现页面爆路径了。
看图:

报错级别为警告,具体原因是说,htmlspecialchars这个函数需要的是string 而你却插入了一个array。紧接着后面就爆出了物理路径。
在php中类似于htmlspecialchars因为传入一个数组而爆路径的函数有很多。像trim等操作字符串的函数。或许这样一个小小的bug只需要一个简单粗暴,快速有效的办法即可完美搞定。那就是在php文件开头添加
<?php error_reporting(0); ...... ?>
即可。可是貌似很多知名的CMS却不会选择这种方法。
插件处理请求的大体思路是这样子的,看下图:
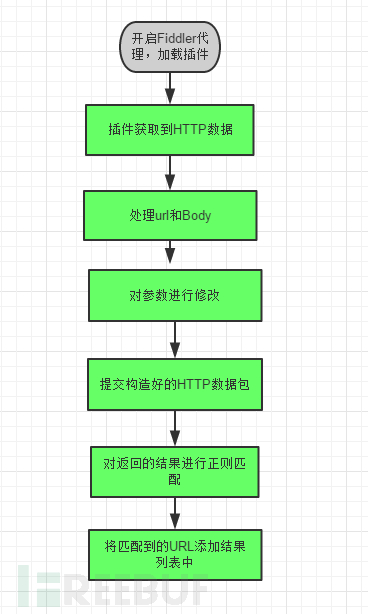
到此,我们已经搞清楚了设计原理和设计思路。接下来就开始编写这个插件吧。
编写插件
在编写插件前,首先要搞清楚开发Fiddler插件的接口。
具体的说明可以参考Fiddler官网。 http://docs.telerik.com/fiddler/Extend-Fiddler/ExtendWithDotNet
官方说明文档并未详细讲解Fiddler插件开发的一些细节。只能通过Reflector工具反编译Fiddler库,或者直接使用Visual Studio引用Fiddler库,查看其内部实现的细节。
当然我们最需要搞清楚这几个接口方法就行了,如下:
public void OnLoad(){ /* 在这编写加载插件是需要执行的code 如加载UI */ } public void OnBeforeUnload() { /*编写在unload插件之前所要执行的code*/ } public void AutoTamperRequestBefore(Session oSession){ /*在这编写请求之前需要执行的code */} public void AutoTamperRequestAfter(Session oSession){ /*在这编写请求之后需要执行的code */} public void AutoTamperResponseBefore(Session oSession){ /*在这编写响应之前需要执行的code */} public void AutoTamperResponseAfter(Session oSession){ /*在这编写响应之后需要执行的code */} public void OnBeforeReturningError(Session oSession){ /*在这编写有错误返回时需要执行的code */} 打开visual studio 2013 新建Visual C#项目,项目类型选择类库(library),.NET Framework版本根据所要开发的插件的功能选择吧。
建立项目后有以下几个事情要做:
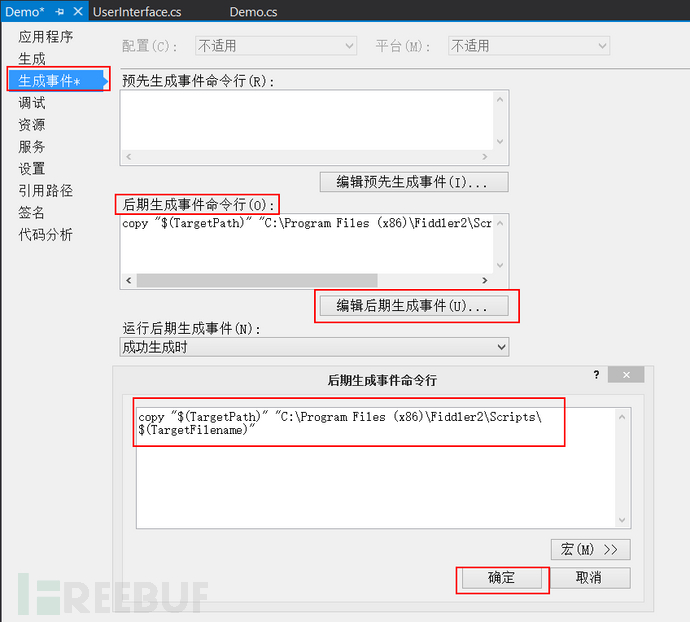
1.添加引用,将Fiddler库和Forms程序集加入到project中。 2.建议添加一个类,用于UI的设计和加载以及相关控件的事件处理。 3.为了方便调试,在项目属性的生成事件中,将编译好的dll复制到Fiddler的插件目录。
插件目录说明:
一般来说用户自定义的插件建议放在: %userprofile%/Documents/Fiddler2/Scripts中。
当然你也可以放在Fiddler安装目录下的Scripts文件夹中。
如下图:
UserInterface类的代码如下:
class UserInterface : UserControl { private TabPage tabPage; //添加一个标签页 用来放置控件 private CheckBox chkb_Enabled; //用来启用或禁用插件 private TextBox textBox_Result; //用来保存最后的结果 private Button btn_Clear; //清空按钮 public bool bEnabled; public delegate void Delegate_AddResult(string strUrl);//定义输出结果的委托 public UserInterface() { this.bEnabled = false; this.InitializeUI(); FiddlerApplication.UI.tabsViews.TabPages.Add(this.tabPage); //新建一个tabPage } public void InitializeUI() //初始化UI { this.tabPage = new TabPage("爆路径检测"); this.tabPage.AutoScroll = true; this.chkb_Enabled = new CheckBox(); this.chkb_Enabled.Top = 10; this.chkb_Enabled.Left = 20; this.chkb_Enabled.Text = "Enable"; this.chkb_Enabled.Checked = false; //初始化为不选中 this.btn_Clear = new Button(); this.btn_Clear.Text = "Clear"; this.btn_Clear.Left = 200; this.btn_Clear.Top = 10; this.Enabled = false; this.textBox_Result = new TextBox(); this.textBox_Result.Top = 50; this.textBox_Result.Left = 20; this.textBox_Result.Width = 1000; this.textBox_Result.Height = 600; this.textBox_Result.ReadOnly = true; this.textBox_Result.Multiline = true; //多行显示 this.textBox_Result.ScrollBars = ScrollBars.Vertical; //垂直滚动条 this.tabPage.Controls.Add(this.chkb_Enabled); this.tabPage.Controls.Add(this.btn_Clear); this.tabPage.Controls.Add(this.textBox_Result); /*给chkb_Enabled添加CheckedChanged事件处理*/ this.chkb_Enabled.CheckedChanged += new EventHandler(this.chkb_Enabled_CheckedChanged); this.btn_Clear.Click += new EventHandler(this.btn_Clear_Click); } private void btn_Clear_Click(object obj, EventArgs args) { this.textBox_Result.Text = ""; } private void chkb_Enabled_CheckedChanged(object obj, EventArgs args) { this.SuspendLayout(); this.bEnabled = this.chkb_Enabled.Checked; this.btn_Clear.Enabled = this.bEnabled; this.ResumeLayout(); } public void AddResult(string strUrl) { if (!this.textBox_Result.InvokeRequired) this.textBox_Result.AppendText(strUrl + "/r/n"); else { Delegate_AddResult delegate_addresult = new Delegate_AddResult(this.AddResult); this.textBox_Result.Invoke(delegate_addresult, strUrl); } } } 最终设计好的UI如下如所示,点击Enable可以启用或禁用插件
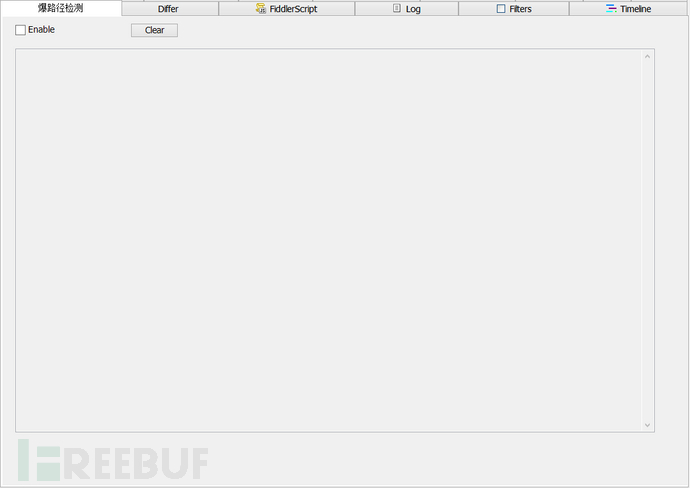
接下来开始编写处理url的code。
处理的具体思路如下:

处理请求的代码如下:
try { if(oSession.RequestMethod == "GET") { if (this.geturlList.Contains(oSession.url) || this.xGETurlList.Contains(oSession.url)) return; this.geturlList.Add(oSession.url); this.strParams = oSession.url.Split('?')[1]; string[] Params = strParams.Split('&'); foreach (string strParamname in Params) { string strUrl = oSession.url; strUrl = strUrl.Replace(strParamname.Split('=')[0], strParamname.Split('=')[0] + "[]"); this.xGETurlList.Add(strUrl); FiddlerApplication.oProxy.InjectCustomRequest(oSession.ToString().Replace(oSession.url, strUrl)); } } else if(oSession.RequestMethod == "POST") { if (this.posturlList.Contains(oSession.url) && this.xPOSTdataList.Contains(oSession.GetRequestBodyEncoding().GetString(oSession.requestBodyBytes))) return; this.posturlList.Add(oSession.url); this.xPOSTdataList.Add(oSession.GetRequestBodyEncoding().GetString(oSession.requestBodyBytes)); this.strParams = oSession.GetRequestBodyEncoding().GetString(oSession.requestBodyBytes); string[] Params = strParams.Split('&'); foreach (string strParamname in Params) { String strData = oSession.ToString(); strData = this.strParams.Replace(strParamname.Split('=')[0], strParamname.Split('=')[0] + "[]"); this.xPOSTdataList.Add(this.strParams.Replace(strParamname.Split('=')[0], strParamname.Split('=')[0] + "[]")); StringDictionary dictionary = new StringDictionary(); dictionary["Flag"] = "FreeBuf"; FiddlerApplication.oProxy.InjectCustomRequest(oSession.oRequest.headers, oSession.GetRequestBodyEncoding().GetBytes(strData), dictionary); } } }catch { } 接下来就是对提交了构造好的HTTP数据包进行响应的判断。
根据爆路径后Web页面内容的对比,使用如下正则进行匹配,判断页面是否存在物理路径。
PHP/s*/w*/:.*///w*.php
处理响应的关键代码如下:
if (oSession.responseCode == 404) return; if (this.xGETurlList.Contains(oSession.url) || this.posturlList.Contains(oSession.url)) { string strResponse = oSession.GetResponseBodyAsString().Replace('//', '/'); this.regex = new Regex(@"PHP/s*/w*/:.*///w*.php"); this.m = this.regex.Match(strResponse); if (this.m.Success) { if (oSession.RequestMethod == "GET") this.ui.AddResult("[" + oSession.RequestMethod + "] " + oSession.url); else if (oSession.RequestMethod == "POST") { this.ui.AddResult("[" + oSession.RequestMethod + "] " + oSession.url); this.ui.AddResult("[POST Data:] " + oSession.GetRequestBodyEncoding().GetString(oSession.requestBodyBytes)); } } } 到此,这个爆路径检测的插件基本就写好了。但是还不够完美。不过已经可以满足我的需求了。
测试
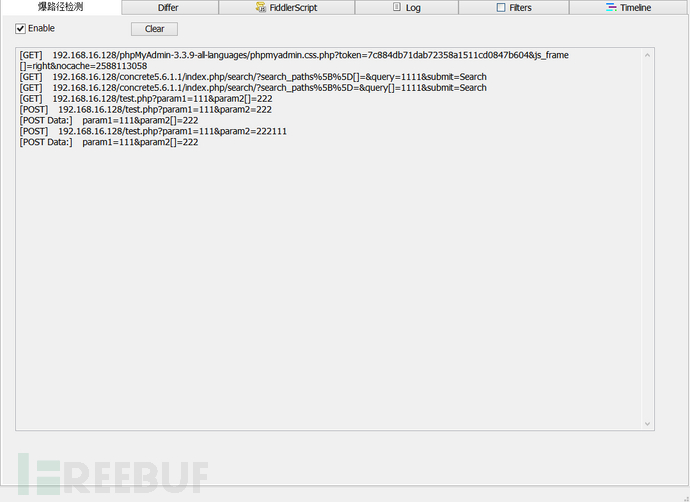
接下来我们进行实战测试。看看功能是否完好。
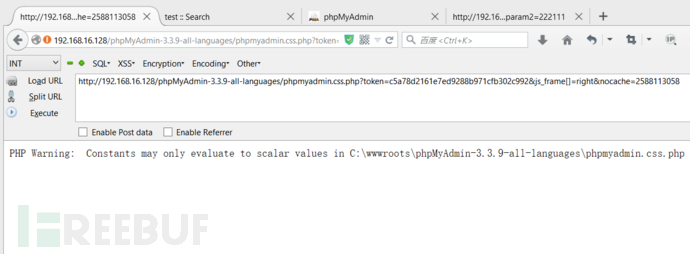
test.php是我自己用来测试的一个文件。也无意间测试到
phpMyAdmin-3.3.9中存在一个爆路径页面,还有concrete5 CMS 也存在爆路径的页面。

总结
爆路径这种漏洞,其价值说大也大,说小也小。而且与你搭建的环境和编写的代码都有一定的关系。现在这个插件还有很多不足的地方,需要改进。另外,我们也可以用类似的思路,去发掘XSS,CSRF,SQLi,LFI等常见的WEB漏洞。
对于Fiddler插件开发中有几个问题需要引起重视:
1) 给插件添加一个switch,不要默认直接被Fiddler加载,会影响Fiddler性能。 2) 必须使用委托来对UI进行操作,这是Fiddler官方的要求。否则会触发异常。 3) 对提交自定义的请求,必须进行”查重”检查,因为自定义的请求也是通过Fiddler代理进行发送的,否则会进入死循环。你可以在数据中添加标记,如header ,也可以使用我现在这个的办法,将已处理的请求保存起来,可以使用ArrayList也可以使用泛型List。实际上,Fiddler的InjectCustomRequest的一个重载的方法是支持添加flag的。
Fiddler已经诞生了十几年,其功能还再不断的完善。更多的开发特性还需要继续去挖掘去探索。
插件源码下载


![[HBLOG]公众号](https://www.liuhaihua.cn/img/qrcode_gzh.jpg)

