XCode依赖管理刨坑记
主要内容
笔者断断续续接触IOS开始有小几个月,中间也遇到了许多问题,这里主要记录一下与依赖管理相关的内容
IOS依赖管理
在进行程序开发过程中,我们经常会用到各种各样的开源工具。 比如IOS开发中经常使用的Alamofire。那这个时候我们如何在我们项目中使用这些第三方开源代码呢?
手动管理
初入IOS坑,必须经历一下手动管理依赖的洗礼,
以Alamofire为例,我们可以使用git submodule来添加依赖
git submodule add https://github.com/Alamofire/Alamofire.git
之后的过程就是手动将Alamofire目录下的Alamofire.xcodeproj文件拖入到项目中

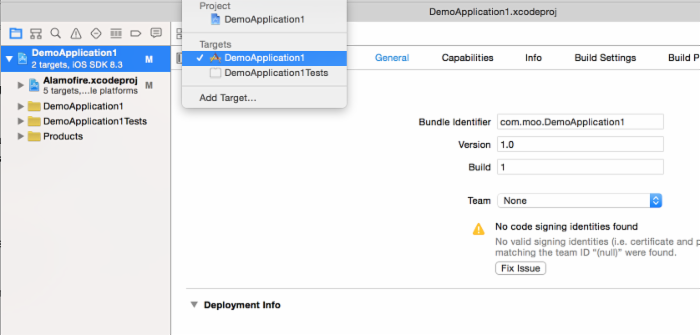
选择项目的Targets

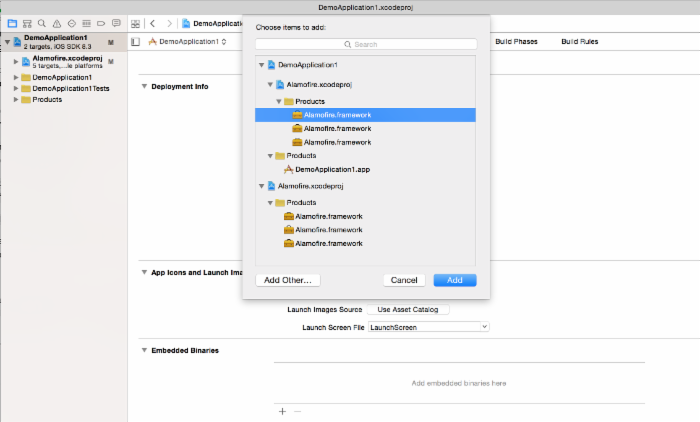
在Embeded Binaries中添加依赖的包

这里可以看到有连个Alamofire的包,两个中任意选择一个即可,上面的包是IOS,下面的包是给OSX的,选择即可
上面的过程中其实忽略了很多其他的问题,包括依赖第三方包得版本,第三方包得Build target信息等等,所以你想真正用上Alamofire提供的功能还有很多曲折的路要走
总之手动管理XCode第三方依赖,缺失够折磨人得
尝鲜之选Carthage
目前笔者已知的XCode依赖管理工具 Cocoapods 和 Carthage .
本着“选新不选旧”,”选轻不选重”的原则,笔者尝试使用了Carthage,
Carthage工具使用本身不复杂
Mac用户直接使用brew进行安装即可,其工作模式是根据用户提供的Cartfile定义的依赖,使用xcodebuild编译依赖的项目成framework包,再直接引入到项目中使用
brew install carthage
以Alamofire为例,我们只需要在项目根目录下创建Cartfile文件,并添加如下内容
github "Alamofire/Alamofire" ~> 2.0
运行carthage update命令下载,并且编译依赖的项目
# 更新下载依赖
carthage update
# 构建
carthage build
生成的目录结构如下:
|- DemoApplication1.xcodeproj
|- Cartfile
|- Cartfile.resolved
|- Carthage
   |- Build
      |- iOS
        |- xxx.framework
      |- Mac
        |- xxx.framework
   |- Checkouts
      |- Alamofire
之后就可以直接依赖Carthage/Build/IOS下的framework包即可
目前Carthage只支持Github源,并且至少的笔者本机进行使用时会出现各种错误信息,比如:
➜  DemoApplication1 git:(master) ✗ carthage update
*** Fetching Alamofire
*** Checking out Alamofire at "2.0.1"
*** xcodebuild output can be found in /var/folders/5q/xkj0b13j7195yb_74vgymr2r0000gn/T/carthage-xcodebuild.NOiC68.log
*** Building scheme "Alamofire watchOS" in Alamofire.xcworkspace
2015-09-20 15:43:01.731 xcodebuild[3402:86145] [MT] iPhoneSimulator: SimVerifier returned: Error Domain=NSPOSIXErrorDomain Code=53 "Simulator verification failed." UserInfo=0x7fc625dadf50 {NSLocalizedFailureReason=A connection to the simulator verification service could not be established., NSLocalizedRecoverySuggestion=Ensure that Xcode.app is installed on a volume with ownership enabled., NSLocalizedDescription=Simulator verification failed.}
xcodebuild: error: Failed to build workspace Alamofire with scheme Alamofire watchOS.
 Reason: The run destination My Mac is not valid for Running the scheme 'Alamofire watchOS'.
A shell task failed with exit code 70
以及其他的错误,所以在折腾了好一段之后,果断还是放弃了。
使用Carthage最终宣告失败
老牌依赖管理工具Cocoapods
在几经周折,还是回到老牌XCode依赖管理工具Cocoapods怀抱中,cocoapods是基于ruby实现的XCode依赖管理工具
安装使用如下命令即可:
sudo gem install cocoapods
在项目根目录下创建Podfile文件
添加以下内容
source 'https://github.com/CocoaPods/Specs.git'
platform :ios, '8.0'
use_frameworks!

pod 'Alamofire', '~> 2.0'
运行pod install即可下载并且编译相关的依赖文件
Updating local specs repositories

CocoaPods 0.39.0.beta.4 is available.
To update use: `sudo gem install cocoapods --pre`
[!] This is a test version we'd love you to try.

For more information see http://blog.cocoapods.org
and the CHANGELOG for this version http://git.io/BaH8pQ.

Analyzing dependencies
Downloading dependencies
Installing Alamofire (2.0.1)
Generating Pods project
Integrating client project

[!] Please close any current Xcode sessions and use `DemoApplication1.xcworkspace` for this project from now on.
Sending stats
Cocoapods会在当前目录下创建应用的xcworkspace,打开生成的workspace即可在项目中使用构建出的第三方项目

折腾到这里,基本上能够正常的使用Cocoapods管理并且使用第三方库
需要注意的一点是对于在Swift中使用Objective-c的第三方库,在Podfile文件中我们使用了,这样一个配置
use_frameworks!
强制将第三方库作为framework使用
在一般情况下,我们使用-Bridging-Header.h文件我们可以导入Objective-c实现swift和objective-c的混合使用。当添加了use_frameworks之后,pod会将objective-c的代码编译成framework,所以我们可以直接在项目的swift代码中使用import导入相应的库


![[HBLOG]公众号](https://www.liuhaihua.cn/img/qrcode_gzh.jpg)

