使用Retrofit请求API数据-codepath教程
英文原文: Consuming APIs with Retrofit
概览
Retrofit 是一个Square开发的类型安全的REST安卓客户端请求库。这个库为网络认证、与api交互以及发用 OkHttp 送网络请求提供了强大的框架 。理解OkHttp 的工作流程见 这个指南 。
注意本文是机遇Retrofit2.0讲解的 - 译者注。
这个库让从web api下载JSON 或者xml数据变的非常简单直接。一旦数据下载完成即将其解析成普通java类(POJO)。
设置
首先确保在AndroidManifest.xml中请求了网络权限 :
<manifest xmlns:android="http://schemas.android.com/apk/res/android" <uses-permission android:name="android.permission.INTERNET" /> </manifest>
在app/build.gradle文件中添加如下代码:
dependencies { compile 'com.google.code.gson:gson:2.3' compile 'com.squareup.retrofit:retrofit:2.0.0-beta1' compile 'com.squareup.retrofit:converter-gson:2.0.0-beta2' compile 'com.squareup.okhttp:okhttp:2.4.0' } 过去,Retrofit 依赖于 Gson 库来解析JSON数据。 Retrofit 2 现在支持许多种解析方式来解析响应数据,包括 Moshi ,一个由Square 创建的高效JSON解析库。
但是,它也存在一些 局限 ,,因此如果你不确定该使用哪种,就暂时使用Gson converter 吧。
有如下的解析库可以选择:
| Converter | Library |
|---|---|
| Gson | com.squareup.retrofit:converter-gson:2.0.0-beta2 |
| Jackson | com.squareup.retrofit:converter-jackson:2.0.0-beta1 |
| Moshi | com.squareup.retrofit:converter-moshi:2.0.0-beta1 |
| Protobuf | com.squareup.retrofit:converter-protobuf:2.0.0-beta1 |
| Wire | com.squareup.retrofit:converter-wire:2.0.0-beta1 |
| Simple XML | com.squareup.retrofit:converter-simplexml:2.0.0-beta1 |
要能把json解析成数据对象,需要响应的Java对象(准确的讲是类),因此我们需要先自己构造Java对象。
从资源中创建Java对象
本文讨论了两种方法。第一种是手动创建,这要求你学会如何使用 Gson 库。第二种是自动生成,使用 jsonschema2pojo 。我们建议你使用手动的方式,因为这样你能更好的理解自动生成代码是如何工作的。
手动方式创建Java对象
这篇指南 讲述了关于如何利用Gson库创建自己的数据对象来供Retrofit使用。它演示了如何使用Gson 接收来自Rotten Tomatoes API的数据,但是对于其他RESTful web service方法是相同的。
自动生成Java对象
假设你已经有了JSON的响应结果,访问 jsonschema2pojo 。

你可以选择注解方式为Gson,但这并不是完全必须的,因为java没有它们也能工作。目前,我们暂且选择None作为注解方式。(Retrofit1.9默认使用的是Gson解析,如果要和Retrofit一起使用,注解方式请选择Gson。不然生成的驼峰命名方式会导致解析失败)

接下来,把JSON 输出粘贴到文字输入框中:

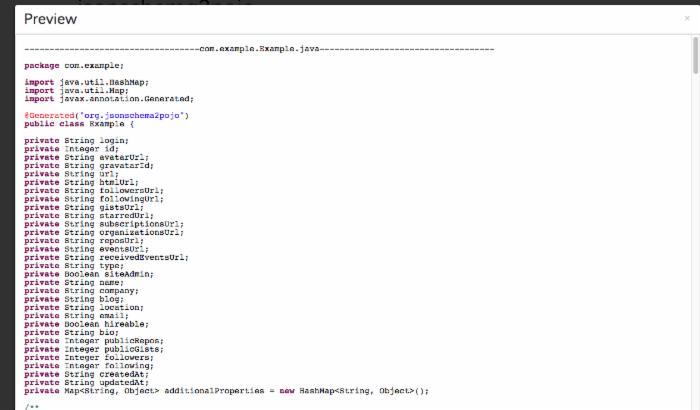
点击Preview 按钮。你可以看到前面部分和下图类似:

把生成的类粘贴到项目的诸如models一类的子包之下,把类名Example重命名为反映数据模型的名称。以这里为例,我们命名为User。
注意:生成的代码中存在@Generated注解。安卓默认并没有javax.annotation library里面的许多东西。如果你希望保留@Generated注解,你需要添加如下的依赖。更多信息参见 Stack Overflow上的讨论 。或者,你可以直接删除这个注解,完全没有问题。
dependencies { provided 'org.glassfish:javax.annotation:10.0-b28' } 创建Retrofit 实例
要向一个api发送我们的网络请求 ,我们需要使用 Retrofit builder 类并指定service的base URL (通常情况下就是域名)。
public static final String BASE_URL = "http://api.myservice.com"; Retrofit retrofit = new Retrofit.Builder() .baseUrl(BASE_URL) .addConverterFactory(GsonConverterFactory.create()) .build();
还需注意我们要指定一个factory 来对响应进行反序列化,使用的是 Gson library。就如这个 视频演讲 中所说的,converters 被添加的顺序将是它们被Retrofit尝试的顺序。如果我们希望传入一个自定义的Gson 解析实例,也是可以指定的:
Gson gson = new GsonBuilder() .setDateFormat("yyyy-MM-dd'T'HH:mm:ssZ") .create(); Retrofit retrofit = new Retrofit.Builder() .baseUrl(BASE_URL) .addConverterFactory(GsonConverterFactory.create(gson)) .build(); 添加多个converters - 译者注。

定义 Endpoints
在Retrofit 2中,endpoints是定义在一个interface里面的(其实1.9版本也是,只是用法略有不同),使用特殊的retrofit 注解来映射参数以及请求方法这些细节。另外,返回值始终是一个参数化了的Call<T>对象,比如Call<User>。如果你不需要任何类型安全的响应,你可以把返回值指定为Call<Response>。
比如,这个interface 用下面的方式定义了每个endpoint :
public interface MyApiEndpointInterface { // Request method and URL specified in the annotation // Callback for the parsed response is the last parameter @GET("/users/{username}") Call<User> getUser(@Path("username") String username); @GET("/group/{id}/users") Call<List<User>> groupList(@Path("id") int groupId, @Query("sort") String sort); @POST("/users/new") Call<User> createUser(@Body User user); } 注意到每个endpoint 都指定了一个关于HTTP(GET, POST, 等等。) 方法的注解以及用于分发网络调用的方法。而且这些方法的参数也可以有特殊的注解。
| 注解 | 描述 |
|---|---|
| @Path | variable substitution for the API endpoint (i.e. username will be swapped for {username} in the URL endpoint). |
| @Query | specifies the query key name with the value corresponding to the value of that annotated parameter. |
| @Body | payload for the POST call |
修改 base URL
一般地,base URL是在实例化 Retrofit instance 的时候定义的。Retrofit 2 允许你在注解里面重写base URL 。
@POST("https://api.github.com/api/v3") 就如 这篇文章 (中文地址:Retrofit 2.0)所讨论的,还有一些允许你使用相对路径(不是完整的URL)修改 base URL的方法。
Multipart forms
如果你要提交多参数表单数据(multi-part form data),可以使用@Multipart与@Part注解:
@Multipart @POST("/some/endpoint") Call<SomeResponse> someEndpoint(@Part("name1") String name1, @Part("name2") String name2) Form URL encoding
如果我们希望提交 form-encoded name/value ,我们可以使用@FormUrlEncoded 与 @FieldMap注解:
@FormUrlEncoded @POST("/some/endpoint") Call<SomeResponse> someEndpoint(@FieldMap Map<String, String> names); Upgrading from Retrofit 1
如果你是想从 Retrofit 1升级过来,你应该记得在1.x版本中,如果你想定义一个异步的API请求而非同步请求,最后一个参数必须是Callback类型:
public interface MyApiEndpointInterface { // Request method and URL specified in the annotation // Callback for the parsed response is the last parameter @GET("/users/{username}") void getUser(@Path("username") String username, Callback<User> cb); @GET("/group/{id}/users") void groupList(@Path("id") int groupId, @Query("sort") String sort, Callback<List<User>> cb); @POST("/users/new") void createUser(@Body User user, Callback<User> cb); } Retrofit 1 依赖于这个Callback类型作为最后一个参数,决定api请求是异步的。为了避免出现两种不同的调用模式,这个接口在Retrofit 2被统一了。现在你可以直接定义返回值为一个参数化了的Call<T>,如前面小节所讲。
Accessing the API
我们现在可以把这些东西放在一起:
MyApiEndpointInterface apiService = retrofit.create(MyApiEndpointInterface.class);
如果我们想异步请求这个API,我们如下调用这个service (注意取名为service 是Retrofit 的惯例,并不是语法的一部分):
String username = "sarahjean"; Call<User> call = apiService.getUser(username); call.enqueue(new Callback<User>() { @Override public void onResponse(Response<User> response) { int statusCode = response.code(); User user = response.body(); } @Override public void onFailure(Throwable t) { // Log error here since request failed } }); 如上所示,Retrofit 将在后台线程下载与解析API数据,然后通过onResponse或者 onFailure方法把结果发送回UI线程。
Retrofit与Authentication
使用Authentication Headers
可以使用一个Interceptor来为请求添加Headers。要发送请求到一个authenticated API,如下:
// Define the interceptor, add authentication headers Interceptor interceptor = new Interceptor() { @Override public Response intercept(Chain chain) throws IOException { Request newRequest = chain.request().newBuilder().addHeader("User-Agent", "Retrofit-Sample-App").build(); return chain.proceed(newRequest); } }; // Add the interceptor to OkHttpClient OkHttpClient client = new OkHttpClient(); client.interceptors().add(interceptor); // Set the custom client when building adapter Retrofit retrofit = new Retrofit.Builder() .baseUrl("https://api.github.com") .addConverterFactory(GsonConverterFactory.create()) .client(client) .build(); 注意在Retrofit 2中,interceptor 必须添加到一个自定义的OkHttpClient。而在Retrofit 1,它可以直接被builder 类设置。
Using OAuth
In order to authenticate with OAuth, we need to sign each network request sent out with a special header that embeds the access token for the user that is obtained during the OAuth process. The actual OAuth process needs to be completed with a third-party library such as signpost and then the access token needs to be added to the header using a request interceptor . Relevant links for Retrofit and authentication below:
-
Parameterized Headers in Retrofit
-
SignPost Retrofit Extension
-
Demo of Retrofit with Google Auth
Resources for using signpost to authenticate with an OAuth API:
-
Authenticating with Twitter using SignPost
-
Guide for using SignPost for Authentication
-
Additional SignPost Code Samples
Several other Android OAuth libraries can be explored instead of signpost:
-
[ Android OAuth Client ](https://github.com/wuman/android-oauth-client)
-
OAuth for Android
参考
- 本文标签: authenticate list cat example Google 实例 https 开发 src 数据 CTO 认证 value 线程 schema FIT parse git dependencies lib UI 域名 web key swap 同步 ACE API 解析 ip 参数 map client 代码 java XML Java类 删除 RESTful Android tab REST 安全 build GitHub rmi json js final http IDE App
- 版权声明: 本文为互联网转载文章,出处已在文章中说明(部分除外)。如果侵权,请联系本站长删除,谢谢。
- 本文海报: 生成海报一 生成海报二


![[HBLOG]公众号](https://www.liuhaihua.cn/img/qrcode_gzh.jpg)

