IBatis.net在asp.net MVC下的使用
IBatis.net 是2001年发起的开源项目,它是一个轻量级的ORM框架,现在IBatisNET已经是属于Apache下的一个子项目了,最新版本是1.6.2.
官方网站: http://www.mybatis.org/
.net项目下载地址: http://code.google.com/p/mybatisnet/
DataMapper:通过配置映射关系的xml业务对象与SQL语句和存储过程进行映射.
DataAcces:简单的说就是IBatis的数据访问层.
这里通过一个简单的增删改查案例 进行学习 Ibatis.net的配置和使用
一、首先需要下载Ibatis.net 的dll.上面的官网估计下载不下来,所以这儿我自己上传了一份
下载地址:
IBatis.net1.9.2&1.6.2最新版本
本项目的 Demo:
asp.net MVC和IBatis.net整合demo程序
本项目的数据库:
asp.net MVC和IBatis.net整合demo数据库部分
二、使用VS 2013新建一个解决方案。
首先使用sqlserver2014 建立数据库表
数据库:UserDemoDb

并建立相关的架构 如图所示

IBatisDemo.Dao 提供一个统一的Mapper访问接口,
IBatisDemo.Model 数据实体
IBatisDemo.Service 数据操作
因为是做Demo没有对整体架构做过多的细节设置.
三、IBatis.net配置
web层拷贝的配置文件,这些文件在 Ibatis.net1.9.2的程序中 解压就有

providers.config 这个直接拷贝到根目录,该文件定义各种数据库的驱动,包括SqlServer, Oracle, MySQL, PostgreSQL, DB2 and OLEDB, ODBC 等。
sqlmap.config 就是非常核心的一个配置文件,主要配置了数据库访问字符串,settings设置,以及配置实体类和数据库表相关xml。
还有一个database.config 文件,它是配置一些在sqlmap中用到得参数.
添加对Ibatis dll的引用

sqlmap.config配置:
<?xml version="1.0" encoding="utf-8"?> <sqlMapConfig xmlns="http://ibatis.apache.org/dataMapper" xmlns:xsi="http://www.w3.org/2001/XMLSchema-instance"> <settings> <!--启用命名空间,对于多个表的时候,进行区分--> <setting useStatementNamespaces="true"/> </settings> <!--连接数据库驱动文件--> <providers resource="providers.config"/> <!-- Database connection information --> <database> <!--配置数据库连接字符串--> <provider name="sqlServer2.0"></provider> <dataSource name="IBatisNet" connectionString="server=WWW;database=UserDemoDb;user id=sa;password=DDD;connection reset=false;"/> </database> <sqlMaps> <!--引用数据库表实体xml文件--> <sqlMap resource="Maps/UserInfo.xml" /> </sqlMaps> </sqlMapConfig>
先配置网站根目录下的Maps/UserInfo.xml如下:
<?xml version="1.0" encoding="utf-8" ?> <sqlMap namespace="UserInfo" xmlns="http://ibatis.apache.org/mapping" xmlns:xsi="http://www.w3.org/2001/XMLSchema-instance" > <alias> <!-- alias:取别名 assembly:表示类所在的文件 type:表示该类的完整的名称 --> <typeAlias alias="UserInfo" assembly="IBatisDemo.Model" type="IBatisDemo.Model.UserInfo" /> </alias> <statements> <select id="select_UserInfoAll" resultMap="UserInfo-result"> select Id,UserName,Age from UserInfo </select> <insert id="insert_UserInfoOne" parameterClass="UserInfo"> INSERT INTO UserInfo( [UserName],[Age] )VALUES( #UserName#,#Age# ) <selectKey type="post" resultClass="int" property="Id"> SELECT CAST(@@IDENTITY as int) as Id </selectKey> </insert> <delete id="del_UserInfoOne" parameterClass="UserInfo"> <![CDATA[ DELETE UserInfo ]]> <dynamic prepend="WHERE"> Id = #Id# </dynamic> </delete> <select id="select_UserInfoOne" resultMap="UserInfo-result"> select * from UserInfo <dynamic prepend="where"> <isParameterPresent property="id" prepend="WHERE"> [Id] = #Id# </isParameterPresent> </dynamic> </select> <update id="update_UserInfoOne" parameterClass="UserInfo"> <![CDATA[ UPDATE UserInfo SET UserName = #UserName#, Age = #Age# ]]> <dynamic prepend="WHERE"> Id = #Id# </dynamic> </update> </statements> <resultMaps > <resultMap id="UserInfo-result" class="UserInfo"> <result property="Id" column="Id" /> <result property="UserName" column="UserName" /> <result property="Age" column="Age" /> </resultMap> </resultMaps> </sqlMap>
说明:
statements 节点:

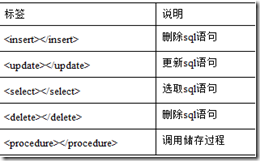
在这些容器标签中有一些常用的属性如下所示

resultMap和resultclass对比:
1、 resultMap 属于直接映射,可以把结果集中的数据库字段与实体类中的属性一一对应,这样通过select语句得到的结果就会准确的对上号
2、 resultclass 属于隐身映射,虽然你指定resultclass=“”,具体某一个类,但是select语句得到的结果是一条实力记录,但如果数据库字段与类的属性名字不一致,这个时候就会出现映射错误,有一种方式可以解决就是在写select语句时,给每个字段用as运算符取名字与属性一样:例如:select realname as name...其中realname是字段列名,name是属性字段名
3、resultmap比resultclass性能要高。尽量使用resultmap
insert标签下的selectKey 是表示返回刚插入数据的主键id,具体说明如下
<!-- 为了使insert操作能够返回插入记录的id,必须为insert写一个selectKey

建立数据库实体类:UserInfo.cs
using System; using System.Collections.Generic; using System.Linq; using System.Text; using System.Threading.Tasks; namespace IBatisDemo.Model { public class UserInfo { public int Id { get; set; } public string UserName { get; set; } public int Age { get; set; } } } Mapper.cs 获取Mapper的对象类:
using IBatisNet.Common.Utilities; using IBatisNet.DataMapper; using IBatisNet.DataMapper.Configuration; using System; using System.Collections.Generic; using System.Linq; using System.Text; using System.Threading.Tasks; namespace IBatisDemo.Dao { public class Mapper { private static volatile ISqlMapper _mapper = null; protected static void Configure(object obj) { _mapper = null; } protected static void InitMapper() { ConfigureHandler handler = new ConfigureHandler(Configure); DomSqlMapBuilder builder = new DomSqlMapBuilder(); _mapper = builder.ConfigureAndWatch(handler); } public static ISqlMapper Instance() { if (_mapper == null) { lock (typeof(SqlMapper)) { if (_mapper == null) // double-check { InitMapper(); } } } return _mapper; } public static ISqlMapper Get() { return Instance(); } /// <summary> /// RealMarket Mapper /// </summary> public static ISqlMapper GetMaper { get { if (_mapper == null) { lock (typeof(ISqlMapper)) { if (_mapper == null) { ConfigureHandler hander = new ConfigureHandler(Configure); DomSqlMapBuilder builder = new DomSqlMapBuilder(); _mapper = builder.ConfigureAndWatch("SqlMap.config", hander); } } } return _mapper; } } } } 然后再Service里面建立UserInfoService.cs 数据访问
using IBatisDemo.Dao; using IBatisDemo.Model; using System; using System.Collections.Generic; using System.Linq; using System.Text; using System.Threading.Tasks; using System.IO; using System.Data.SqlClient; namespace IBatisDemo.Service { public class UserInfoService { public int UserInfoInsertOne(UserInfo userInfo) { Object obj = Mapper.GetMaper.Insert("UserInfo.insert_UserInfoOne", userInfo); return (int)obj; } public UserInfo GetUserInfo(int id) { return (UserInfo)Mapper.GetMaper.QueryForObject("UserInfo.select_UserInfoOne", id); } public IList<UserInfo> GetUserInfoList() { //xml里面配置的格式 return Mapper.GetMaper.QueryForList<UserInfo>("UserInfo.select_UserInfoAll", null); } public int DelUserInfoOne(int id) { Object obj = Mapper.GetMaper.Delete("UserInfo.del_UserInfoOne", id); return (int)obj; } public int UpdateUserInfo(UserInfo userInfo) { Object obj = Mapper.GetMaper.Update("UserInfo.update_UserInfoOne", userInfo); return (int)obj; } } } 最后在web层 controller文件夹下建立 HomeController.cs 控制器
using IBatisDemo.Service; using System; using System.Collections.Generic; using System.Linq; using System.Web; using System.Web.Mvc; using IBatisDemo.Model; namespace IBatisDemo.Controllers { public class HomeController : Controller { // // GET: /Home/ UserInfoService service = new UserInfoService(); #region 显示员工 public ActionResult Index() { IList<UserInfo> userInfos = service.GetUserInfoList(); ViewData["list"] = userInfos; return View(); } #endregion #region 添加员工 [HttpGet] public ActionResult UserInsert() { return View(); } [HttpPost] public ActionResult UserInsert(UserInfo userInfo) { userInfo.UserName = Request["UserName"]; userInfo.Age = int.Parse(Request["Age"]); if (service.UserInfoInsertOne(userInfo) > 0) { return Redirect("Index"); } else { return Content("添加失败"); } } #endregion #region 删除员工 public ActionResult delUserInfo(int id) { id = int.Parse(Request["Id"]); if (service.DelUserInfoOne(id) > 0) { return Redirect("Index"); } else { return Content("删除失败"); } } #endregion #region 编辑员工资料 [HttpGet] public ActionResult getUserInfo(int Id) { Id = int.Parse(Request["Id"]); UserInfo userInfos = service.GetUserInfo(Id); //ViewData["user"] = userInfos; return View(userInfos); } [HttpPost] public ActionResult getUserInfo(UserInfo userInfo) { userInfo.Id = int.Parse(Request["Id"]); userInfo.UserName = Request["UserName"]; userInfo.Age = int.Parse(Request["Age"]); if (service.UpdateUserInfo(userInfo) > 0) { return Redirect("Index"); } else { return Content("修改失败"); } } #endregion } } View层 Index.cshtml
@{ Layout = null; } @using IBatisDemo.Model <!DOCTYPE html> <html> <head> <meta name="viewport" content="width=device-width" /> <title>Index</title> </head> <body> <div> <h1>IBatis 学习Demo</h1> @if (ViewData["List"] != null) { <table style="width:100%;text-align:center;" id="tabs"> <tr><th>编号</th><th>姓名</th><th>年龄</th><th>详细</th><th>删除</th><th>修改</th></tr> @foreach (var newInfo in (IList<UserInfo>)ViewData["List"]) { <tr> <td>@newInfo.Id</td> <td>@newInfo.UserName</td> <td>@newInfo.Age</td> <td><a href="javascript:void(0)" class="details" ids="@newInfo.Id">详细</a></td> <td><a href="/home/delUserInfo?Id=@newInfo.Id" class="deletes">删除</a></td> <td><a href="/home/getUserInfo?Id=@newInfo.Id" class="edits">修改</a></td> </tr> } </table> } else { <span>暂无数据</span> } <a href="/home/UserInsert">添加</a> </div> </body> </html> 编辑和添加的模板 直接在添加视图的时候生成就可以了,源码里面都有,这儿就不贴出来了
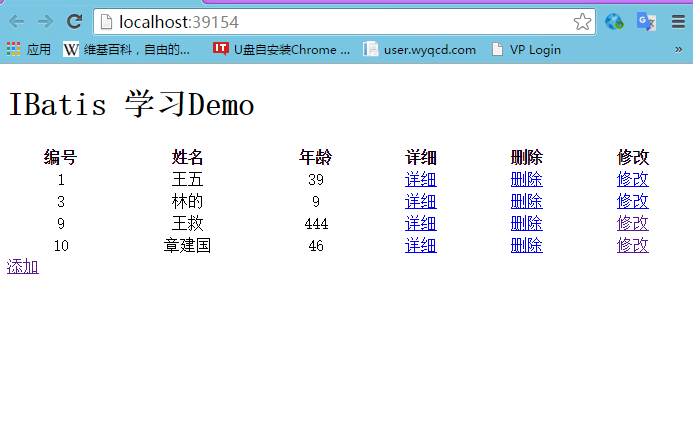
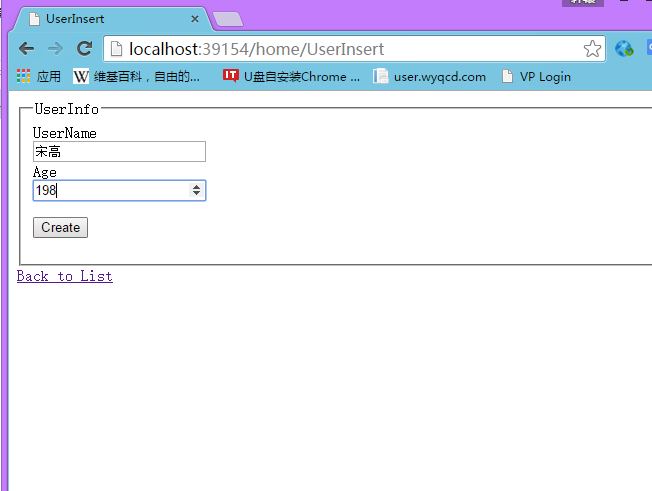
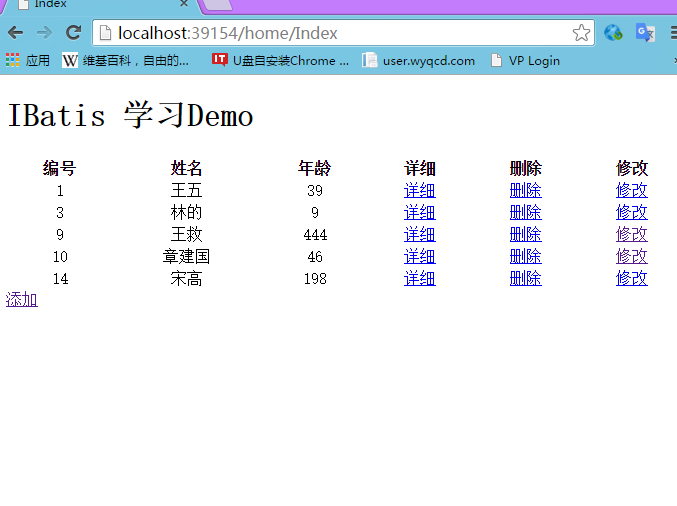
下面是运行效果:


- 本文标签: map ask App list java schema 数据 ACE Select 开源 源码 sql entity 空间 value 目录 Connection ip UI Word DOM volatile web 网站 src Google key mysql dataSource db Region 删除 parse 参数 apache 数据库 client 开源项目 XML 工资 db2 配置 http HTML mybatis update Oracle build IDE 下载 Collections provider tab
- 版权声明: 本文为互联网转载文章,出处已在文章中说明(部分除外)。如果侵权,请联系本站长删除,谢谢。
- 本文海报: 生成海报一 生成海报二


![[HBLOG]公众号](https://www.liuhaihua.cn/img/qrcode_gzh.jpg)

