【原创】CSS3中3D综合应用及分析
今天我要和大家一起来学习一个酷炫的鼠标Hover效果。主要将会涉及到CSS3中3D效果的使用,以及在实现过程中我们使用到的一些简单的转换算法,我会尽量以图解的形式让理论变得更容易理解。废话不多说,我们先看一下最终效果:Hover特效。打开连接,鼠标进入图片列表区域并移动鼠标,观察对应区域中内容浮层的变化效果,注意:请使用高级浏览器预览(推荐Chrome浏览器)。
预备
我们先来做一些预备工作,我们在理解三维效果的时候,通常需要发挥一下自己的空间想象力,在二维的屏幕上看到三维的深度(立体几何中的Z轴)。除此之外我们也需要了解一些基本理论知识,比如透视点/观察点(perspective),比如远小近大等。当然我们还需要掌握一点点简单的数据转换能力,根据变换过程中的一些数据,利用一些简单的数学换算公式,计算得到我们在效果实现过程中需要的数据。再啰嗦一句:空间想象力是非常重要的,好吧,这就够了!
效果分析
为了帮助大家构建一个三维空间,我们现在一起来想想一下,正在阅读本文的自己,你的眼睛距离屏幕是有一定距离的,这个距离就相当于示例中的透视点(鼠标位置)到内容浮层的距离,只是案例为了做出内容区与背景之间的视差感,而将透视的终点定在了背景上,而背景距离内容层之间还有一定的距离。能想象出这三者的关系吗?透视点 – 内容浮层 – 背景,他们是有一个纵向深度的,就像你的眼睛到屏幕的距离。当我们移动我们的头将眼睛靠近屏幕的一边的时候,你会发现另一端的文字显得很小(远小近大),而且看着比较吃力,所以这个时候我们会希望旋转一下屏幕,让屏幕正对我们的眼睛,这就好比示例中鼠标移动到区域的一边,内容浮层发生小角度旋转,转向鼠标位置的方向一样(这里需要注意的是示例涉及X,Y两个方向)。
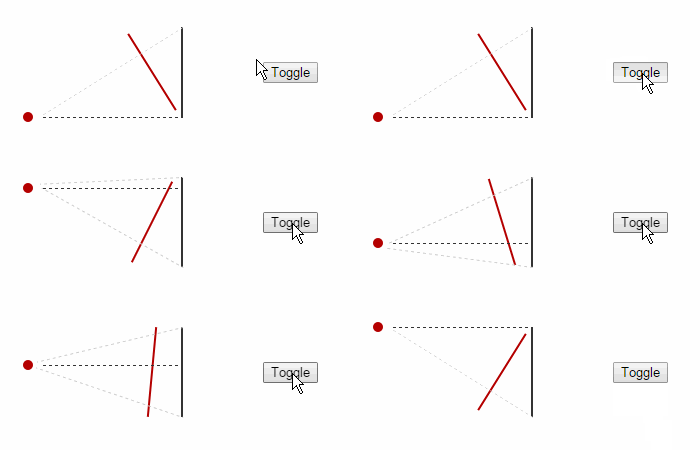
现在我们将这个模型从正中间剖开然后延Y轴旋转90度,我们来分步看看几种不同的情况:
情形一,没有内容层,眼睛直达背景:

情形二,有内容层,但内容层不跟随观察点变化:

情形三,有内容层,且内容层会根据观察点发生角度偏移:

至此,我们示例的静态模型基本上就展示完成了,唯一的区别在于,我们的案例中内容层的扭转角度并没达到与观察点始终垂直,不过也只是参数上的差异而已,下面我们通过一个完gif动画,看看内容层随观察点变化的全过程:

有了这个模型,我们实现示例的时候就轻松多了。
打码
第一步,背景层和内容层布局(以单个容器为例)
XHTML
<div class="wrap" id="J_Wrap"> <!-- 背景层 --> <div class="bg"> <img src="imgs/bg.png"> </div> <!-- 内容层 --> <div class="up"> <img src="imgs/text.png"> </div> </div>
<div class="wrap"id="J_Wrap"> <!-- 背景层 --> <divclass="bg"> <imgsrc="imgs/bg.png"> </div> <!-- 内容层 --> <divclass="up"> <imgsrc="imgs/text.png"> </div> </div>
然后通过CSS样式,将他们层叠起来,并设置观察点距背景的距离:
CSS
.wrap { position: relative; float: left; margin-top: 20px; margin-left: 20px; width: 400px; height: 600px; /* 观察点距离背景的距离为400像素,即图示中眼睛到黑色竖线的距离 */ perspective: 400px; /* 默认眼睛的观察点在wrap的中心 */ perspective-origin: 50% 50%; overflow: hidden; } .wrap .up { position: absolute; top: 0; left: 0; width: 100%; height: 100%; /* * 内容层距背景层80像素,内容层距眼睛近,看起来会变大 * 所以设置显示比例0.8,以保证内容显示完整 */ transform: scale(.8) translateZ(80px); } .wrap { position:relative; float:left; margin-top:20px; margin-left:20px; width:400px; height:600px; /* 观察点距离背景的距离为400像素,即图示中眼睛到黑色竖线的距离 */ perspective:400px; /* 默认眼睛的观察点在wrap的中心 */ perspective-origin:50%50%; overflow:hidden; } .wrap .up { position:absolute; top:0; left:0; width:100%; height:100%; /* * 内容层距背景层80像素,内容层距眼睛近,看起来会变大 * 所以设置显示比例0.8,以保证内容显示完整 */ transform:scale(.8)translateZ(80px); } 第二步,分析鼠标移动过程中所需数据的计算公式:
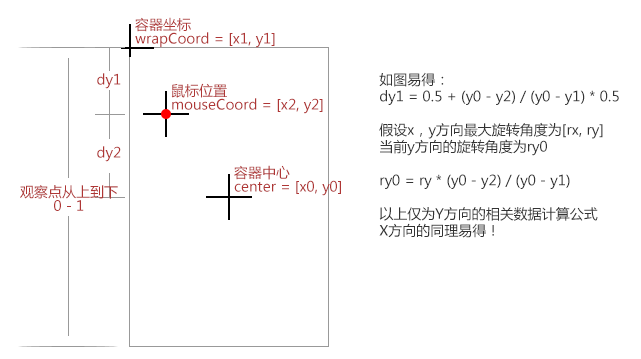
我们先来看一个图例:

图示已然非常清晰,但是看起来还有很多未知数。我们知道在JS中,我们很容易获取到一个节点(容器)相对于浏览器可视区域左上角的相对坐标,所以[x1, y1]实为已知。而容器中心位置正是容器的x、y坐标分别加上容器自身宽高的一半,即[x0, y0]亦为已知。最后鼠标在移动过程中,我们可以通过事件对象本身轻松获取到鼠标相对于浏览器左上角的坐标,很显然[x2, y2]也可以得到,而尚不可知的[rx, ry],我可以在实际应用中为他设定较为合理的值,所以已知数据代入公式,最后dx1, dy1, rx0, ry0就很容易计算出来了。
第三步,理论结合实践,实践检验整理:
JavaScript
(function(){ var c = [], // center: 鼠标move区域中心点坐标 m = [], // mouseCoordinates: 鼠标当前位置坐标 w = [], // wrapCoordinates: 鼠标move区域左上角坐标 d = [3, 3]; // X/Y方向的最大扭转角度(deg) document.getElementById('J_Wrap').onmousemove = function(ev){ ev.preventDefault(); var _this = this, r, z; m[0] = ev.clientX + window.scrollX; m[1] = ev.clientY + window.scrollY; w[0] = _this.getBoundingClientRect().left + window.scrollX; w[1] = _this.getBoundingClientRect().top + window.scrollY; c[0] = w[0] + _this.offsetWidth / 2; c[1] = w[1] + _this.offsetHeight / 2; // rotate: 根据当前鼠标位置相对于区域中心位置百分比计算出当前X/Y方向的扭转角度(deg) r = [-(c[0] - m[0]) / (c[0] - w[0]) * d[0], (c[1] - m[1]) / (c[1] - w[1]) * d[1]]; // perspectiveOrigin: 视觉观察点相对于鼠标move区域左上角的百分比(0-1) p = [0.5 + (c[0] - m[0]) / (c[0] - w[0]) * 0.5, 0.5 + (c[1] - m[1]) / (c[1] - w[1]) * 0.5]; z = 80; _this.style['perspectiveOrigin'] = p[0] * 100 + '%' + ' ' + p[1] * 100 + '%'; _this.getElementsByTagName('div')[1].style['transform'] = 'scale(.8) translateZ(' + Math.abs(z) + 'px) rotateX(' + r[1] + 'deg) rotateY(' + r[0] + 'deg)'; }; })(); (function(){ varc=[],// center: 鼠标move区域中心点坐标 m=[],// mouseCoordinates: 鼠标当前位置坐标 w=[],// wrapCoordinates: 鼠标move区域左上角坐标 d=[3,3];// X/Y方向的最大扭转角度(deg) document.getElementById('J_Wrap').onmousemove=function(ev){ ev.preventDefault(); var_this=this,r,z; m[0]=ev.clientX+window.scrollX; m[1]=ev.clientY+window.scrollY; w[0]=_this.getBoundingClientRect().left+window.scrollX; w[1]=_this.getBoundingClientRect().top+window.scrollY; c[0]=w[0]+_this.offsetWidth/2; c[1]=w[1]+_this.offsetHeight/2; // rotate: 根据当前鼠标位置相对于区域中心位置百分比计算出当前X/Y方向的扭转角度(deg) r=[-(c[0]-m[0])/(c[0]-w[0])*d[0],(c[1]-m[1])/(c[1]-w[1])*d[1]]; // perspectiveOrigin: 视觉观察点相对于鼠标move区域左上角的百分比(0-1) p=[0.5+(c[0]-m[0])/(c[0]-w[0])*0.5,0.5+(c[1]-m[1])/(c[1]-w[1])*0.5]; z=80; _this.style['perspectiveOrigin']=p[0]*100+'%'+' '+p[1]*100+'%'; _this.getElementsByTagName('div')[1].style['transform']='scale(.8) translateZ('+Math.abs(z)+'px) rotateX('+r[1]+'deg) rotateY('+r[0]+'deg)'; }; })(); 将数组r和数组p的计算过程与上图公式对比,是不是一模一样,而图例中位置的d数组,我们使用前已经将他指定为了[3, 3],当然你也可以根据你的喜好指定成你喜欢的数字,至此整个效果实现基本就完成了。
整理与封装
前面的代码虽然已经实现了功能,但是代码编写可谓极不规范:随意的变量命名、完全没考虑代码复用性,未考虑多实例情况,鼠标移出后显示效果未复原等等。所以基本不可能用于生产环境,我们还需要对它略作加工:
JavaScript
(function(window, $){ var _default = { target: '.up', deg: [3, 3], translateZ: 80, scale: .8 }; $.fn.magicHover = function(cfg) { var config = $.extend({}, _default, cfg), center = [], // center: 鼠标move区域中心点坐标 mouseCoord = [], // mouseCoordinates: 鼠标当前位置坐标 wrapCoord = [], // wrapCoordinates: 鼠标move区域左上角坐标 deg = config.deg; // X/Y方向的最大扭转角度(deg) return this.each(function(idx, wrap){ $(wrap).on('mousemove', function(ev){ ev.preventDefault(); var _this = $(this), rotate; mouseCoord[0] = ev.clientX + $(window).scrollLeft(); mouseCoord[1] = ev.clientY + $(window).scrollTop(); wrapCoord[0] = _this.offset().left; wrapCoord[1] = _this.offset().top; center[0] = wrapCoord[0] + _this.width() / 2; center[1] = wrapCoord[1] + _this.height() / 2; // rotate: 根据当前鼠标位置相对于区域中心位置百分比计算出当前X/Y方向的扭转角度(deg) rotate = [-(center[0] - mouseCoord[0]) / (center[0] - wrapCoord[0]) * deg[0], (center[1] - mouseCoord[1]) / (center[1] - wrapCoord[1]) * deg[1]]; // perspectiveOrigin: 视觉观察点相对于鼠标move区域左上角的百分比(0-1) perspectiveOrigin = [0.5 + (center[0] - mouseCoord[0]) / (center[0] - wrapCoord[0]) * 0.5, 0.5 + (center[1] - mouseCoord[1]) / (center[1] - wrapCoord[1]) * 0.5]; _this.css('perspectiveOrigin', perspectiveOrigin[0] * 100 + '%' + ' ' + perspectiveOrigin[1] * 100 + '%'); _this.find(config.target).css('transform', 'scale(' + config.scale + ') translateZ(' + Math.abs(config.translateZ) + 'px) rotateX(' + rotate[1] + 'deg) rotateY(' + rotate[0] + 'deg)'); }).on('mouseout', function(ev){ var _this = $(this); _this.css('perspectiveOrigin', '50% 50%'); _this.find(config.target).css('transform', 'scale(' + config.scale + ') translateZ(' + Math.abs(config.translateZ) + 'px) rotateX(0) rotateY(0)'); }); }); }; })(window, jQuery); (function(window,$){ var_default={ target:'.up', deg:[3,3], translateZ:80, scale:.8 }; $.fn.magicHover=function(cfg){ varconfig=$.extend({},_default,cfg), center=[],// center: 鼠标move区域中心点坐标 mouseCoord=[],// mouseCoordinates: 鼠标当前位置坐标 wrapCoord=[],// wrapCoordinates: 鼠标move区域左上角坐标 deg=config.deg;// X/Y方向的最大扭转角度(deg) returnthis.each(function(idx,wrap){ $(wrap).on('mousemove',function(ev){ ev.preventDefault(); var_this=$(this),rotate; mouseCoord[0]=ev.clientX+$(window).scrollLeft(); mouseCoord[1]=ev.clientY+$(window).scrollTop(); wrapCoord[0]=_this.offset().left; wrapCoord[1]=_this.offset().top; center[0]=wrapCoord[0]+_this.width()/2; center[1]=wrapCoord[1]+_this.height()/2; // rotate: 根据当前鼠标位置相对于区域中心位置百分比计算出当前X/Y方向的扭转角度(deg) rotate=[-(center[0]-mouseCoord[0])/(center[0]-wrapCoord[0])*deg[0],(center[1]-mouseCoord[1])/(center[1]-wrapCoord[1])*deg[1]]; // perspectiveOrigin: 视觉观察点相对于鼠标move区域左上角的百分比(0-1) perspectiveOrigin=[0.5+(center[0]-mouseCoord[0])/(center[0]-wrapCoord[0])*0.5,0.5+(center[1]-mouseCoord[1])/(center[1]-wrapCoord[1])*0.5]; _this.css('perspectiveOrigin',perspectiveOrigin[0]*100+'%'+' '+perspectiveOrigin[1]*100+'%'); _this.find(config.target).css('transform','scale('+config.scale+') translateZ('+Math.abs(config.translateZ)+'px) rotateX('+rotate[1]+'deg) rotateY('+rotate[0]+'deg)'); }).on('mouseout',function(ev){ var_this=$(this); _this.css('perspectiveOrigin','50% 50%'); _this.find(config.target).css('transform','scale('+config.scale+') translateZ('+Math.abs(config.translateZ)+'px) rotateX(0) rotateY(0)'); }); }); }; })(window,jQuery); 而最终调用的方式也非常简单:
JavaScript
$(function(){ $('.wrap').magicHover({ target: '.up', deg: [3, 3], translateZ: 80 }); }); $(function(){ $('.wrap').magicHover({ target:'.up', deg:[3,3], translateZ:80 }); }); 最后,有一个比较迷惑的点就是CSS3旋转(rotate)中的(rotateX、rotateY、rotateZ)是相对于坐标轴而言的,例使用rotateX时,实际是围绕X轴做旋转,变化的效果作用在Y方向上,其余同理,所以仔细看以上代码,你会发现在设置style的时候rotate中的x和y我刻意交换了位置。你可以试试修改deg和translateZ参数,对比一下浏览效果,更容易理解其中的原理!行啦,大功告成,今晚可以睡个安稳觉了~~


![[HBLOG]公众号](https://www.liuhaihua.cn/img/qrcode_gzh.jpg)

