Docker Registry v2 + Token Auth Server (Registry v2 认证)实例。
关于Registry
对于registry v1 --> v2中,其中的原理、优化等,这里不再做一一介绍。这里有篇文章我瞄过几眼应该是比较不错的介绍文章了: http://dockone.io/article/747 。
Registry v2 token机制
官方document: https://docs.docker.com/registry/spec/auth/token/
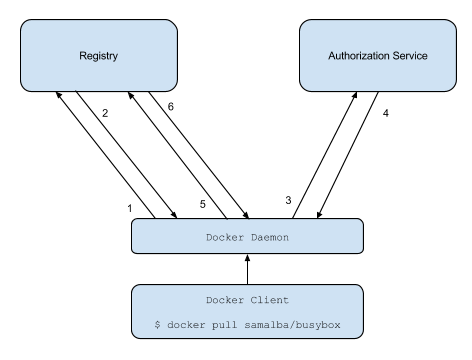
目前docker registry v2 认证分为以下6个步骤:

1. docker client 尝试到registry中进行push/pull操作;
2. registry会返回401未认证信息给client(未认证的前提下),同时返回的信息中还包含了到哪里去认证的信息;
3. client发送认证请求到认证服务器(authorization service);
4. 认证服务器(authorization service)返回token;
5. client携带这附有token的请求,尝试请求registry;
6. registry接受了认证的token并且使得client继续操作;
然后我们来详细分解、讨论下以上的6个步骤
Step #1 , Client 向registry 发起连接
通常,Docker Client在进行pull/push操作时,会先尝试连接docker registry。
Note: 当你访问远程的registry时,会用到tls验证域名的有效性(证书),否则会出现如下错误:
FATA[0000] Error response from daemon: v1 ping attempt failed with error:
 Get https://registry.example.com/v1/_ping: tls: oversized record received with length 20527.
 If this private registry supports only HTTP or HTTPS with an unknown CA certificate,please add
 `--insecure-registry registry.example.com` to the daemon's arguments.
 In the case of HTTPS, if you have access to the registry's CA certificate, no need for the flag;
 simply place the CA certificate at /etc/docker/certs.d/registry.example.com/ca.crt
在docker的启动中加入下面的命令,来忽略对registry域名证书的审核:
--insecure-registry registry.example.com
Step #2 , 未认证响应(Unauthorized response)
Registry server会返回401并且会附带Authentication endpoint:
$ curl https://registry.example.com/v2 -k -IL
 HTTP/1.1 301 Moved Permanently
 Server: nginx/1.4.7
 Date: Sun, 22 Nov 2015 09:01:42 GMT
 Content-Type: text/plain; charset=utf-8
 Connection: keep-alive
 Docker-Distribution-Api-Version: registry/2.0
 Location: /v2/

 HTTP/1.1 401 Unauthorized
 Server: nginx/1.4.7
 Date: Sun, 22 Nov 2015 09:01:42 GMT
 Content-Type: application/json; charset=utf-8
 Content-Length: 87
 Connection: keep-alive
 Docker-Distribution-Api-Version: registry/2.0
 Www-Authenticate: Bearer realm="https://registry.example.com:5001/auth",service="Docker registry"
 X-Content-Type-Options: nosniff
Authentication server返回的头信息中包含了如何去或许token,它有几个重要的查询参数:
realm: #### 描述了认证的enpoint。
realm="https://registry.example.com:5001/auth"
service: #### 描述了持有资源服务器的名称。
service="Docker registry"
scope: #### 描述了client端操作资源的方法(push/pull)
scope="repository:shuyun/hello:push"
account: #### 描述了操作的账号
account=admin
Step #3&4 , 认证endpoint通讯
这2步描述了client与认证服务2者的 验证过程 ,
需要明确的是,你需要知道:client发送请求到认证服务器签署token,请求信息中包含的基本身份验证信息将于服务器中的用户列表做匹配,然后根据请求中的scope要操作的范围、方法进而进行匹配,最后服务器匹配成功后将token进行签名,并且将token返回给客户端。
Step #5&6 , 最后沟通
Client尝试与registry连接(这次带了token信息),registry接到请求后验证token,继而开始pull/push操作。
开始搭建registry v2 与认证服务器
系统环境:Cent OS 7.0
Registry: registry:2.2.0
Auth Server: cesanta/docker_auth ,可以基于本地、LDAP、Google Sign-In。
这里我创建了2个目录结构(他们都是基于/data目录而论的)
auth_server/
 ├── config
 │   └── auth_config.yml
 └── ssl
 ├── server.key
 └── server.pem
 docker_registry/
 └── data/
证书创建过程省略。。。
启动 Auth Server
docker run -d --name docker_auth -p 5001:5001 -v /data/auth_server/config:/config:ro -v /var/log/docker_auth:/logs --restart=always -v /data/auth_server/ssl:/ssl cesanta/docker_auth /config/auth_config.yml
auth_config.yml 内容如下:
server:  # Server settings.
 # Address to listen on.
 addr: ":5001"
 # TLS certificate and key.
 certificate: "/ssl/server.pem"
 key: "/ssl/server.key"

 token:  # Settings for the tokens.
 issuer: "Auth Service"  # 需要和 Registry config 匹配。
 expiration: 900
Static user map.
users:
# Password is specified as a BCrypt hash. Use htpasswd -B to generate. Apache版本需要2.4以上
"admin":
password: "xxx"
"hussein":
password: "xxx"
"": {} # Allow anonymous (no "docker login") access.
acl:
# Admin has full access to everything.
- match: {account: "admin"}
actions: ["*"]
# User "test" has full access to ubuntu image but nothing else.
- match: {account: "hussien", name: "ubuntu"}
actions: ["*"]
- match: {account: "test"}
actions: []
# All logged in users can pull all images.
- match: {account: "/.+/"}
actions: ["pull"]
# Anonymous users can pull "hello-world".
- match: {account: "", name: "hello-world"}
actions: ["pull"]
# Access is denied by default.
更多的配置信息,可以参考他们的 github 。
启动 Registry Server
由于要配置Registry到Auth Server中认证,所以需要设置一些例如"REGISTRY_variable"的环境变量。例如这样:
auth:
 token:
 issuer: "Auth Service"
需要设置成这样:
REGISTRY_AUTH_TOKEN_ISSUER="Auth Service"
所以配置token认证,需要配置的信息大致如下:
$ docker run -d -p 5000:5000 /
 -e REGISTRY_STORAGE_FILESYSTEM_ROOTDIRECTORY=/var/lib/registry /
 -e REGISTRY_AUTH=token /
 -e REGISTRY_AUTH_TOKEN_REALM=https://registry.example.com:5001/auth /
 -e REGISTRY_AUTH_TOKEN_SERVICE="Docker registry" /
 -e REGISTRY_AUTH_TOKEN_ISSUER="Auth Service" /
 -e REGISTRY_AUTH_TOKEN_ROOTCERTBUNDLE=/ssl/server.pem /
 -v /root/auth_server/ssl:/ssl /
 -v /root/docker_registry/data:/var/lib/registry /
 --restart=always /
 --name registry registry:2
最后,启动起来,进行相应的调试~过程忽略。
使用 Docker Compose
dockerauth:
 image: cesanta/docker_auth
 ports:
 - "5001:5001"
 volumes:
 - /data/auth_server/config:/config:ro
 - /var/log/docker_auth:/logs
 - /data/auth_server/ssl:/ssl
 command: /config/auth_config.yml
 restart: always

 registry:
 image: registry:2.2.0
 ports:
 - "5000:5000"
 volumes:
 - /data/auth_server/ssl:/ssl
 - /data/docker_registry/data:/var/lib/registry
 restart: always
 environment:
 - REGISTRY_STORAGE_FILESYSTEM_ROOTDIRECTORY=/var/lib/registry
 - REGISTRY_AUTH=token
 - REGISTRY_AUTH_TOKEN_REALM=https://registry.example.com:5001/auth
 - REGISTRY_AUTH_TOKEN_SERVICE="Docker registry"
 - REGISTRY_AUTH_TOKEN_ISSUER="Auth Service"
 - REGISTRY_AUTH_TOKEN_ROOTCERTBUNDLE=/ssl/server.pem
然后 # docker-compose up 启动
测试过程暂时忽略,markdown格式写真心有点别扭。。
Note:
这款Auth Server是没有UI界面的,暂时我也没有找到很好的UI支撑。
另外有一款搭建在SUSE上的UI+Auth系统,暂时没有测试,附上链接: https://github.com/SUSE/Portus
相关链接:
https://the.binbashtheory.com/ ... vice/
https://hub.docker.com/r/cesanta/docker_auth/
https://github.com/cesanta/docker_auth


![[HBLOG]公众号](https://www.liuhaihua.cn/img/qrcode_gzh.jpg)

