iOS 9 by Tutorials 笔记(六)
3D Touch
苹果在 iPhone 6s 与 iPhone 6s Plus 上推出了 3D Touch 功能,不同于以往,这次的新 feature 是对开发者开放的,你也可以在自己的 App 上部署 3D Touch,API 层面上的变化主要是下面三点:
- UITouch 现在有了
force属性,可以识别按压力度了 - UIViewController 扩展了一系列 API,允许你的 ViewController 以一个预览的方式展示(peek),当用户持续重压屏幕则会全屏展示(pop)
- UIApplicationShortcutItem 是一个全新增加的类,增加一些可以执行的动作,然后你可以在 iPhone 主界面重压程序图标快捷执行。
UITouch force
UITouch 有了一个新的属性 force ,他值的范围(CGFloat)从 0 到 maximumPossibleForce (新添加的属性),通常值为 1 表示一个平均的压力水平。
现在你可以实现一个画板 App,画布对按压力度敏感,力度越大笔画越粗,反之越细。
下面的方法实现了划线这一步骤,注意他带三个参数:起点、终点、力度(默认为1,稍后我们会从 UITouch 的 force 属性中获取真实的值)
extension Canvas { private func addLineFromPoint(from: CGPoint, toPoint: CGPoint, withForce force: CGFloat = 1) { UIGraphicsBeginImageContextWithOptions(bounds.size, false, 0.0) drawing?.drawInRect(bounds) let cxt = UIGraphicsGetCurrentContext() CGContextMoveToPoint(cxt, from.x, from.y) CGContextAddLineToPoint(cxt, toPoint.x, toPoint.y) CGContextSetLineCap(cxt, .Round) CGContextSetLineWidth(cxt, 2 * force * strokeWidth) strokeColor.setStroke() CGContextStrokePath(cxt) drawing = UIGraphicsGetImageFromCurrentImageContext() layer.contents = drawing?.CGImage UIGraphicsEndImageContext() } } 在 touchesMoved(_:withEvent:) 中判断当前设备是否支持 3D Touch,支持就从 touch 中获取真实的 force ,不支持 force 就默认设为 1(前面已经设好了)
if traitCollection.forceTouchCapability == .Available { addLineFromPoint(touch.previousLocationInView(self), toPoint: touch.locationInView(self), withForce: touch.force) } else { addLineFromPoint(touch.previousLocationInView(self), toPoint: touch.locationInView(self)) } 现在你可以随心所欲地画画了

Peeking and popping
在支持 3D Touch 的设备上,View Controller 是可以识别出不同的压力力度的
- 用户开始用力按压一个界面,该界面会逐渐以焦点显示,而周围的背景会慢慢模糊掉
- 当用户继续用力,这个预览界面会显示在屏幕中心,这个就叫做
peek此时手指离开,预览界面也会消失。当手指向上滑动,这个预览界面会展示几个 action 按钮供你选择 - 当用户继续重压,整个预览界面就会全屏展示,被称为
pop
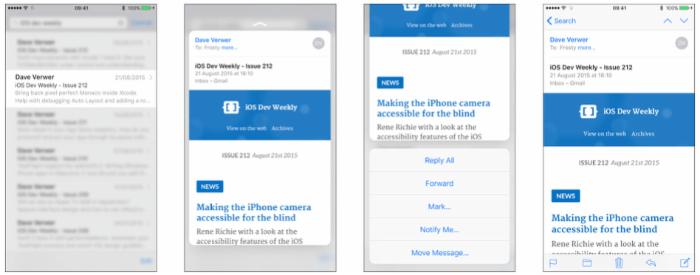
前面我们已经提到,iOS 9 的 View Controller 已经添加了 3D Touch API 支持,下面的代码首先判断了设备是否支持 3D Touch, registerForPreviewingWithDelegate(_:sourceView:) 是 iOS 9 新增的 API,见名思义,注册一个 view controller 参与 3D Touch 的预览 peek 和 pop
if traitCollection.forceTouchCapability == .Available { registerForPreviewingWithDelegate(self, sourceView: view) } 该方法带两个参数, delegate 通过实现 UIViewControllerPreviewingDelegate 来协调展示 preview VC, sourceView 表示需要回应 3D Touch 的 view
回顾上图所示,我们在 TableView 上实现按压 cell 弹出 preview,所以我们就在 TableView Controller 上实现这个方法,那么 sourceView 也就是 tableView
既然指定了 self 是 delegate,下面要实现 UIViewControllerPreviewingDelegate 方法
extension DoodlesViewController: UIViewControllerPreviewingDelegate { func previewingContext( previewingContext: UIViewControllerPreviewing, viewControllerForLocation location: CGPoint) -> UIViewController? { // peek! return nil } func previewingContext( previewingContext: UIViewControllerPreviewing, commitViewController viewControllerToCommit: UIViewController) { // pop! } } 1.第一个 delegate 方法 previewingContext(_:viewControllerForLocation:) 带两个参数:
-
location表示 3D Touch 发生的位置,你根据该参数判断那个 view 被按压 -
previewingContext是一个UIViewControllerPreviewing实例,这个类有两个属性比较有用:- sourceView :就是你之前从
registerForPreviewingWithDelegate(_:sourceView:)方法中传递进来的 view - sourceRect :表示可以按下去的尺寸,这里为一个 cell 的 frame
- sourceView :就是你之前从
这个 delegate 返回一个被 preview 展示的 view controller
2.第二个 delegate 方法 previewingContext(_:commitViewController:) 当用户按压力度更大触发 pop 时被调用,该方法同样带两个参数,一个与上面相同,另一个 viewControllerToCommit 来自于上面 delegate 方法的返回值,即将要被展示的 VC。当用户持续重压,由 preview 转到全屏展示,也是会显示这个 VC
现在来完善这两个方法:
extension DoodlesViewController: UIViewControllerPreviewingDelegate { func previewingContext( previewingContext: UIViewControllerPreviewing, viewControllerForLocation location: CGPoint) -> UIViewController? { // 1 guard let indexPath = tableView.indexPathForRowAtPoint(location), cell = tableView .cellForRowAtIndexPath(indexPath) as? DoodleCell else { return nil } // 2 let identifier = "DoodleDetailViewController" guard let detailVC = storyboard? .instantiateViewControllerWithIdentifier(identifier) as? DoodleDetailViewController else { return nil } detailVC.doodle = cell.doodle // 3 这样当 cell 被持续按压的话,tableView 其余的地方就会变模糊 previewingContext.sourceRect = cell.frame // 4 return detailVC } func previewingContext( previewingContext: UIViewControllerPreviewing, commitViewController viewControllerToCommit: UIViewController) { showViewController(viewControllerToCommit, sender: self) } } Preview view controller通常会显示一个默认的尺寸,但是你可以通过覆盖 preferredContentSize 属性来修改
Apple 已经为一些控件实现了 peek 和 pop ,比如 UIWebView 和 WKWebView ,你只需要将他们的 allowsLinkPreview 属性设为 true 即可
Preview actions
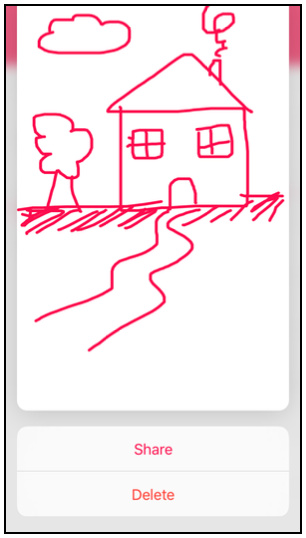
前面我们提到在 peek 展示 preview 阶段,用户手指不离开屏幕向上滑动,会显示一些操作按钮。实现起来也很简单,在将会被 preview 展示的 VC (即最终会被 pop 到屏幕上的 VC)上实现 - previewActionItems 方法
override func previewActionItems() -> [UIPreviewActionItem] { // 1 let shareAction = UIPreviewAction(title: "Share", style: .Default) { (previewAction, viewController) in if let doodlesVC = self.doodlesViewController, activityViewController = self.activityViewController { doodlesVC.presentViewController(activityViewController, animated: true, completion: nil) } } // 2 let deleteAction = UIPreviewAction(title: "Delete", style: .Destructive) { (previewAction, viewController) in guard let doodle = self.doodle else { return } Doodle.deleteDoodle(doodle) if let doodlesViewController = self.doodlesViewController { doodlesViewController.tableView.reloadData() } } return [shareAction, deleteAction] } 上面分别用 UIPreviewAction 创建了两个 preview action:分享和删除操作
UIPreviewAction 类似于 UIAlertActions ,你还可以使用 UIPreviewActionGroup 将他们分组,也就是说一个 group 可以包含多个 action,当你点击这个 group ,会打开个子菜单提供一些 actions 供你选择。
因为这个 preview action 方法最终是要由 containerVC ( doodlesViewController ) 来执行,在这里我们仅仅是在 preview VC 中保留了 containerVC 的一个引用(注意是 weak 的),当然你也可以用代理这种设计模式来解耦。
Home screen quick actions
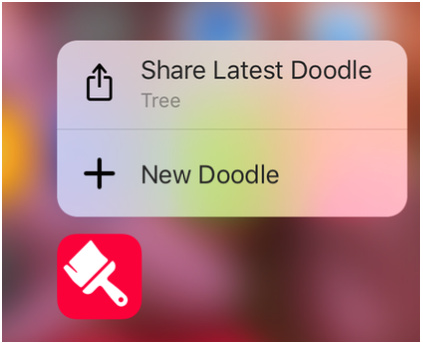
最后一个关于 3D Touch 的特性是可以在手机主屏,重压 App 图标弹出一个菜单来快速执行一些操作
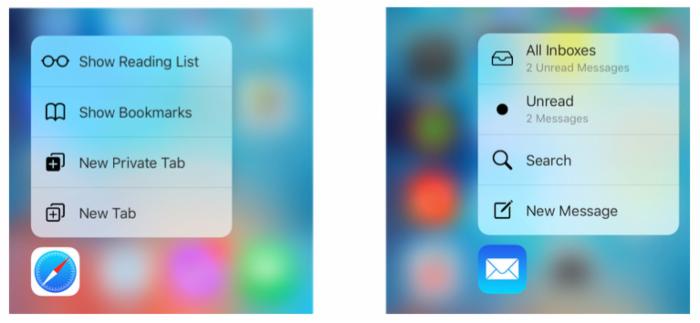
每个 App 图标可以添加四个 action,每个 action 分成两种类型:
- Static shortcuts: Static shortcuts 在 Info.plist 中定义,随 App 安装生效
- Dynamic shortcuts: 在 runtime 时设置,能够被动态添加移除。只有运行一次才会生效
Adding a static shortcut

增加一个 key 为 UIApplicationShortcutItems 的 Array ,添加一个字典,然后添加下面的 item:

- UIApplicationShortcutItemTitle: 表示 Action 的标题为 New Doodle
- UIApplicationShortcutItemType:
com.razeware.Doodles.new表示唯一的标识符,稍后代码中会用到 - UIApplicationShortcutItemIconType:
UIApplicationShortcutIconTypeAdd表示 Action 为 Add,稍后展示的 icon 也为 Add( + 号)
除了这三个类型的 key 外,通过查看文档还有下面三种 key:
- UIApplicationShortcutItemSubtitle:定义了子标题
- UIApplicationShortcutItemIconFile:用来提供自定义的 icon 图像
- UIApplicationShortcutItemUserInfo:允许你提供自定义的字典,包含你所需要的内容
现在你已经定义了一个 shortcut item,当用户用力按压图标时,iOS 9 会执行一个新的 UIApplicationDelegate 方法 application:performActionForShortcutItem:completionHandler:
func application(application: UIApplication, performActionForShortcutItem shortcutItem: UIApplicationShortcutItem, completionHandler: (Bool) -> Void) { handleShortcutItem(shortcutItem) completionHandler(true) } 我们来实现这个 handleShortcutItem
func handleShortcutItem( shortcutItem: UIApplicationShortcutItem) { switch shortcutItem.type { case "com.razeware.Doodles.new": presentNewDoodleViewController() default: break } } 根据我们之前在 Info.plist 中定义的 UIApplicationShortcutItemType 唯一标识符来判断是否执行快捷操作,在这里我们快速新建一个新的 VC
func presentNewDoodleViewController() { let identifier = "NewDoodleNavigationController" let doodleViewController = UIStoryboard.mainStoryboard .instantiateViewControllerWithIdentifier(identifier) window?.rootViewController? .presentViewController(doodleViewController, animated: true, completion: nil) } 最终效果:
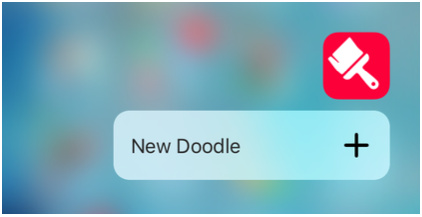
当你从 quick action 启动一个应用,application(_:didFinishLaunchingWithOptions:) 依然会被调用,且他的 launchOptions 字典中的 UIApplicationLaunchOptionsShortcutItemKey 会包含这个 UIApplicationShortcutItem
Adding a dynamic shortcut
在 Doodle.swift(包含涂鸦的 model) 中增加一个静态方法,所做的事情也很简单,用代码创建一个 UIApplicationShortcutItem 且加入应用程序的 shortcutItems 数组:
static func configureDynamicShortcuts() { if let mostRecentDoodle = Doodle.sortedDoodles.first { let shortcutType = "com.razeware.Doodles.share" let shortcutItem = UIApplicationShortcutItem( type: shortcutType, localizedTitle: "Share Latest Doodle", localizedSubtitle: mostRecentDoodle.name, icon: UIApplicationShortcutIcon(type: .Share), userInfo: nil) UIApplication.sharedApplication().shortcutItems = [ shortcutItem ] } else { UIApplication.sharedApplication().shortcutItems = [] } } 接着在 addDoodle(_:) 和 deleteDoodle(_:) 更新 model 的操作中都执行下 Doodle.configureDynamicShortcuts() ,这样无论新增或删除一个涂鸦,你都会动态更新 shortcut item
除了更新 model,在 App 启动时也要动态更新下,在 application(_:didFinishLaunchingWithOptions:) 添加 Doodle.configureDynamicShortcuts()
最后来处理按下 shortItem action 所要执行的操作:
func handleShortcutItem( shortcutItem: UIApplicationShortcutItem) { switch shortcutItem.type { case "com.razeware.Doodles.new": presentNewDoodleViewController() case "com.razeware.Doodles.share": shareMostRecentDoodle() default: break } } func shareMostRecentDoodle() { guard let mostRecentDoodle = Doodle.sortedDoodles.first, navigationController = window?.rootViewController as? UINavigationController else { return } let identifier = "DoodleDetailViewController" let doodleViewController = UIStoryboard.mainStoryboard .instantiateViewControllerWithIdentifier(identifier) as! DoodleDetailViewController doodleViewController.doodle = mostRecentDoodle doodleViewController.shareDoodle = true navigationController .pushViewController(doodleViewController, animated: true) } 最终结果:


![[HBLOG]公众号](https://www.liuhaihua.cn/img/qrcode_gzh.jpg)

