设计模式
前言
以前做项目的时候并没有想过用过采用什么样的设计模式进行开发。唯一用过的模式也就是MVC的开发模式了。但是当初对MVC模式理解的也是很片面。为了提高程序的运行效率,或者是对程序进行更进一步的优化,合理的设计模式是十分重要的。
MVC模式

来自百度百科
MVC 是一种使用 MVC(Model View Controller 模型-视图-控制器)
-
-
Model(模型)表示应用程序核心(比如数据库记录列表)。
-
View(视图)显示数据(数据库记录)。
-
Controller(控制器)处理输入(写入数据库记录)。
-
MVC 模式同时提供了对 HTML、CSS 和 JavaScript 的完全控制。
Model
(模型)是应用程序中用于处理应用程序数据逻辑的部分。通常模型对象负责在数据库中存取数据。
View
(视图)是应用程序中处理数据显示的部分。
通常视图是依据模型数据创建的。
Controller
(控制器)是应用程序中处理用户交互的部分。通常控制器负责从视图读取数据,控制用户输入,并向模型发送数据。
其中最典型的MVC就是JSP + servlet + javaBean的模式。用javaEE做过网站的都知道,structs框架就是采用的MVC的设计模式。
简单不能再简单的mvc的例子
1.用户请求
...... <form action="LoginServlet" name="login" method="post"> 姓名:<input type="text" name="userName"> 密码:<input type="text" name="password"> <input type="submit" value="提交"> </form> ......
2.Model部分
......javaBean, 处理应用程序数据逻辑的部分 public class LoginService { public LoginService(){} public boolean checkLogin(String userName, String password){ //DAO层实现数据的查询,根据数据库中的信息进行对比判断是否登录成功 //用于登录成功后可以调用GetMessage()得到最终VIEW中要显示的数据。 } public List<Message> GetMessage(String userName){ //返回用户的信息,存入Message实例中,并放入sessino中。 } } 3.Controler部分
...... @WebServlet("/LoginServlet") public class LoginServlet extends HttpServlet { private static final long serialVersionUID = 1L; public LoginServlet() { super(); } public void process(HttpServletRequest request, HttpServletResponse response) throws ServletException, IOException { HttpSession session=request.getSession(); ...... 判断登录是否成功 ...... ...... 通过Model的逻辑处理,得到View中要显示的数据,并跳转到相应的View ...... response.sendRedirect("index.jsp"); } protected void doGet(HttpServletRequest request, HttpServletResponse response) throws ServletException, IOException { process(request,response); } protected void doPost(HttpServletRequest request, HttpServletResponse response) throws ServletException, IOException { process(request, response); } } 4.View部分
......jsp页面 <% ...... 通过session获得Model产生的数据并显示 ...... %> ......
观察者模式
观察者模式定义了一个一对多的依赖关系,让一个或多个观察者对象监察一个主题对象。这样一个主题对象在状态上的变化能够通知所有的依赖于此对象的
那些观察者对象,使这些观察者对象能够自动更新。
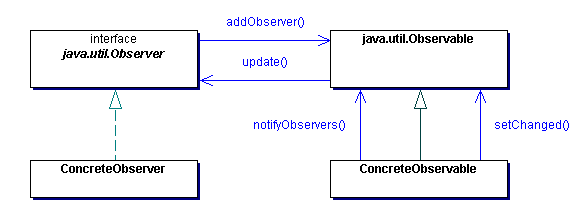
 java观察者模式
实现观察者模式
1.创建被观察者类,它继承自java.util.Observable类;
2.创建观察者类,它实现java.util.Observer接口;
3.对于被观察者类,
添加它的观察者:
void addObserver(Observer o)
addObserver()方法把观察者对象添加到观察者对象列表中。
当被观察事件发生时,执行:
setChanged();
notifyObservers();
setChange()方法用来设置一个内部标志位注明数据发生了变化;
notifyObservers()方法会去调用观察者对象列表中所有的Observer的update()方法,通知它们数据发生了变化。
只有在setChange()被调用后,notifyObservers()才会去调用update()。至于为什么可以看一下下面的源码。
/** * If {@code hasChanged()} returns {@code true}, calls the {@code update()} * method for every observer in the list of observers using null as the * argument. Afterwards, calls {@code clearChanged()}. * <p> * Equivalent to calling {@code notifyObservers(null)}. */ public void notifyObservers() { notifyObservers(null); } /** * If {@code hasChanged()} returns {@code true}, calls the {@code update()} * method for every Observer in the list of observers using the specified * argument. Afterwards calls {@code clearChanged()}. * * @param data * the argument passed to {@code update()}. */ @SuppressWarnings("unchecked") public void notifyObservers(Object data) { int size = 0; Observer[] arrays = null; synchronized (this) { if (hasChanged()) {//如果变换了,arrays才不会为null clearChanged(); size = observers.size(); arrays = new Observer[size]; observers.toArray(arrays); } } if (arrays != null) { for (Observer observer : arrays) { observer.update(this, data); } } } 4.对于观察者类,实现Observer接口的唯一方法update
void update(Observable o, Object arg)
形参Object arg,对应一个由notifyObservers(Object arg);传递来的参数,当执行的是notifyObservers();时,arg为null。
观察者模式举例
1.生产者充当被观测的对象,生产者可以生产的水果如下。
class ProduceFruit extends Observable{ private String[] msg = {"苹果", "香蕉", "橘子"}; private int fruitNum; public String[] getMsg() { return msg; } public int getFruitNum() { return fruitNum; } public void setFruitNum(int fruit, int fruitNum) { this.fruitNum = fruitNum; setChanged(); notifyObservers(fruit); } } 2.多个消费者充当观察者,每个消费者观察不同的水果生产情况
class ConsumeFruit implements Observer{ private String consumeMsg; @Override public void update(Observable o, Object arg) { ProduceFruit pf = (ProduceFruit)o; Integer index = (Integer)arg; if(consumeMsg.equals(pf.getMsg()[index])){ //每种水果对应的不同的消费观察者 System.out.println(consumeMsg + "消费的数量 " + pf.getFruitNum()); } } public ConsumeFruit(String consumeMsg) { super(); this.consumeMsg = consumeMsg; } } 3.生产者(被观察者)随机生产水果,通知消费者(观察者)进行消费
public class Main { public static void main(String[] args){ ProduceFruit pf = new ProduceFruit(); pf.addObserver(new ConsumeFruit("苹果"));//观察苹果生产 pf.addObserver(new ConsumeFruit("香蕉"));//观察香蕉生产 pf.addObserver(new ConsumeFruit("橘子"));//观察橘子生产 Random rd = new Random(); for(int i=0; i<5; ++i){ int fruit = Math.abs(rd.nextInt())%3; int fruitNum = Math.abs(rd.nextInt())%100; pf.setFruitNum(fruit, fruitNum); } if(pf instanceof ProduceFruit) System.out.println(true); if(pf.getClass().equals(ProduceFruit.class)) System.out.println(true); if(pf.getClass() == ProduceFruit.class) System.out.println(true); } } JDK中已经实现的一套观察者模式
最典型的就是Swing框架的JButton的实现。JButton继承自AbstractButton,在AbstractButton中维护了一组监听器,它们就扮演者被观察的角色。而AbstractButton本身就是被观察对象。监听器ActionListener并不是依靠循环监听去获取按钮何时被单击,而是当按钮被单击时,通过AbstractButton的fireActionPerformed()方法回调ActionListener.actionPerformed()方法实现。基于这种结构,在应用程序开发时,只要简单的实现ActionListerner接口(也就是Observer),并将其添加到按钮的观察者列表中,那么当单击事件发生就可以自动促发监听器的业务处理函数。
1.亲测一个小例子
class BtnListener implements ActionListener{ @Override public void actionPerformed(ActionEvent e) { System.out.println("click"); } } public class Main { public static void main(String[] args){ JFrame p = new JFrame(); JButton btn = new JButton("点击我!"); btn.addActionListener(new BtnListener()); btn.setPreferredSize(new Dimension(200, 200)); p.add(btn); p.pack();//调整此窗口的大小,以适合其子组件的首选大小和布局 p.setVisible(true); } } 2.以下是AbstractButton中的一段处理代码
protected void fireActionPerformed(ActionEvent event) { // Guaranteed to return a non-null array Object[] listeners = listenerList.getListenerList(); ActionEvent e = null; // Process the listeners last to first, notifying // those that are interested in this event for (int i = listeners.length-2; i>=0; i-=2) { if (listeners[i]==ActionListener.class) { // Lazily create the event: if (e == null) { String actionCommand = event.getActionCommand(); if(actionCommand == null) { actionCommand = getActionCommand(); } e = new ActionEvent(AbstractButton.this, ActionEvent.ACTION_PERFORMED, actionCommand, event.getWhen(), event.getModifiers()); } ((ActionListener)listeners[i+1]).actionPerformed(e); } } } 写到这里,不得不说一下MVC模式和观察者模式结合的小例子。Long long ago,我用C写了一个贪吃蛇的小游戏,没有什么技术含量,当时并没有考虑用什么样的设计模式去写,而是想怎么写就怎么写,最终完成了。我知道这样的写法非常的不好,尤其是出现BUG的时候,调试起来是非常的麻烦。基于上面的两个设计模式,看一下“贪吃蛇”新的设计思路。
“贪吃蛇”设计模式
1.Model,并充当被观察者
class SnakeModel extends Observable implements Runnable{ //...... //Snake状态信息,以及状态变化的方法。 //...... @Override public void run() { //通过线程实现 模型的状态变化。 //每次的状态变化,Model通知View数据已经更新,请更新视图。 //...... } } 2.View,并充当观察者
class SnakeView extends JFrame implements Observer{ private void initView(){ //初始化视图 //...... } @Override public void update(Observable o, Object arg) { SnakeModel mode = (SnakeModel)o;//获取被监控的模型 //根据模型中Snake状态信息,开始更新Snake的视图 //...... } } 3.Controler,将Model和View结合起来
class SnakeControl extends KeyAdapter{ private SnakeModel model;//待控制的贪吃蛇的模型对象 private SnakeView view;//贪吃蛇的视图对象 private void initControl(){ //创建SnakeModel //创建SnakeView model.addObserver(view);//为模型添加视图(被观察者添加观察者) view.addKeyListener(this);//为视图添加键盘的事件处理器 } @Override public void keyPressed(KeyEvent e) { super.keyPressed(e); int keyCode = e.getKeyCode(); //根据不同的按键,通过Model设置Snake新的状态 } } 最后通过主函数,创建SnakeControl对象就可以是整个程序跑起来了。设计方法很重要,最后就是一步一步的完善了。关于设计模式就先写到这里了,过几天再完善,要考6级了,先复习...


![[HBLOG]公众号](https://www.liuhaihua.cn/img/qrcode_gzh.jpg)

