将一个 ISAM 逆向代理配置为一个 OpenID Connect 提供程序的 PEP
IBM Security Access Manager (ISAM) 在 9.0 版添加了 OpenID Connect (OIDC) 作为一个联合身份验证协议。OIDC 包含配置一个 OpenID 提供程序 (OP) 的能力,该提供程序可发放用户身份 (id_tokens) 和访问令牌,用于以与 OAuth Version 2.0 相同的方式执行身份验证。 能够用作一个使用 OAuth 访问令牌的策略执行点 (PEP),这些访问令牌使用这里定义的 WS-Trust 接口来实现。此接口在传统上与一个 ISAM for Mobile API 保护定义结合使用,但是它与 OpenID Connect 流中发放的访问令牌不兼容。本文介绍如何将一个逆向代理配置为一个与 OpenID Connect 发放的访问令牌兼容的策略执行点。
需要执行以下步骤:
- 配置一个 OP 联合认证协议。
- 将一个逆向代理配置为联系点。
- 配置一个 STS 链来做出授权决策。
- 将一个逆向代理配置为一个策略执行点 (PEP)。
“ 在本文中,我将介绍如何将一个逆向代理配置为一个与 OpenID Connect 提供程序所发放的访问令牌兼容的策略执行点。 ”
ISAM 上的 OpenID Connect 提供程序是一个联合身份验证协议,其中每组回复方凭据是一个伙伴。在我下面介绍的过程中,配置了一个 OP 联合认证协议并创建了两个伙伴;一个表示回复方实体,另一个由逆向代理/安全令牌服务在充当 PEP 时使用。
备注: 本文中的 “逆向代理” 始终指的是 ISAM 逆向代理。
第 1 步. 配置 OP 联合认证协议
联合认证协议可在联合认证协议用户界面 (UI) 中或通过 REST API 调用来配置和管理。联合认证协议 UI 可在 Secure:Federation > Federations 下打开。如果使用 REST 服务,请参阅 Web 服务文档(转到 Secure:Federation > Federations > Create a new federation )来查看如何调用 Federation REST API 和要提供的属性。
通过用户界面配置联合认证协议
- 选择 Federations 菜单选项。

点击查看大图
关闭 [x]

- 添加一个新联合认证协议。
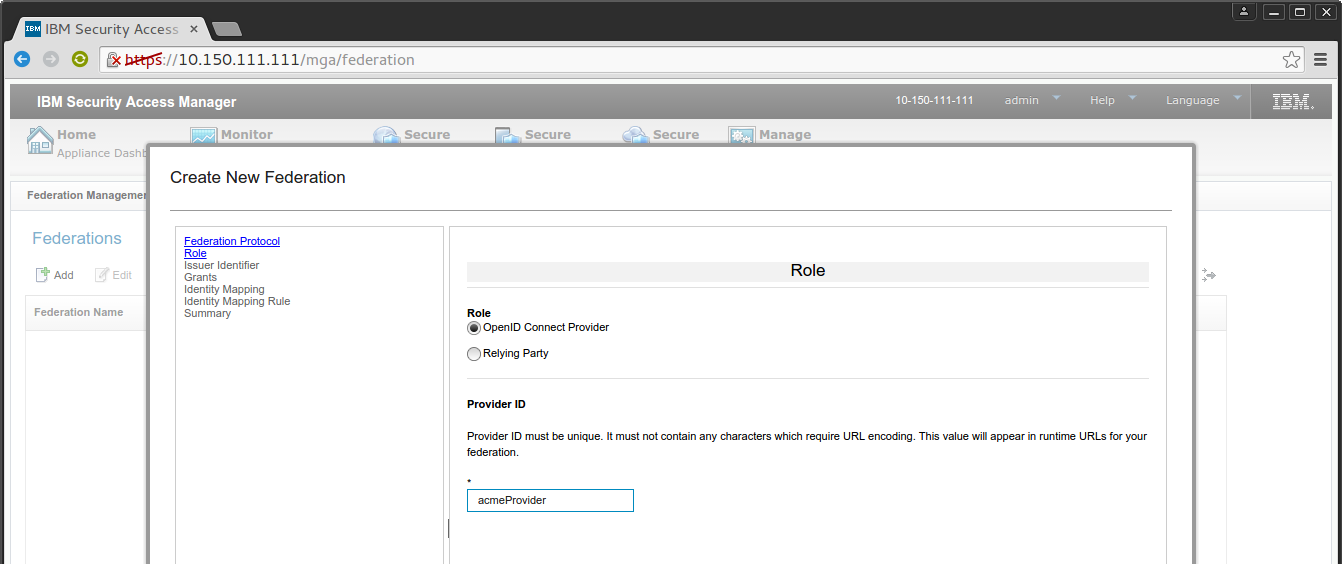
点击查看大图
关闭 [x]

- 输入 issuer 值,作为您想要出现在 id_token 的
'iss'声明中的值。选择 HS256 signing 。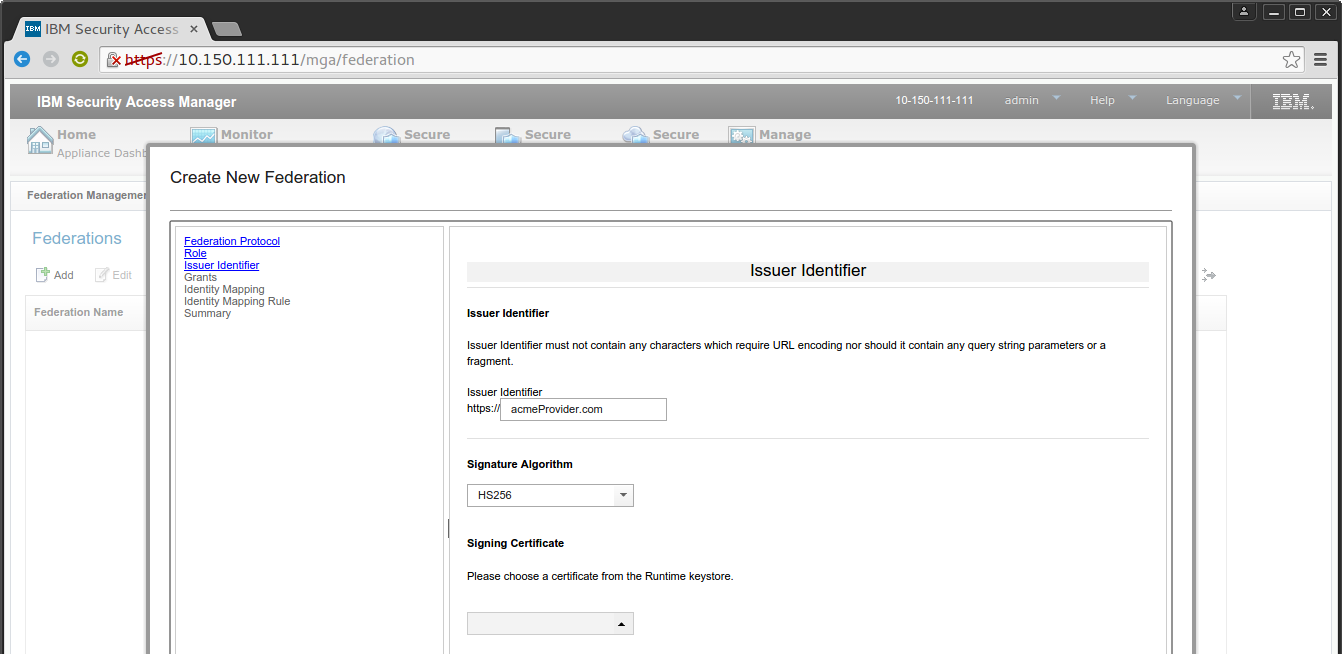
点击查看大图
关闭 [x]

- 至少从可用授权中选择 Authorization Code 。

点击查看大图
关闭 [x]

- 选择映射规则。

点击查看大图
关闭 [x]

- 检查摘要,确保所有值都是正确的。

点击查看大图
关闭 [x]

通过 REST 配置联合认证协议
使用以下代码创建联合认证协议:
POST_DATA=' { "name": "acmeProvider", "protocol": "OIDC", "role": "op", "configuration": { "providerId": "acmeProvider", "issuerIdentifier": "https://acmeProvider.com", "signatureAlgorithm": "HS256", "authorizationCodeLength": 30, "refreshTokenLength": 50, "accessTokenLength": 40, "authorizationCodeLifetime": 30, "accessTokenLifetime": 7200, "authorizationGrantLifetime": 604800, "idTokenLifetime": 7200, "grantTypesSupported": [ "authorization_code", "implicit", "refresh_token" ], "identityMapping": { "activeDelegateId": "default-map", "properties": { "identityMappingRuleReference": "5" } } } }' curl -k -vvv --user $USER:$PASSWORD -H 'Content-Type: application/json' / -H 'Accept: application/json' https://$HOST/iam/access/v8/federations/ -d "$POST_DATA" 这将返回一个包含此联合认证协议的 的位置头部。要列出所有联合认证协议,发出下面这条命令。
curl -k -vvv --user $USER:$PASSWORD -H 'Accept: application/json' / https://$HOST/iam/access/v8/federations/$FED_UUID/partners
要仅显示一个联合认证协议,可包含此联合认证协议的 UUID 作为路径参数:
curl -k -vvv --user $USER:$PASSWORD -H 'Accept: application/json' / https://$HOST/iam/access/v8/federations/$FED_UUID/partners/$PARTNER_UUID
备注: 可使用此联合认证协议之前,必须部署未应用的更改。部署它们将触发一次运行时重新启动。
配置 OP 伙伴
OP 上每个配置的伙伴表示一组用于获取一个授权的客户端凭据。这些客户端凭据包含:
- 客户端 Id
- 客户端密钥(可选)
- 重定向 URI
- 允许的范围(至少必须包含
openid)
还有更多选项可以为 OP 伙伴配置。请参阅IBM 知识中心 了解更多信息。
伙伴在接下来的子步骤中配置。
配置测试伙伴
- 选择要添加伙伴的联合认证协议并单击 Partners 按钮。

点击查看大图
关闭 [x]

- 单击 Add 并为该伙伴输入易记的名称。启用该伙伴。

点击查看大图
关闭 [x]

- 手动设置客户端凭据,或者选择 Generate 来创建它们。

点击查看大图
关闭 [x]

- 输入显示名称。
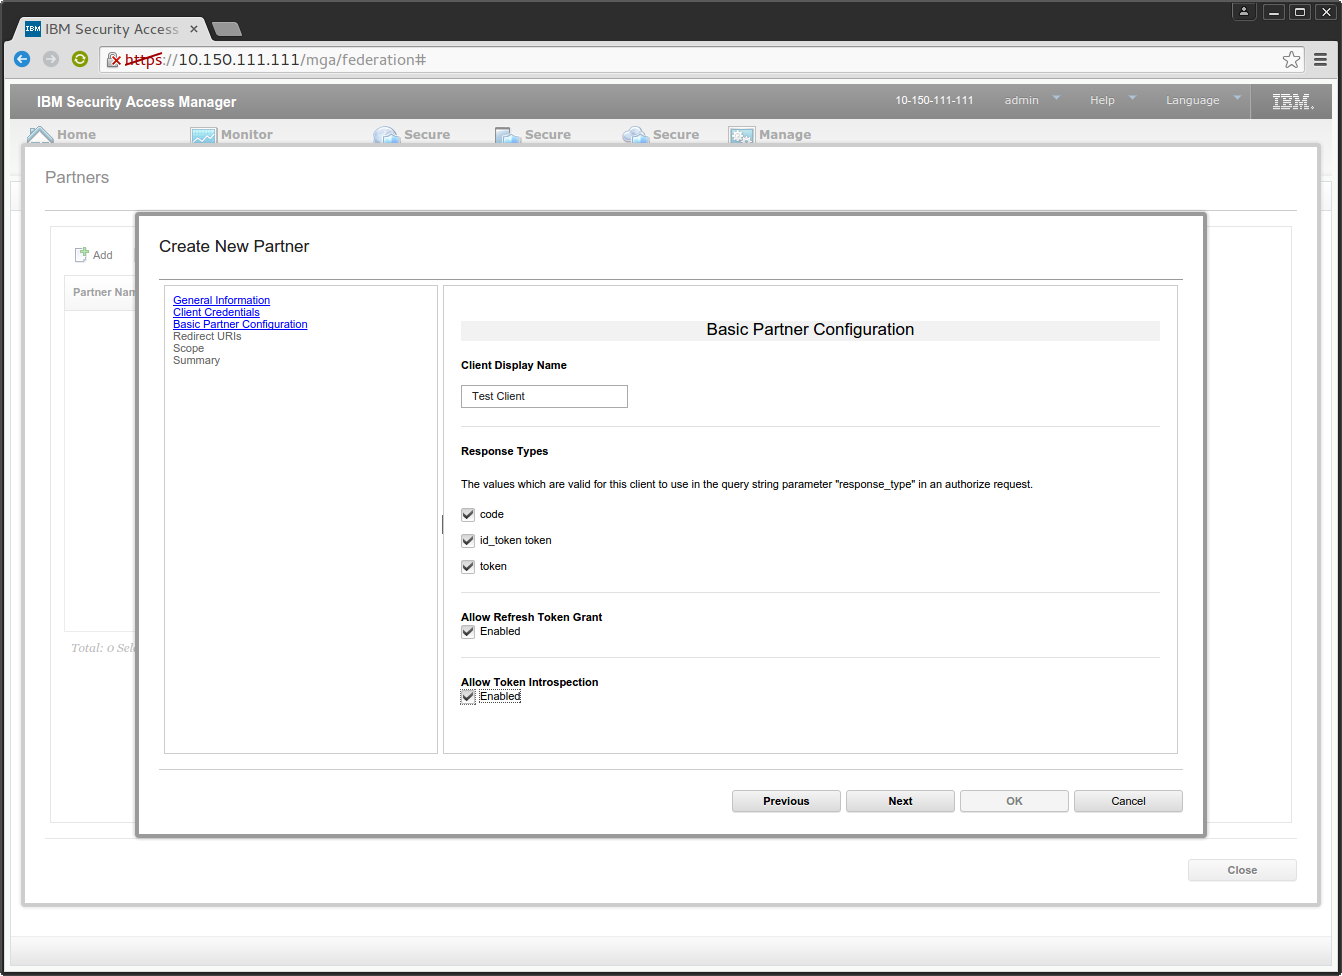
点击查看大图
关闭 [x]

- 输入重定向 URI。

点击查看大图
关闭 [x]

- 输入可请求的有效范围,并指示一个达成一致的给定范围是否已预先授权。
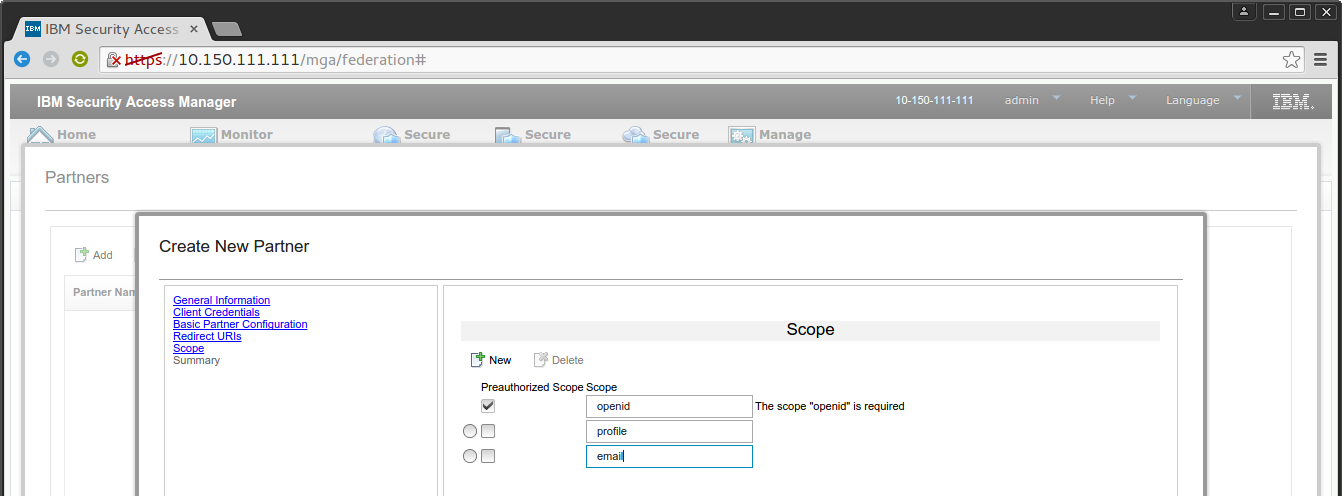
点击查看大图
关闭 [x]

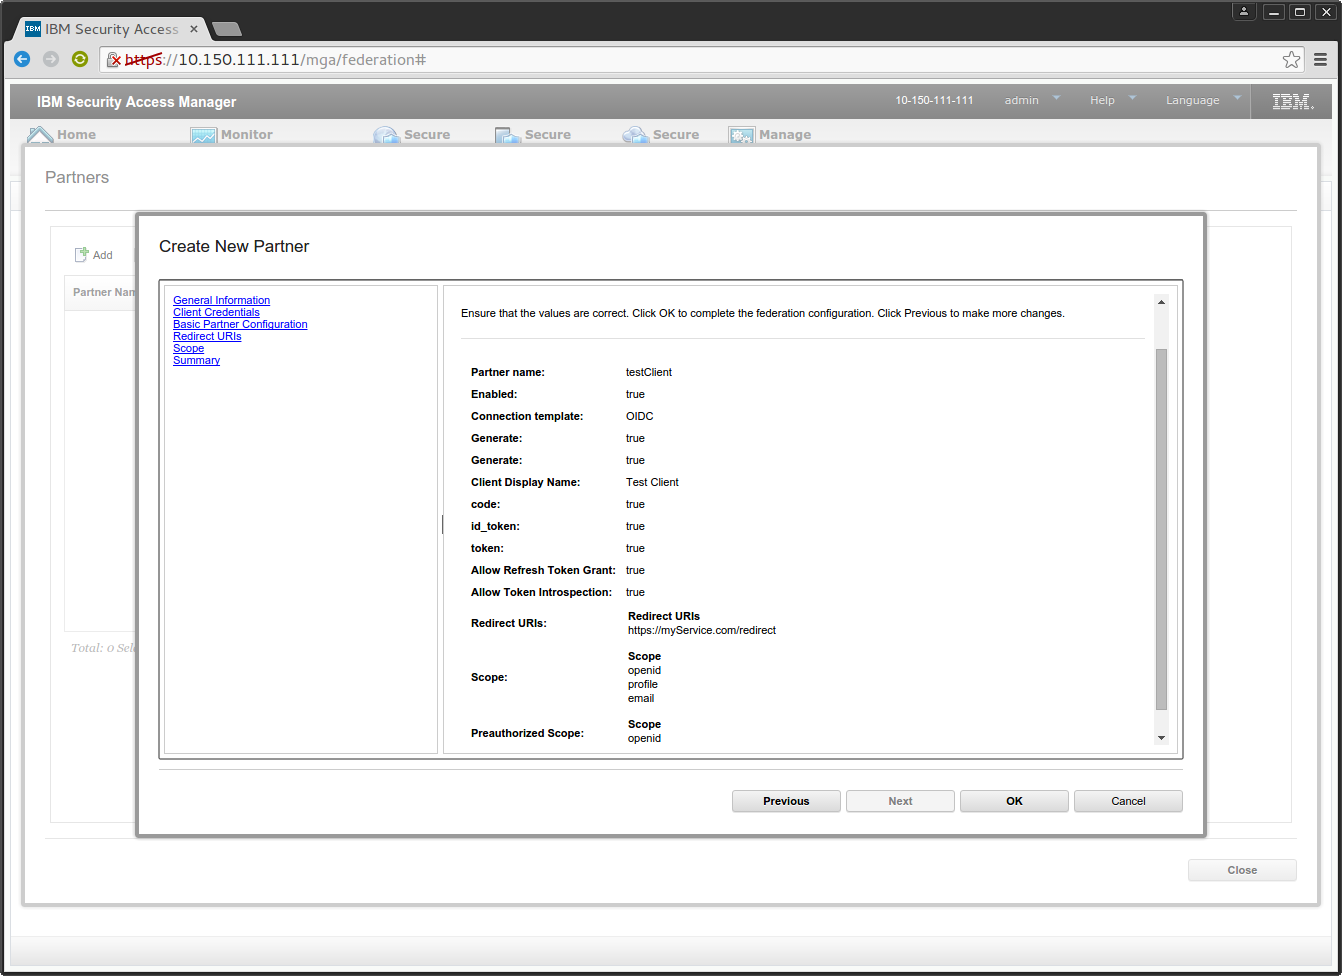
- 检查摘要,确保所有值都是正确的。
点击查看大图
关闭 [x]

- 使用以下代码创建该伙伴:
POST_DATA=' { "role": "op", "templateName": "", "configuration": { "responseTypes": [ "code" ], "clientId":"rpClient", "clientSecret":"rpClientSecret", "clientName": "Reverse proxy Client", "tokenEndpointAuthMethod": "clientSecretBasic", "scope": [ "openid", ], "allowRefreshGrant": true, "redirectUris": [ "https://unused.com/" ], "allowIntrospect": true }, "name": "reverseProxyClient", "enabled": true } ' curl -k -vvv --user $USER:$PASSWORD -H 'Content-Type: application/json' / -H 'Accept: application/json' https://$HOST/iam/access/v8/federations/$UUID/partners -d "$POST_DATA"
备注: 可使用此伙伴之前,必须部署未应用的更改。这将触发一次运行时重新启动。要自动生成一个 clientID 或 clientSecret ,可从请求中排除它。要指定一个空白 clientSecret ,可包含具有 ""(空字符串)值的 clientSecret 属性。客户端密钥 "" 不能供逆向代理伙伴使用,如果伙伴执行下面的示例中所示的授权代码流,密钥也不能是 ""。
创建逆向代理伙伴凭据
要创建逆向代理伙伴凭据,可使用以下代码段。如果使用用户界面,一定要选择 Allow Introspect 选项。
POST_DATA=' { "role": "op", "templateName": "", "configuration": { "responseTypes": [ "code" ], "clientId":"rpClient", "clientSecret":"rpClientSecret", "clientName": "Reverse proxy Client", "tokenEndpointAuthMethod": "clientSecretBasic", "scope": [ "openid", ], "allowRefreshGrant": true, "redirectUris": [ "https://unused.com/" ], "allowIntrospect": true }, "name": "reverseProxyClient", "enabled": true } ' curl -k -vvv --user $USER:$PASSWORD -H 'Content-Type: application/json' / -H 'Accept: application/json' https://$HOST/iam/access/v8/federations/$UUID/partners -d "$POST_DATA" 一定要注意, allowIntrospect 设置为 true。此设置允许客户端向 /introspect 端点发出请求。
第 2 步. 将一个逆向代理配置为 OpenID Connect 的一个联系点。
为了使用配置的 OpenID Connect 提供程序联合认证协议,需要将一个逆向代理配置为合适的联系点。本文基于一个全新配置的逆向代理。有关配置逆向代理的更多信息,请参阅 ISAM 9 用户文档中的配置一个实例。
配置该实例后,使用联合认证自动化配置 Web 服务来适当地配置逆向代理。这可使用以下代码段来完成。要找到联合认证协议的 UUID,请参阅上面的 “配置 OP 联合认证协议”。
POST_DATA=' { "runtime": { "hostname": "localhost", "port": "443", "username": "easuser", "password": "passw0rd" }, "federation_id": "'$FED_UUID'", "reuse_certs": true, "reuse_acls": true } ' curl -k -vvv --user $USER:$PASSWORD -H "Accept: application/json" -H "Content-Type:application/json" / https://$HOST/wga/reverseproxy/$REVERSE_PROXY_NAME/fed_config -d "$POST_DATA" 执行此调用后,部署所有未应用的更改并重新启动逆向代理。有关调用 fed_config Web 服务的更多信息,请参阅设备的 Web 服务文档(位于主题 Secure:Web Settings > Manage > Reverse Proxy > Federation Configuration 下)。
备注: 您必须首先部署联合认证协议,然后才能尝试调用联合身份验证配置 Web 服务。
创建一个测试用户
使用以下命令,创建一个要在此刻的测试中使用的基本 用户。创建此用户后,必须向用户添加属性,比如电话号码。有关更多信息,请参阅创建一个用户。
pdadmin -a sec_master -p $PASSWORD user create testuser cn=testuser,dc=iswga testuser testuser testPwd pdadmin -a sec_master -p $PASSWORD user modify testuser account-valid yes
执行一个测试流
此刻,应该有一个已配置的 OpenID Connect 提供程序联合认证协议、伙伴和逆向代理。现在可获得一个授权,但本文未介绍配置任何类型的客户端。下面将解释如何使用 Curl 执行授权代码流。也可以在浏览器中执行该流的前半部分, /token 端点上的授权代码交换通过 Curl 执行。要启动一个 OpenID Connect 流,可通过客户端发起的某个方法来向 /authorize 端点发出一个请求。下面的 URL 可粘贴到浏览器中来检索授权代码,或者可以使用 Curl。
备注: 授权代码拥有 60 秒的默认寿命。
您可使用以下脚本来执行授权代码流:
点击查看代码清单
关闭 [x]
#!/bin/bash #hostname of the reverse proxy REVERSE_PROXY_HOSTNAME=isam-demo PROVIDER_ID=acmeProvider USERNAME=testuser #populate with testusers password PASSWORD= #populate with client credentials CLIENT_ID= CLIENT_SECRET= #state is presented at /authorize and /token STATE=someState$RANDOM$RANDOM$$ #change to a registered redirect URI. REDIR_URI=https%3A%2F%2FmyService.com%2Fredirect #initial /authorize request curl -b cookieJar.txt -c cookieJar.txt -v -k "https://$REVERSE_PROXY_HOSTNAME/isam/oidc/endpoint/amapp-runtime-$PROVIDER_ID/authorize?scope=openid%20profile%20email&response_type=code&client_id=$CLIENT_ID&redirect_uri=$REDIR_URI&state=$STATE" curl -b cookieJar.txt -c cookieJar.txt -v -k "https://$REVERSE_PROXY_HOSTNAME/isam/sps/amapp-runtime-$PROVIDER_ID/oidc/auth" #this returns a login form curl -b cookieJar.txt -c cookieJar.txt -v -k "https://$REVERSE_PROXY_HOSTNAME/isam/sps/auth" #POST to the login form curl -b cookieJar.txt -c cookieJar.txt -v -k -d "username=$USERNAME&password=$PASSWORD&login-form-type=pwd" "https://$REVERSE_PROXY_HOSTNAME/pkmslogin.form" curl -b cookieJar.txt -c cookieJar.txt -v -k "https://$REVERSE_PROXY_HOSTNAME/isam/sps/auth" curl -b cookieJar.txt -c cookieJar.txt -v -k "https://$REVERSE_PROXY_HOSTNAME/isam/sps/amapp-runtime-$PROVIDER_ID/oidc/auth" #Extract the consent nonce from the consent page CONSENT=$(curl -b cookieJar.txt -c cookieJar.txt -v -k "https://$REVERSE_PROXY_HOSTNAME/isam/oidc/endpoint/amapp-runtime-$PROVIDER_ID/authorize?scope=openid%20profile%20email&response_type=code&client_id=$CLIENT_ID&redirect_uri=$REDIR_URI&state=someState") CONSENT_NONCE=$(echo $CONSENT | grep -o -P '(?<="consentNonce":")[a-zA-Z0-9]*(?=")') #Hard coded consent decision of "yes" to openid, profile, email CODE_RSP=$(curl -b cookieJar.txt -c cookieJar.txt -v -k "https://$REVERSE_PROXY_HOSTNAME/isam/oidc/endpoint/amapp-runtime-$PROVIDER_ID/authorize" -d "consentNonce=$CONSENT_NONCE&client_id=9sp9hJrMXpLDKPVY57M4&response_type=code&scope=openid+profile+email&state=someState&redirect_uri=$REDIR_URI&prompt=consent" 2>&1) # Extract the code echo here CODE=$(echo $CODE_RSP | grep -o -P '(?<=&code=)[^&]*') echo code: $CODE #Exchange code for an id token at /token, token does not require a cookieJar curl -k -u $CLIENT_ID:$CLIENT_SECRET https://$REVERSE_PROXY_HOSTNAME/isam/oidc/endpoint/amapp-runtime-$PROVIDER_ID/token -d "code=$CODE&grant_type=authorization_code&state=$STATE&redirect_uri=$REDIR_URI" #Make it stateless rm cookieJar.txt
此脚本的最终输出应是来自 /token 端点的成功响应,这是一个不记名令牌,其中包含一个 id_token 声明。此声明是一个 JSON Web 令牌 (JWT)。一个示例响应是:
{ "access_token": "RMOqVQl7WHMNDeQQBwoXlpP41cqQdZqEq5TGSZrM", "token_type": "Bearer", "expires_in": 7199, "scope": "openid profile email", "refresh_token": "M62yhoNS7uGYboXGy7hJsHCyx6DhdMaCJFYEEXvtwNf18zY1AP", "id_token": "eyJhbGciOiJIUzI1NiJ9.eyJpc3MiOiJodHRwczovL2FjbWVQcm92aWRlci5jb20iLCJ hdF9oYXNoIjoiVWtwMlo3SnFnSDRna2lPTGJZZnJpQSIsInN1YiI6InRlc3R1c2VyIiw iYXVkIjoiOXNwOWhKck1YcExES1BWWTU3TTQiLCJyZWFsbU5hbWUiOiJtZ2EiLCJleHA iOjE0NDQ5NzY4NTMsImlhdCI6MTQ0NDk2OTY1M30.ViLy3ixFSkNBfMUFscFiQA6dVWJ p4i0QjL7r0_c6e1s" } id_token 包含 3 部分,前两部分是 base64URL 编码的 JSON。第三部分是用于验证 JWT 的签名。
$ JWT="eyJhbGciOiJIUzI1NiJ9.eyJpc3MiOiJodHRwczovL2FjbWVQcm92aWRlci5jb20iLCJhdF9oYXN oIjoiVWtwMlo3SnFnSDRna2lPTGJZZnJpQSIsInN1YiI6InRlc3R1c2VyIiwiYXVkIjoiOXNwOWh Kck1YcExES1BWWTU3TTQiLCJyZWFsbU5hbWUiOiJtZ2EiLCJleHAiOjE0NDQ5NzY4NTMsImlhdCI 6MTQ0NDk2OTY1M30.ViLy3ixFSkNBfMUFscFiQA6dVWJp4i0QjL7r0_c6e1s" $ JWT_HEAD=$(echo $JWT | cut -f1 -d".") $ echo $JWT_HEAD | base64 -d {"alg":"HS256"} $ JWT_BODY=$(echo $JWT | cut -f2 -d".") $ echo $JWT_BODY | base64 -d { "iss": "https://acmeProvider.com", "at_hash": "Ukp2Z7JqgH4gkiOLbYfriA", "sub": "testuser", "aud": "9sp9hJrMXpLDKPVY57M4", "realmName": "mga", "exp": 1444976853, "iat": 1444969653 } 自检一个令牌
令牌自检(introspection)端点允许客户端确定一个 access_token 的有效性。此端点需要使用客户端凭据来执行身份验证。一个示例请求将是:
#!/bin/bash REVERSE_PROXY_HOSTNAME=isam-demo ACCESS_TOKEN=zWmP2T7qITV2ibMKaicNl8gxoQ9oWlWNX6VAExPE PROVIDER_ID=acmeProvider CLIENT_ID=9sp9hJrMXpLDKPVY57M4 CLIENT_SECRET=BYjqNcIHWGrP0wseZMNg curl -k -u $CLIENT_ID:$CLIENT_SECRET / https://$REVERSE_PROXY_HOSTNAME/isam/oidc/endpoint/amapp-runtime-$PROVIDER_ID/introspect / -d "token=$ACCESS_TOKEN"
这将得到以下输出:
{ "sub": "testuser", "grant_type": "authorization_code", "realmName": "mga", "scope": "openid profile email", "active": true, "exp": 1445228044, "token_type": "Bearer", "iat": 1445220844, "client_id": "9sp9hJrMXpLDKPVY57M4" } 这提供了足够的信息来向 STSUU 正确地填入想要的信息。
备注: 行 2、3、5、7 和 10 中的值将在映射规则中提取出来并返回到逆向代理,然后将作为属性包含在逆向代理中。
第 3 步. 配置 STS 链
要配置的 STS 链获取一个 STSUU,而且基于它的内容,添加可供 WebSEAL 用作授权决策的属性。这是一个明确定义的接口。STS 链的配置在以下步骤中完成:
- 创建链模板。
- 上传将由映射模块使用的映射规则。
- 创建链模板的一个实例。
创建链模板
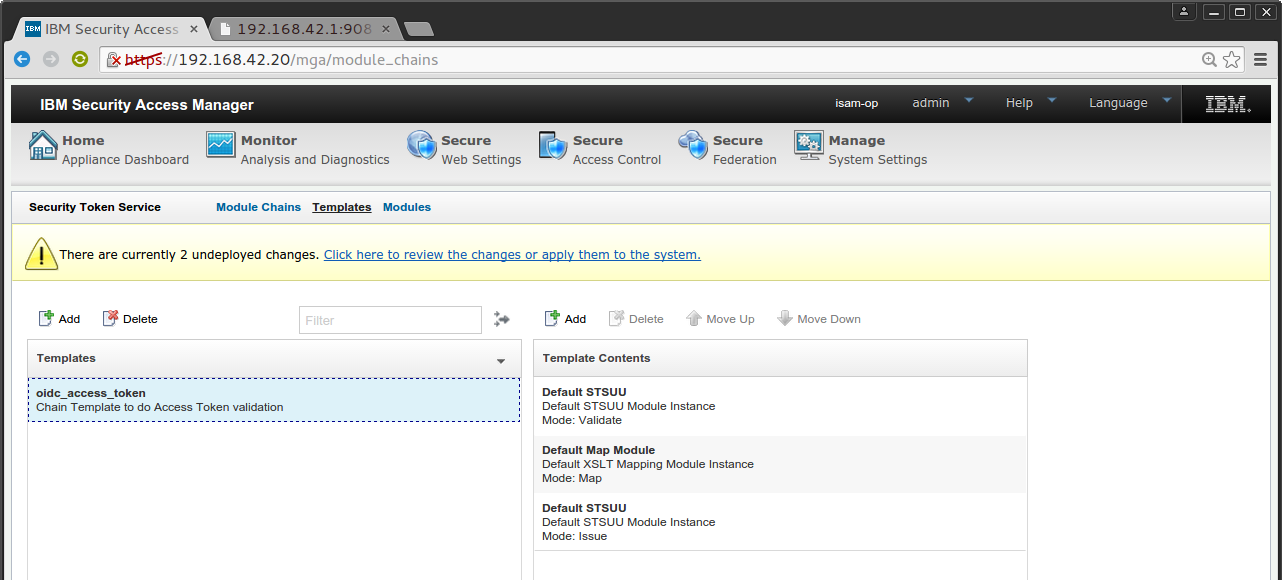
STS 模板的创建通过 STS 用户界面完成。对于此链,您需要 3 个模块:
-
validate模式下的 STSUU 模块 -
map模式下的默认映射模块 -
issue模式下的 STSUU 模块
按照下面的步骤配置该模板:
- 单击 Manage 下的 Security Token Service 。

点击查看大图
关闭 [x]

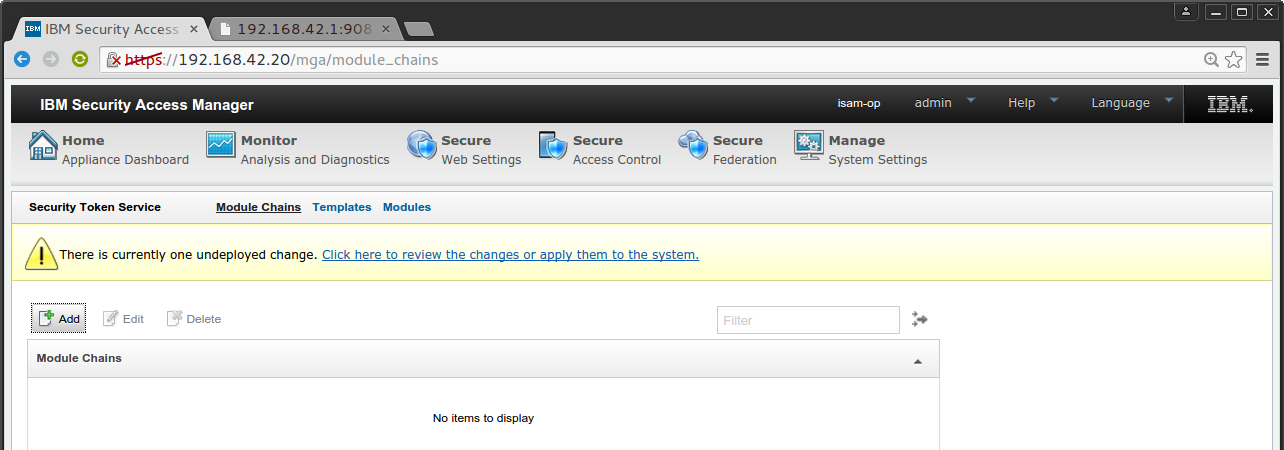
- 单击 Templates 。

点击查看大图
关闭 [x]

- 单击 Add 添加一个新模板。

点击查看大图
关闭 [x]

- 填充该模板。
点击查看大图
关闭 [x]

上传映射规则
创建链的实例之前,需要上传一个供默认映射模块使用的映射规则。有一个 Web 界面可用来上传和编辑 JavaScript 映射规则。将上传的映射规则执行以下操作:
- 从 STSUU 提取 access_token。
- 如果未返回访问令牌,则不要更改 STSUU。
- 如果有一个访问令牌,可向 OP 的
/introspect端点发出一个请求。 - 确认来自
/introspect的响应为200。 - 如果来自
/introspect的响应显示该令牌无效,则返回一个未授权决策。 - 如果来自
/introspect的响应包含active = true属性,则该令牌有效;从 introspect 响应中提取值并将它们插入到 STSUU 中。
此映射规则填充 “ 管理授权执行点的 OAuth STS 接口 ” 中定义的大部分属性。
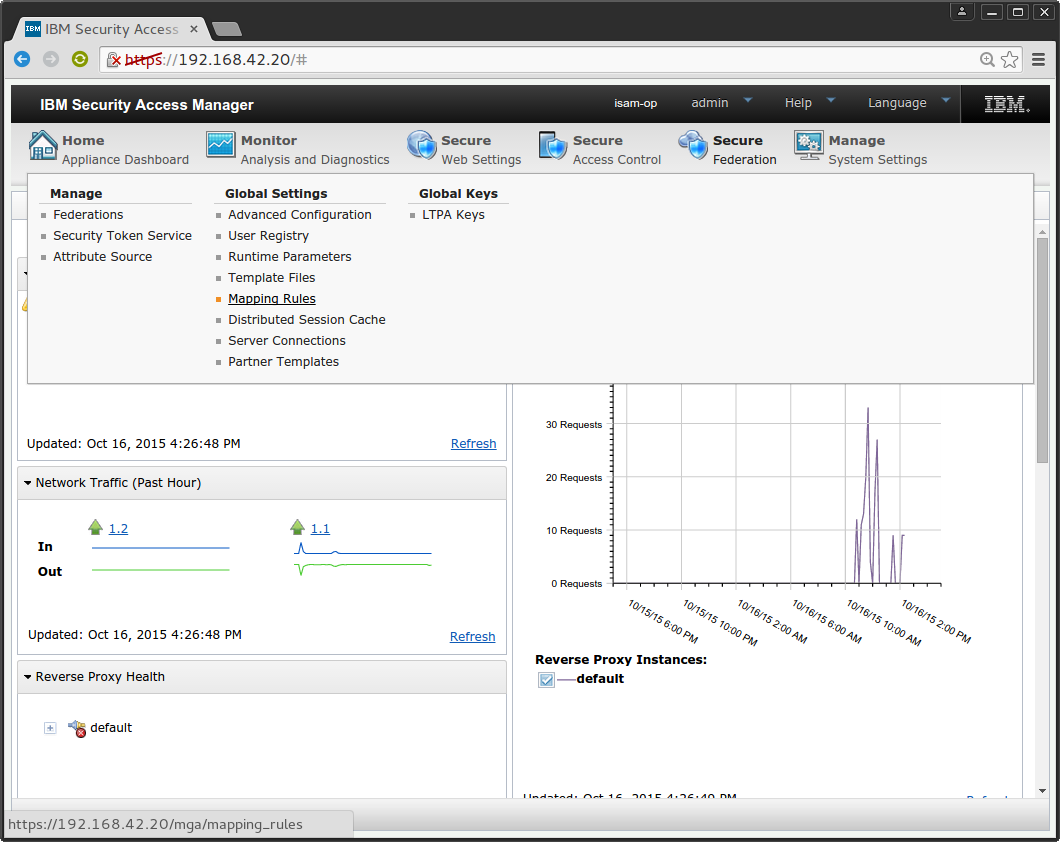
- ISAM Version 9 添加了一个 Web 接口来管理映射规则。单击 Global Settings 下的 Mapping Rules 。
点击查看大图
关闭 [x]

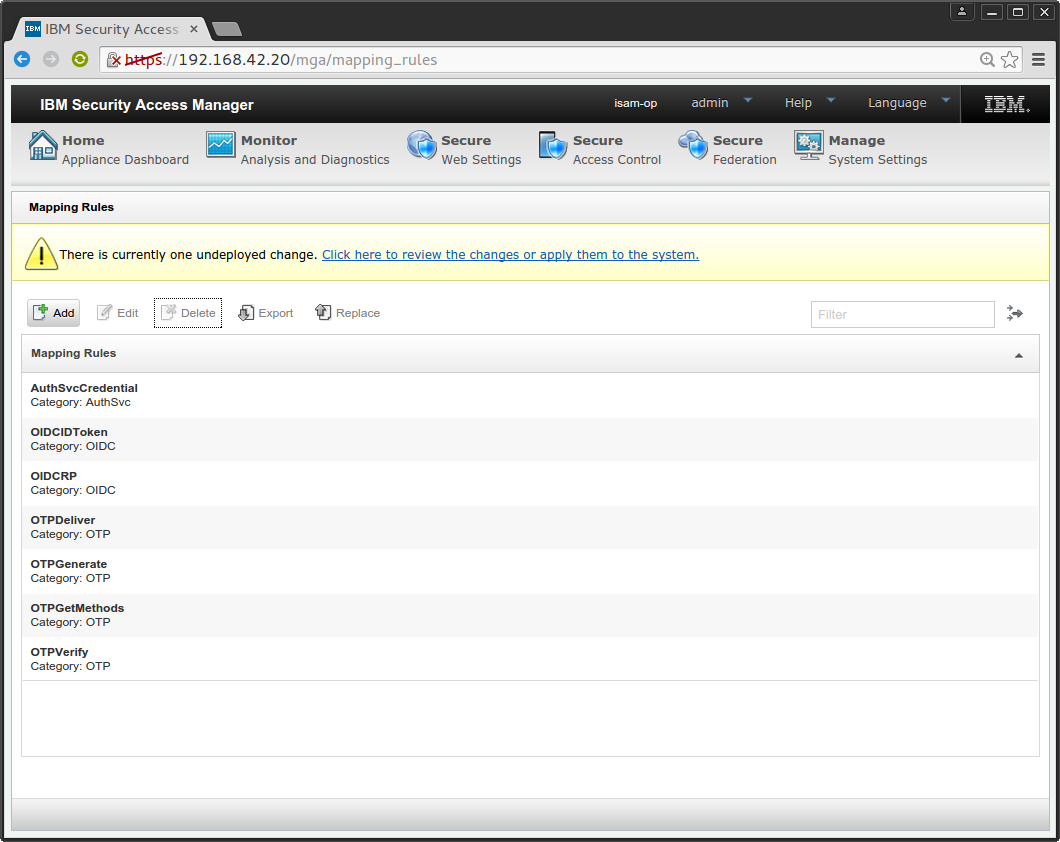
- 单击 Add 添加一条新规则。
点击查看大图
关闭 [x]

- 保存该规则。

点击查看大图
关闭 [x]

映射规则为:
点击查看代码清单
关闭 [x]
//Use the trace strings below to debug: //com.tivoli.am.fim.trustserver.sts.utilities.* so IDMappingExtUtils.traceString will show. //com.tivoli.am.fim.trustserver.sts.modules.* rule execution pre/post //com.ibm.security.access.httpclient.* http client debugging. importPackage(Packages.com.tivoli.am.fim.trustserver.sts); importPackage(Packages.com.tivoli.am.fim.trustserver.sts.uuser); importPackage(Packages.com.tivoli.am.fim.trustserver.sts.utilities); importPackage(Packages.com.ibm.security.access.httpclient); // Types: var attribute = "urn:ibm:names:ITFIM:oauth:response:attribute"; var decision = "urn:ibm:names:ITFIM:oauth:response:decision"; var param = "urn:ibm:names:ITFIM:oauth:param"; //Names(minimum): var USERNAME = "username"; var AUTHZ = "authorized"; var EXPIRES = "expires"; var AT = "access_token"; //Names (extra): var CLIENT_TYPE = "client_type"; // "confidential" or "public" var SCOPE = "scope"; var TOKEN_CLIENT_ID = "oauth_token_client_id" //Constants: var TRUE = "TRUE"; var FALSE = "FALSE"; // Introspect details: var ENDPOINT = "https://127.0.0.1/oidc/endpoint/amapp-runtime-acmeProvider/introspect"; // Used to authenticate to /introspect var CLIENT_ID = "websealClient"; var CLIENT_SECRET = "websealClientSecret"; var access_token = stsuu.getContextAttributes().getAttributeValueByName(AT); IDMappingExtUtils.traceString("access_token: " + access_token); if (access_token != null || access_token.trim() != "" ) { var body = "token=" + access_token; IDMappingExtUtils.traceString("body: " + body); var headers = new Headers(); headers.addHeader("Accept", "*/*"); /* * httpPost(String url, * Map headers, * String body, * String httpsTrustStore, * String basicAuthUsername, * String basicAuthPassword, * String clientKeyStore, * String clientKeyAlias); */ var hr = HttpClient.httpPost( ENDPOINT, headers, body, "rt_profile_keys", CLIENT_ID, CLIENT_SECRET, null, null) IDMappingExtUtils.traceString("code: " + hr.getCode()); IDMappingExtUtils.traceString("body: " + hr.getBody()); if (hr.getCode() == "200") { var rsp = JSON.parse(hr.getBody()); IDMappingExtUtils.traceString("active:" + rsp.active); IDMappingExtUtils.traceString("is active:" + (rsp.active == true)); IDMappingExtUtils.traceString("clientId:" + rsp.client_id); IDMappingExtUtils.traceString("sub:" + rsp.sub); //active will be false if its bad otherwise if(rsp.active == true) { // active == authorized stsuu.addAttribute(new Attribute(AUTHZ, decision, TRUE)); //Some attributes stsuu.addAttribute(new Attribute(USERNAME, attribute, rsp.sub)); stsuu.addAttribute(new Attribute(TOKEN_CLIENT_ID, attribute, rsp.client_id)); stsuu.addAttribute(new Attribute(SCOPE, attribute, rsp.scope)); stsuu.addAttribute(new Attribute(EXPIRES, decision, secondsToDate(rsp.exp))); // Based on the grant type used to get this // access_token we decide on the client_type: if(rsp.grant_type == "authorization_code"){ stsuu.addAttribute(new Attribute(CLIENT_TYPE, attribute, "confidential")); } else { stsuu.addAttribute(new Attribute(CLIENT_TYPE, attribute, "public")); } } else { IDMappingExtUtils.traceString("invalid access token"); stsuu.addAttribute(new Attribute(AUTHZ, decision, FALSE)); } } else { IDMappingExtUtils.traceString("non 200 code"); stsuu.addAttribute(new Attribute(AUTHZ, decision, FALSE)); } } else { IDMappingExtUtils.traceString("access_token was null"); stsuu.addAttribute(new Attribute(AUTHZ, decision, FALSE)); } /* * Helper: * Turn an OIDC exp property which is in seconds and turn it into a string * suitable for the EXPIRES attribute of a STSUU */ function secondsToDate(seconds) { var d = new Date(0); d.setSeconds(seconds); IDMappingExtUtils.traceString("Expires:" + d); return IDMappingExtUtils.getTimeStringUTC(d.getFullYear(), d.getMonth(), d.getDay(), d.getHours(), d.getMinutes(), d.getSeconds()); } 创建链
现在已有一个模板,您可配置一条映射规则来使用该链的实例。为该链配置逆向代理将在调用该链时使用的值。Issuer 地址必须是 urn:ibm:ITFIM:oauth20:token:bearer ,但您可配置逆向代理所提供的 Applies To。它将给定的默认值是 https://localhost/sps/oauthfed/oauth10 。逆向代理将使用的值可在 [oauth] 节中的 default-fed-id 属性下设置。此示例使用 Applies To 值 https://localhost/sps/oidc 。
- 添加一个链。
点击查看大图
关闭 [x]

- 配置一个新链。

点击查看大图
关闭 [x]

- 设置 Request Type、Issuer 和 Applies To 值。

点击查看大图
关闭 [x]

- 配置模块。在本例中,您仅可为默认映射模块配置一个选项,那就是要使用的规则。

点击查看大图
关闭 [x]

测试该链
您可使用下面的代码段来测试配置的 STS 链。请求必须是一条包含请求安全性令牌的消息。逆向代理要发送的消息将包含几个有关请求的端点和逆向代理的信息片段。但是,提供的规则仅使用 "access_token" 上下文属性。下面的示例仅提供了一个 access_token。逆向代理所提供的属性可用于增强该规则。
#!/bin/bash #For more on invoking the STS via HTTP. #See Shane Weeden's blog post: https://ibm.biz/BdHHTt REVERSE_PROXY_HOSTNAME=isam-demo ISSUER=urn:ibm:ITFIM:oauth20:token:bearer APPLIES_TO=https://localhost/sps/oidc ACCESS_TOKEN=39eAcg8X9PUN6CWGoF9Wnti1KDME9IsjeR8y49fh USER=easuser PASSWORD=passw0rd BODY=' <SOAP-ENV:Envelope xmlns:SOAP-ENV="http://schemas.xmlsoap.org/soap/envelope/" xmlns:xsd="http://www.w3.org/2001/XMLSchema" xmlns:xsi="http://www.w3.org/2001/XMLSchema-instance" xmlns:ns1="http://docs.oasis-open.org/ws-sx/ws-trust/200512" xmlns:wsa="http://schemas.xmlsoap.org/ws/2004/08/addressing" xmlns:wsp="http://schemas.xmlsoap.org/ws/2004/09/policy" xmlns:wst="http://docs.oasis-open.org/ws-sx/ws-trust/200512" > <SOAP-ENV:Body> <ns1:RequestSecurityTokenCollection> <ns1:RequestSecurityToken> <wsp:AppliesTo> <wsa:EndpointReference> <wsa:Address>https://localhost/sps/oidc</wsa:Address> </wsa:EndpointReference> </wsp:AppliesTo> <wst:Issuer> <wsa:Address>urn:ibm:ITFIM:oauth20:token:bearer</wsa:Address> </wst:Issuer> <wst:RequestType>http://schemas.xmlsoap.org/ws/2005/02/trust/Validate</wst:RequestType> <wst:Base> <stsuuser:STSUniversalUser xmlns:stsuuser="urn:ibm:names:ITFIM:1.0:stsuuser"> <stsuuser:Principal/> <stsuuser:AttributeList/> <stsuuser:RequestSecurityToken> <stsuuser:Attribute name="AppliesTo" type="http://schemas.xmlsoap.org/ws/2004/09/policy"> <stsuuser:Value>https://localhost/sps/oidc</stsuuser:Value> </stsuuser:Attribute> <stsuuser:Attribute name="Issuer" type="http://docs.oasis-open.org/ws-sx/ws-trust/200512"> <stsuuser:Value>urn:ibm:ITFIM:oauth20:token:bearer</stsuuser:Value> </stsuuser:Attribute> <stsuuser:Attribute name="Base" type="urn:ibm:names:ITFIM:1.0:stsuuser"> <stsuuser:Value> <stsuuser:STSUniversalUser> <stsuuser:ContextAttributes> <stsuuser:Attribute name="access_token" type="urn:ibm:names:ITFIM:oauth:param"> <stsuuser:Value>QLW6clF6O6NEXu8KjMZ2r2u9Si4qYtEC67EUMYon</stsuuser:Value> </stsuuser:Attribute> </stsuuser:ContextAttributes> </stsuuser:STSUniversalUser> </stsuuser:Value> </stsuuser:Attribute> </stsuuser:RequestSecurityToken> <stsuuser:ContextAttributes> <stsuuser:Attribute name="access_token" type="urn:ibm:names:ITFIM:oauth:param"> <stsuuser:Value>QLW6clF6O6NEXu8KjMZ2r2u9Si4qYtEC67EUMYon</stsuuser:Value> </stsuuser:Attribute> </stsuuser:ContextAttributes> <stsuuser:AdditionalAttributeStatement/> </stsuuser:STSUniversalUser> </wst:Base> </ns1:RequestSecurityToken> </ns1:RequestSecurityTokenCollection> </SOAP-ENV:Body> </SOAP-ENV:Envelope> ' curl -k -vvv --user $USER:$PASSWORD / https://$REVERSE_PROXY_HOSTNAME/isam/TrustServerWS/SecurityTokenServiceWST13 -d "$BODY"
备注: 该端点将需要附加一个 unauth acl 。也可以将运行时绑定到一个外部接口并将 URL 更新为直接转到运行时。 备注: STS 受 身份验证保护。请参阅管理用户注册表 来了解配置用户帐户的更多信息。
第 4 步. 将逆向代理配置为一个执行点
您现在需要将逆向代理配置为一个 OAuth PEP。您将使用与之前相同的实例。对配置文件执行以下更改,这将启用 OAuth 授权。记下 default-fed-id 值,因为它必须与 STS 链的 Applies To 值对应。
[oauth] fed-id-param = FederationId default-fed-id = https://localhost/sps/oidc user-identity-attribute = username oauth-auth = both cluster-name = oauth-cluster [server] http-method-disabled-remote = TRACE,CONNECT [tfim-cluster:oauth-cluster] basic-auth-user = easuser basic-auth-passwd = passw0rd handle-idle-timeout = 240 handle-pool-size = 10 ssl-keyfile = pdsrv.kdb ssl-keyfile-stash = pdsrv.sth server = 9,https://127.0.0.1/TrustServerWS/SecurityTokenServiceWST13 ssl-keyfile-label = server [azn-decision-info] HTTP_CONTENT_TYPE_HDR = header:content-type HTTP_HOST_HDR = header:host HTTP_REQUEST_METHOD = method HTTP_TRANSFER_ENCODING_HDR = header:transfer-encoding HTTP_AZN_HDR = header:authorization HTTP_REQUEST_URI = uri HTTP_REQUEST_SCHEME = scheme
这已写入下面的代码段中。
点击查看代码清单
关闭 [x]
#! /bin/bash USER=admin PASSWORD= HOST= INST=default APPLIES_TO=https://localhost/sps/oidc RUNTIME=127.0.0.1 function setEntry { STZ=$1b ENT=$2 VAL=$3 curl -k -H "Accept: application/json" -H "Content-Type: application/json" / --user $USER:$PASSWORD https://$HOST/wga/reverseproxy/$INST/configuration/stanza/$STZ/entry_name/$ENT / -X PUT -d '{"value":"'$VAL'"}' } setEntry oauth fed-id-param FederationId setEntry oauth default-fed-id $APPLIES_TO setEntry oauth user-identity-attribute username setEntry oauth oauth-auth both setEntry oauth cluster-name oauth-cluster setEntry server http-method-disabled-remote TRACE,CONNECT setEntry "tfim-cluster:oauth-cluster" ssl-keyfile-stash pdsrv.sth setEntry "tfim-cluster:oauth-cluster" basic-auth-user easuser setEntry "tfim-cluster:oauth-cluster" handle-idle-timeout 240 setEntry "tfim-cluster:oauth-cluster" handle-pool-size 10 setEntry "tfim-cluster:oauth-cluster" basic-auth-passwd passw0rd setEntry "tfim-cluster:oauth-cluster" ssl-keyfile pdsrv.kdb setEntry "tfim-cluster:oauth-cluster" server 9,https://$RUNTIME/TrustServerWS/SecurityTokenServiceWST13 setEntry "tfim-cluster:oauth-cluster" ssl-keyfile-label server setEntry azn-decision-info HTTP_CONTENT_TYPE_HDR header:content-type setEntry azn-decision-info HTTP_HOST_HDR header:host setEntry azn-decision-info HTTP_REQUEST_METHOD method setEntry azn-decision-info HTTP_TRANSFER_ENCODING_HDR header:transfer-encoding setEntry azn-decision-info HTTP_AZN_HDR header:authorization setEntry azn-decision-info HTTP_REQUEST_URI uri setEntry azn-decision-info HTTP_REQUEST_SCHEME scheme curl -k -v -L -H 'Accept: application/json' -X PUT --user $USER:$PASSWORD https://$HOST/isam/pending_changes curl -k -v -L -H 'Accept: application/json' -H "Content-Type: application/json" -X PUT / --user $USER:$PASSWORD https://$HOST/wga/reverseproxy/$INST -d '{"operation":"restart"}' 配置 POP
需要配置一个 来触发 OAuth EAS。请参阅 “OAuth EAS 总体概述 来了解有关 OAuth EAS 的更多信息。您可使用以下 pdadmin 命令来配置 POP:
pop create oidc-pop pop modify oidc-pop set attribute eas-trigger oauth_pop_trigger
将以下代码附加到根资源以作测试:
pop attach /WebSEAL/isam-op-default/ oidc-pop server replicate
测试 PEP
现在可通过使用 Authorization:Bearer 头部,将访问令牌用作一种通过逆向代理验证请求的方法。可执行以下步骤来进行测试:
- 获取一个访问令牌。
- 不使用授权头部访问资源并提示登录。
- 使用授权头部访问资源并允许访问。
这可通过以下代码演示:
$ curl -v -k -L https://isam-demo/ > GET / HTTP/1.1 > User-Agent: curl/7.37.0 > Host: isam-demo > Accept: */* > < HTTP/1.1 200 OK < content-length: 12505 < content-type: text/html < date: Tue, 20 Oct 2015 01:06:46 GMT < ... <form class="login-container" method="POST" action="/pkmslogin.form?token=Unknown"> ... Login form. $ curl -v -k -L -H "Authorization: Bearer QLW6clF6O6NEXu8KjMZ2r2u9Si4qYtEC67EUMYon" / https://isam-demo/ > GET / HTTP/1.1 > User-Agent: curl/7.37.0 > Host: isam-demo > Accept: */* > Authorization: Bearer QLW6clF6O6NEXu8KjMZ2r2u9Si4qYtEC67EUMYon > < HTTP/1.1 200 OK < content-length: 510 < content-type: text/html ... <center><img src="/pics/iv30.gif" alt=""></center> ...Reverse Proxy Landing page
POP 现在可附加到各种资源来允许使用 access_token 访问它们。
结束语
为使 ISAM 逆向代理能够接受 OpenID Connect 访问令牌作为一种身份验证方法而进行的配置到此就完成了。您现在应能够:
- 使用 UI 或 Web 服务配置一个 OpenID Connect 联合认证协议。
- 调用联合身份验证配置 Web 服务。
- 执行一个 OpenID Connect 授权代码流。
- 创建一个 STS 模板和链。
- 创建一个 POP 并将它附加到一个资源。
- 使用一个访问令牌作为身份验证方法,从逆向代理请求页面。
相关主题: OpenID Connect 术语 Oasis WS-Trust 使用 Curl 联系 STS ISAM 上的 OAuth
- 本文标签: 管理 json 协议 mail schema 安全 App list tab http IDE 实例 ssl 自动化 Developer 密钥 代码 value authenticate js entity UI DOM web db provider cat 2015 API key 认证 https src 配置 parse java 参数 remote grep ACE SOA XML 测试 ip client map HTML REST IBM tar Word
- 版权声明: 本文为互联网转载文章,出处已在文章中说明(部分除外)。如果侵权,请联系本站长删除,谢谢。
- 本文海报: 生成海报一 生成海报二


![[HBLOG]公众号](https://www.liuhaihua.cn/img/qrcode_gzh.jpg)

