翻译了一篇raywenderlich的文章,Core Graphics的入门教程。(有部分省略,剩下的都是主要过程。)
原文链接: http://www.raywenderlich.com/90690/modern-core-graphics-with-swift-part-1
想象一下你开发完成了你的app,并且运行良好,但是界面不太好看。你可以用Photoshop绘制多个size的控件图片,希望Apple不会出@4x retina的屏幕。。
或者你可以提前预想到使用 Core Graphice 代码创建一个image,这样就能自动适应各种尺寸显示在设备上。
Core Graphics 是Apple的矢量绘图框架。它非常强大,API功能齐全,里面有许多需要学习的知识。但不用害怕,这里三部分可以引导你入门,最后你将在app里面创建一个好看的图形。
这是一个全新的系列,用先进的方法来教开发者使用 Core Graphice 。这个系列全部在Xcode6用Swift写(现在Xcode7了,测试可以通过),包含了新的功能,例如 @IBDesignable 和 @IBInspectable ,可以让 Core Graphics 学起来更加有趣和容易。
带着你最喜欢的饮料,让我们开始吧!
介绍Flo - 每次喝一杯
你将创建一个完整的app来记录你喝水的习惯。
这个app很容易记录你喝了多少水。 它会告诉我们一天喝8杯水是健康的,但很容易在记录几杯后就忘记了。这就是写Flo的原因。每次你干完一杯新鲜的水,点击计数器。你也可以在里面看见7天的记录。

在这部分里面,你将使用 UIKit 的绘制方法创建3个控件。
在第二部分,你将深入了解 Core Graphice 内容,绘制图形。
在第三部分,你将创建带图案的背景,奖励自己一枚自己绘制的金牌.
创建自定义视图
当你想自定义绘制图形的时候,你需要三个步骤:
- 1、创建
UIView的子类 - 2、覆盖
drawRect方法,在里面写一些绘制的代码 - 3、没有第三步了
让我们尝试做一个自定义的加号按钮

先差创建一个button,命名为 PushButtonView
UIButton 是 UIView 的子类,所以在 UIButton 里面能够使用 UIView 的所有方法,例如 drawRect
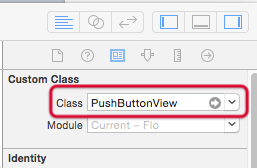
打开 Identity Inspector ,修改class为自定义的 PushButtonView
坐标和大小是X=250, Y=350, Width=100, and Height=100

增加约束
使用Auto Layout增加约束
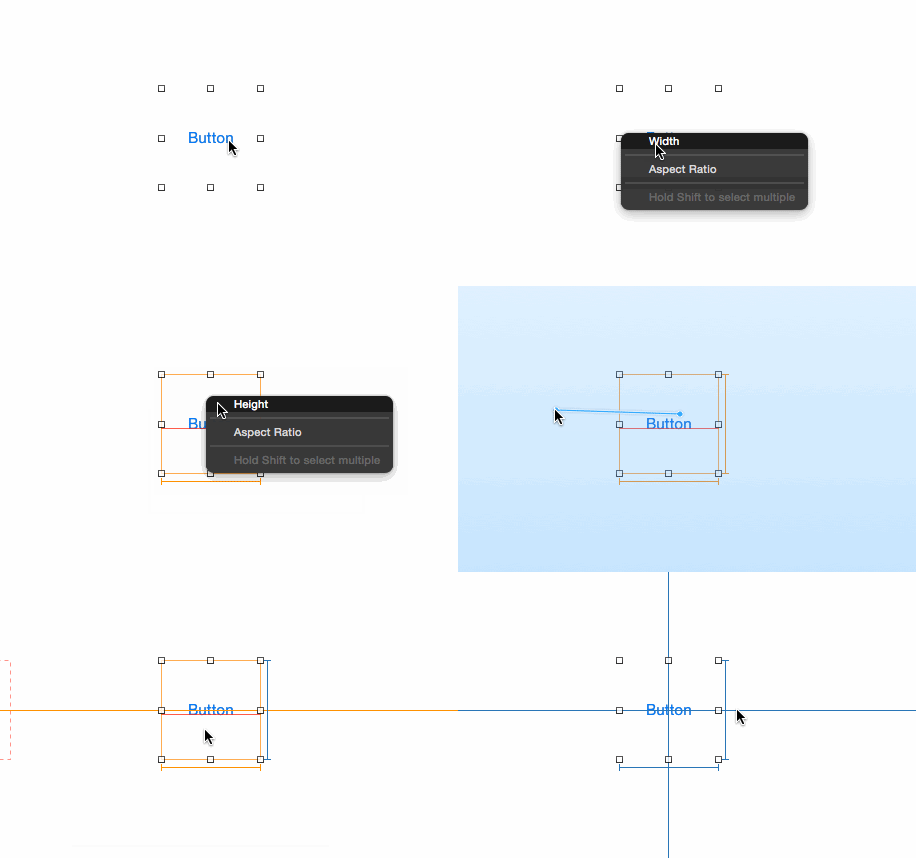
会创建4个约束,你可以在 Size Inspector 里面看见下面的内容

移除默认的Button的title
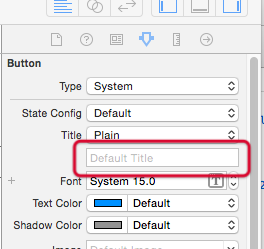
绘制Button
首先需要明白3个原理,绘制图片的路径:
- 1、路径是可以绘制和填充的
- 2、路径轮廓的颜色是当前绘制的颜色
- 3、使用当前的填充颜色填满封闭的路径
创建 Core Graphice 路径可以通过 UIBezierPath ,他提供了友好的API创建路径。无论你想要线、曲线、矩形、还有一些列的连接点。
在 PushButtonView.swift 下面添加方法
 override func drawRect(rect: CGRect) {
  var path = UIBezierPath(ovalInRect: rect)
  UIColor.greenColor().setFill()
  path.fill()
}
这里用 ovalInRect 椭圆形方法,传递了一个矩形的大小。生成一个100*100的button在storyboard.所以椭圆形实际上是圆形。
路径本身不知道如何绘制。你可以定义一个路径但是不会绘制任何有用的内容。为了绘制路径,你可以给当前内容一个填充的颜色(fill color)
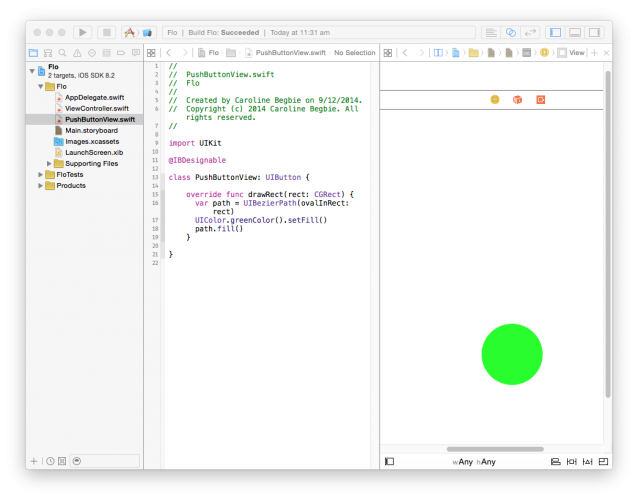
运行程序将看见绿色的圆形.
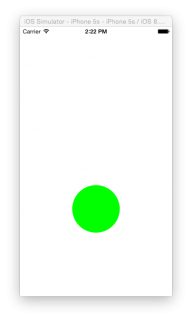
到目前为止,你会发现创建一个自定义的图形是多么容易,你已经创建了一个button的子类,覆盖了 drawRect 方法,并且添加了 UIButton 在你的Storyboard上面

Core Graphics绘制的原理
每一个 UIView 都有一个 graphics context (绘图上下文),在设备硬件显示前,绘制的所有视图都会被渲染到这个上下文中.
iOS 在任何时候需要更新视图都是通过调用 drawRect 方法。发生在
- 1、视图是在屏幕上是新的
- 2、顶部视图被移除
- 3、视图的hidden属性改变
- 4、明确调用
setNeedsDisplay()和setNeedsDisplayInRect()方法
注意:所有 drawRect 里面绘制,在完成之后会放到view 的graphics context中。如果你在 drawRect 外部绘制,你需要在最后面创建自己的graphics context
你还不必使用 Core Graphics 因为UIKit封装了很多 Core Graphics 的方法。例如 UIBezierPath 封装了 CGMutablePath (这是Core Graphics底层的API)
注意:不要直接调用 drawRect . 如果你需要更新视图,调用 setNeedsDisplay() 方法
setNeedsDisplay() 不会自己调用 drawRect 方法,但是会标记视图,让视图通过 drawRect 重绘在下一次循环更新的时候。 所以当你在一个方法里面多次调用 setNeedsDisplay() 的时候,你实际上也只是调用了一次 drawRect
@IBDesignable - 交互式绘制
代码创建路径去绘制,运行app去看结果看起来就像等颜料干一样精彩。但是你有其他的选择,Xcode6允许一个视图通过 @IBDesignable 设置属性。 可以在storyboard上面实时更新。
在 PushButtonView.swift ,在class声明前添加 @IBDesignable
打开 Assistant Editor ,通过下面视图查看

最后屏幕是这个样子的
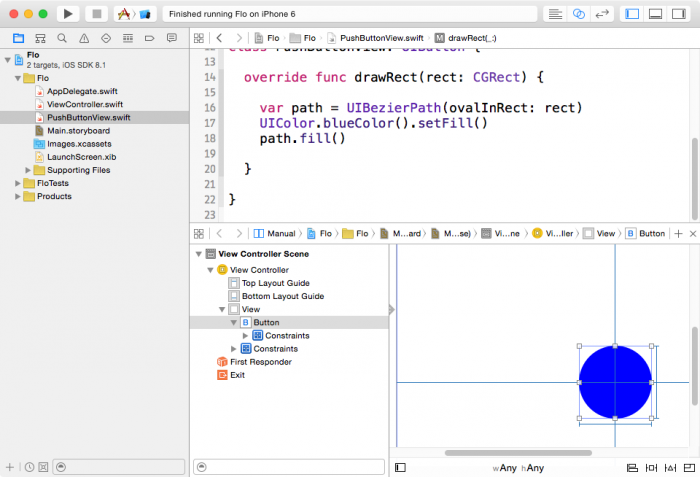
修改显示的颜色,改成blueColor
UIColor.blueColor().setFill()
你会发现屏幕会立即改变
下面我们来添加”+”符号的线
绘制到Context
Core Graphics使用的是”画家绘画的模式”(原文是”Core Graphics uses a “painter’s model.”,一开始不太明白是什么意思,但是看下文的图再来看这句话就明白是什么意思了)
当你画一个内容的时候,就像在制作一幅画。你绘制了一个路径并且填满它,然后你在这上面又绘制了另外一个路径填满它。 你不可能改变绘制的像素,但是你可以覆盖他们。
下面这张图片来自苹果的官方文档,描述了是如何工作的。正如你在一块画板上绘制图片,决定样式的是你绘制的顺序
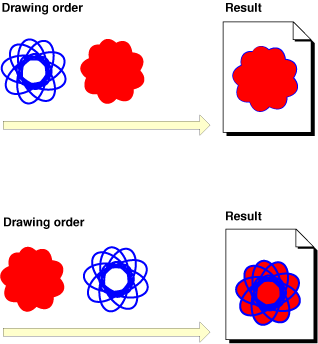
你的 + 号在蓝色圆形的上面,所以首先你需要写绘制蓝色圆形的代码,然后才是加号的绘制。
你可以画两个矩形实现加号,但是你同样可以画一个路径然后用同样的厚度描边
修改 drawRect() 的代码
 //set up the width and height variables
//for the horizontal stroke
let plusHeight: CGFloat = 3.0
let plusWidth: CGFloat = min(bounds.width, bounds.height) * 0.6

//create the path
var plusPath = UIBezierPath()

//set the path's line width to the height of the stroke
plusPath.lineWidth = plusHeight

//move the initial point of the path
//to the start of the horizontal stroke
plusPath.moveToPoint(CGPoint(
  x:bounds.width/2 - plusWidth/2,
  y:bounds.height/2))

//add a point to the path at the end of the stroke
plusPath.addLineToPoint(CGPoint(
  x:bounds.width/2 + plusWidth/2,
  y:bounds.height/2))

//set the stroke color
UIColor.whiteColor().setStroke()

//draw the stroke
plusPath.stroke()
可以在storyboard中看到是这样的结果
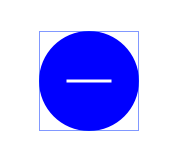
在iPad2和iPhone 6 Plus模拟器上运行。你会发现下面的情况

点和像素
点和像素占据相同的空间和大小,本质上是相同的事情。当retain的iPhone面世的时候,相同点上有4个像素
同样的,iPhone6 Plus再一次把每个点的像素提升了。
具体学习可以参考 这篇 文章
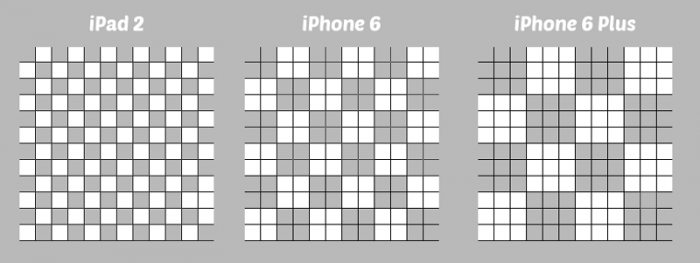
这里有一个12 * 12 像素的宫格,点是灰色和白色的。iPad2是点和像素直接映射。iPhone6是2x retain屏幕,4个像素是一个点。第三个iPhone6 Plus 是3x retain屏幕,9个像素是一个点.
刚刚画得线是3个点的高度。线从路径的中间开始描绘,所以1.5个点会描绘在线的两边。
这个图片展示了将回执3个点的线在设备上的情况。iPad2和iPhone6 Plus结果是需要跨越半个像素。iOS在两种颜色中当一种颜色只有半边像素填充的时候会抗锯齿,所以线会看得模糊
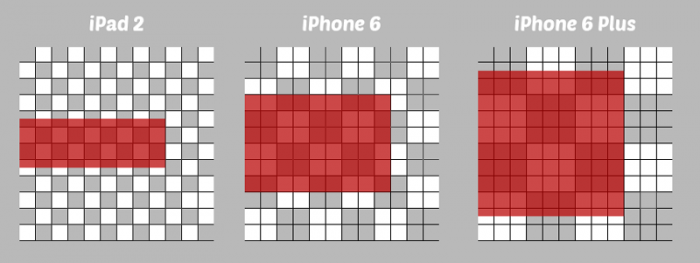
实际的情况是,iPhone6 Plus有很多个像素,所以可能看不到模糊的情况。尽管如此,你需要检查在真机上检查你的app。但是假如你在不是retain的屏幕上(iPad2 or iPad mini),你可以避免抗锯齿。
如果你的直线大小是单数,你应该把她们的点增加或减少0.5为了预防锯齿。在iPad2上将移动半个像素点,在iPhone6上,刚好充满整个像素。在iPhone6 Plus,刚好充满1.5个像素.
修改后的代码
 //move the initial point of the path
//to the start of the horizontal stroke
plusPath.moveToPoint(CGPoint(
  x:bounds.width/2 - plusWidth/2 + 0.5,
  y:bounds.height/2 + 0.5))

//add a point to the path at the end of the stroke
plusPath.addLineToPoint(CGPoint(
  x:bounds.width/2 + plusWidth/2 + 0.5,
  y:bounds.height/2 + 0.5))
iOS 将清晰的渲染直线在三个设备上,因为你改变了路径的半个点
注意:为了线展现完美的像素,你可以用 UIBezierPath(rect:) 用fill填充,取代直接画线。使用 contentScaleFactor 计算矩形的高度和宽度。 不像从路径中心像两边描绘,fill只会向路径里面填充 (这个东西好重要呀。。。)
接下来化垂直的线
 //Vertical Line

//move to the start of the vertical stroke
plusPath.moveToPoint(CGPoint(
  x:bounds.width/2 + 0.5,
  y:bounds.height/2 - plusWidth/2 + 0.5))

//add the end point to the vertical stroke
plusPath.addLineToPoint(CGPoint(
  x:bounds.width/2 + 0.5,
  y:bounds.height/2 + plusWidth/2 + 0.5))
结果是这样子的
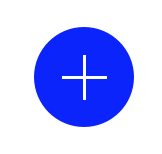
@IBInspectable 自定义Storyboard属性
@IBInspectable 定义的属性能够在IB里面可见。这意味着你可以不用代码,在IB里面设置button的颜色
@IBInspectable var fillColor: UIColor = UIColor.greenColor()
@IBInspectable var isAddButton: Bool = true
在 drawRect 里面修改
UIColor.blueColor().setFill()
变成
fillColor.setFill()
最后修改好的代码是
 import UIKit

@IBDesignable
class PushButtonView: UIButton {

  @IBInspectable var fillColor: UIColor = UIColor.greenColor()
  @IBInspectable var isAddButton: Bool = true

  override func drawRect(rect: CGRect) {

    var path = UIBezierPath(ovalInRect: rect)
    fillColor.setFill()
    path.fill()

    //set up the width and height variables
    //for the horizontal stroke
    let plusHeight: CGFloat = 3.0
    let plusWidth: CGFloat = min(bounds.width, bounds.height) * 0.6

    //create the path
    var plusPath = UIBezierPath()

    //set the path's line width to the height of the stroke
    plusPath.lineWidth = plusHeight

    //move the initial point of the path
    //to the start of the horizontal stroke
    plusPath.moveToPoint(CGPoint(
      x:bounds.width/2 - plusWidth/2 + 0.5,
      y:bounds.height/2 + 0.5))

    //add a point to the path at the end of the stroke
    plusPath.addLineToPoint(CGPoint(
      x:bounds.width/2 + plusWidth/2 + 0.5,
      y:bounds.height/2 + 0.5))

    //Vertical Line
    if isAddButton {
      //move to the start of the vertical stroke
      plusPath.moveToPoint(CGPoint(
        x:bounds.width/2 + 0.5,
        y:bounds.height/2 - plusWidth/2 + 0.5))

      //add the end point to the vertical stroke
      plusPath.addLineToPoint(CGPoint(
        x:bounds.width/2 + 0.5,
        y:bounds.height/2 + plusWidth/2 + 0.5))
    }

    //set the stroke color
    UIColor.whiteColor().setStroke()

    //draw the stroke
    plusPath.stroke()

  }

}
isAddButton 的设置可以标识是否需要添加竖线,也就是表明是加号还是减号
改变fill颜色RGB(87, 218, 213), isAddButton 为off
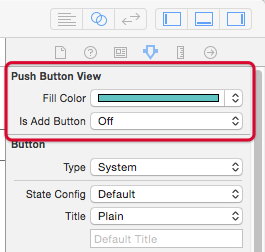
显示出来的结果是

UIBezierPath 画圆弧
下面我们自定义的视图是这样子的
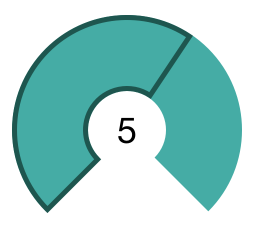
这看起来像一个填充的形状,但是这个圆弧实际上是一个大的描边。外部的线是另外一个路径的描边组成的2个圆弧。
创建一个 CounterView 类,这个事UIView的子类
import UIKit

let NoOfGlasses = 8
let π:CGFloat = CGFloat(M_PI)

@IBDesignable class CounterView: UIView {

  @IBInspectable var counter: Int = 5
  @IBInspectable var outlineColor: UIColor = UIColor.blueColor()
  @IBInspectable var counterColor: UIColor = UIColor.orangeColor()

  override func drawRect(rect: CGRect) {

  }
}
NoOfGlasses :是一个数字表明每天喝水的杯数。
counter : 记录了喝水的杯数
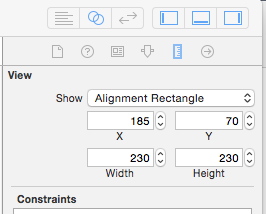
在刚刚PushButtonView上面放置一个视图,所属类是 CounterView ,坐标大小是
数学知识
画这个圆弧需要根据单位园来画

红色箭头表示开始与结束的点,顺时针绘画。 从3π/4弧度开始画。相当于135°,顺时针到π/4弧度,也就是45°
画弧度
在 CounterView.swift 里面, drawRect 方法
 // 1
let center = CGPoint(x:bounds.width/2, y: bounds.height/2)

// 2
let radius: CGFloat = max(bounds.width, bounds.height)

// 3
let arcWidth: CGFloat = 76

// 4
let startAngle: CGFloat = 3 * π / 4
let endAngle: CGFloat = π / 4

// 5
var path = UIBezierPath(arcCenter: center,
  radius: radius/2 - arcWidth/2,
  startAngle: startAngle,
  endAngle: endAngle,
  clockwise: true)

// 6
path.lineWidth = arcWidth
counterColor.setStroke()
path.stroke()
- 1、设置中心点
- 2、计算视图最大尺寸的半径
- 3、计算扇形的厚度
- 4、设置开始和结束的弧度
- 5、根据中心点、半径、还有度数画路径
- 6、设置线的宽度和颜色,最后把路径绘制出来。
注意:这里有画弧的更详细的介绍 Core Graphics Tutorial on Arcs and Paths
最后实现的效果是

圆弧的轮廓
 //Draw the outline

//1 - first calculate the difference between the two angles
//ensuring it is positive
let angleDifference: CGFloat = 2 * π - startAngle + endAngle

//then calculate the arc for each single glass
let arcLengthPerGlass = angleDifference / CGFloat(NoOfGlasses)

//then multiply out by the actual glasses drunk
let outlineEndAngle = arcLengthPerGlass * CGFloat(counter) + startAngle

//2 - draw the outer arc
var outlinePath = UIBezierPath(arcCenter: center,
                                  radius: bounds.width/2 - 2.5,
                              startAngle: startAngle,
                                endAngle: outlineEndAngle,
                               clockwise: true)

//3 - draw the inner arc
outlinePath.addArcWithCenter(center,
                     radius: bounds.width/2 - arcWidth + 2.5,
                 startAngle: outlineEndAngle,
                   endAngle: startAngle,
                  clockwise: false)

//4 - close the path
outlinePath.closePath()

outlineColor.setStroke()
outlinePath.lineWidth = 5.0
outlinePath.stroke()
- 1、
outlineEndAngle是轮廓结束的度数。根据当前的counter来计算 - 2、
outlinePath是轮廓的路径。 - 3、添加一个内置的圆弧。有相同的度数,不过要反着来绘画(clockWise要设置为false)
- 4、自动闭合路径,画线。
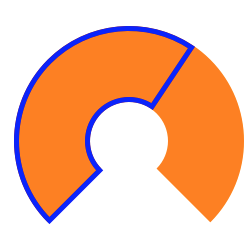
最后的结果是这样的
让它工作起来
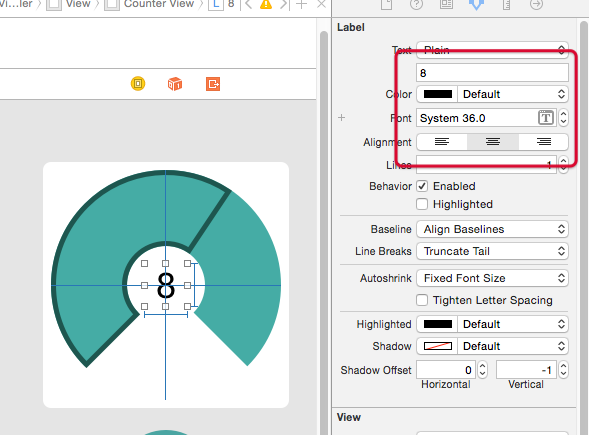
在Storyboard里面调整Counter Color为 RGB(87, 218, 213) ,Outline Color为 RGB(34, 110, 100)
在 ViewController.swift 里面增加这些属性和方法
 //Counter outlets
@IBOutlet weak var counterView: CounterView!
@IBOutlet weak var counterLabel: UILabel!
@IBAction func btnPushButton(button: PushButtonView) {
  if button.isAddButton {
    counterView.counter++
  } else {
    if counterView.counter > 0 {
      counterView.counter--
    }
  }
  counterLabel.text = String(counterView.counter)
}
在 viewDidLoad 里面设置counterLabel的更新值
counterLabel.text = String(counterView.counter)
最后在Storyboard里面连线
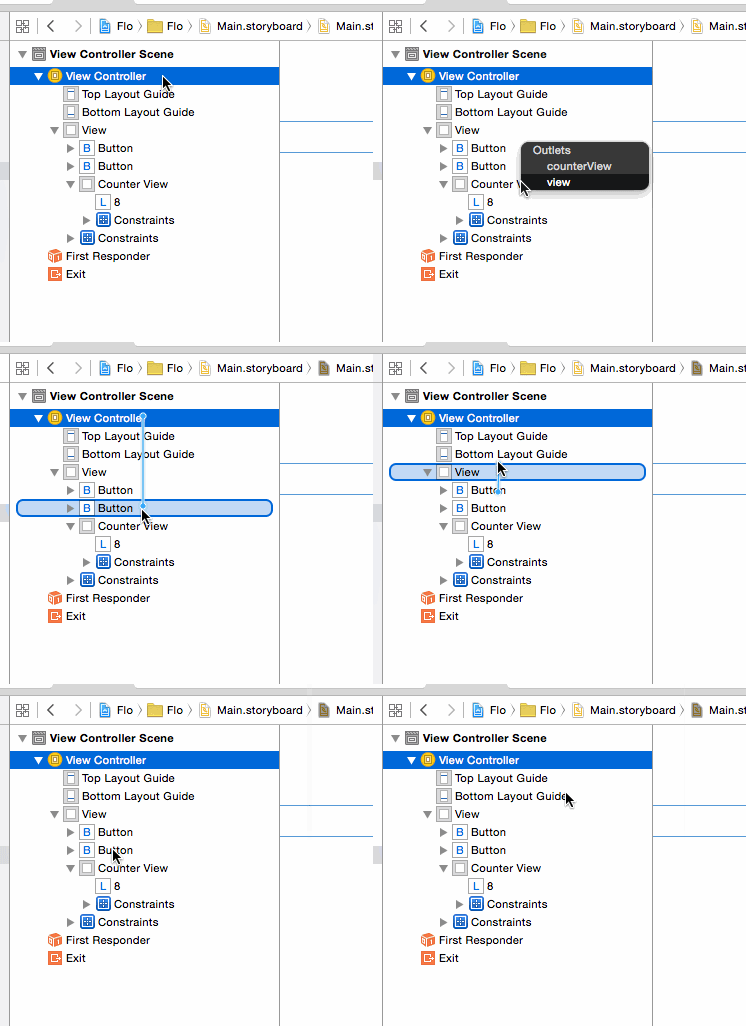
为了能够点击按钮后能够重新绘制,需要修改 CounterView 里面的 counter 属性的setter方法,调用 setNeedsDisplay
 @IBInspectable var counter: Int = 5 {
  didSet {
    if counter <=  NoOfGlasses {
      //the view needs to be refreshed
      setNeedsDisplay()
    }
  }
}
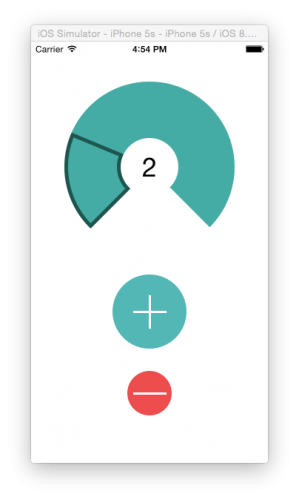
最后app可以运行啦
总结:
1、学习了绘图的基本原理
2、如何使用@IBDesignable 和 @IBInspectable 3、抗锯齿问题是如何解决的
4、绘图的顺序,以及扇形的基本知识,如何去绘制扇形


![[HBLOG]公众号](https://www.liuhaihua.cn/img/qrcode_gzh.jpg)

