使用 PHP、MongoDB 和 IBM Bluemix 构建一个笔记本应用程序
用户不再希望将他们的内容(照片、音乐和文档)限制在一个桌面或笔记本计算机中。他们希望可从任何地方访问它,从其移动设备和办公桌面都能进行访问。为了满足这个要求,涌现出了各种各样的云存储服务,每种服务都提供了存储和同步工具,以便用户能随时随地访问他们的数据。
来自 IBM developerWorks 的强大工具
通过 developerWorks Premium 会员计划在云中快速投入生产。在它的许多特别待遇中,您会获得 Bluemix 的 12 个月订阅,以及用于使用 Bluemix 服务(比如 Watson、IoT 和移动)开发应用程序的 240 美元贷款。了解 developerWorks Premium 会员的所有权益。
如果您是一位正考虑构建这样一个服务的开发人员,那么现在是开始行动的好时机。云基础架构已变得更加经济和开发人员友好,而且没有损失任何稳定性和可伸缩性。此外,构建原生移动和 Web 应用程序的工具能够广泛可用,这意味着开发、测试和部署新的移动友好的应用程序的任务比过去简单得多。
在本教程中,我讲介绍构建一个简单的笔记本应用程序的过程,该应用程序允许用户使用移动或桌面 Web 浏览器在云中存储和搜索自由形式文本笔记。我还将介绍如何在 IBM Bluemix® 云平台上部署和运行该应用程序。
需要做的准备工作
示例笔记本应用程序允许用户使用无限多个文本笔记,还允许运行他们编辑、搜索和删除笔记。此外,用户可以对笔记进行颜色编码,以方便分类或识别。
在客户端上,我将使用 Bootstrap 为应用程序创建一个移动友好的用户界面。在服务器上,我将使用 Slim (一个 PHP 微型框架)管理应用程序流,连接 MongoDB 并从中检索数据。
要完成本文中的步骤,您需要:
- 基本熟悉 Bootstrap 、 PHP 和 MongoDB
- 一个包含 Apache (具有 mod_rewrite 和 .htaccess 文件支持)或 nginx 的本地 PHP 开发环境
- 一个包含已配置的数据库、用户和密码的 MongoDB 的本地或远程部署;您可以通过注册 MongoLab 帐户 获得 MongoDB 的免费或付费部署
- 一个 Bluemix 帐户(注册您的 免费试用帐户 ,或者如果已经有一个帐户,请 登录到 Bluemix )。
- Composer (PHP 依赖项管理器)
- CloudFoundry 命令行工具
- 一个文本编辑器或 IDE
“ 这个笔记本应用程序使用 MongoDB 提供快速的、可扩展的文档存储,使用 Slim PHP 微型框架提供业务逻辑,使用 Bootstrap 提供一个响应式、移动友好的用户界面。 ”
在 GitHub 上获取代码
第 1 步. 创建空应用程序
- 第一步是创建一个包含 Slim PHP 微型框架的空应用程序。您可以使用 Composer(PHP 依赖关系管理器)下载和安装它。在使用这个 Composer 配置文件时,应将它保存到 <$APP_ROOT> /composer.json( <$APP_ROOT> 是您的项目目录):
{ "require": { "slim/slim": "2.*" } } - 使用 Composer 通过以下命令安装 Slim:
shell> php composer.phar install
- 接下来,设置应用程序的主要控制脚本。此脚本将加载 Slim 框架并初始化 Slim 应用程序。它还将包含对应用程序的每个路线的回调,每个回调定义在该路线与一个传入请求匹配时要执行的代码。因为该应用程序必须支持列出、查看、添加、编辑、删除和搜索笔记,所以您可以定义 URL 路线
/index、/view、/save和/delete,如下所示。将此脚本保存为 <$APP_ROOT> /index.php。<?php // use Composer autoloader require 'vendor/autoload.php'; require 'config.php'; // configure Slim application instance // initialize application $app = new /Slim/Slim(array( 'debug' => true, 'templates.path' => './views' )); $app->config = $config; // index page handlers $app->get('/', function () use ($app) { $app->redirect($app->urlFor('index')); }); // handler to list available notes in database // if query string included // filter results to match query string $app->get('/index', function () use ($app) { // code here })->name('index'); // handler to display add/edit form $app->get('/save(/:id)', function ($id = null) use ($app) { // code here }); // handler to process form input // save note content to database $app->post('/save', function () use ($app) { // code here }); // handler to delete specified note $app->get('/delete/:id', function ($id) use ($app) { // code here }); // handler to display specified note $app->get('/view/:id', function ($id) use ($app) { // code here }); // hook to add request URI path as template variable $app->hook('slim.before.dispatch', function() use ($app) { $app->view()->appendData(array( 'baseUri' => $app->request()->getRootUri() )); }); $app->run(); - 请注意
'slim.before.dispatch'hook,它获取当前请求 URL(包含任何子目录路径),并提供该请求作为一个名为$baseUri的模板变量。这最大化了可移植性,因为它允许您将应用程序移动到 Web 服务器上的不同目录,无需重写您的视图中的 URL 路径。您可以在源代码存储库中的各种模板中看到这种可移植性的实际运用。 - 您还需要构建一个基础用户界面,应用程序可以用它来呈现各种视图。这是一个示例:
点击查看代码清单
关闭 [x]
<!DOCTYPE html> <html lang="en"> <head> <meta charset="utf-8"> <meta http-equiv="X-UA-Compatible" content="IE=edge"> <meta name="viewport" content="width=device-width, initial-scale=1"> <title>Cloud Notepad</title> <link rel="stylesheet" href="https://maxcdn.bootstrapcdn.com/bootstrap/3.3.5/css/bootstrap.min.css"> <link rel="stylesheet" href="https://maxcdn.bootstrapcdn.com/bootstrap/3.3.5/css/bootstrap-theme.min.css"> <!-- HTML5 shim and Respond.js for IE8 support of HTML5 elements and media queries --> <!-- WARNING: Respond.js doesn't work if you view the page via file:// --> <!--[if lt IE 9]> <script src="https://oss.maxcdn.com/html5shiv/3.7.2/html5shiv.min.js"></script> <script src="https://oss.maxcdn.com/respond/1.4.2/respond.min.js"></script> <![endif]--> </head> <body> <div class="panel panel-default"> <div class="panel-heading clearfix"> <h4 class="pull-left">Notes</h4> </div> </div> <!-- page content here --> <!-- jQuery (necessary for Bootstrap's JavaScript plugins) --> <script src="https://ajax.googleapis.com/ajax/libs/jquery/1.11.2/jquery.min.js"></script> <script src="https://maxcdn.bootstrapcdn.com/bootstrap/3.3.5/js/bootstrap.min.js"></script> </body> </html>
所有部分准备就绪后,现在可以开始构建应用程序了。
第 2 步. 添加笔记
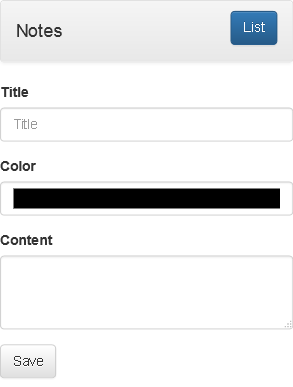
基本上讲,一个笔记包含三个属性: 'title' 、 'body' 和 'color' 。这些值由用户提供。每个笔记还包含两个额外的属性:一个唯一的 'id' 和一个 'updated' 属性,前者在 MongoDB 集合中标识该笔记,后者存储最后修改该笔记的时间。
构建一个表单来与这些属性进行匹配非常容易。以下是该表单的外观:
点击查看代码清单
关闭 [x]
<form method="post" action="<?php echo $this->data['baseUri']; ?>/save"> <input name="id" type="hidden" value="<?php echo $this->data['note']['_id']; ?>" /> <div class="form-group"> <label for="title">Title</label> <input type="title" class="form-control" id="title" name="title" placeholder="Title" value="<?php echo htmlspecialchars($this->data['note']['title']); ?>"> </div> <div class="form-group"> <label for="color">Color</label> <input type="color" class="form-control" id="color" name="color" placeholder="Color" value="<?php echo$this->data['note']['color']; ?>"> </div> <div class="form-group"> <label for="body">Content</label> <textarea name="body" id="body" class="form-control" rows="3"><?php echo htmlspecialchars($this->data['note']['body']); ?></textarea> </div> <div class="form-group"> <button type="submit" class="btn btn-default">Save</button> </div> </form>
请注意,该表单使用了新的 HTML5 'color' 输入类型,该类型会自动生成一个调色板或颜色滑块,允许用户从一系列颜色中为每个笔记选择颜色。选择的颜色会作为十六进制值返回。
要减少重复,可以重用这个表单来编辑现有笔记。这就是该表单包含一个隐藏的 'id' 字段的原因,对于新笔记,该字段将保留为空。系统可以利用此标识符的存在与否来确定是在数据库中创建新笔记还是更新现有笔记。
这是使用来自 <$APP_ROOT> /config.php 文件的信息初始化数据库连接的代码段:
<?php // attach configuration to application $app->config = $config; // extract database name from URI // initialize PHP Mongo client $dbn = substr(parse_url($app->config['db_uri'], PHP_URL_PATH), 1); $mongo = new MongoClient($app->config['db_uri'], array("connectTimeoutMS" => 30000)); $db = $mongo->selectDb($dbn); 在将该表单提交到 /save 端点后,表单处理器必须首先验证和整理 POST 输入,然后将其保存到数据库中。这是该过程的回调函数:
<?php // handler to process form input // save note content to database $app->post('/save', function () use ($app, $db) { $collection = $db->notes; $id = trim(strip_tags($app->request->post('id'))); $note = new stdClass; $note->title = trim(strip_tags($app->request->post('title'))); $note->body = trim(strip_tags($app->request->post('body'))); $note->color = trim(strip_tags($app->request->post('color'))); $note->updated = time(); if (!empty($id)) { $note->_id = new MongoId($id); } $collection->save($note); $app->redirect($app->urlFor('index')); 上面的代码整理了 POST 输入并将 'updated' 属性的值设置为当前时间。根据 POST 输入是否包含标识符,它为笔记创建一个新的 MongoDB 文档,或使用该标识符使用修改后的内容更新现有文档。
这是添加一个新笔记的示例:

第 3 步. 列出和搜索笔记
能够添加和更新笔记只是部分功能,您还需要能够列出和搜索笔记。列出它们很简单:只需更新对 /index 路线的回调,允许使用 MongoDB 客户端的 find() 方法检索集合中的所有文档,将它们交给视图并按更新日期从新到旧进行排序。
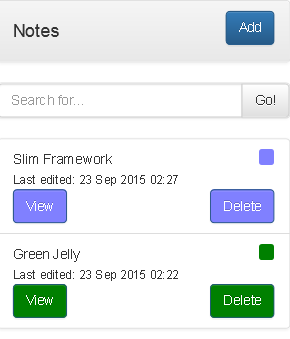
<?php // handler to list available notes in database $app->get('/index', function () use ($app, $db) { $collection = $db->notes; $notes = $collection->find()->sort(array('updated' => -1)); $app->render('index.tpl.php', array('notes' => $notes)); })->name('index'); 这是输出的示例:

如果您有大量笔记,全部列出它们有些不太实际。在理想情况下,您还想采用某种方法在笔记内容中搜索一个或多个关键词,以便可以快速找到要寻找的信息。
- 第一步是使用一个额外的搜索字段更新列表模板,如下所示:
<div class="panel panel-default"> <form method="get" action="<?php echo $this->data['baseUri']; ?>/index"> <div class="input-group"> <input type="text" name="q" class="form-control" placeholder="Search for..."> <span class="input-group-btn"> <button type="submit" class="btn btn-default">Go!</button> </span> </div> </form> </div>
- 用户在该字段中输入一个搜索词汇时,有必要修改一般性的 "find all documents" 处理程序,仅检索其
'title'或'body'属性包含与搜索词汇匹配的值的文档。这是修改后的代码:<?php // handler to list available notes in database // if query string included // filter results to match query string $app->get('/index', function () use ($app, $db) { $collection = $db->notes; $q = trim(strip_tags($app->request->get('q'))); $where = array(); if (!empty($q)) { $where = array( '$or' => array( array( 'title' => array('$regex' => new MongoRegex("/$q/i"))), array( 'body' => array('$regex' => new MongoRegex("/$q/i"))) ) ); } $notes = $collection->find($where)->sort(array('updated' => -1)); $app->render('index.tpl.php', array('notes' => $notes)); })->name('index');
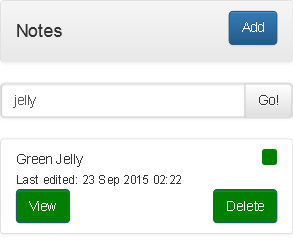
如上述代码所示,当对 /index 路线的请求包含一个查询字符串时,该处理程序将生成一个额外条件,该条件要求仅返回其标题或正文中包含该搜索词汇(表示为 PHP MongoRegex 对象)的笔记。这个额外的条件在 $where 变量中表示,它作为一个额外传输传递给 find() 方法。像之前一样将结果数据传递给该视图并显示它们。
这是它的一个实际应用示例:

第 4 步. 查看和删除笔记
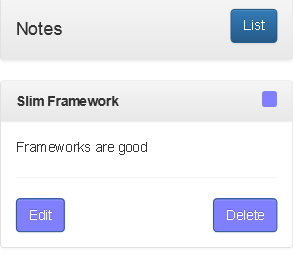
从上一幅图中可以注意到,列表中的每个笔记都包含一个 View 按钮。此按钮超链接到 /view 路线,并包含相应笔记的文档 ID 作为一个请求参数。 /view 回调处理程序仅需使用 MongoDB 客户端的 findOne() 方法从数据库获取指定的笔记并显示它,如下面的代码中所示:
<?php // handler to display specified note $app->get('/view/:id', function ($id) use ($app, $db) { $collection = $db->notes; $note = $collection->findOne(array('_id' => new MongoId($id))); $app->render('view.tpl.php', array('note' => $note)); }); 这是输出的示例:

类似地, /delete 处理程序收到一个文档 ID 作为请求参数,使用 MongoDB 客户端的 remove() 方法从数据库中删除相应的笔记。
<?php // handler to delete specified note $app->get('/delete/:id', function ($id) use ($app, $db) { $collection = $db->notes; $collection->remove(array('_id' => new MongoId($id))); $app->redirect($app->urlFor('index')); }); 第 5 步. 部署到 Bluemix
- 此刻应用程序已完成,可以部署到 Bluemix 了。首先,更新应用程序配置文件并修改数据库凭据,以便它们指向您的远程 MongoDB 数据库部署。然后,创建应用程序清单文件,记住通过附加一个随即字符串(比如您姓名的首字母)来使用唯一的主机和应用程序名称。
--- applications: - name: notes-[initials] memory: 256M instances: 1 host: notes-[initials] buildpack: https://github.com/cloudfoundry/php-buildpack.git stack: cflinuxfs2
- Cloud Foundry PHP buildpack 默认情况下不包含 PHP MongoDB 扩展,所以您必须配置该 buildpack,以便在部署期间启用此扩展。创建一个包含以下内容的 <$APP_ROOT> /.bp-config/options.json 文件:
{ "WEB_SERVER": "httpd", "PHP_EXTENSIONS": ["bz2", "zlib", "curl", "mcrypt", "mongo"] } - 您现在可以继续将应用程序推送到 Bluemix。
shell> cf api https://api.ng.bluemix.net shell> cf login shell> cf push
- 您可以浏览到应用程序清单中指定的主机(例如 http://notes- <initials> .mybluemix.net)来开始使用该应用程序。如果看到一个空白页面或其他错误,请参阅 “ 在 IBM Bluemix 上调试 PHP 错误 ” ,查明哪儿出错了。
结束语
构建受云基础架构和存储支持的桌面或移动 Web 应用程序从来没像现在这么轻松过。通过将 Bluemix PaaS 基础架构与 MongoDB、PHP、Slim 框架和 Bootstrap 相结合,您就拥有一组完整的工具来快速高效地创建、部署和扩展您自己的基于云的应用程序。
- 本文标签: API Nginx https MongoDB 标题 同步 IDE 删除 apache 代码 IBM json jquery client linux 管理 免费 root HTML git cat 开发 PaaS http update HTML5 tab CDN Select 配置 build 移动设备 下载 PHP App ip 数据库 参数 数据 主机 java GitHub 测试 js Document 安装 Developer CSS ACE web 响应式 shell find list 调试 src 目录 Google 服务器 zlib parse 贷款 Ajax Bootstrap 关键词 rewrite 时间 db tar value UI lib 云
- 版权声明: 本文为互联网转载文章,出处已在文章中说明(部分除外)。如果侵权,请联系本站长删除,谢谢。
- 本文海报: 生成海报一 生成海报二


![[HBLOG]公众号](https://www.liuhaihua.cn/img/qrcode_gzh.jpg)

