如何使用Metabrik实现恶意软件分析的自动化
在这篇文章中我们会展示如何使用Metabrik来进行恶意软件分析的自动化,使你在对Windows系统建立了一个快照之后,就可以在虚拟机上运行恶意程序了。而在本文的例子中,这个快照只包含运行进程,但是你其实可以做更多的东西。下面,我将会对 remote::wmi 、 remote::winex e和 system::virtualbox Briks进行介绍。
另外,我们也会介绍 forensic::volatility Brik,这个工具能够帮你动态分析恶意软件并提取IOC。
小知识:使用Metabrik Shell时,你可以使用<tab>键来补全Brik的名字和命令。
环境搭建
wmic和winexe需要你自己进行编译,幸运的是,Metabrik简化了这个过程你只需要运行命令即可完成。由于wmic和winexe源自同一软件套件,你只需要运行remote::wmi和remote::winexe的其中一个安装命令。这里我认为你应该已经安装了VitualBox的虚拟机所以并没有运行system::virtualbox Brik的安装命令。
use brik::tool use remote::wmi use remote::winexe use forensic::volatility help remote::wmi help remote::winexe help forensic::volatility run brik::tool install_needed_packages remote::wmi run brik::tool install_needed_packages remote::volatility

你的虚拟机需要配置来允许指定用户的WMI接入,并启动WINEXESVC服务。可以在remote::wmi和remote::winexe Briks的源码中找到一些使用帮助。
启动虚拟机并建一个快照
我们的环境已经建立起来了,让我们在执行恶意软件之前建立一个快照。为了达到练习的目的,恶意软件只是简单的calc.exe程序。
use system::virtualbox help system::virtualbox run system::virtualbox list
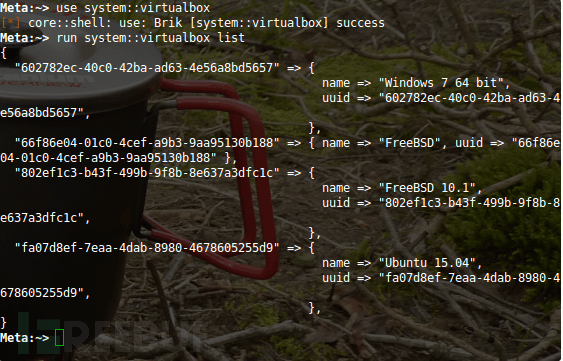
让我们在headless模式(BISO下的一种无IO模式)下启动windows机器:(这里我就不介绍GUI相关的东西了)
set system::virtualbox type headless run system::virtualbox start 602782ec-40c0-42ba-ad63-4e56a8bd5657 run system::virtualbox snapshot_live 602782ec-40c0-42ba-ad63-4e56a8bd5657 "before calc.exe"
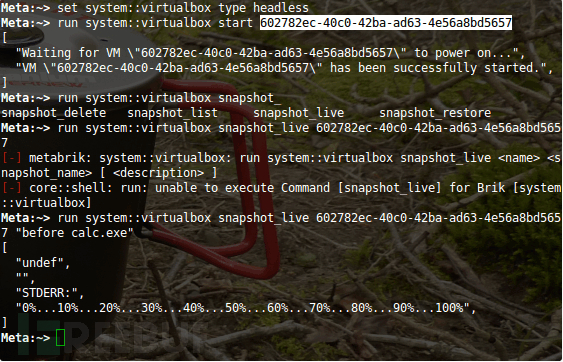
这里我已经知道了机器的IP地址,不过由于 network::arp Brik的存在你可以通过在vboxnet0接口上进行ARP扫描来获得IP地址。
my $win = '192.168.56.101' my $user = 'Administrator' my $password = 'YOUR_SECRET' set remote::wmi host $win set remote::wmi user $user set remote::wmi password $password set remote::winexe host $win set remote::winexe user $user set remote::winexe password $password run remote::wmi get_win32_process for (@$RUN) { print $_->{Name}."/n"; } 现在你可以看到calc.exe程序了。
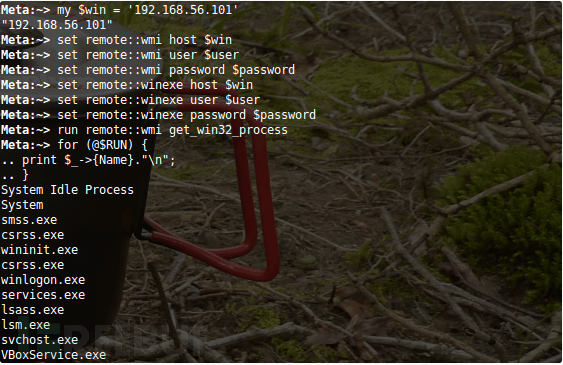
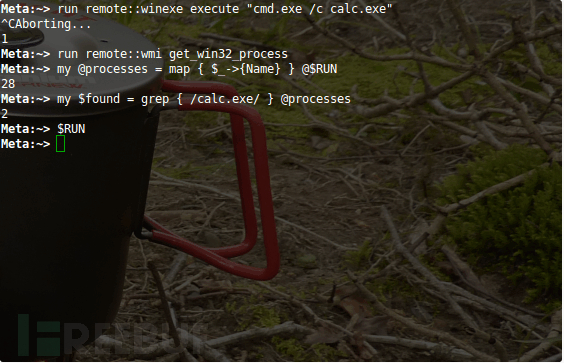
启动calc.exe程序并在进程列表找查找它。由于程序会阻塞在这里,你可以使用Ctrl+C组合按键来跳出,但是calc.exe会继续在远程主机上运行。
run remote::winexe execute "cmd.exe /c calc.exe" run remote::wmi get_win32_process my @processes = map { $_->{Name} } @$RUN my $found = grep { /calc.exe/ } @processes 在下面的截屏中,你会看到grep出来的两个结果, 其实是因为在测试时运行了两次执行命令。
现在我们将虚拟机恢复到默认状态,此时calc.exe恶意软件还没有运行。
run system::virtualbox stop 602782ec-40c0-42ba-ad63-4e56a8bd5657 run system::virtualbox snapshot_restore 602782ec-40c0-42ba-ad63-4e56a8bd5657 "before calc.exe" run system::virtualbox start 602782ec-40c0-42ba-ad63-4e56a8bd5657 run remote::wmi get_win32_process my @processes = map { $_->{Name} } @$RUN my $found = grep { /calc.exe/ } @processes 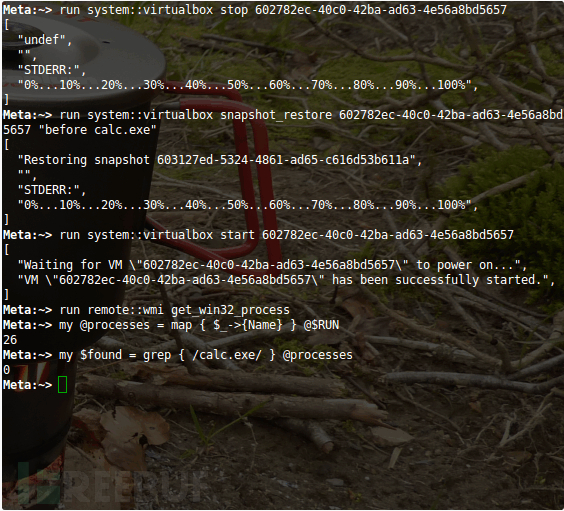
没有calc.exe进程。
关于Volatility
从这里开始将变得十分有趣,你可以使用Volatility来做同样的进程分析。要使用Volatility需要dump出系统内存,而获得dump内存需要使用system::virtualbox的bumpguestcore命令。然后你还要使用extract_memdump_from_dumpguestcore命令从dump内存中提取生成核心文件的部分。
接下来你就可以对dump的内存进行深入分析了,例如查找calc.exe是否被弹出。如果你回顾原始的恶意软件分析过程,你会发现Volatility这个工具能够校验刚刚用remote::winexe Brik执行恶意软件的过程。这个方法是从恶意软件中提取IOC完美的工具结合。
run system::virtualbox dumpguestcore 602782ec-40c0-42ba-ad63-4e56a8bd5657 dump.core run system::virtualbox extract_memdump_from_dumpguestcore dump.core dump.volatility

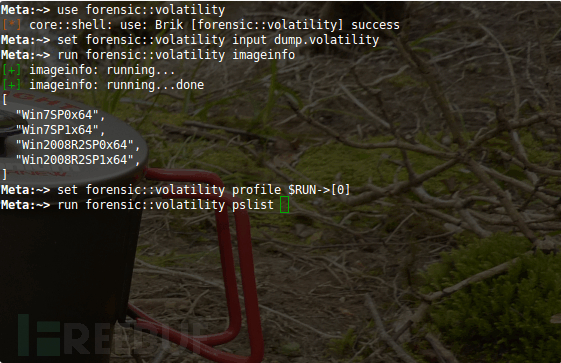
我们已经使用Volatility工具dump出一些有用的东西了。让我们用 forensic::volatility Brik进行深入挖掘。
use forensic::volatility set forensic::volatility input dump.volatility run forensic::volatility imageinfo set forensic::volatility profile $RUN->[0]

WINEXESVC的特征:获得windows的远程shell
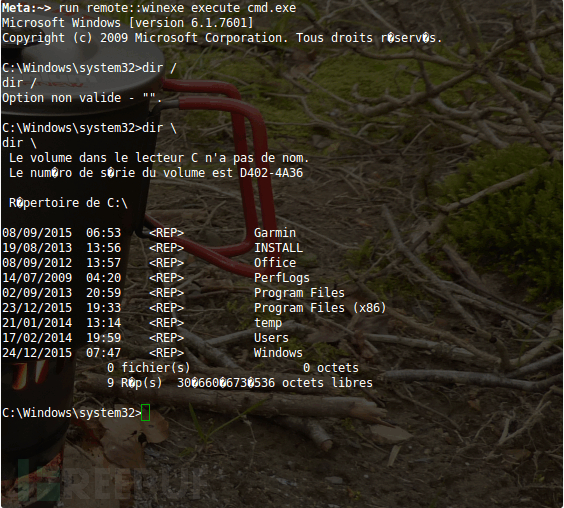
最后一张截图展示了remote::winexe Brik如何获得远程windows shell。
run remote::winexe execute cmd.exe
结论
我们可以看到使用Briks的工具组合可以很容易的分析windows下的恶意软件。而将不同工具(VirtualBox,winexe,Volatility)的特征组合在一起,可以分析恶意软件在机器上的运行序列。如果你想要找到恶意样本到底如何影响你的系统提取恶意软件的IOC是很有用的,接下来你可以使用remote::wmi Brik在网络中扫描这些特征。
提取IOC本身是一个很大的课题,所以我们只是用虚拟机的”scapegoat”命令简单的提取一些数据。除此之外提取IOC还可以使用静态分析,但那又是完全不同的体系了。
最后我非常建议你试试Volatility(当然还有Metabrik),你会看到它到底有多强大。
*原文链接: metabrik ,转载请注明来自FreeBuf黑客与极客(FreeBuf.COM)


![[HBLOG]公众号](https://www.liuhaihua.cn/img/qrcode_gzh.jpg)

