React Native开发初探

Facebook在React.js Conf 2015大会(2015.3.26)上开源了React Native。最开始只支持iOS,2015年9月15日发布了React Native for Android,至此React Native支持主流的两大平台(iOS和Android)。
新事物的出现,都会引发行业的热烈讨论,自React Native发布起,一直都是热门的讨论话题。React Native的出现在一定程度上解决了我们目前在移动开发上面临的问题。我们身处在移动互联网的黄金时代,越来越多的业务移植到移动端。我们都清楚,原生的APP开发是需要一定的门槛的,这就导致了市场需求大,而相关的开发人员稀缺的问题。相比较而言,React Native采用的开发语言是JavaScript,相关的开发者也就比较多。
如果你是一个原生APP的开发者,React Native的出现会帮你打开一扇门,会让你发掘开发中的更多可能性(比如跨平台开发、动态更新等等)。如果你是使用JavaScript的开发者,它的出现无疑会带来巨大的影响,会有越来越多的前端开发人员投入到移动APP开发的领域。
本文主要是介绍React Native在本人开发中的一些实践,React Native的详细使用是一个很庞大的话题,本文不会详细介绍,建议仔细阅读官方的文档和示例程序。
React Native背景
What we really want is the user experience of the native mobile platforms, combined with the developer experience we have when building with React on the web.
上面的这段话摘自 《Introducing React Native》 ,加粗的关键字传达了React Native的设计理念:既拥有Native的用户体验,又保留React的开发效率。这个理念迎合了业界普遍存在的痛点,开源不到一周github star过万,目前是26162(2016/01/22)。

It’s worth noting that we’re not chasing “ write once, run anywhere. ” Different platforms have different looks, feels, and capabilities, and as such, we should still be developing discrete apps for each platform, but the same set of engineers should be able to build applications for whatever platform they choose, without needing to learn a fundamentally different set of technologies for each. We call this approach “ learn once, write anywhere .”
上面的这段话也是摘自 《Introducing React Native》 ,在软件开发中最理想的情况是像Java这样“write once, run anywhere”,但是不同的平台有不同的用户体验(looks, feels, and capabilities),过分要求应用在不同的平台上的一致性是不太合适的。React Native提出了一种理念,learn once, write anywhere, 可以在不同平台上编写基于React的代码。
开发环境配置
1.需要一台Mac(OSX),上面要安装Xcode(建议Xcode7及以上的版本),Xcode可以在Mac App Store下载
2.安装Homebrew,后面安装Watchman和Flow推荐使用Homebrew安装
ruby -e "$(curl -fsSL https://raw.githubusercontent.com/Homebrew/install/master/install)"
如果之前安装过Homebrew,可以先更新下:
brew update && brew upgrade
3.安装node.js
(1)安装nvm(Node Version Manager)
curl -o- https://raw.githubusercontent.com/creationix/nvm/v0.30.2/install.sh | bash
(2)安装最新版本的Node.js
nvm install node && nvm alias default node
当然可以直接到Node.js官网下载dmg文件直接安装,下载地址是 https://nodejs.org/download/
4.建议安装watchman:
brew install watchman
5.安装flow:
brew install flow
ok,按照以上步骤,你应该已经配置好了环境。
在现有项目中集成
1.CocoaPods
推荐使用CocoaPods的方式进行集成,如果没有使用过,可以参考 《使用CocoaPods管理iOS项目中的依赖库》 这篇文章安装配置。
2.安装react-native package
react native现在使用npm的方式进行安装
(1)如果没有安装Node.js,需要按照前面的方式进行安装
(2)安装完Node.js之后再项目根目录(.xcodeproj文件所在目录)下执行 npm install react-native 的命令,执行完成之后会创建一个node_modules的文件夹。
3.修改Podfile配置
在项目根目录下的Podfile(如果没有该文件可以使用pod init命令生成)文件中加入如下代码:
pod 'React', :path => './node_modules/react-native', :subspecs => [ 'Core', 'RCTImage', 'RCTNetwork', 'RCTText', 'RCTWebSocket', #添加其他需要的subspecs ] 如果你在项目中使用了 <Text> 的组件,那么你必须添加 RCTText 的subspecs。配置完成之后执行 pod install 即可。
4.编写React Native代码
(1)在项目的根目录创建存放React Native代码的目录:
mkdir ReactComponent(2)新建一个示例的index.ios.js的代码
touch ReactComponent/index.ios.jsindex.ios.js文件内容,示例如下:
'use strict'; var React = require('react-native'); var { Text, View } = React; var styles = React.StyleSheet.create({ container: { flex: 1, backgroundColor: 'red' } }); class SimpleApp extends React.Component { render() { return ( <View style={styles.container}> <Text>This is a simple application.</Text> </View> ) } } React.AppRegistry.registerComponent('SimpleApp', () => SimpleApp); SimpleApp 即为你的Module Name,在后面会使用到。
5.在项目中加载React Native代码
React Native不是通过UIWebView的方式进行代码的加载,而是使用了 RCTRootView 自定义的组件。RCTRootView提供了一个初始化的方法,支持在初始化视图组件的时候加载React的代码。
- (instancetype)initWithBundleURL:(NSURL *)bundleURL moduleName:(NSString *)moduleName initialProperties:(NSDictionary *)initialProperties launchOptions:(NSDictionary *)launchOptions;使用方式如下:
NSURL *jsCodeLocation = [NSURL URLWithString:@"http://localhost:8081/index.ios.bundle?platform=ios"]; RCTRootView *rootView = [[RCTRootView alloc] initWithBundleURL:jsCodeLocation moduleName: @"SimpleApp" initialProperties:nil launchOptions:nil]; [self.view addSubview:rootView]; rootView.frame = self.view.bounds; 需要指出的是在初始化的时候支持通过URL的方式进行加载,上面的方法是在线的服务器地址使用在发布环境下替换localhost为正式服务器的地址,另外一个是Bundle的路径地址,示例如下:
NSURL *jsCodeLocation = [[NSBundle mainBundle] URLForResource:@"main" withExtension:@"jsbundle"];为了生成jsbundle文件,可以通过下面的命令:
curl http://localhost:8081/index.ios.bundle -o main.jsbundle
6.启动Development Server
终端进入项目所在根目录,执行下面的代码
(JS_DIR=`pwd`/ReactComponent; cd node_modules/react-native; npm run start -- --root $JS_DIR) 启动完成之后可以通过: http://localhost:8081/index.ios.bundle 进行调用
Native和React的交互
关于React Native的通信机制,这里不再介绍,推荐两篇文章:
1. 《React Native通信机制详解》
2. 《React Native 初探(iOS)》
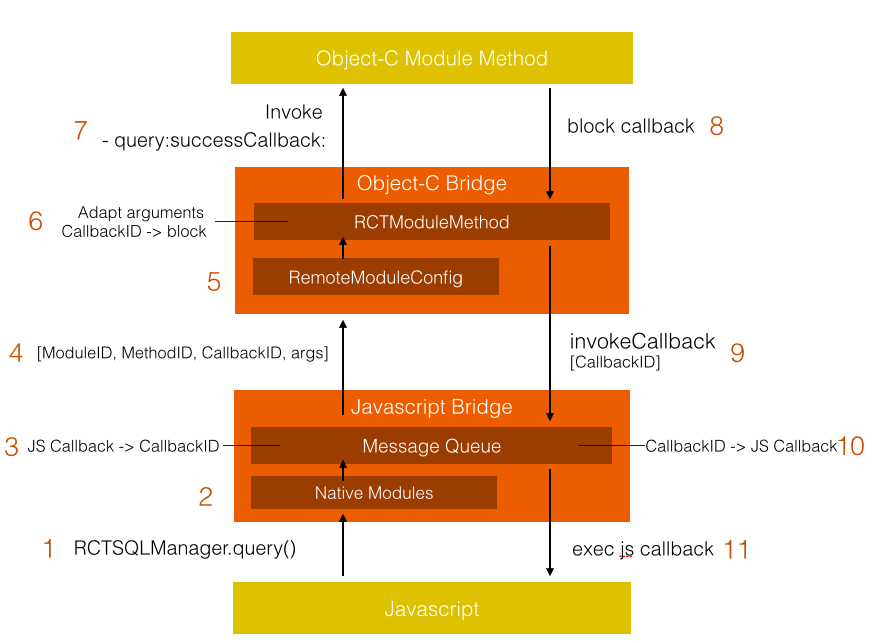
通信的流程图如下:

React Native中JavaScript和Native之间交互是同Module的方式进行的。Module是一个实现RCTBridgeModule协议的普通Objective-C的类,示例如下:
在.h文件中实现 RCTBridgeModule 的协议,示例如下:
//CalendarManager.h #import "RCTBridgeModule.h" @interface CalendarManager : NSObject <RCTBridgeModule> @end 在.m文件中声明是Module,添加 RCT_EXPORT_MODULE 的标记,示例如下:
// CalendarManager.m @implementation CalendarManager RCT_EXPORT_MODULE(); @end1.JavaScript调用Native Method
(1)Native的Module中使用RCT_EXPORT_METHOD()标记方法:
RCT_EXPORT_METHOD(addEvent:(NSString *)name location:(NSString *)location) { RCTLogInfo(@"Pretending to create an event %@ at %@", name, location); }(2)在JavaScript代码中使用
var CalendarManager = require('react-native').NativeModules.CalendarManager; CalendarManager.addEvent('Birthday Party', '4 Privet Drive, Surrey');2.Native发送Events –> JavaScript
在西北督查中心项目表单的填写页面上右上角放了一个提交按钮,点击提交按钮后iOS的Objective-C会向React的Javascript代码发送消息,代码示例如下:
NSDictionary *parameters = @{@"data":@"hello"}; [self.rootView.bridge.eventDispatcher sendDeviceEventWithName:@"DemoEventName" body:parameters];JavaScript端的处理代码如下:
var subscription; //在组件mount的时候注册 subscription = DeviceEventEmitter.addListener('DemoEventName', (data) => { //todo something }); //在组件unmount的时候移除 subscription.remove();更多用法请参考官方文档中关于Native Modules的介绍 《Native Modules》
参考资料
1. 《React Native官方文档》
2. 《React Native概述:背景、规划和风险》
3. 《React Native 中组件的生命周期》
4. 《React-Native入门指南》


![[HBLOG]公众号](https://www.liuhaihua.cn/img/qrcode_gzh.jpg)

