sqlite作为轻量型数据库,也就是一个.db文件,使用起来非常方便。下面简单介绍下数据库常用的增删改查操作。
首先布局文件:
[java]view plain
copy
print?


- <!--?xml version="1.0" encoding="utf-8"?>
- <linearlayout xmlns:android="http://schemas.android.com/apk/res/android"</linearlayout xmlns:android=
- android:layout_width="match_parent"
- android:layout_height="match_parent"
- android:orientation="vertical" >
-
- <button </button <>
- android:layout_width="match_parent"
- android:layout_height="wrap_content"
- android:id="@+id/createdatabase"
- android:text="创建数据库" />
-
- <button </button <>
- android:layout_width="match_parent"
- android:layout_height="wrap_content"
- android:id="@+id/insert"
- android:text="插入数据" />
-
- <button </button <>
- android:layout_width="match_parent"
- android:layout_height="wrap_content"
- android:id="@+id/query"
- android:text="查询并显示数据" />
- <button </button <>
- android:layout_width="match_parent"
- android:layout_height="wrap_content"
- android:id="@+id/update"
- android:text="更新数据" />
- <button </button <>
- android:layout_width="match_parent"
- android:layout_height="wrap_content"
- android:id="@+id/delete"
- android:text="删除数据" />
- <textview </textview <>
- android:id="@+id/text"
- android:layout_width="wrap_content"
- android:layout_height="30dp"
- android:text="显示数据" />
-
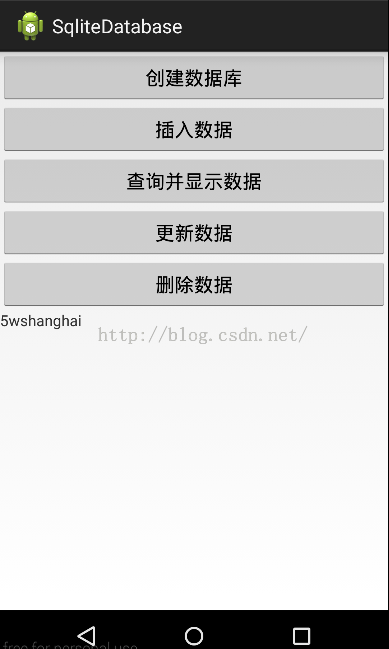
效果:

借助SQLiteOpenHelper创建数据库,创建了一张表worker(id,name,adress),可以指定id为主键:id integer primary key,还可以指定自动增长,再加上autoincrement就行了。简单的说明下sqlite中常用数据类型,integer表示整型,text表示文本类型,real表示浮点型,blob表示二进制类型。
[java]view plain
copy
print?


- public class myDatabaseAdapter extends SQLiteOpenHelper{
-
- private final String CREATE_TABLE_A = "create table worker(" + "id integer," + "name text," + "adress text)";
- public myDatabaseAdapter(Context context, String name,CursorFactory factory, int version) {
- super(context, name,factory, version);
- // TODO 自动生成的构造函数存根
- }
-
- @Override
- public void onCreate(SQLiteDatabase db) {
- // TODO 自动生成的方法存根
- db.execSQL(CREATE_TABLE_A);
- }
- @Override
- public void onUpgrade(SQLiteDatabase db, int oldVersion, int newVersion) {
- // TODO 自动生成的方法存根
-
- }
- }
MainActivity.java: [java]view plain
copy
print?


- public class MainActivity extends Activity implements OnClickListener{
-
- private String DB_NAME = "lios";
- private Button buttoncreate;
- private Button insert;
- private Button query;
- private Button update;
- private Button delete;
- private TextView text;
- private SQLiteDatabase db;
- private myDatabaseAdapter dbHelper;
-
- @Override
- protected void onCreate(Bundle savedInstanceState) {
- super.onCreate(savedInstanceState);
- setContentView(R.layout.activity_main);
-
- buttoncreate = (Button)findViewById(R.id.createdatabase);
- insert = (Button)findViewById(R.id.insert);
- query = (Button)findViewById(R.id.query);
- update = (Button)findViewById(R.id.update);
- delete = (Button)findViewById(R.id.delete);
- text = (TextView)findViewById(R.id.text);
- dbHelper= new myDatabaseAdapter(this,DB_NAME,null,1);
- buttoncreate.setOnClickListener(this);
- insert.setOnClickListener(this);
- query.setOnClickListener(this);
- update.setOnClickListener(this);
- delete.setOnClickListener(this);
-
- }
- public void onClick(View v) {
- // TODO 自动生成的方法存根
- switch (v.getId()) {
- case R.id.createdatabase:
-
- db = dbHelper.getWritableDatabase();
- break;
- case R.id.insert:
- SQLiteDatabase db1 = dbHelper.getWritableDatabase();
- db1.execSQL("insert into worker (id,name,adress) values (?,?,?)",new String[]{"1","w","shanghai"});
- /* ContentValues values = new ContentValues();
- values.put("id",1);
- values.put("name","w");
- values.put("adress", "shanghai");
- db1.insert("worker",null, values);
- values.clear();
- values.put("id",3);
- values.put("name","d");
- values.put("adress", "shanghai");
- db1.insert("worker",null, values);*/
- break;
- case R.id.query:
- SQLiteDatabase db2 = dbHelper.getWritableDatabase();
- Cursor cursor = db2.rawQuery("select * from worker",null);
- if(cursor.moveToFirst()){
- int id = cursor.getInt(cursor.getColumnIndex("id"));
- String name = cursor.getString(cursor.getColumnIndex("name"));
- Log.d("name",name);
- String adress = cursor.getString(cursor.getColumnIndex("adress"));
- text.setText(id+name+adress);
- }
- cursor.close(); //关闭游标
- break;
- case R.id.update:
- SQLiteDatabase db3 = dbHelper.getWritableDatabase();
- db3.execSQL("update worker set id =? where name =?",new String[]{"5","w"});
- Toast.makeText(this,"数据已更改",Toast.LENGTH_SHORT).show();;
- break;
- case R.id.delete:
- SQLiteDatabase db4 = dbHelper.getWritableDatabase();
- db4.execSQL("delete from worker where adress = ?",new String[]{"beijing"});
- break;
- default:
- break;
- }
-
-
- }
-
- public void onDestory(){
-
- db.close();
- }
-
- }
简单的分析上面代码,由于自己喜欢写sql语句,所以上面就直接写sql语句了,也可以用sqlite提供的方法进行操作。注意我们进行CRUD操作,都是借助SQLiteDatabase对象来进行操作,而SQLiteOpenHelper抽象类中有方法getWritableDatabase()可以获得SQLiteDatabase对象: [java]view plain
copy
print?


- <pre name=SQLiteDatabase getWritableDatabase() { </pre name=<>
- synchronized (this) {
- return getDatabaseLocked(true);
- }
- }
或者用
SQLiteOpenHelper抽象类中getReadableDatabase()方法来获取:
[java]view plain
copy
print?


- public SQLiteDatabase getReadableDatabase() {
- synchronized (this) {
- return getDatabaseLocked(false);
- }
- }
为了看的更清楚,给出getDatabaseLocked()函数部分,详细请阅读源码。
[java]view plain
copy
print?


- private SQLiteDatabase getDatabaseLocked(boolean writable) {
- if (mDatabase != null) {
- if (!mDatabase.isOpen()) {
- // Darn! The user closed the database by calling mDatabase.close().
- mDatabase = null;
- } else if (!writable || !mDatabase.isReadOnly()) {
- // The database is already open for business.
- return mDatabase;
- }
- }
- .....
- .....
其中getWritableDatabase() 方法以读写方式打开数据库,一旦数据库的磁盘空间满了,数据库就只能读而不能写,倘若使用的是getWritableDatabase() 方法就会出错。
而getReadableDatabase()方法则是先以读写方式打开数据库,如果数据库的磁盘空间满了,就会打开失败,当打开失败后会继续尝试以只读方式打开数据库。如果该问题成功解决,则只读数据库对象就会关闭,然后返回一个可读写的数据库对象。


![[HBLOG]公众号](https://www.liuhaihua.cn/img/qrcode_gzh.jpg)

