从源代码看 ObjC 中消息的发送
关注仓库,及时获得更新: iOS-Source-Code-Analyze
因为 ObjC 的 runtime 只能在 Mac OS 下才能编译,所以文章中的代码都是在 Mac OS,也就是 x86_64 架构下运行的,对于在 arm64 中运行的代码会特别说明。
写在前面
如果你点开这篇文章,相信你对 Objective-C 比较熟悉,并且有多年使用 Objective-C 编程的经验,这篇文章会假设你知道:
- 在 Objective-C 中的“方法调用”其实应该叫做消息传递
-
[receiver message]会被翻译为objc_msgSend(receiver, @selector(message)) - 在消息的响应链中 可能 会调用
- resolveInstanceMethod:- forwardInvocation:等方法 -
关于选择子 SEL 的知识
如果对于上述的知识不够了解,可以看一下这篇文章 Objective-C Runtime ,但是其中关于
objc_class的结构体的代码已经过时了,不过不影响阅读以及理解。 -
方法在内存中存储的位置, 深入解析 ObjC 中方法的结构
文章中不会刻意区别方法和函数、消息传递和方法调用之间的区别。
-
能翻墙(会有一个 Youtube 的链接)
概述
关于 Objective-C 中的消息传递的文章真的是太多了,而这篇文章又与其它文章有什么不同呢?
由于这个系列的文章都是对 Objective-C 源代码的分析,所以会 从 Objective-C 源代码中分析并合理地推测一些关于消息传递的问题 。

关于 @selector() 你需要知道的
因为在 Objective-C 中,所有的消息传递中的“消息“都会被转换成一个 selector 作为 objc_msgSend 函数的参数:
[object hello] -> objc_msgSend(object, @selector(hello)) 这里面使用 @selector(hello) 生成的选择子 SEL 是这一节中关注的重点。
我们需要预先解决的问题是:使用 @selector(hello) 生成的选择子,是否会因为类的不同而不同?各位读者可以自己思考一下。
先放出结论:使用 @selector() 生成的选择子不会因为类的不同而改变,其内存地址在编译期间就已经确定了。也就是说 向不同的类发送相同的消息时,其生成的选择子是完全相同的 。
XXObject *xx = [[XXObject alloc] init] YYObject *yy = [[YYObject alloc] init] objc_msgSend(xx, @selector(hello)) objc_msgSend(yy, @selector(hello)) 接下来,我们开始验证这一结论的正确性,这是程序主要包含的代码:
// XXObject.h #import <Foundation/Foundation.h> @interface XXObject : NSObject - (void)hello; @end // XXObject.m #import "XXObject.h" @implementation XXObject - (void)hello { NSLog(@"Hello"); } @end // main.m #import <Foundation/Foundation.h> #import "XXObject.h" int main(int argc, const char * argv[]) { @autoreleasepool { XXObject *object = [[XXObject alloc] init]; [object hello]; } return 0; } 在主函数任意位置打一个断点, 比如 -> [object hello]; 这里,然后在 lldb 中输入:
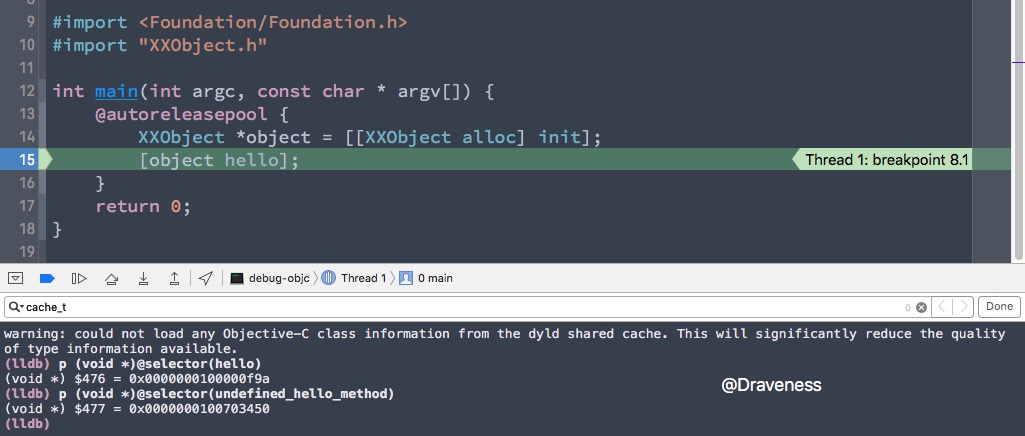
这里面我们打印了两个选择子的地址 @selector(hello) 以及 @selector(undefined_hello_method) ,需要注意的是:
@selector(hello) 是在编译期间就声明的选择子,而后者在编译期间并不存在, undefined_hello_method 选择子由于是在运行时生成的,所以内存地址明显比 hello 大很多
如果我们修改程序的代码:
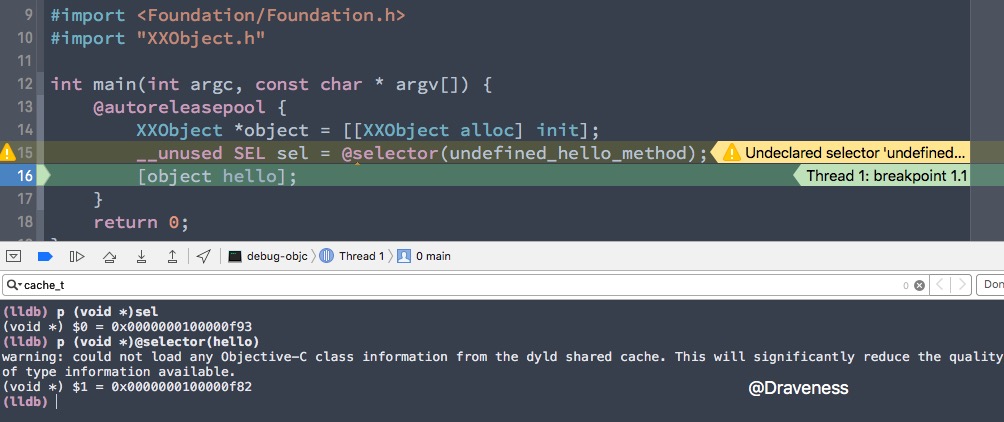
在这里,由于我们在代码中显示地写出了 @selector(undefined_hello_method) ,所以在 lldb 中再次打印这个 sel 内存地址跟之前相比有了很大的改变。
更重要的是,我没有通过指针的操作来获取 hello 选择子的内存地址,而只是通过 @selector(hello) 就可以返回一个选择子。
从上面的这些现象,可以推断出选择子有以下的特性:
- Objective-C 为我们维护了一个巨大的选择子表
- 在使用
@selector()时会从这个选择子表中根据选择子的名字查找对应的SEL。如果没有找到,则会生成一个SEL并添加到表中 - 在编译期间会扫描全部的头文件和实现文件将其中的方法以及使用
@selector()生成的选择子加入到选择子表中
在运行时初始化之前,打印 hello 选择子的的内存地址:

message.h 文件
Objective-C 中 objc_msgSend 的实现并没有开源,它只存在于 message.h 这个头文件中。
/** * @note When it encounters a method call, the compiler generates a call to one of the * functions /c objc_msgSend, /c objc_msgSend_stret, /c objc_msgSendSuper, or /c objc_msgSendSuper_stret. * Messages sent to an object’s superclass (using the /c super keyword) are sent using /c objc_msgSendSuper; * other messages are sent using /c objc_msgSend. Methods that have data structures as return values * are sent using /c objc_msgSendSuper_stret and /c objc_msgSend_stret. */ OBJC_EXPORT id objc_msgSend(id self, SEL op, ...) 在这个头文件的注释中对 消息发送的一系列方法 解释得非常清楚:
当编译器遇到一个方法调用时,它会将方法的调用翻译成以下函数中的一个 objc_msgSend 、 objc_msgSend_stret 、 objc_msgSendSuper 和 objc_msgSendSuper_stret 。 发送给对象的父类的消息会使用 objc_msgSendSuper 有数据结构作为返回值的方法会使用 objc_msgSendSuper_stret 或 objc_msgSend_stret 其它的消息都是使用 objc_msgSend 发送的
在这篇文章中,我们只会对 消息发送的过程 进行分析,而不会对 上述消息发送方法的区别 进行分析,默认都使用 objc_msgSend 函数。
objc_msgSend 调用栈
这一小节会以向 XXObject 的实例发送 hello 消息为例,在 Xcode 中观察整个消息发送的过程中调用栈的变化,再来看一下程序的代码:
// XXObject.h #import <Foundation/Foundation.h> @interface XXObject : NSObject - (void)hello; @end // XXObject.m #import "XXObject.h" @implementation XXObject - (void)hello { NSLog(@"Hello"); } @end // main.m #import <Foundation/Foundation.h> #import "XXObject.h" int main(int argc, const char * argv[]) { @autoreleasepool { XXObject *object = [[XXObject alloc] init]; [object hello]; } return 0; } 在调用 hello 方法的这一行打一个断点,当我们尝试进入(Step in)这个方法只会直接跳入这个方法的实现,而不会进入 objc_msgSend :

因为 objc_msgSend 是一个私有方法,我们没有办法进入它的实现,但是,我们却可以在 objc_msgSend 的调用栈中“截下”这个函数调用的过程。
调用 objc_msgSend 时,传入了 self 以及 SEL 参数。
既然要执行对应的方法,肯定要寻找选择子对应的实现。
在 objc-runtime-new.mm 文件中有一个函数 lookUpImpOrForward ,这个函数的作用就是查找方法的实现,于是运行程序,在运行到 hello 这一行时,激活 lookUpImpOrForward 函数中的断点。

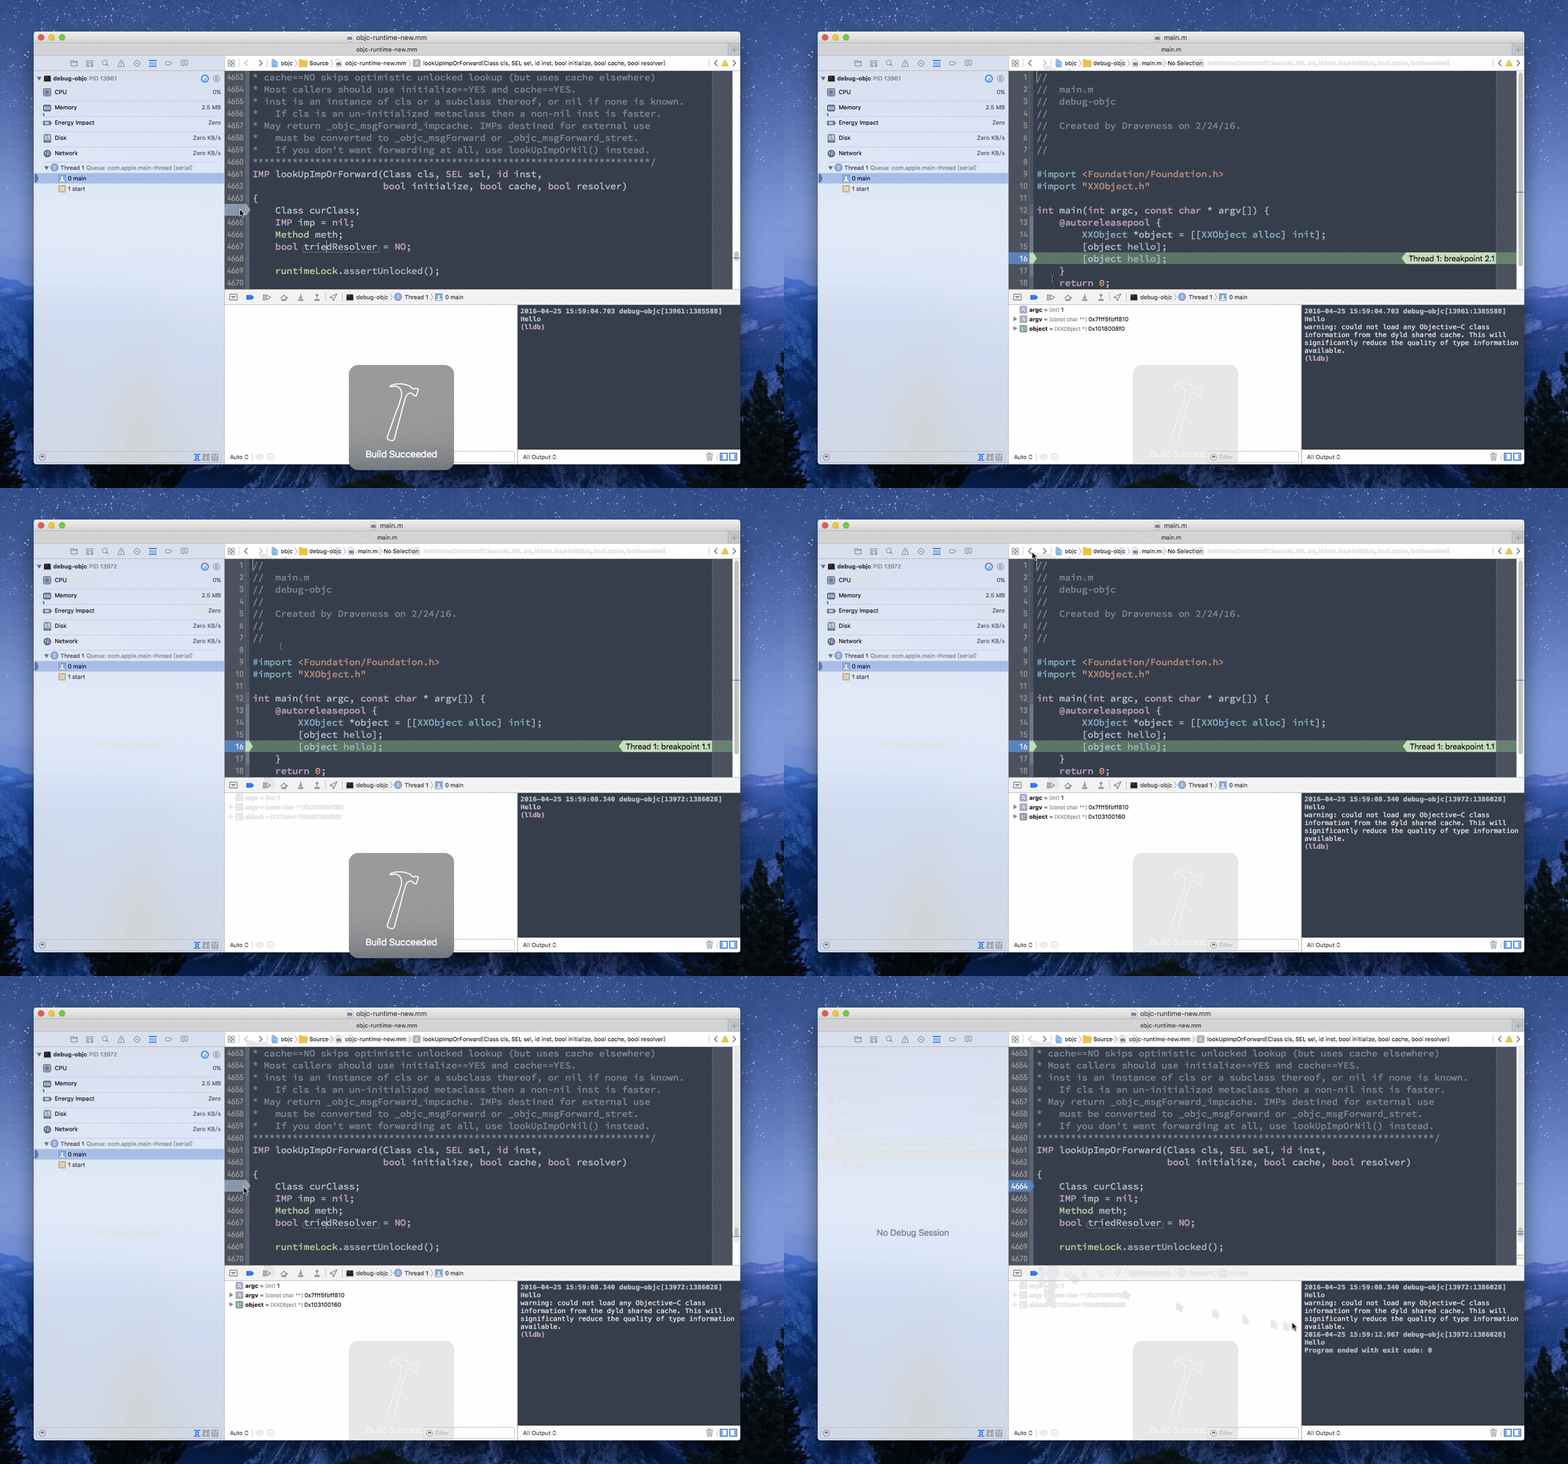
由于转成 gif 实在是太大了,笔者试着用各种方法生成动图,然而效果也不是很理想,只能贴一个 Youtube 的视频链接,不过对于能够翻墙的开发者们,应该也不是什么问题吧(手动微笑)
如果跟着视频看这个方法的调用栈有些混乱的话,也是正常的。在下一个节中会对其调用栈进行详细的分析。
解析 objc_msgSend
对 objc_msgSend 解析总共分两个步骤,我们会向 XXObject 的实例发送两次 hello 消息,分别模拟无缓存和有缓存两种情况下的调用栈。
无缓存
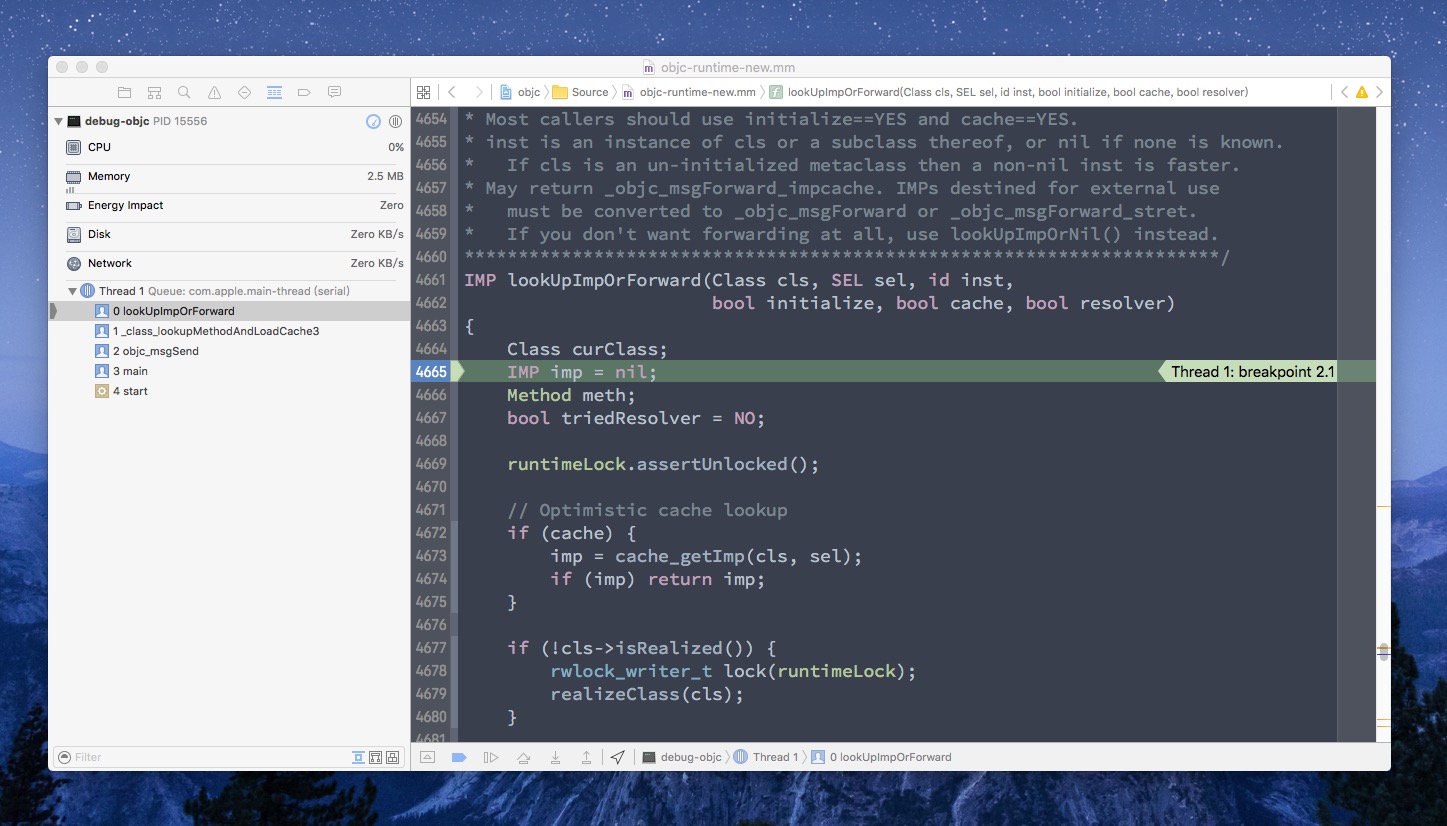
在 -> [object hello] 这里增加一个断点, 当程序运行到这一行时 ,再向 lookUpImpOrForward 函数的第一行添加断点,确保是捕获 @selector(hello) 的调用栈,而不是调用其它选择子的调用栈。
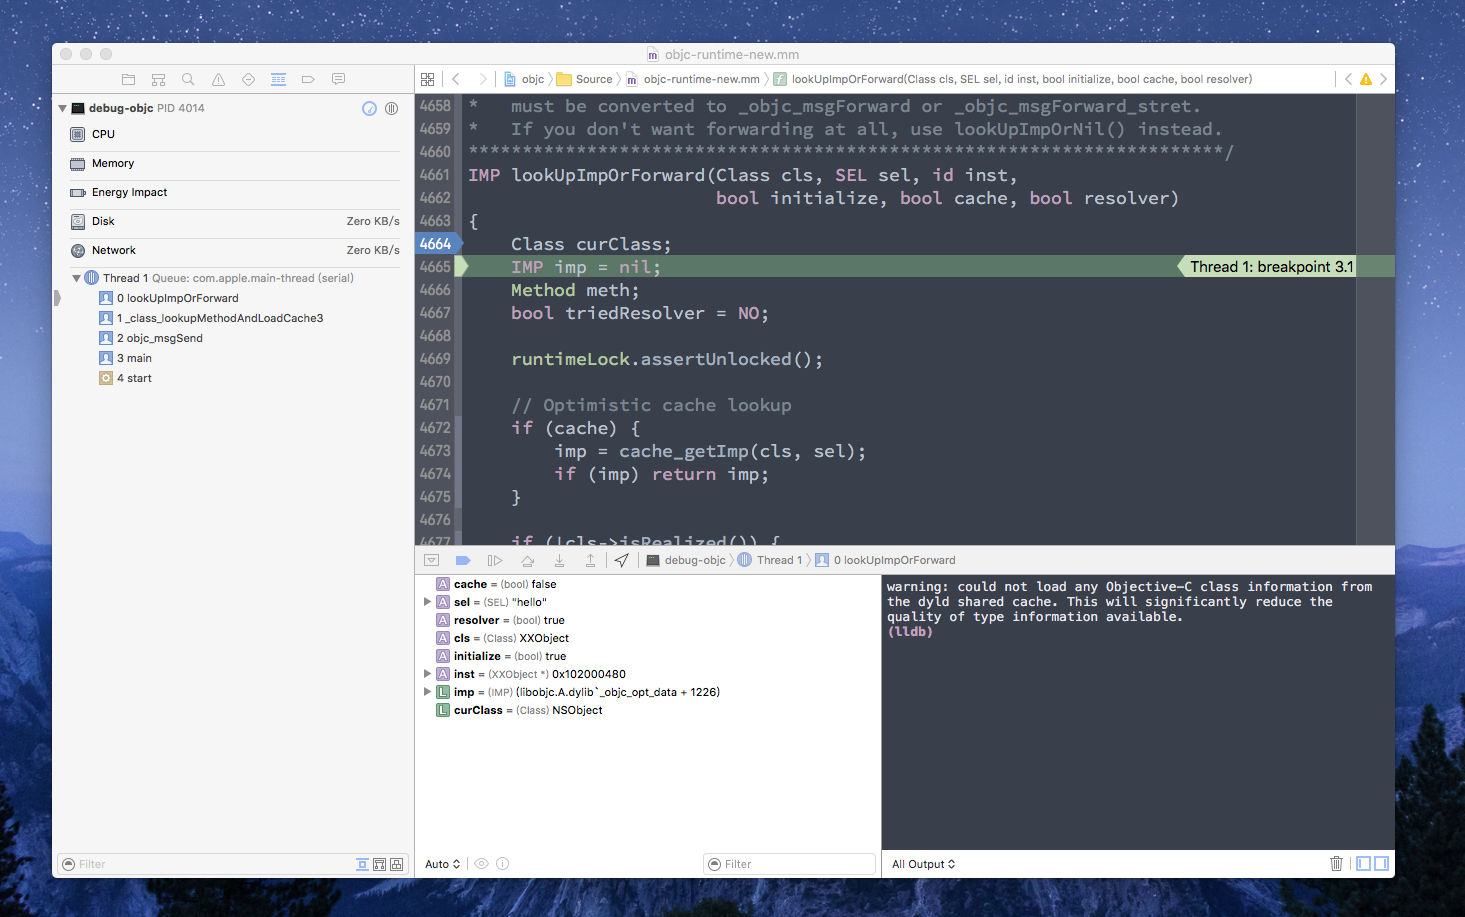
由图中的变量区域可以了解,传入的选择子为 "hello" ,对应的类是 XXObject 。所以我们可以确信这就是当调用 hello 方法时执行的函数。在 Xcode 左侧能看到方法的调用栈:
0 lookUpImpOrForward 1 _class_lookupMethodAndLoadCache3 2 objc_msgSend 3 main 4 start 调用栈在这里告诉我们: lookUpImpOrForward 并不是 objc_msgSend 直接调用的,而是通过 _class_lookupMethodAndLoadCache3 方法:
IMP _class_lookupMethodAndLoadCache3(id obj, SEL sel, Class cls) { return lookUpImpOrForward(cls, sel, obj, YES/*initialize*/, NO/*cache*/, YES/*resolver*/); } 这是一个 仅提供给派发器(dispatcher) 用于方法查找的函数,其它的代码都应该使用 lookUpImpOrNil() (不会进行方法转发)。 _class_lookupMethodAndLoadCache3 会传入 cache = NO 避免在 没有加锁 的时候对缓存进行查找,因为派发器已经做过这件事情了。
实现的查找 lookUpImpOrForward
由于实现的查找方法 lookUpImpOrForward 涉及很多函数的调用,所以我们将它分成以下几个部分来分析:
- 无锁的缓存查找
- 如果类没有实现(isRealized)或者初始化(isInitialized),实现或者初始化类
- 加锁
- 缓存以及当前类中方法的查找
- 尝试查找父类的缓存以及方法列表
- 没有找到实现,尝试方法解析器
- 进行消息转发
- 解锁、返回实现
无锁的缓存查找
下面是在没有加锁的时候对缓存进行查找,提高缓存使用的性能:
runtimeLock.assertUnlocked(); // Optimistic cache lookup if (cache) { imp = cache_getImp(cls, sel); if (imp) return imp; } 不过因为 _class_lookupMethodAndLoadCache3 传入的 cache = NO ,所以这里会直接跳过 if 中代码的执行,在 objc_msgSend 中已经使用汇编代码查找过了。
类的实现和初始化
在 Objective-C 运行时 初始化的过程中会对其中的类进行第一次初始化也就是执行 realizeClass 方法,为类分配可读写结构体 class_rw_t 的空间,并返回正确的类结构体。
而 _class_initialize 方法会调用类的 initialize 方法,我会在之后的文章中对类的初始化进行分析。
if (!cls->isRealized()) { rwlock_writer_t lock(runtimeLock); realizeClass(cls); } if (initialize && !cls->isInitialized()) { _class_initialize (_class_getNonMetaClass(cls, inst)); } 加锁
加锁这一部分只有一行简单的代码,其主要目的保证方法查找以及缓存填充(cache-fill)的原子性,保证在运行以下代码时不会有 新方法添加导致缓存被冲洗(flush) 。
runtimeLock.read(); 在当前类中查找实现
实现很简单,先调用了 cache_getImp 从某个类的 cache 属性中获取选择子对应的实现:
imp = cache_getImp(cls, sel); if (imp) goto done; 
不过 cache_getImp 的实现目测是不开源的,同时也是汇编写的,在我们尝试 step in 的时候进入了如下的汇编代码。
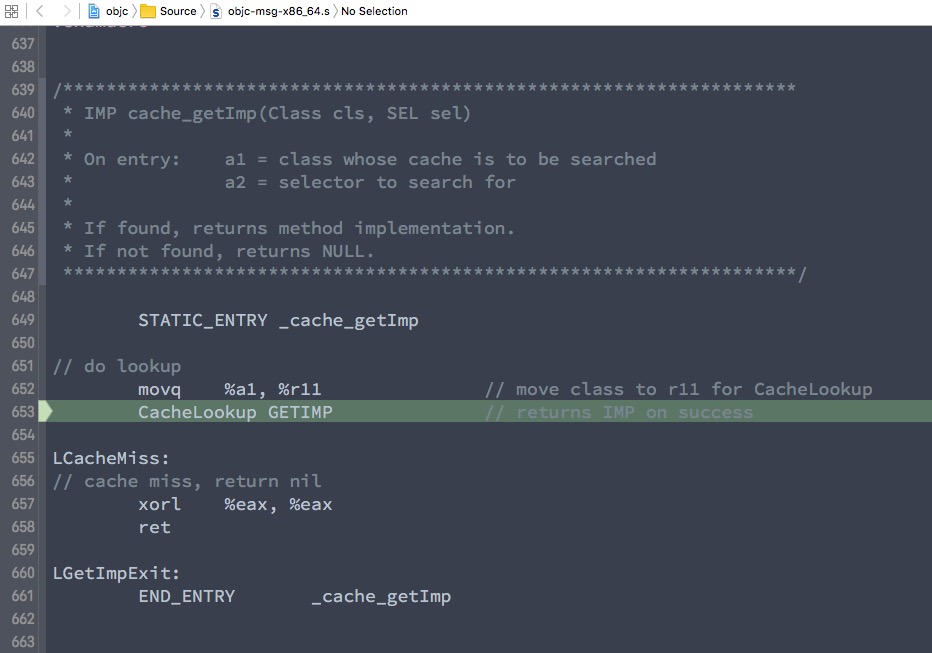
它会进入一个 CacheLookup 的标签,获取实现,使用汇编的原因还是因为要加速整个实现查找的过程,其原理推测是在类的 cache 中寻找对应的实现,只是做了一些性能上的优化。
如果查找到实现,就会跳转到 done 标签,因为我们在这个小结中的假设是无缓存的(第一次调用 hello 方法),所以会进入下面的代码块,从类的方法列表中寻找方法的实现:
meth = getMethodNoSuper_nolock(cls, sel); if (meth) { log_and_fill_cache(cls, meth->imp, sel, inst, cls); imp = meth->imp; goto done; } 调用 getMethodNoSuper_nolock 方法查找对应的方法的结构体指针 method_t :
static method_t *getMethodNoSuper_nolock(Class cls, SEL sel) { for (auto mlists = cls->data()->methods.beginLists(), end = cls->data()->methods.endLists(); mlists != end; ++mlists) { method_t *m = search_method_list(*mlists, sel); if (m) return m; } return nil; } 因为类中数据的方法列表 methods 是一个二维数组 method_array_t ,写一个 for 循环遍历整个方法列表,而这个 search_method_list 的实现也特别简单:
static method_t *search_method_list(const method_list_t *mlist, SEL sel) { int methodListIsFixedUp = mlist->isFixedUp(); int methodListHasExpectedSize = mlist->entsize() == sizeof(method_t); if (__builtin_expect(methodListIsFixedUp && methodListHasExpectedSize, 1)) { return findMethodInSortedMethodList(sel, mlist); } else { for (auto& meth : *mlist) { if (meth.name == sel) return &meth; } } return nil; } findMethodInSortedMethodList 方法对有序方法列表进行线性探测,返回方法结构体 method_t 。
如果在这里找到了方法的实现,将它加入类的缓存中,这个操作最后是由 cache_fill_nolock 方法来完成的:
static void cache_fill_nolock(Class cls, SEL sel, IMP imp, id receiver) { if (!cls->isInitialized()) return; if (cache_getImp(cls, sel)) return; cache_t *cache = getCache(cls); cache_key_t key = getKey(sel); mask_t newOccupied = cache->occupied() + 1; mask_t capacity = cache->capacity(); if (cache->isConstantEmptyCache()) { cache->reallocate(capacity, capacity ?: INIT_CACHE_SIZE); } else if (newOccupied <= capacity / 4 * 3) { } else { cache->expand(); } bucket_t *bucket = cache->find(key, receiver); if (bucket->key() == 0) cache->incrementOccupied(); bucket->set(key, imp); } 如果缓存中的内容大于容量的 3/4 就会扩充缓存,使缓存的大小翻倍。
在缓存翻倍的过程中,当前类 全部的缓存都会被清空 ,Objective-C 出于性能的考虑不会将原有缓存的 bucket_t 拷贝到新初始化的内存中。
找到第一个空的 bucket_t ,以 (SEL, IMP) 的形式填充进去。
在父类中寻找实现
这一部分与上面的实现基本上是一样的,只是多了一个循环用来判断根类:
- 查找缓存
- 搜索方法列表
curClass = cls; while ((curClass = curClass->superclass)) { imp = cache_getImp(curClass, sel); if (imp) { if (imp != (IMP)_objc_msgForward_impcache) { log_and_fill_cache(cls, imp, sel, inst, curClass); goto done; } else { break; } } meth = getMethodNoSuper_nolock(curClass, sel); if (meth) { log_and_fill_cache(cls, meth->imp, sel, inst, curClass); imp = meth->imp; goto done; } } 与当前类寻找实现的区别是:在父类中寻找到的 _objc_msgForward_impcache 实现会交给当前类来处理。
方法决议
选择子在当前类和父类中都没有找到实现,就进入了方法决议(method resolve)的过程:
if (resolver && !triedResolver) { _class_resolveMethod(cls, sel, inst); triedResolver = YES; goto retry; } 这部分代码调用 _class_resolveMethod 来解析没有找到实现的方法。
void _class_resolveMethod(Class cls, SEL sel, id inst) { if (! cls->isMetaClass()) { _class_resolveInstanceMethod(cls, sel, inst); } else { _class_resolveClassMethod(cls, sel, inst); if (!lookUpImpOrNil(cls, sel, inst, NO/*initialize*/, YES/*cache*/, NO/*resolver*/)) { _class_resolveInstanceMethod(cls, sel, inst); } } } 根据当前的类是不是 元类 在 _class_resolveInstanceMethod 和 _class_resolveClassMethod 中选择一个进行调用。
static void _class_resolveInstanceMethod(Class cls, SEL sel, id inst) { if (! lookUpImpOrNil(cls->ISA(), SEL_resolveInstanceMethod, cls, NO/*initialize*/, YES/*cache*/, NO/*resolver*/)) { // 没有找到 resolveInstanceMethod: 方法,直接返回。 return; } BOOL (*msg)(Class, SEL, SEL) = (__typeof__(msg))objc_msgSend; bool resolved = msg(cls, SEL_resolveInstanceMethod, sel); // 缓存结果,以防止下次在调用 resolveInstanceMethod: 方法影响性能。 IMP imp = lookUpImpOrNil(cls, sel, inst, NO/*initialize*/, YES/*cache*/, NO/*resolver*/); } 这两个方法的实现其实就是判断当前类是否实现了 resolveInstanceMethod: 或者 resolveClassMethod: 方法,然后用 objc_msgSend 执行上述方法,并传入需要决议的选择子。
关于 resolveInstanceMethod 之后可能会写一篇文章专门介绍,不过关于这个方法的文章也确实不少,在 Google 上搜索会有很多的文章。
在执行了 resolveInstanceMethod: 之后,会跳转到 retry 标签, 重新执行查找方法实现的流程 ,只不过不会再调用 resolveInstanceMethod: 方法了(将 triedResolver 标记为 YES )。
消息转发
在缓存、当前类、父类以及 resolveInstanceMethod: 都没有解决实现查找的问题时,Objective-C 还为我们提供了最后一次翻身的机会,进行方法转发:
imp = (IMP)_objc_msgForward_impcache; cache_fill(cls, sel, imp, inst); 返回实现 _objc_msgForward_impcache ,然后加入缓存。
====
这样就结束了整个方法第一次的调用过程,缓存没有命中,但是在当前类的方法列表中找到了 hello 方法的实现,调用了该方法。

缓存命中
如果使用对应的选择子时,缓存命中了,那么情况就大不相同了,我们修改主程序中的代码:
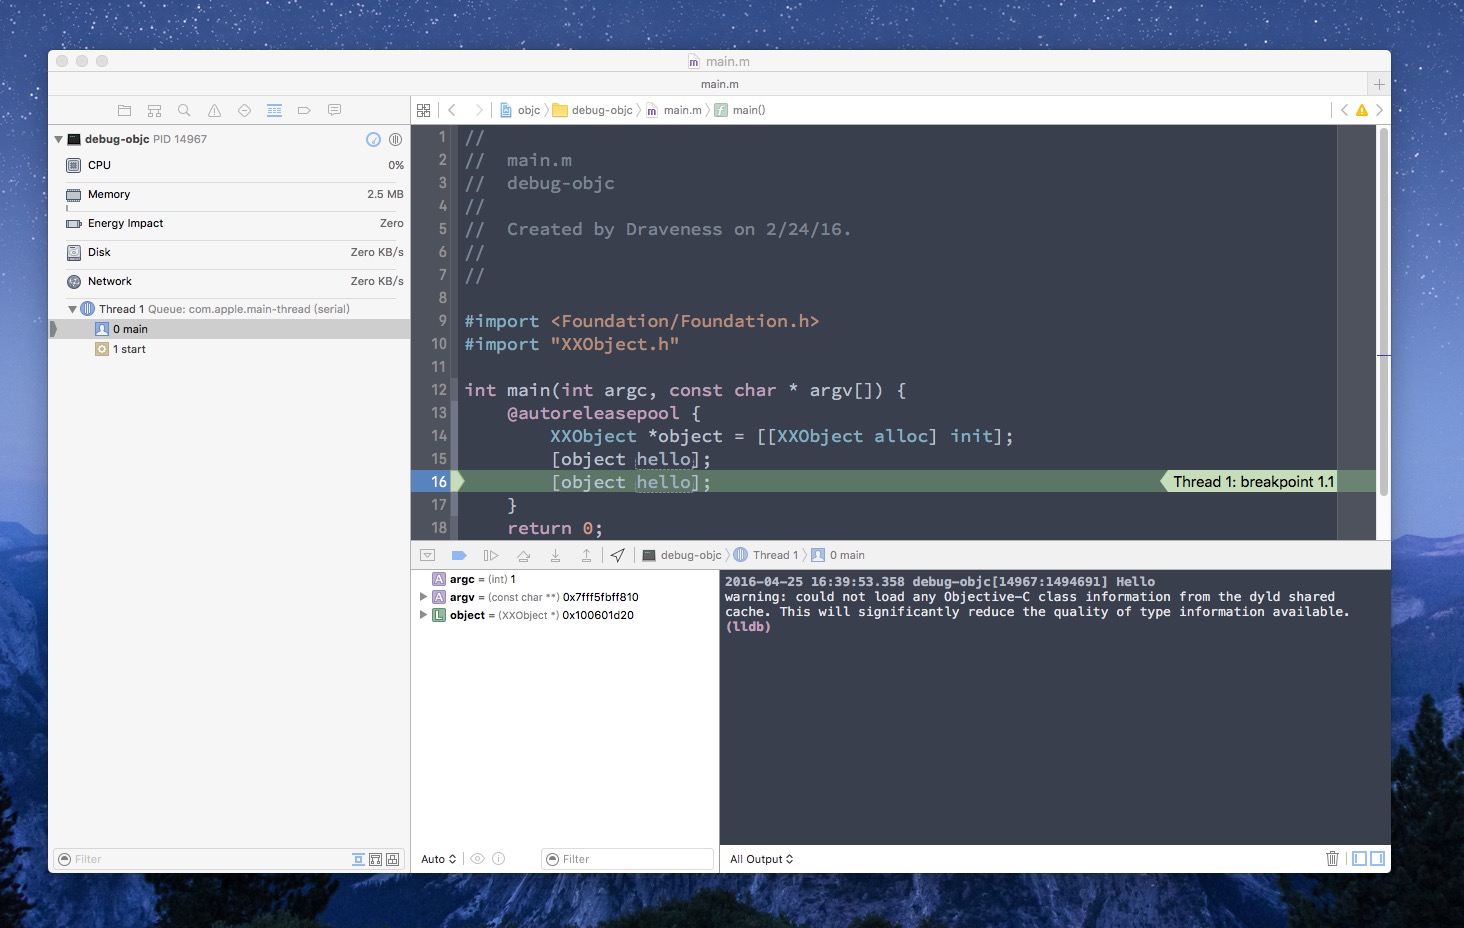
int main(int argc, const char * argv[]) { @autoreleasepool { XXObject *object = [[XXObject alloc] init]; [object hello]; [object hello]; } return 0; } 然后在第二次调用 hello 方法时,加一个断点:
objc_msgSend 并没有走 lookupImpOrForward 这个方法,而是直接结束,打印了另一个 hello 字符串。
我们如何确定 objc_msgSend 的实现到底是什么呢?其实我们没有办法来 确认 它的实现,因为这个函数的实现使用汇编写的,并且实现是不开源的。
不过,我们需要确定它是否真的 访问了类中的缓存 来加速实现寻找的过程。
好,现在重新运行程序至第二个 hello 方法调用之前:
打印缓存中 bucket 的内容:
(lldb) p (objc_class *)[XXObject class] (objc_class *) $0 = 0x0000000100001230 (lldb) p (cache_t *)0x0000000100001240 (cache_t *) $1 = 0x0000000100001240 (lldb) p *$1 (cache_t) $2 = { _buckets = 0x0000000100604bd0 _mask = 3 _occupied = 2 } (lldb) p $2.capacity() (mask_t) $3 = 4 (lldb) p $2.buckets()[0] (bucket_t) $4 = { _key = 0 _imp = 0x0000000000000000 } (lldb) p $2.buckets()[1] (bucket_t) $5 = { _key = 0 _imp = 0x0000000000000000 } (lldb) p $2.buckets()[2] (bucket_t) $6 = { _key = 4294971294 _imp = 0x0000000100000e60 (debug-objc`-[XXObject hello] at XXObject.m:17) } (lldb) p $2.buckets()[3] (bucket_t) $7 = { _key = 4300169955 _imp = 0x00000001000622e0 (libobjc.A.dylib`-[NSObject init] at NSObject.mm:2216) } 在这个缓存中只有对 hello 和 init 方法实现的缓存,我们要将其中 hello 的缓存清空:
(lldb) expr $2.buckets()[2] = $2.buckets()[1] (bucket_t) $8 = { _key = 0 _imp = 0x0000000000000000 } 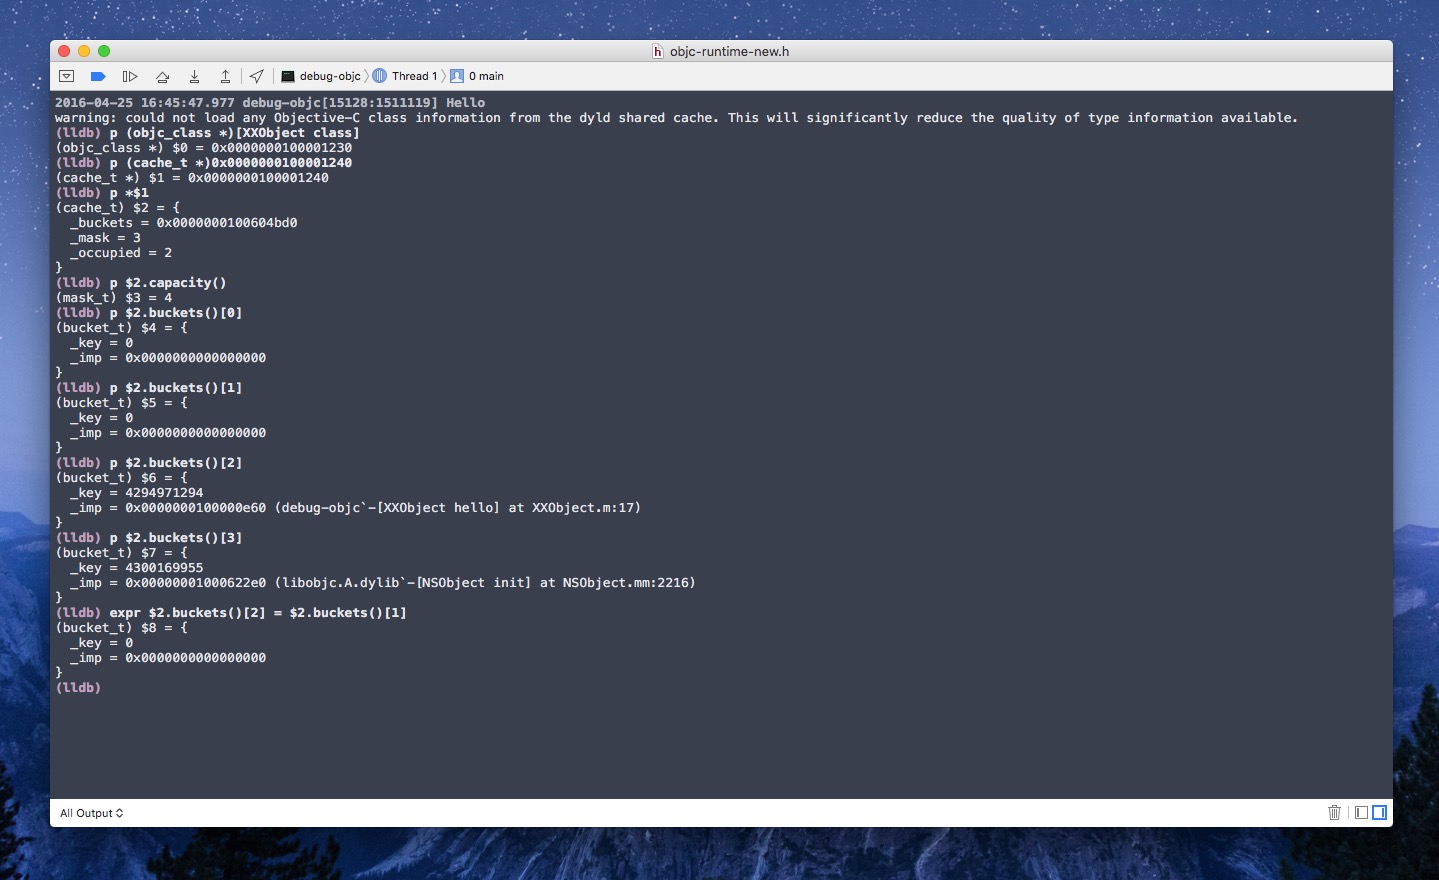
这样 XXObject 中就不存在 hello 方法对应实现的缓存了。然后继续运行程序:
虽然第二次调用 hello 方法,但是因为我们清除了 hello 的缓存,所以,会再次进入 lookupImpOrForward 方法。
下面会换一种方法验证猜测: 在 hello 调用之前添加缓存 。
添加一个新的实现 cached_imp :
#import <Foundation/Foundation.h> #import <objc/runtime.h> #import "XXObject.h" int main(int argc, const char * argv[]) { @autoreleasepool { __unused IMP cached_imp = imp_implementationWithBlock(^() { NSLog(@"Cached Hello"); }); XXObject *object = [[XXObject alloc] init]; [object hello]; [object hello]; } return 0; } 我们将以 @selector(hello), cached_imp 为键值对,将其添加到类结构体的缓存中,这里的实现 cached_imp 有一些区别,它会打印 @"Cached Hello" 而不是 @"Hello" 字符串:
在第一个 hello 方法调用之前将实现加入缓存:

然后继续运行代码:
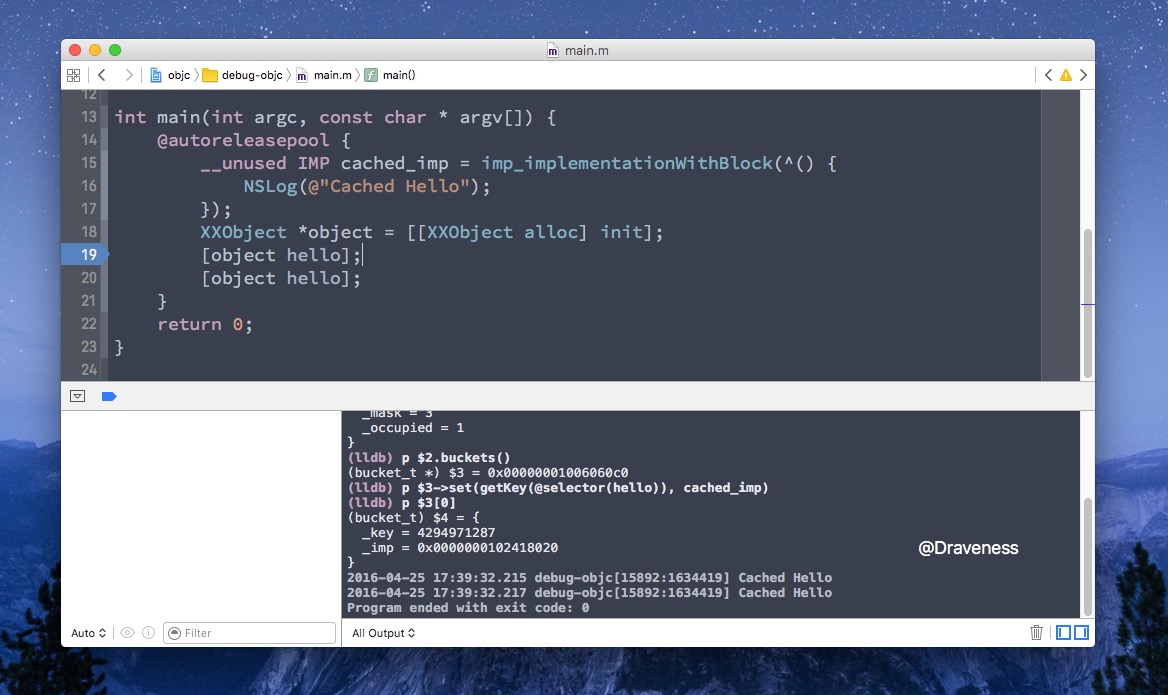
可以看到,我们虽然没有改变 hello 方法的实现,但是在 objc_msgSend 的消息发送链路中,使用错误的缓存实现 cached_imp 拦截了实现的查找,打印出了 Cached Hello 。
由此可以推定, objc_msgSend 在实现中确实检查了缓存。如果没有缓存会调用 lookupImpOrForward 进行方法查找。
为了提高消息传递的效率,ObjC 对 objc_msgSend 以及 cache_getImp 使用了汇编语言来编写。
如果你想了解有关 objc_msgSend 方法的汇编实现的信息,可以看这篇文章 Let's Build objc_msgSend
小结
这篇文章与其说是讲 ObjC 中的消息发送的过程,不如说是讲方法的实现是如何查找的。
Objective-C 中实现查找的路径还是比较符合直觉的:
- 缓存命中
- 查找当前类的缓存及方法
- 查找父类的缓存及方法
- 方法决议
- 消息转发
文章中关于方法调用栈的视频最开始是用 gif 做的,不过由于 gif 时间较长,试了很多的 gif 转换器,都没有得到一个较好的质量和合适的大小,所以最后选择用一个 Youtube 的视频。
参考资料
- 深入解析 ObjC 中方法的结构
- Objective-C Runtime
- Let's Build objc_msgSend


![[HBLOG]公众号](https://www.liuhaihua.cn/img/qrcode_gzh.jpg)

