用 Vuex 构建一个笔记应用
原文: Learn Vuex by Building a Notes App ,有删改。
本文假设读者熟悉 Vuex 文档 的内容。如果不熟悉,you definitely should!
在这个教程里面,我们会通过构建一个笔记应用来学习怎么用 Vuex。我会简单地介绍一下 Vuex 的基础内容, 什么时候该用它以及用 Vuex 的时候该怎么组织代码,然后我会一步一步地把这些概念应用到这个笔记应用里面。
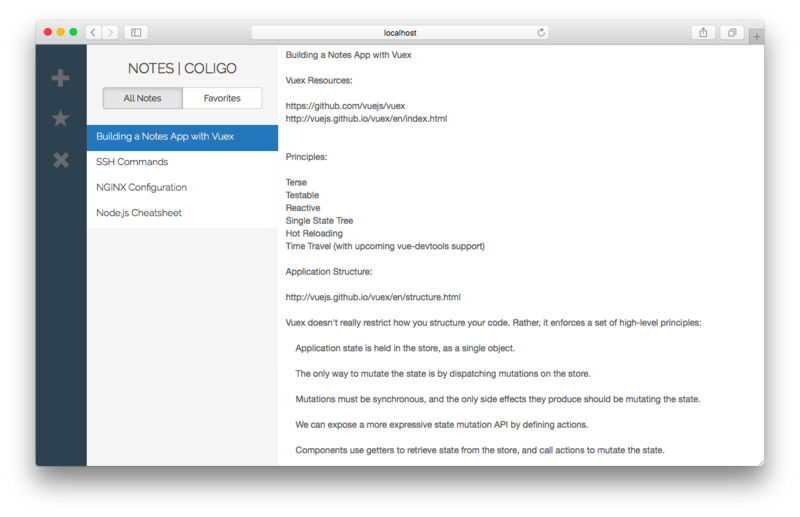
这个是我们要构建的笔记应用的截图:

你可以从 Github Repo 下载源码,这里是 demo 的地址。
Vuex 概述
Vuex 是一个主要应用在中大型单页应用的类似于 Flux 的数据管理架构。它主要帮我们更好地组织代码,以及把应用内的的状态保持在可维护、可理解的状态。
如果你不太理解 Vue.js 应用里的状态是什么意思的话,你可以想象一下你此前写的 Vue 组件里面的 data 字段。Vuex 把状态分成 组件内部状态 和 应用级别状态 :
-
组件内部状态:仅在一个组件内使用的状态(data 字段)
-
应用级别状态:多个组件共用的状态
举个例子:比如说有一个父组件,它有两个子组件。这个父组件可以用 props 向子组件传递数据,这条数据通道很好理解。
那如果这两个子组件相互之间需要共享数据呢?或者子组件需要向父组件传递数据呢?这两个问题在应用体量较小的时候都好解决,只要用 自定义事件 即可。
但是随着应用规模的扩大:
-
追踪这些事件越来越难了。这个事件是哪个组件触发的?谁在监听它?
-
业务逻辑遍布各个组件,导致各种意想不到的问题。
-
由于要显式地分发和监听事件,父组件和子组件强耦合。
Vuex 要解决的就是这些问题,Vuex 背后有四个核心的概念:
-
状态树: 包含所有应用级别状态的对象
-
Getters: 在组件内部获取 store 中状态的函数
-
Mutations: 修改状态的事件回调函数
-
Actions: 组件内部用来分发 mutations 事件的函数
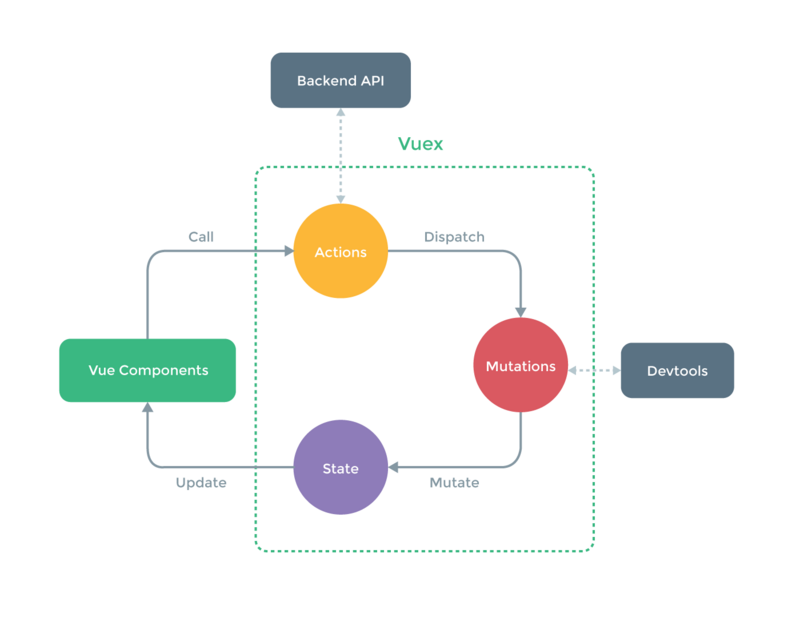
下面这张图完美地解释了一个 Vuex 应用内部的数据流动:

这张图的重点:
-
数据流动是单向的
-
组件可以调用 actions
-
Actions 是用来分发 mutations 的
-
只有 mutations 可以修改状态
-
store 是反应式的,即,状态的变化会在组件内部得到反映
搭建项目
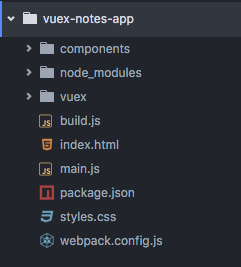
项目结构是这样的:

-
components/包含所有的组件
-
vuex/包含 Vuex 相关的文件 (store, actions)
-
build.js是 webpack 将要输出的文件
-
index.html是要渲染的页面
-
main.js是应用的入口点,包含了根实例
-
style.css
-
webpack.config.js
新建项目:
mkdir vuex-notes-app && cd vuex-note-app npm init -y安装依赖:
npm install/ webpack webpack-dev-server/ vue-loader vue-html-loader css-loader vue-style-loader vue-hot-reload-api/ babel-loader babel-core babel-plugin-transform-runtime babel-preset-es2015/ babel-runtime@5/ --save-dev npm install vue vuex --save然后配置 Webpack:
// webpack.config.js module.exports = { entry: './main.js', output: { path: __dirname, filename: 'build.js' }, module: { loaders: [ { test: //.vue$/, loader: 'vue' }, { test: //.js$/, loader: 'babel', exclude: /node_modules/ } ] }, babel: { presets: ['es2015'], plugins: ['transform-runtime'] } }然后在 package.json 里面配置一下 npm script:
"scripts": { "dev": "webpack-dev-server --inline --hot", "build": "webpack -p" } 后面测试和生产的时候直接运行 npm run dev 和 npm run build 就行了。
创建 Vuex Store
在 vuex/文件夹下创建一个 store.js:
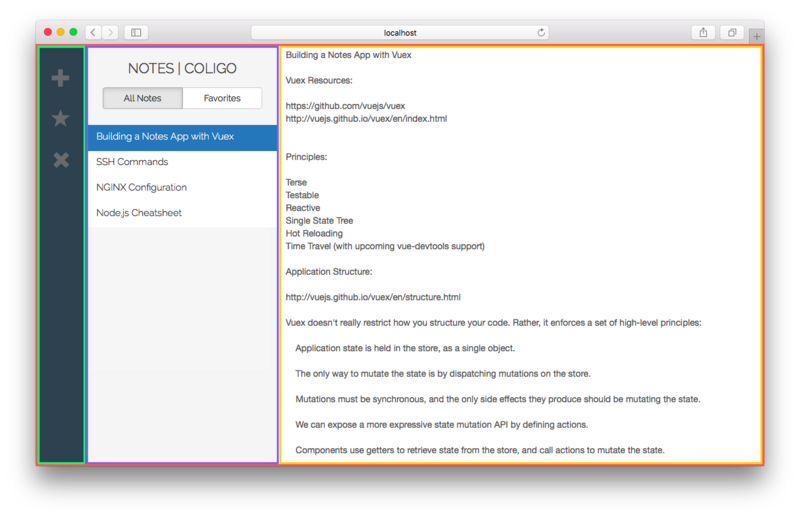
import Vue from 'vue' import Vuex from 'vuex' Vue.use(Vuex) const state = { notes: [], activeNote: {} } const mutations = { ... } export default new Vuex.Store({ state, mutations })现在我用下面这张图把应用分解成多个组件,并把组件内部需要的数据对应到 store.js 里的 state。

-
App, 根组件,就是最外面那个红色的盒子
-
Toolbar是左边的绿色竖条,包括三个按钮
-
NotesList是包含了笔记标题列表的紫色框。用户可以点击所有笔记(All Notes)或者收藏笔记(Favorites)
-
Editor是右边这个可以编辑笔记内容的黄色框
store.js 里面的状态对象会包含所有应用级别的状态,也就是各个组件需要共享的状态。
笔记列表( notes: [] )包含了 NodesList 组件要渲染的 notes 对象。当前笔记(activeNote: {})则包含当前选中的笔记对象,多个组件都需要这个对象:
-
Toolbar 组件的收藏和删除按钮都对应这个对象
-
NotesList 组件通过 CSS 高亮显示这个对象
-
Editor 组件展示及编辑这个笔记对象的内容。
聊完了状态(state),我们来看看 mutations, 我们要实现的 mutation 方法包括:
-
添加笔记到数组里 (state.notes)
-
把选中的笔记设置为「当前笔记」(state.activeNote)
-
删掉当前笔记
-
编辑当前笔记
-
收藏/取消收藏当前笔记
首先,要添加一条新笔记,我们需要做的是:
-
新建一个对象
-
初始化属性
-
push 到
state.notes里去 -
把新建的这条笔记设为当前笔记(activeNote)
ADD_NOTE (state) { const new Note = { text: 'New note', favorite: fals } state.notes.push(newNote) state.activeNote= newNote }然后,编辑笔记需要用笔记内容 text 作参数:
EDIT_NOTE (state, text) { state.activeNote.text = text }剩下的这些 mutations 很简单就不一一赘述了。整个 vuex/store.js 是这个样子的:
import Vue from 'vue' import Vuex from 'vuex' Vue.use(Vuex) const state = { note: [], activeNote: {} } const mutations = { ADD_NOTE (state) { const newNote = { text: 'New Note', favorite: false } state.notes.push(newNote) state.activeNote = newNote }, EDIT_NOTE (state, text) { state.activeNote.text = text }, DELETE_NOTE (state) { state.notes.$remove(state.activeNote) state.activeNote = state.notes[0] }, TOGGLE_FAVORITE (state) { state.activeNote.favorite = !state.activeNote.favorite }, SET_ACTIVE_NOTE (state, note) { state.activeNote = note } } export default new Vuex.Store({ state, mutations }) 接下来聊 actions, actions 是组件内用来分发 mutations 的函数。它们接收 store 作为第一个参数。比方说,当用户点击 Toolbar 组件的添加按钮时,我们想要调用一个能分发 ADD_NOTE mutation 的 action。现在我们在 vuex/文件夹下创建一个 actions.js 并在里面写上 addNote 函数:
// actions.js export const addNote = ({ dispatch }) => { dispatch('ADD_NOTE') }剩下的这些 actions 都跟这个差不多:
export const addNote = ({ dispatch }) => { dispatch('ADD_NOTE') } export const editNote = ({ dispatch }, e) => { dispatch('EDIT_NOTE', e.target.value) } export const deleteNote = ({ dispatch }) => { dispatch('DELETE_NOTE') } export const updateActiveNote = ({ dispatch }, note) => { dispatch('SET_ACTIVE_NOTE', note) } export const toggleFavorite = ({ dispatch }) => { dispatch('TOGGLE_FAVORITE') }这样,在 vuex 文件夹里面要写的代码就都写完了。这里面包括了 store.js 里的 state 和 mutations,以及 actions.js 里面用来分发 mutations 的 actions。
构建 Vue 组件
最后这个小结,我们来实现四个组件 (App, Toolbar, NoteList 和 Editor) 并学习怎么在这些组件里面获取 Vuex store 里的数据以及调用 actions。
创建根实例 - main.js
main.js是应用的入口文件,里面有根实例,我们要把 Vuex store 加到到这个根实例里面,进而注入到它所有的子组件里面:
import Vue from 'vue' import store from './vuex/store' import App from './components/App.vue' new Vue({ store, // 注入到所有子组件 el: 'body', components: { App } })App - 根组件
根组件 App 会 import 其余三个组件:Toolbar, NotesList 和 Editor:
<template> <div id="app"> <toolbar></toolbar> <notes-list></notes-list> <editor></editor> </div> </template> <script> import Toolbar from './Toolbar.vue' import NotesList from './NotesList.vue' import Editor from './Editor.vue' export default { components: { Toolbar, NotesList, Editor } } </script>把 App 组件放到 index.html 里面,用 BootStrap 提供基本样式,在 style.css 里写组件相关的样式:
<!-- index.html --> <!DOCTYPE html> <html lang="en"> <head> <meta charset="utf-8"> <title>Notes | coligo.io</title> <link rel="stylesheet" href="https://maxcdn.bootstrapcdn.com/bootstrap/3.3.6/css/bootstrap.min.css"> <link rel="stylesheet" href="styles.css"> </head> <body> <app></app> <script src="build.js"></script> </body> </html>Toolbar
Toolbar 组件提供给用户三个按钮:创建新笔记,收藏当前选中的笔记和删除当前选中的笔记。

这对于 Vuex 来说是个绝佳的用例,因为 Toolbar 组件需要知道「当前选中的笔记」是哪一条,这样我们才能删除、收藏/取消收藏它。前面说了「当前选中的笔记」是各个组件都需要的,不应该单独存在于任何一个组件里面,这时候我们就能发现共享数据的必要性了。
每当用户点击笔记列表中的某一条时,NodeList 组件会调用 updateActiveNote() action 来分发 SET_ACTIVE_NOTE mutation, 这个 mutation 会把当前选中的笔记设为 activeNote 。
也就是说,Toolbar 组件需要从 state 获取 activeNote 属性:
vuex: { getters: { activeNote: state => state.activeNote } }我们也需要把这三个按钮所对应的 actions 引进来,因此 Toolbar.vue 就是这样的:
<template> <div id="toolbar"> <i @click="addNote" class="glyphicon glyphicon-plus"></i> <i @click="toggleFavorite" class="glyphicon glyphicon-star" :class="{starred: activeNote.favorite}"></i> <i @click="deleteNote" class="glyphicon glyphicon-remove"></i> </div> </template> <script> import { addNote, deleteNote, toggleFavorite } from '../vuex/actions' export default { vuex: { getters: { activeNote: state => state.activeNote }, actions: { addNote, deleteNote, toggleFavorite } } } </script> 注意到当 activeNote.favorite === true 的时候,收藏按钮还有一个 starred 的类名,这个类的作用是对收藏按钮提供高亮显示。

NotesList
NotesList 组件主要有三个功能:
-
把笔记列表渲染出来
-
允许用户选择"所有笔记"或者只显示"收藏的笔记"
-
当用户点击某一条时,调用
updateActiveNoteaction 来更新 store 里的activeNote
显然,在 NoteLists 里需要 store 里的 notes array 和 activeNote :
vuex: { getters: { notes: state => state.notes, activeNote: state => state.activeNote } }当用户点击某一条笔记时,把它设为当前笔记:
import { updateActiveNote } from '../vuex/actions' export default { vuex: { getters: { // as shown above }, actions: { updateActiveNote } } }接下来,根据用户点击的是"所有笔记"还是"收藏笔记"来展示过滤后的列表:
import { updateActiveNote } from '../vuex/actions' export default { data () { return { show: 'all' } }, vuex: { // as shown above }, computed: { filteredNotes () { if (this.show === 'all'){ return this.notes } else if (this.show === 'favorites') { return this.notes.filter(note => note.favorite) } } } }在这里组件内的 show 属性是作为组件内部状态出现的,很明显,它只在 NoteList 组件内出现。
以下是完整的 NotesList.vue:
<template> <div id="notes-list"> <div id="list-header"> <h2>Notes | coligo</h2> <div class="btn-group btn-group-justified" role="group"> <!-- All Notes button --> <div class="btn-group" role="group"> <button type="button" class="btn btn-default" @click="show = 'all'" :class="{active: show === 'all'}"> All Notes </button> </div> <!-- Favorites Button --> <div class="btn-group" role="group"> <button type="button" class="btn btn-default" @click="show = 'favorites'" :class="{active: show === 'favorites'}"> Favorites </button> </div> </div> </div> <!-- render notes in a list --> <div class="container"> <div class="list-group"> <a v-for="note in filteredNotes" class="list-group-item" href="#" :class="{active: activeNote === note}" @click="updateActiveNote(note)"> <h4 class="list-group-item-heading"> {{note.text.trim().substring(0, 30)}} </h4> </a> </div> </div> </div> </template> <script> import { updateActiveNote } from '../vuex/actions' export default { data () { return { show: 'all' } }, vuex: { getters: { notes: state => state.notes, activeNote: state => state.activeNote }, actions: { updateActiveNote } }, computed: { filteredNotes () { if (this.show === 'all'){ return this.notes } else if (this.show === 'favorites') { return this.notes.filter(note => note.favorite) } } } } </script>这个组件的几个要点:
-
用前30个字符当作该笔记的标题
-
当用户点击一条笔记,该笔记变成当前选中笔记
-
在"all"和"favorite"之间选择实际上就是设置 show 属性
-
通过
:class=""设置样式
Editor
Editor 组件是最简单的,它只做两件事:
-
从 store 获取当前笔记
activeNote,把它的内容展示在 textarea -
在用户更新笔记的时候,调用
editNote()action
以下是完整的 Editor.vue:
<template> <div id="note-editor"> <textarea :value="activeNoteText" @input="editNote" class="form-control"> </textarea> </div> </template> <script> import { editNote } from '../vuex/actions' export default { vuex: { getters: { activeNoteText: state => state.activeNote.text }, actions: { editNote } } } </script>这里的 textarea 不用 v-model 的原因在 vuex 文档里面有 详细的说明 。
至此,这个应用的代码就写完了,不明白的地方可以看 源代码 , 然后动手操练一遍。


![[HBLOG]公众号](https://www.liuhaihua.cn/img/qrcode_gzh.jpg)

