关于Fragment的重要性,不言而喻。不但应用在平板中,还广泛的用在手机应用程序中。由于没有在线上的应用中使用过Fragment,所以本文也是带着初探的心使用Fragment,下面通过demo初步使用Fragment.
首先还是阅读官方API文档,养成查阅文档的习惯对于学习非常有帮助,笔者英文水平也不是很好,但是理解文档的内容还是可以的;当然对于理解底层的知识,还需要阅读源码。对于Android开发人员来说,JDK,SDK 的API文档是必备的。

截图真的是浪费版面,哈哈,上面没有什么需要解释的。Fragment(碎片)的生命周期依附于它的"宿主",也就是Activity,只有当Activity存在的时候,才可以有Fragment,Activity结束的时候,Fragment也就消失了。碎片有自己的布局,然后放置在Activity布局中,既然碎片的宿主是Activity,那么两者肯定有信息交流。碎片与Activity一样,有着生命周期,理解起来也很简单,首先看创建碎片需要经历哪些过程:

省略了Activity的生命周期过程,所以以上不是完整的碎片生命周期过程,那么碎片销毁的过程是如何呢:

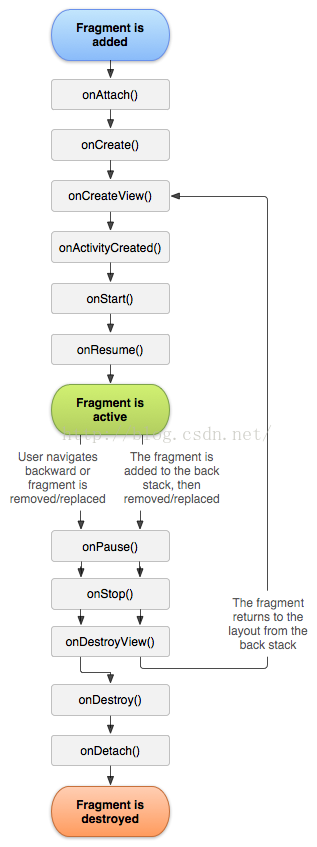
上面的回调函数很好理解,那么下面是官方提供的碎片完整生命周期图:

解释几个回调函数:
onAttach() 当碎片与活动建立关联的时候调用
onCreateView() 为碎片加载布局文件的时候调用
onActivityCreated() 与碎片相关联的活动已经创建时候调用
onDestroyView() 被碎片加载的视图被移除时候调用
onDetach() 当碎片和关联的活动解除关联时调用
下面通过demo实现两个Fragment拼凑成一个Activity,并且动态实现第三个Fragment替换其中一个Fragment,下面看第一个Fragment:的布局:fragment_title.xml
[html]view plain
copy
print?


- <LinearLayout xmlns:android="http://schemas.android.com/apk/res/android"
- android:layout_width="match_parent"
- android:layout_height="45dp"
- >
-
- <Button
- android:id="@+id/buttonone"
- android:layout_width="match_parent"
- android:layout_height="match_parent"
- android:background="@color/red"
- android:text="我是Button One!"/>
- </LinearLayout>
创建第一个Fragment: [java]view plain
copy
print?


- public class TitleFragment extends Fragment
- {
- @Override
- public View onCreateView(LayoutInflater inflater, ViewGroup container,
- Bundle savedInstanceState)
- {
- View view = inflater.inflate(R.layout.fragment_title, container, false);
- Button button = (Button)view.findViewById(R.id.buttonone);
- button.setOnClickListener(new OnClickListener() {
-
- @Override
- public void onClick(View v) {
- // TODO 自动生成的方法存根
- Toast.makeText(getActivity(),"你好,我是Button-one",Toast.LENGTH_LONG).show();
- }
- });
- return view;
- }
- }
第二个Fragment的布局:frament_content.xml [html]view plain
copy
print?


- <LinearLayout xmlns:android="http://schemas.android.com/apk/res/android"
- android:layout_width="match_parent"
- android:gravity="center"
- android:layout_height="match_parent"
- android:orientation="vertical" >
- <Button
- android:id="@+id/buttontwo"
- android:layout_width="match_parent"
- android:layout_height="match_parent"
- android:text="我是Button Two!"
- android:translationZ="10dp"
- android:background="@drawable/ripple"
- />
- </LinearLayout>
创建第二个Fragment: ContentFragment.java [java]view plain
copy
print?


- public class ContentFragment extends Fragment
- {
- @Override
- public View onCreateView(LayoutInflater inflater, ViewGroup container,
- Bundle savedInstanceState)
- {
- View view = inflater.inflate(R.layout.frament_content, container, false);
- Button button = (Button)view.findViewById(R.id.buttontwo);
- button.setOnClickListener(new OnClickListener() {
-
- public void onClick(View v) {
- // TODO 自动生成的方法存根
- Toast.makeText(getActivity(),"你好,我是Button Two!",Toast.LENGTH_SHORT).show();;
- }
- });
- return view;
- }
-
- }
第三个Fragment布局:replace.xml [html]view plain
copy
print?


- <LinearLayout xmlns:android="http://schemas.android.com/apk/res/android"
- android:layout_width="match_parent"
- android:layout_height="match_parent"
- android:orientation="vertical" >
- <Button
- android:id="@+id/buttonthree"
- android:layout_width="match_parent"
- android:layout_height="match_parent"
- android:background="@color/yellow"
- />
- </LinearLayout>
创建第三个Fragment: [java]view plain
copy
print?


- public class replaceFragment extends Fragment{
- public View onCreateView(LayoutInflater layoutInflater,ViewGroup viewGroup,Bundle savedInstanceState){
- View view = layoutInflater.inflate(R.layout.replace,viewGroup,false);
- Button buttonthree=(Button)view.findViewById(R.id.buttonthree);
- buttonthree.setText(getResources().getString(R.string.buttonthree));//获取字符串资源 与在Activity中无异
- buttonthree.setOnClickListener(new OnClickListener() {
-
- public void onClick(View v) {
- // TODO 自动生成的方法存根
- Toast.makeText(getActivity(),"你好,我是Buttonthree",Toast.LENGTH_LONG).show();
- }
- });
- return view;
- }
- }
那么接下来就是主布局文件了: [html]view plain
copy
print?


- <LinearLayout xmlns:android="http://schemas.android.com/apk/res/android"
- xmlns:tools="http://schemas.android.com/tools"
- android:orientation="vertical"
- android:layout_width="match_parent"
- android:layout_height="match_parent" >
-
- <FrameLayout
- android:id="@+id/framelayout"
- android:layout_width="match_parent"
- android:layout_height="0dp"
- android:layout_weight="1">
- <fragment <!--用<frament/>标签添加一个碎片,android:name属性指定要添加的碎片,必须加上完整的包名-->
- android:id="@+id/id_fragment_title"
- android:name="com.example.fragment.TitleFragment"
- android:layout_width="match_parent"
- android:layout_height="match_parent"/>
- </FrameLayout>
-
- <fragment
- android:id="@+id/id_fragment_content"
- android:name="com.example.fragment.ContentFragment"
- android:layout_width="fill_parent"
- android:layout_height="0dp"
- android:layout_weight="1" />
- </LinearLayout>
代码部分: [java]view plain
copy
print?


- public class MainActivity extends Activity
- {
- private Button button ;
- private Fragment replaceFragment;
-
- @Override
- protected void onCreate(Bundle savedInstanceState)
- {
- super.onCreate(savedInstanceState);
- requestWindowFeature(Window.FEATURE_NO_TITLE);
- setContentView(R.layout.activity_main);
- // TODO 自动生成的方法
- button = (Button)findViewById(R.id.buttonone);
- button.setOnClickListener(new OnClickListener() {
-
- public void onClick(View v) {
- // TODO 自动生成的方法存根
- FragmentManager fragmentManager = getFragmentManager();
- //TitleFragment titleFragment = (TitleFragment)getFragmentManager().findFragmentById(R.id.fragment_title);获得TitleFragment的实例
- FragmentTransaction transaction = fragmentManager.beginTransaction();
- transaction.replace(R.id.framelayout,new replaceFragment());
- transaction.addToBackStack(null);
- transaction.commit();
-
-
- }
- });
-
-
- }
- }
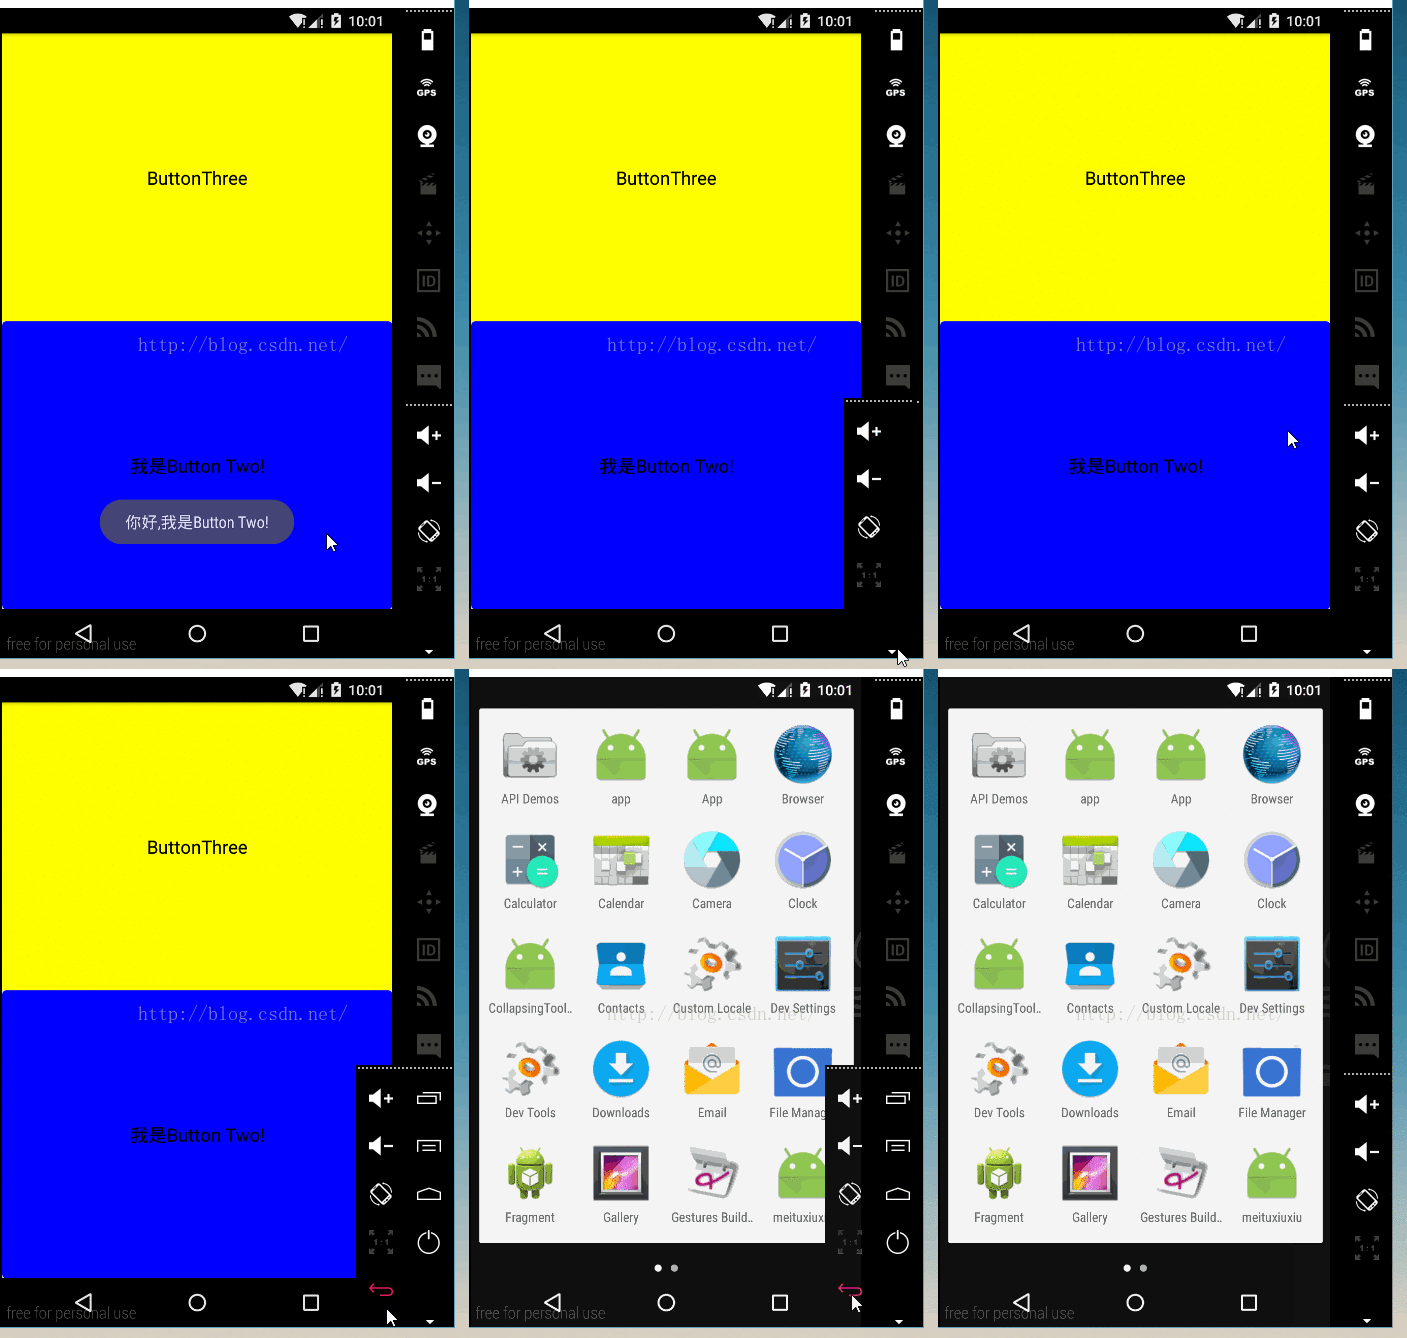
上面主要是通过FragmentManager开启一个事务,然后通过事务来替换FrameLayout中的Fragment,然后在事务结束前,调用addToBackStatck(),把替换掉的事务添加到返回栈中,所以在替换后,按back键,会回到替换前的Fragment中去,然后再按back键,退出activity.
文档中给出的说明:
[html]view plain
copy
print?


- After each call to this function, a new entry is on the stack, and pressing back will pop it to return the user to
- whatever previous state the activity UI was in.
其中参数一般为null
运行结果:
关于Fragment与Activity间通信交流代码中已经给出,在Fragment中通过getActivity()可以获得与之关联的活动;
在Activity中,通过
TitleFragment titleFragment =(TitleFragment)getFragmentManager().findFragmentById(R.id.fragment_title),获得活动中Fragment的实例。


![[HBLOG]公众号](https://www.liuhaihua.cn/img/qrcode_gzh.jpg)

