基于Laravel Task-Scheduler定时发送邮件小程序
说明:本文主要学习Laravel的Artisan Command、Task Scheduler和Mail相关知识。做一个简单的小demo,用来定时发邮件。。走完整个流程最多只需一小时。同时,作者会将开发过程中的一些截图和代码黏上去,提高阅读效率。作者的开发环境是本机的MAMP集成软件,PHP7.0,Laravel5.2.*。
Laravel中Artisan Command内容可以参看: 服务 —— Artisan Console ,Mail邮件服务内容可以参看: 服务 —— 邮件 ,以及Task-Scheduler任务定时器可以参看: 服务 —— 任务调度 。
Artisan Command
新建一个artisan command:
php artisan make:console SendEmails --command=emails:send并在AppConsoleCommandsSendEmails.php文件中添加代码:
class SendEmails extends Command { /** * The name and signature of the console command. * * @var string */ protected $signature = 'emails:send'; /** * The console command description. * * @var string */ protected $description = 'This is a demo about sending emails to myself'; /** * Create a new command instance. * * @return void */ public function __construct() { parent::__construct(); } /** * Execute the console command. * * @return mixed */ public function handle() { $this->info('I am handsome'); $this->error('I am not ugly'); } }写上$description和handle()方法,$description变量用来显示命令的说明,handle()用来处理命令,然后在AppConsoleCommandsKernel.php中注册命令:
protected $commands = [ // Commands/Inspire::class, Commands/SendEmails::class, ];好,这下可以在终端输入php artisan查看并执行命令了:


邮件服务API驱动需要安装guzzlehttp/guzzle这个包,在项目根目录下:
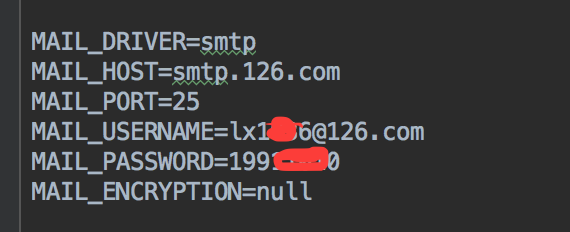
composer require guzzlehttp/guzzle然后在.env文件中配置下邮件驱动和用户名密码:

然后修改下handle()方法:
/** * Execute the console command. * * @return mixed */ public function handle() { // $this->info('I am handsome'); // $this->error('I am not ugly'); $user = [ 'email' => 'XXX@XXX.com',//一个有效的邮箱接收地址 'name' => 'liuxiang', ]; $status = Mail::send('emails.send', ['user'=>$user], function($msg) use ($user){ $msg->from('XXX@XXX.com', 'liuxiang email');//一个有效的邮箱发送地址 $msg->to($user['email'], $user['name'])->subject('This is a demo about sending emails to myself'); }); if(!$status){ $this->error('Fail to send email');exit; } $this->info('Success to send email');exit; }发送的内容在视图emails.send里,新建resources/views/emails/send.blade.php文件:
<html lang="en"> <head> <meta charset="utf-8"> <meta http-equiv="X-UA-Compatible" content="IE=edge"> <meta name="viewport" content="width=device-width, initial-scale=1"> <!-- 上述3个meta标签*必须*放在最前面,任何其他内容都*必须*跟随其后! --> <title>Bootstrap Template</title> <style> html,body{ width: 100%; height: 100%; } *{ margin: 0; border: 0; } .content{ text-align: center; margin: 50px; } </style> </head> <body> <div class="container"> <div class="row"> <div class="col-xs-12 col-md-12"> <p class="content">This is a email by Laravel Artisan Command</p> </div> </div> </div> <script> </script> </body> </html>一切准备OK,在项目根目录运行邮件发送命令吧,然后会收到邮件发送成功打印:

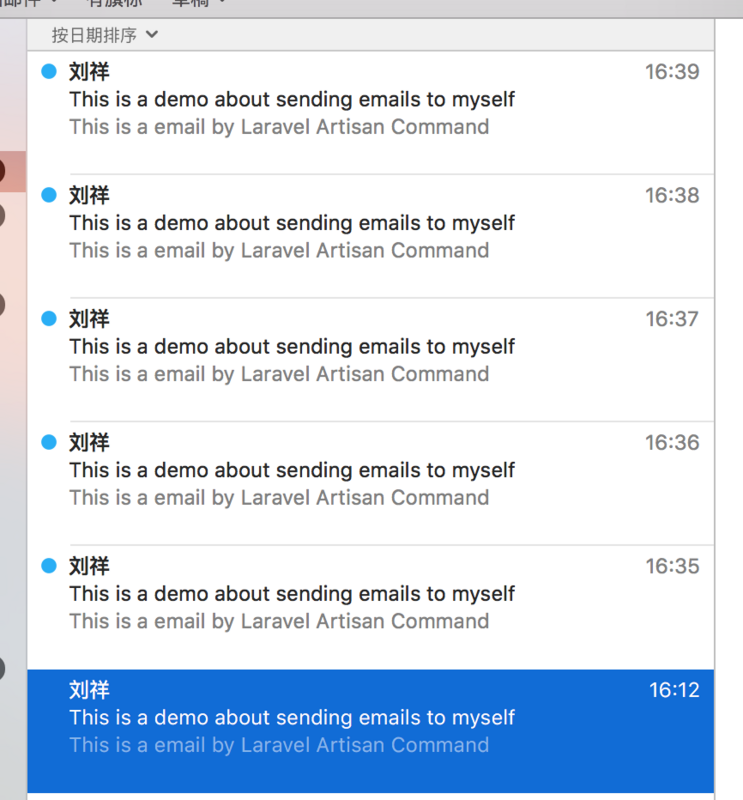
然后接收的邮箱会收到邮件:

It is working!!!
Task-Scheduler
每次手动发邮件毕竟不太爽啊,可以利用系统的定时器crontab定时发送,Laravel里有任务定时器可以玩一玩。修改app/Console/Kernel.php文件:
/** * Define the application's command schedule. * * @param /Illuminate/Console/Scheduling/Schedule $schedule * @return void */ protected function schedule(Schedule $schedule) { // $schedule->command('inspire')->hourly(); //$schedule->command('emails:send')->everyFiveMinutes(); $schedule->command('emails:send')->everyMinutes(); } 在终端输入 crontab -e 添加一个cron条目:
* * * * * php /Applications/MAMP/htdocs/laravelemail/artisan schedule:run 1>> /dev/null 2>&1然后程序每隔一分钟发个邮件过来:

总结:本文主要以Laravel的Artisan Command、Mail和Task-Scheduler做一个好玩的小demo,来定时发发骚扰邮件,哈哈。还挺好玩的,可以试一试。。嘛,过几天想结合设计模式来聊聊Laravel,到时见。


![[HBLOG]公众号](https://www.liuhaihua.cn/img/qrcode_gzh.jpg)

