Text Kit入门
本文主要介绍Text Kit的四个特性:
- 动态字体(Dynamic type)
- 凸版印刷体效果(Letterpress effects)
- 路径排除(Exclusion paths)
- 动态文本格式化和存储(Dynamic text formatting and storage
文中涉及到的代码 请戳这里
1. 动态字体
Dynamic type是iOS7的重要的特性之一,程序会根据用户设定的字体大小和粗细来显示文本.要使用Dynamic type,你必须使用指定字体风格而不是使用具体的字体名称和大小.可以通过UIFont中新增的preferredFontForTextStyle:方法来获取用户偏好的字体.
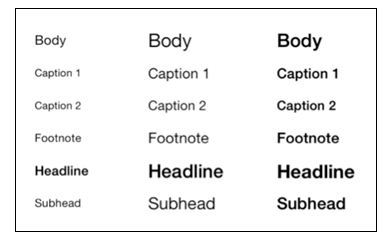
下图是六种不同字体风格的示例:

左边的文字是用户选择的最小字体,中间的是最大字体,右边的则是粗体.
1.1 基本实现
实现动态字体的代码比较简单,只需要设置字体使用使用style,runtime会根据用户设置的字体偏好自动选择合适的字体.
打开 NoteEditorViewController.swift ,在 viewDidLoad 方法最后一行加上:
self.textView.font = UIFont.preferredFontForTextStyle(UIFontTextStyleBody) 然后打开 NotesListViewController.swift 在 tableView(tableView: UITableView, cellForRowAtIndexPath indexPath: NSIndexPath) 方法retur之前添加如下代码:
cell.textLabel?.font = UIFont.preferredFontForTextStyle(UIFontTextStyleHeadline) 重新运行程序,在系统设置中修改字体大小,然后返回应用,如果跳转设置之前的页面是 U Notes ,会发现List中的字体大小修改了(因为我们在viewDidAppear刷新了列表),如果跳转之前的界面是 Note ,那么 Note 中的字体并没有修改.
接下来让我们解决这个问题.
1.2 响应更新
打开 NoteEditorViewController.swift ,在 viewDidLoad 方法最后一行加上:
NSNotificationCenter.defaultCenter().addObserver(self, selector: #selector(preferredContentSizeChanged(_:)), name: UIContentSizeCategoryDidChangeNotification, object: nil) 然后添加preferredContentSizeChanged方法的实现:
func preferredContentSizeChanged(notification:NSNotification) -> Void { self.textView.font = UIFont.preferredFontForTextStyle(UIFontTextStyleBody) } 同样的,在 NotesListViewController.swift 中viewDidLoad中接收 UIContentSizeCategoryDidChangeNotification 通知,并在处理方法中刷新tableview.
重新运行程序,会发现Note编辑界面的文字也随之改变了.
1.3 改变约束
上面的代码看上去已经能正常运行了,但是当你选择一个非常小的字体时,tableview看上去内容会十分稀疏.为了保证tableViewCell的高度跟字体的高度匹配,必须在字体改变的同时更新布局约束.
具体来说,就是在tableView代理方法 heightForRowAtIndexPath 中改变行高.
在 NotesListViewController.swift 添加下面的代码:
//MARK: - TableView Delegate override func tableView(tableView: UITableView, heightForRowAtIndexPath indexPath: NSIndexPath) -> CGFloat { let label = UILabel() label.text = "test" label.font = UIFont.preferredFontForTextStyle(UIFontTextStyleHeadline) label.sizeToFit() return CGFloat(ceilf(Float(label.frame.size.height) * 1.7)) } 2. 凸版印刷体效果
凸版印刷替效果是给文字加上阴影和高光,让文字看起有凹凸感,像是被压在屏幕上一样.
打开 NotesListViewController.swift ,用下面的代码替代 cellForRowAtIndexPath 方法:
let cell = tableView.dequeueReusableCellWithIdentifier("Cell", forIndexPath: indexPath) let note = self.notes[indexPath.row].title let font = UIFont.preferredFontForTextStyle(UIFontTextStyleHeadline) let textColor = UIColor(colorLiteralRed: 0.175, green: 0.458, blue: 0.831, alpha: 1.0) let attrs = [NSForegroundColorAttributeName:textColor,NSFontAttributeName:font,NSTextEffectAttributeName:NSTextEffectLetterpressStyle] let attrString = NSAttributedString(string: note, attributes: attrs) cell.textLabel?.attributedText = attrString return cell 重新运行程序,会发现列表标题变成了印刷效果.这个效果很有趣,但是不要滥用它,因为它并不一定会让文本显示得更清晰.
3. 路径排除
在排版中,图文混排是非常常见的需求,但有时候我们的图片并一定都是正常的矩形,这个时候我们如果需要将文本环绕在图片周围,就可以用路径排除(exclusion paths)了.
3.1 添加View
打开 NoteEditorViewController.swift 增加一个类的实例变量:
var timeView:TimeIndicatorView! 在 viewDidLoad 最后添加如下代码:
timeView = TimeIndicatorView(date: note.timestamp) self.view.addSubview(timeView) 并增加如下方法:
override func viewDidLayoutSubviews() { self.updateTimeIndicatorFrame() } func updateTimeIndicatorFrame() -> Void { timeView.updateSize() timeView.frame = CGRectOffset(timeView.frame, self.view.frame.size.width - timeView.frame.size.width, self.textView.frame.origin.y) } 最后,在 preferredContentSizeChanged 方法中调用 updateTimeIndicatorFrame :
func preferredContentSizeChanged(notification:NSNotification) -> Void { self.textView.font = UIFont.preferredFontForTextStyle(UIFontTextStyleBody) self.updateTimeIndicatorFrame() } 3.2 路径排除
打开 NoteEditorViewController.swift ,在 updateTimeIndicatorFrame 最后添加下面的代码:
let exclusionPath = timeView.curvePathWithOrigin(timeView.center) textView.textContainer.exclusionPaths = [exclusionPath] 重新运行程序,会发现文字会环绕在时间视图周围了.
4. 动态文本格式化和存储
现在我们知道了Text Kit可以动态的根据用户设置的字体大小进行调整,但更酷炫的是,字体还能根据用户的输入进行变化.
比如,我们的示例将支持下面的功能:
- 用字符~ 标记的文本将展示为花体
- 用字符_ 标记的文本将展示为斜体
- 用字符- 标记的文本将展示为删除线样式
- 全大写的文字将展示为红色
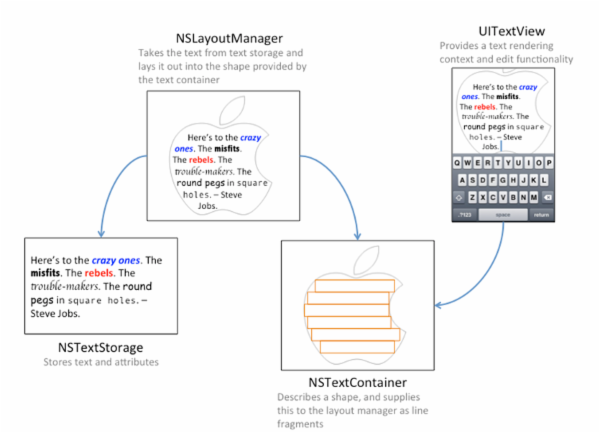
这才是Text Kit的真正强大之处.在此之前你需要理解Text Kit中的文本存储系统是怎么工作的,下图显示了Text Kit中文本的保存、渲染和现实之间的关系:

当你创建一个UITextView,UILabel或UITextField,Apple会自动创建上面的类.你可以使用系统的默认实现,也可以根据需要自定义.
- NSTextStorage:以attributed string的形式存储被渲染的文本,在文本改变时通知layout manager对象.如果需要在文本改变时动态改变其显示样式,可以自定义一个NSTextStorage的子类.
- NSLayoutManager:获取存储的文本,并渲染到屏幕上.
- NSTextContainer:描述可渲染文本的几何区域,每个text container与一个具体的UITextView相关联.如果你需要定义一个很复杂形状的区域来显示文本,可能需要创建NSTextContainer子类.
要实现我们上面描述的功能,我们需要创建一个NSTextStorage的子类,以便在用户输入文本的时候动态改变文本的显示样式.
4.1 创建NSTextStorage子类
在项目中创建继承自NSTextStorage的子类 SyntaxHighlightTextStorage.swift ,打开 SyntaxHighlightTextStorage.swift 并增加下面的代码:
var backingStore:NSMutableAttributedString override init() { backingStore = NSMutableAttributedString() super.init() } required init?(coder aDecoder: NSCoder) { fatalError("init(coder:) has not been implemented") } A text storage subclass must provide its own ‘persistence’ hence the use of a NSMutabeAttributedString ‘backing store’ (more on this later).
接下来继续添加下面的代码:
override var string: String{ return backingStore.string } override func attributesAtIndex(location: Int, effectiveRange range: NSRangePointer) -> [String : AnyObject] { return backingStore .attributesAtIndex(location, effectiveRange: range) } 最后重载下面几个方法:
override func replaceCharactersInRange(range: NSRange, withString str: String) { print("replaceCharactersInRange: + /(range),withString: + /(str)") self.beginEditing() backingStore.replaceCharactersInRange(range, withString: str) self.edited([.EditedAttributes,.EditedCharacters], range: range, changeInLength: NSString(string:str).length - range.length) self.endEditing() } override func setAttributes(attrs: [String : AnyObject]?, range: NSRange) { print("setAttributes: + /(attrs),range: + /(range)") self.beginEditing() backingStore.setAttributes(attrs, range: range) self.edited(.EditedAttributes, range: range, changeInLength: 0) self.endEditing() } 到这一步,已经完成了NSTextStorage子类的自定义,现在需要将其和一个UITextView绑定起来.
4.2 设置UITextView
从storyboard实例化的UITextView会自动创建对应的NSTextStorage,NSLayoutManager和NSTextContainer的只读实例.
为了使用我们自定义的NSTextStorage子类,接下来我们将使用代码创建UITextView.
打开 Main.storyboard ,删除掉UITextView控件及之前定义和设置UITextView的代码.
然后打开 NoteEditorViewController.swift ,增加两个个实例对象:
var textStorage:SyntaxHighlightTextStorage! var textView: UITextView! 接下来添加下面创建UITextView的方法:
func createTextView() -> Void { // 1. Create the text storage that backs the editor let attrs = [NSFontAttributeName:UIFont.preferredFontForTextStyle(UIFontTextStyleBody)] let attrString = NSAttributedString(string: note.contents, attributes: attrs) textStorage = SyntaxHighlightTextStorage() textStorage.appendAttributedString(attrString) let newTextViewRect = self.view.bounds // 2. Create the layout manager let layoutManager = NSLayoutManager() // 3. Create a text container let containerSize = CGSizeMake(newTextViewRect.size.width, CGFloat.max) let container = NSTextContainer(size: containerSize) container.widthTracksTextView = true layoutManager.addTextContainer(container) textStorage.addLayoutManager(layoutManager) // 4. Create a UITextView textView = UITextView(frame: newTextViewRect, textContainer: container) textView.delegate = self self.view.addSubview(textView) } 每一步的说明如下:
- 创建一个自定义的textStorage对象
- 创建一个layout manager对象
- 创建一个text container对象,并关联到layout manager,同时将layout manager关联到textStorage
- 使用text container创建UITextView对象
四者间的关系正如之前的描述图:

接着上面的步骤,在viewDidLoad方法设置timeView之前添加下面的一行代码:
self.createTextView() 然后保证preferredContentSizeChanged方法跟下面一致:
func preferredContentSizeChanged(notification:NSNotification) -> Void { textView.font = UIFont.preferredFontForTextStyle(UIFontTextStyleBody) self.updateTimeIndicatorFrame() } 到目前为止,我们用代码替换了之前storyboard中的textView.
最后一点要注意的是,用代码创建的view没有集成storyboard中的布局约束.当设备方向改变时,你必须自己指定view的frame.
为了实现这一点,在viewDidLayoutSubviews方法最后加上下面的代码:
textView.frame = self.view.bounds 运行程序,打开编辑note,并观察控制台输出.这些输出表明我们自定义的 SyntaxHighlightTextStorage 被成功调用了.
4.3 动态样式
这一节中,我们将把* *标记的文本设置为粗体.
打开 SyntaxHighlightTextStorage.swift ,添加一个方法:
override func processEditing() -> Void { self.performReplacementsForRange(self.editedRange) super.processEditing() } processEditing当文本变化时会向layout manager发送通知.其中performReplacementsForRange方法的实现如下:
func performReplacementsForRange(changedRange:NSRange) -> Void { var extendedRange = NSUnionRange(changedRange,NSString(string:backingStore.string).lineRangeForRange(NSMakeRange(changedRange.location, 0))) extendedRange = NSUnionRange(changedRange,NSString(string:backingStore.string).lineRangeForRange(NSMakeRange(NSMaxRange(changedRange), 0))) self.applyStylesToRange(extendedRange) } 上面这个方法的作用是设置检查被星号包围文本的范围。这个方法是很重要的,因为changedRange通常代表一个字符,而lineRangeForRange将其扩展到一行的范围.
applyStylesToRange方法的实现如下:
func applyStylesToRange(searchRange:NSRange) -> Void { // 1. create some fonts let fontDescriptor = UIFontDescriptor.preferredFontDescriptorWithTextStyle(UIFontTextStyleBody) let boldFontDescriptor = fontDescriptor.fontDescriptorWithSymbolicTraits(.TraitBold) let boldFont = UIFont(descriptor: boldFontDescriptor, size: 0) let normalFont = UIFont.preferredFontForTextStyle(UIFontTextStyleBody) // 2. match items surrounded by asterisks let regexStr = "(//*//w+(//s//w+)*//*)" let regex = try! NSRegularExpression(pattern: regexStr, options:.CaseInsensitive) let boldAttributes = [NSFontAttributeName : boldFont] let normalAttributes = [NSFontAttributeName : normalFont] // 3. iterate over each match, making the text bold regex.enumerateMatchesInString(backingStore.string, options: .ReportProgress, range: searchRange) { match, flags, stop in let matchRange = match!.rangeAtIndex(1) self.addAttributes(boldAttributes, range: matchRange) // 4. reset the style to the origin let maxRange = matchRange.location + matchRange.length if maxRange + 1 <= self.length { self.addAttributes(normalAttributes, range: NSMakeRange(maxRange, 1)) } } } 上面的代码主要功能是:
- 通过UIFontDescriptor创建一个加粗的字体格式和一个正常的字体格式。UIFontDescriptor可以避免使用硬编码来设置字体的类型和格式。
- 创建一个正则表达式,用于查找被星号包围的文本。比如说,这有一个字符串”iOS是 非常完美 的一个系统”,那么正则表达式就可以将” 非常完美 ”过滤出来。如果不熟悉正则表达式也没关系,在后面会详细介绍.
- 遍历通过正则表达式过滤出的文本,将我们定义的加粗字体属性设置给它们。
- 重置跟在最后一个星号后的文本的属性为正常,确保只在闭合星号内的文本才显示为粗体。
重新运行程序,打开一条笔记,输入一些文本信息,然后用星号包围几段文本,你会看到被星号包围的文本变成了粗体.
4.4 更多样式
实现该功能的基本方法其实很简单:在applyStylesToRange方法中通过正则表达式过滤出你想要的文本信息,然后给过滤出的文本设置新的文本属性.
首先在 SyntaxHighlightTextStorage.swift 添加一个方法:
func createAttributesForFontStyle(style:String,withTrait trait:UIFontDescriptorSymbolicTraits)->[String:UIFont]{ let fontDescriptor = UIFontDescriptor.preferredFontDescriptorWithTextStyle(UIFontTextStyleBody) let descriptorWithTrait = fontDescriptor.fontDescriptorWithSymbolicTraits(trait) let font = UIFont(descriptor: descriptorWithTrait, size: 0) return [NSFontAttributeName : font] } 该方法可以创建正文文本字体的样式.在该方法中构建UIFont时,其构造函数中的size属性设置为0,这是为了让字体的大小使用用户当前设置的字体大小.
接着在 SyntaxHighlightTextStorage.swift 中添加一个成员变量和方法:
var replacements:NSDictionary! func createHighlightPatterns() -> Void { let scriptFontDescriptor = UIFontDescriptor(fontAttributes: [UIFontDescriptorFamilyAttribute : "Zapfino"]) // 1. base our script font on the preferred body font size let bodyFontDescriptor = UIFontDescriptor.preferredFontDescriptorWithTextStyle(UIFontTextStyleBody) let bodyFontSize = bodyFontDescriptor.fontAttributes()[UIFontDescriptorSizeAttribute] as! NSNumber let scriptFont = UIFont(descriptor: scriptFontDescriptor, size: CGFloat(bodyFontSize.floatValue)) // 2. create the attributes let boldAttributes = createAttributesForFontStyle(UIFontTextStyleBody, withTrait:.TraitBold) let italicAttributes = createAttributesForFontStyle(UIFontTextStyleBody, withTrait:.TraitItalic) let strikeThroughAttributes = [NSStrikethroughStyleAttributeName:1] let scriptAttributes = [NSFontAttributeName : scriptFont] let redTextAttributes = [NSForegroundColorAttributeName : UIColor.redColor()] // construct a dictionary of replacements based on regexes replacements = [ "(//*//w+(//s//w+)*//*)" : boldAttributes, "(_//w+(//s//w+)*_)" : italicAttributes, "([0-9]+//.)//s" : boldAttributes, "(-//w+(//s//w+)*-)" : strikeThroughAttributes, "(~//w+(//s//w+)*~)" : scriptAttributes, "//s([A-Z]{2,})//s" : redTextAttributes ] } 这个方法主要有以下几个功能:
- 首先,使用Zapfino字体创建一个手写风格的字体。然后让它的字体大小基于正文文本设置的字体大小。
- 其次,创建若干用于匹配的字体属性。
- 最后,创建了一个字典,key为各种正则表达式,值为刚才创建的字体属性。
接下来调用createHighlightPatterns方法:
override init() { backingStore = NSMutableAttributedString() super.init() self.createHighlightPatterns() } 最后一步,替换applyStylesToRange方法的实现:
func applyStylesToRange(searchRange:NSRange) -> Void{ let normalAttrs = [NSFontAttributeName : UIFont.preferredFontForTextStyle(UIFontTextStyleBody)] // iterate over each replacement for (pattern, attributes) in replacements { let regex = try! NSRegularExpression(pattern: pattern as! String, options: NSRegularExpressionOptions.CaseInsensitive) regex.enumerateMatchesInString(backingStore.string, options: .ReportProgress, range: searchRange, usingBlock: { (match, flags, stop) in if match != nil { // apply the style let matchRange = match!.rangeAtIndex(1) self.addAttributes(attributes as! [String : AnyObject], range: matchRange) // reset the style to the original let maxRange = matchRange.location + matchRange.length if maxRange + 1 <= self.length { self.addAttributes(normalAttrs, range: NSMakeRange(maxRange, 1)) } } }) } } 在之前,该方法只使用一个正则表达式过滤出被星号围绕的文本,并将其设置为粗体,现在,虽然该方法所做的事情没有变,但是却不只使用一个正则表达式,而是遍历正则表达式字典中的所有表达式,过滤出文本中所有被符号围绕的文本,然后设置相应的字体样式.
重新运行程序,试试效果.
作者博客:http://coderzhang.xyz
版权所有,转载请保留本链接


![[HBLOG]公众号](https://www.liuhaihua.cn/img/qrcode_gzh.jpg)

