逆向探索微信消息界面实现
背景
工作中自己负责IM功能的开发,平时对微信进行了不少研究学习。 这篇文章主要关注微信iOS客户端界面实现中的“聊天消息界面”实现。
写这篇文章的目的: - 分享微信的聊天界面实现方式。 - 展示逆向主要流程。
PS: 最初是为了解决项目中的一个小问题才逆向的微信。
准备
设备:iPhone5 iOS 8.4 越狱
usbmuxd
➜ python-client python tcprelay.py -t 22:2222 Forwarding local port 2222 to remote port 22 ...... ssh
ssh root@localhost -p 2222 找到可执行文件:
everettjfs-iPhone:~ root# ps aux | grep /App mobile 38363 4.4 8.5 776400 88748 ?? Ss 8:55PM 0:52.96 /var/mobile/Containers/Bundle/Application/25FB096A-8122-49B5-9304-5FDB9080D9B0/WeChat.app/WeChat 沙盒路径:
everettjfs-iPhone:~ root# cycript -p WeChat cy# [[NSFileManager defaultManager] URLsForDirectory:NSDocumentDirectory inDomains:NSUserDomainMask] @[#"file:///var/mobile/Containers/Data/Application/F36BD1C1-1C39-4C83-AD4B-6D9F2B976330/Documents/"] 砸壳:
everettjfs-iPhone:~ root# clutch -i everettjfs-iPhone:~ root# clutch -b com.tencent.xin Finished dumping com.tencent.xin to /var/tmp/clutch/5F6CA026-C176-4FB0-9569-90F2DD251385 导出头文件:
这里不用class-dump-z 是因为class-dump-z会无法识别UIKit的很多类。
[everettjf@e w ]$ class-dump -s -S -H WeChat -o headers 初步窥探
定位Controller
打开微信,进入和某个人的会话(也就是这篇文章要研究的“聊天消息界面”)
everettjfs-iPhone:~ root# cycript -p WeChat cy# [[[UIWindow keyWindow] rootViewController] _printHierarchy].toString() <MMTabBarController 0x18265240>, state: appeared, view: <UILayoutContainerView 0x18265ac0> | <MMUINavigationController 0x1800f230>, state: appeared, view: <UILayoutContainerView 0x180cd0e0> | | <NewMainFrameViewController 0x179a2400>, state: disappeared, view: <MMUIHookView 0x1827f980> not in the window | | <BaseMsgContentViewController 0x179b3800>, state: appeared, view: <UIView 0x16e36c30> | <MMUINavigationController 0x181a40a0>, state: disappeared, view: <UILayoutContainerView 0x181a4400> not in the window | | <ContactsViewController 0x17162800>, state: disappeared, view: (view not loaded) | <MMUINavigationController 0x181adb10>, state: disappeared, view: <UILayoutContainerView 0x181ade00> not in the window | | <FindFriendEntryViewController 0x179aec00>, state: disappeared, view: (view not loaded) | <MMUINavigationController 0x18003e00>, state: disappeared, view: <UILayoutContainerView 0x18008cc0> not in the window | | <MoreViewController 0x179ad400>, state: disappeared, view: (view not loaded) 微信主界面是个MMTabBarController,有四个TabBarItem,分别对应一个MMUINavigationController。对应的RootViewController如下:
- 微信 NewMainFrameViewController
- 通讯录 ContactsViewController
- 发现 FindFriendEntryViewController
- 我 MoreViewController
此次我们关注的“聊天消息界面”,就是BaseMsgContentViewController (state:appeared)。
观察Views
Reveal
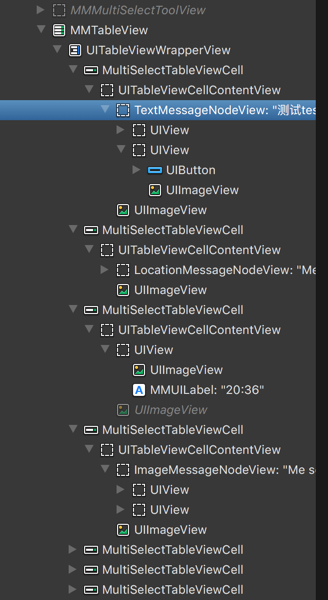
界面中各种类型的消息都发送一下,这里先发送:文本、图片、位置、语音。 使用Reveal观察,如下图:


MMTableView
从这两张图可以看到:
整个消息列表本质上是个 MMTableView (这个我们自己实现一般也是这么做)。从class-dump出的头文件中可知道,MMTableView是UITableView的子类。
@interface MMTableView : UITableView <MMDelegateCenterExt> TableView的Cell只有一种类型, MultiSelectTableViewCell。 这里开始看到时,很让我好奇。为什么没有采用传统的一个消息一个Cell的方式呢
@interface MultiSelectTableViewCell : UITableViewCell MessageNodeView
Cell都是MultiSelectTableViewCell,而区分不同消息的是contentView的内容。
- 文本消息 : TextMessageNodeView
- 图像消息: ImageMessageNodeView
- 位置消息:LocationMessageNodeView
- 语音消息:VocieMessageNodeView (上面的截图看不到)
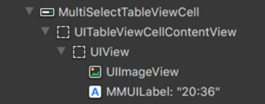
此外,消息之间的时间,也是MultiSelectTableViewCell,只是contentView是关于时间的Label。
简单总结
弄明白消息UI的基本结构,下一步就是找到如何创建这些MessageNodeView。 这里很容易有个疑问,所有消息都是MultiSelectTableViewCell,那如何实现的Cell重用呢? 继续探索。
观察Controller
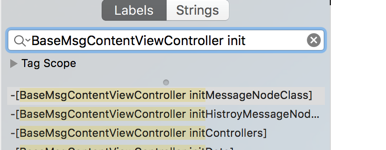
在class-dump出的头文件中找到 BaseMsgContentViewController类。可以找到 BaseMsgContentViewController.h文件,这个头文件有614行,可见这个类的复杂。(估计微信开发早期并没有考虑到后期的大量需求加入,于是成了今天的Mess View Controller)
这里细化此次行动的目的:想知道聊天中的每一条消息是如何创建、显示的。
观察类的实现,发现一些相关变量和方法:
// 字面上看,应该就是存储MessageNode的数组 NSMutableArray *m_arrMessageNodeData; // 应该是存储所有支持的MessageNode Class类型 struct vector<Class, std::__1::allocator<Class>> m_messageNodeClass; // 这就是主要是TableView MMTableView *m_tableView; // 预创建消息,有意思,一会儿仔细研究研究 - (void)preCreateMessageContentNode:(id)arg1; - (void)preCreateMessageSplitNode:(id)arg1; - (void)preCreateMessageTimeNode:(id)arg1; // 初始化Class - (void)initMessageNodeClass; - (id)newMessageNodeViewForMessageWrap:(id)arg1 contact:(id)arg2 chatContact:(id)arg3; // 获取node数目 - (unsigned int)getMsgNodeCount; // 获取指定索引的node - (id)getNodeDataByIndex:(unsigned int)arg1; // 获取消息node数组 - (id)GetMessageNodeDataArray; // 添加 - (void)addMessageNode:(id)arg1 layout:(BOOL)arg2 addMoreMsg:(BOOL)arg3; - (void)addReceiveMessageNode:(id)arg1; - (id)addSplitNode:(id)arg1 addMoreMsg:(BOOL)arg2; - (void)addTimeNode:(id)arg1 layout:(BOOL)arg2 addMoreMsg:(BOOL)arg3; // 移除 - (void)removeAllObjectsFromMessageNodeDatas; - (void)removeObjectsFromMessageNodeDatas:(id)arg1; // 更新 - (void)updateMessageNodeImageLoadingPercent:(unsigned long)arg1 percent:(unsigned long)arg2; - (void)updateMessageNodeStatus:(id)arg1; - (void)updateMessageNodeViewForOrientation:(id)arg1; // 一些NodeView的事件 - (void)tagLink:(id)arg1 messageWrap:(id)arg2; - (void)tapAppNodeView:(id)arg1; - (void)tapFriendCard_NodeView:(id)arg1 WithContact:(id)arg2 WithMsg:(id)arg3; - (void)tapImage_NodeView:(id)arg1; - (void)tapLocation_NodeView:(id)arg1; - (void)tapPushContact_NodeView:(id)arg1; - (void)tapPushMail_NodeView:(id)arg1 withPushMailWrap:(id)arg2; - (void)tapReader_NodeView:(id)arg1; - (void)tapStatus_NodeView:(id)arg1; - (void)tapText_NodeView:(id)arg1; - (void)tapVideoStatus_NodeView:(id)arg1; NSMutableArray *m_arrMessageNodeData;
cycript 打印出来
cy# v = #0x15067600 #"<BaseMsgContentViewController: 0x15067600>" cy# v->m_arrMessageNodeData @[#"<CMessageNodeData: 0x15b95260>",#"<CMessageNodeData: 0x15adf260>",#"<CMessageNodeData: 0x15a4abb0>",#"<CMessageNodeData: 0x1580f190>",#"<CMessageNodeData: 0x15a49930>",#"<CMessageNodeData: 0x1589b8a0>",#"<CMessageNodeData: 0x15a41410>",#"<CMessageNodeData: 0x158783e0>",#"<CMessageNodeData: 0x15a4a3b0>",#"<CMessageNodeData: 0x15aa14f0>",#"<CMessageNodeData: 0x1475ce50>",#"<CMessageNodeData: 0x15bf9960>",#"<CMessageNodeData: 0x15b53f40>",#"<CMessageNodeData: 0x147ad9f0>",#"<CMessageNodeData: 0x15b6d240>",#"<CMessageNodeData: 0x15ba04b0>",#"<CMessageNodeData: 0x15b90050>",#"<CMessageNodeData: 0x15be7ba0>",#"<CMessageNodeData: 0x15b84eb0>"] cy# v->m_arrMessageNodeData.count 19 前提,与对方的聊天消息已经有很多条 ,首次打开与对方的聊天消息界面,可以看到微信默认只加载19条消息。
CMessageNodeData是什么?
@interface CMessageNodeData : NSObject { int m_eMsgNodeType; CMessageWrap *m_msgWrap; UIView *m_view; unsigned long m_uCreateTime; } 注意,这里有个UIView
@interface CMessageWrap : MMObject <IAppMsgPathMgr, ISysNewXmlMsgExtendOperation, IMsgExtendOperation, NSCopying> { BOOL m_bIsSplit; BOOL m_bNew; unsigned long m_uiMesLocalID; long long m_n64MesSvrID; NSString *m_nsFromUsr; NSString *m_nsToUsr; unsigned long m_uiMessageType; NSString *m_nsContent; unsigned long m_uiStatus; unsigned long m_uiImgStatus; //.............省略大量字段............. CMessageWrap自然就是对消息数据的封装。
CMessageNodeData有个UIView *m_view的变量,看看是什么:
y# d = v->m_arrMessageNodeData @[#"<CMessageNodeData: 0x15b95260>",#"<CMessageNodeData: 0x15adf260>",#"<CMessageNodeData: 0x15a4abb0>",#"<CMessageNodeData: 0x1580f190>",#" .....省略.... cy# var x = []; for(var i = 0; i < d.count;i++) x.push([d objectAtIndex:i].m_view); x [#"<UIView: 0x1592f9c0; frame = (0 10; 320 28); layer = <CALayer: 0x147e6cc0>>",#"<TextMessageNodeView: 0x1582cca0; frame = (251 0; 60 59); layer = <CALayer: 0x158b1350>>",#"<TextMessageNodeView: 0x15a58d60; frame = (251 0; 60 59); layer = <CALayer: 0x15a3cdf0>>",#"<TextMessageNodeView: 0x15a3ba10; frame = (251 0; 60 59); layer = <CALayer: 0x15ab9ab0>>",#"<TextMessageNodeView: 0x15a31610; frame = (251 0; 60 59); layer = <CALayer: 0x15a31760>>",#"<TextMessageNodeView: 0x15a57dc0; frame = (251 0; 60 59); layer = <CALayer: 0x15a547b0 .....省略....... odeView: 0x159ee260; frame = (186 0; 125 59); layer = <CALayer: 0x159ee3b0>>",#"<ImageMessageNodeView: 0x15b91cd0; frame = (179.5 0; 131.5 150); layer = <CALayer: 0x15b6e8e0>>",#"<UIView: 0x15b675d0; frame = (0 10; 320 28); layer = <CALayer: 0x15be5fa0>>",#"<LocationMessageNodeView: 0x15bdaee0; frame = (50 0; 261 139); layer = <CALayer: 0x15b7d290>>",#"<TextMessageNodeView: 0x15bbf400; frame = (144 0; 167 59); layer = <CALayer: 0x15be6770>>"] 可见,m_view就是MultiSelectTableViewCell的contentView下的那个UIView。
这里又有疑问:屏幕上显示的Cell其实就4个,为什么这些 CMessageNodeData中的m_view都有值(不是nil),难道没有实现重用?是的,目前我发现,确实没有实现重用。
为验证,我随便发送了几百条各种消息,再输出所有的m_view。
cy# d.count 419 cy# var x = []; for(var i = 0; i < d.count;i++) x.push([d objectAtIndex:i].m_view); x [#"<UIView: 0x15c91540; frame = (0 10; 320 28); layer = <CALayer: 0x16096bb0>>",#"<AppUrlMessageNodeView: 0x160977e0; frame = (0 0; 327 149); layer = <CALayer: 0x16098f50>>",#"<UIView: 0x16098d70; frame = (0 10; 320 28); layer = <CALayer: 0x16099bd0>>",#"<ImageMessageNodeView: 0x1609b000; frame = (179.5 0; 131.5 150); layer = <CALayer: 0x1609a840>>",#"<ImageMessageNodeView: 0x160a3d80; frame = ( // ........省略.................. cy# x.length 419 好吧,果然419个m_view都不是nil。
我的天呐,这怎么能行。不过观察下内存占用,以及再仔细想想,这种方案还是可以接受的
我想到的原因如下:
- 内存占用并不会太多(具体数据见下文)。
- 聊天界面出现太多m_view的情形并不多。且出现时由于内存占用可接受,就无所谓了。
struct vector<Class, std::__1::allocator > m_messageNodeClass;
这里能看出BaseMsgContentViewController的实现文件是 BaseMsgContentViewController.mm,也就是Objective C++写的。(结合微信内很多变量的命名方式,微信早期的开发者应该有MFC的开发经验)
m_messageNodeClass与下面的方法有关: - (void)initMessageNodeClass;
使用Hopper反编译WeChat的二进制文件:

再反汇编为c代码:
void -[BaseMsgContentViewController initMessageNodeClass](void * self, void * _cmd) { r7 = &arg_C; sp = sp - 0xb4; r11 = self; r6 = *objc_ivar_offset_BaseMsgContentViewController_m_messageNodeClass; r5 = *(r11 + r6); r0 = *(r11 + 0xa4); if (r0 != r5) { do { *(r11 + 0xa4) = r0 - 0x4; r0 = *(r0 + 0xfffffffffffffffc); [r0 release]; r0 = *(r11 + 0xa4); } while (r0 != r5); r6 = *objc_ivar_offset_BaseMsgContentViewController_m_messageNodeClass; } r8 = @selector(class); r0 = [MultiColumnReaderMessageNodeView class]; r7 = r7; r0 = [r0 retain]; r1 = r6 + 0x4; arg_B0 = r0; r2 = r6 + r11; r3 = *(r11 + r1); if (r3 < *(r2 + 0x8)) { arg_B0 = 0x0; *r3 = r0; *(r11 + r1) = *(r11 + r1) + 0x4; } else { void std::__1::vector<objc_class* __strong, std::__1::allocator<objc_class* __strong> >::__push_back_slow_path<objc_class* __strong>(); [arg_B0 release]; } r4 = *objc_ivar_offset_BaseMsgContentViewController_m_messageNodeClass; r0 = [ImageTextReaderMessageNodeView class]; //.....省略...... 就是把所有支持的MessageNode的Class都push_back到这个vector中。
这里能看到微信支持的所有可显示的消息类型
手动整理伪代码如下:
std::vector<Class> m_messageNodeClass; m_messageNodeClass.push_back([MultiColumnReaderMessageNodeView class]); m_messageNodeClass.push_back([ImageTextReaderMessageNodeView class]); m_messageNodeClass.push_back([HeadImgReaderMessageNodeaView class]); m_messageNodeClass.push_back([MessageSysNodeView class]); m_messageNodeClass.push_back([AttributedReaderMessageNodeaView class]); m_messageNodeClass.push_back([ReaderNewMessageNodeView class]); m_messageNodeClass.push_back([MultiReaderMessageNodeView class]); m_messageNodeClass.push_back([MailMessageNodeView class]); m_messageNodeClass.push_back([MassSendMessageNodeView class]); m_messageNodeClass.push_back([ImageMessageNodeView class]); m_messageNodeClass.push_back([VoiceMessageNodeView class]); m_messageNodeClass.push_back([ShortVideoMessageNodeView class]); m_messageNodeClass.push_back([VideoMessageNodeView class]); m_messageNodeClass.push_back([ShareCardMessageNodeView class]); m_messageNodeClass.push_back([EmoticonMessageNodeView class]); m_messageNodeClass.push_back([GameMessageNodeView class]); m_messageNodeClass.push_back([VoipContentNodeView class]); m_messageNodeClass.push_back([AppTextMessageNodeView class]); m_messageNodeClass.push_back([AppImageMessageNodeView class]); m_messageNodeClass.push_back([AppEmoticonMessageNodeView class]); m_messageNodeClass.push_back([AppFileMessageNodeView class]); m_messageNodeClass.push_back([AppUrlMessageNodeView class]); m_messageNodeClass.push_back([AppShakeMessageNodeView class]); m_messageNodeClass.push_back([VoiceReminderConfirmNodeView class]); m_messageNodeClass.push_back([VoiceReminderRemindNodeView class]); m_messageNodeClass.push_back([AppProductMessageNodeView class]); m_messageNodeClass.push_back([AppEmoticonSharedMessageNodeView class]); m_messageNodeClass.push_back([AppWCProductMessageNodeView class]); m_messageNodeClass.push_back([AppWCCardMessageNodeView class]); m_messageNodeClass.push_back([AppTVMessageNodeView class]); m_messageNodeClass.push_back([AppTrackRoomMessageNodeView class]); m_messageNodeClass.push_back([AppRecordMessageNodeView class]); m_messageNodeClass.push_back([AppNoteMessageNodeView class]); m_messageNodeClass.push_back([AppHardWareRankMessageNode class]); m_messageNodeClass.push_back([AppHardWareLikeNotifyMessageNode class]); m_messageNodeClass.push_back([MultiTalkMessageNodeView class]); m_messageNodeClass.push_back([WCPayTransferMessageNodeView class]); m_messageNodeClass.push_back([WCPayTransferAcceptedMessageNodeView class]); m_messageNodeClass.push_back([WCPayTransferRejectedMessageNodeView class]); m_messageNodeClass.push_back([WCPayMessageBaseNodeView class]); m_messageNodeClass.push_back([WCPayC2CMessageNodeView class]); m_messageNodeClass.push_back([WCPayC2CFestivalMsgNodeView class]); m_messageNodeClass.push_back([AppDefaultMessageNodeView class]); m_messageNodeClass.push_back([TextMessageNodeView class]); 可见,微信真实个巨大的工程,支持的消息类型这么多(我使用的微信版本:6.3.19)。
随便看个消息,例如: MessageSysNodeView 继承自 BaseMessageNodeView 然后 MMUIView
- (void) preCreateMessageXXXXNode
- (void)preCreateMessageContentNode:(id)arg1; - (void)preCreateMessageSplitNode:(id)arg1; - (void)preCreateMessageTimeNode:(id)arg1; 由这三个preCreateMessage开头的方法,可猜测到 MultiSelectTableViewCell的contentView的第一层子View 存在三类:
- 具体内容ContentNode
- 分隔符Node
- 时间Node
Hopper反汇编找到对应代码:

TimeNode
为循序渐进,先研究下TimeNode的preCreate:
由于内部有取arg2.m_view的代码,能基本猜到 arg2是 CMessageNodeData类型。(后面可以用lldb证实)
关键代码行及伪代码大概如下:
void -[BaseMsgContentViewController preCreateMessageTimeNode:](void * self, void * _cmd, void * arg2) { messageNodeData = arg2 if(messageNodeData.m_view == nil){ // 就是填充m_view // 从MMThemeManager获取时间Node的高度 r5 = [[MMThemeManager sharedThemeManager] retain]; [[r5 getValueOfProperty:@"message_node_timeNode_height" inRuleSet:@"#message_node_view"] retain]; UIView *timeRoot = [][UIView alloc]initWithFrame:....]; r11 = [[MMUILabel alloc] init]; // 这是label各种属性 r10 = [[UIImageView alloc] init]; // 设置ImageView各种属性 } 最终就是构成这个:

ContentNode
知道了TimeNode如何preCreate的,那ContentNode就类似了,只是代码更多。
void -[BaseMsgContentViewController preCreateMessageContentNode:](void * self, void * _cmd, void * arg2) { messageNodeData = arg2 if(messageNodeData.m_view == nil){ // 仍然是填充m_view // 判断是否自己发的消息 r5 = [[r11 m_msgWrap] retain]; arg_14 = [CMessageWrap isSenderFromMsgWrap:r5]; 如果是对方消息 r0 = [r8 newMessageNodeViewForMessageWrap:r4 contact:r5 chatContact:STK-1]; 如果是我发送的消息 r0 = [r8 newMessageNodeViewForMessageWrap:r6 contact:0x0 chatContact:STK-1]; 设置m_view //计算frame //GameNode特殊处理 //语音特殊处理 r2 = [VoiceMessageNodeView class]; } PS:这个方法之前的版本很长,现在的版本进行了优化。新增了newMessageNodeViewForMessageWrap方法。
void * -[BaseMsgContentViewController newMessageNodeViewForMessageWrap:contact:chatContact:](void * self, void * _cmd, void * arg2, void * arg3, void * arg4) { // 这里循环判断vector中的每个类,交给每个类判断是否是自己的类型 r0 = r5->m_messageNodeClass; for(Class in r0){ // 先判断能否创建 r4 = *(r0 + r11 * 0x4); if (([r4 canCreateMessageNodeViewInstanceWithMessageWrap: r2] & 0xff) != 0x0) goto loc_1609718; // 创建 r0 = [r4 alloc]; r4 = arg_8; r6 = arg_4; var_0 = r6; r5 = [r0 initWithMessageWrap:arg_C Contact:r4 ChatContact:STK-1]; } } canCreateMessageNodeViewInstanceWithMessageWrap
看下canCreateMessageNodeViewInstanceWithMessageWrap方法,
char +[BaseMessageNodeView canCreateMessageNodeViewInstanceWithMessageWrap:](void * self, void * _cmd, void * arg2) { return 0x0; } 先看所有NodeView的基类 BaseMessageNodeView,默认返回0x0,也就是NO。(32位下BOOL是char,这里也就是返回个BOOL类型)
再随便找个子NodeView类,例如:MessageSysNodeView
char +[MessageSysNodeView canCreateMessageNodeViewInstanceWithMessageWrap:](void * self, void * _cmd, void * arg2) { r4 = [arg2 retain]; r5 = @selector(m_uiMessageType); if ([r4 m_uiMessageType] == 0x2710) { r5 = 0x1; } else { r0 = [r4 m_uiMessageType]; r5 = 0x0; asm{ it eq }; if (r0 == 0x2712) { r5 = 0x1; } } [r4 release]; r0 = r5; return r0; } 可见。如果 m_uiMessageType(CMessageNodeData的CMessageWrap的成员)是 0x2710或0x2712,则认为是此消息类型。
再看ImageMessageNodeView:
char +[ImageMessageNodeView canCreateMessageNodeViewInstanceWithMessageWrap:](void * self, void * _cmd, void * arg2) { r4 = [arg2 retain]; r5 = @selector(m_uiMessageType); if (([r4 m_uiMessageType] == 0x3) || ([r4 m_uiMessageType] == 0xd)) { r5 = 0x1; } else { r0 = [r4 m_uiMessageType]; r5 = 0x0; asm{ it eq }; if (r0 == 0x27) { r5 = 0x1; } } [r4 release]; r0 = r5; return r0; } 可知 0x3、0xd、0x27 都是图像。
还有很多消息,不一一列出了。
最后再看下 TextMessageNodeView:
char +[TextMessageNodeView canCreateMessageNodeViewInstanceWithMessageWrap:](void * self, void * _cmd, void * arg2) { return 0x1; } 直接返回的YES。可见,如果所有消息都不是的话,则按照文本消息来处理。TextMessageNodeView也正好是最后一个push_back到 m_messageNodeClass中去的。
initWithMessageWrap
先看BaseMessageNodeView:
void * -[BaseMessageNodeView initWithMessageWrap:Contact:ChatContact:](void * self, void * _cmd, void * arg2, void * arg3, void * arg4) { 省略…… 再看看TextMessageNodeView 的initWithMessageWrap:Contact:ChatContact。 代码或多或少,没有什么关键代码。
就是根据CMessageWrap配置各种View的属性。
继续研究
下面想办法找到preCreate调用源。
准备工作
usbmuxd
➜ python-client python tcprelay.py -t 22:2222 1234:1234 Forwarding local port 2222 to remote port 22 Forwarding local port 1234 to remote port 1234 ...... ssh
ssh root@localhost -p 2222 debugserver
everettjfs-iPhone:~ root# debugserver *:1234 -a WeChat debugserver-@(#)PROGRAM:debugserver PROJECT:debugserver-320.2.89 for armv7. Attaching to process WeChat... Listening to port 1234 for a connection from *... Waiting for debugger instructions for process 0. lldb
[everettjf@e ~ ]$ lldb (lldb) process connect connect://localhost:1234 Process 67776 stopped * thread #1: tid = 0x214590, 0x31ef4474 libsystem_kernel.dylib`mach_msg_trap + 20, queue = 'com.apple.main-thread', stop reason = signal SIGSTOP frame #0: 0x31ef4474 libsystem_kernel.dylib`mach_msg_trap + 20 libsystem_kernel.dylib`mach_msg_trap: -> 0x31ef4474 <+20>: pop {r4, r5, r6, r8} 0x31ef4478 <+24>: bx lr libsystem_kernel.dylib`mach_msg_overwrite_trap: 0x31ef447c <+0>: mov r12, sp 0x31ef4480 <+4>: push {r4, r5, r6, r8} 找到偏移地址
(lldb) image list -o -f [ 0] 0x000e7000 /private/var/mobile/Containers/Bundle/Application/25FB096A-8122-49B5-9304-5FDB9080D9B0/WeChat.app/WeChat(0x00000000000eb000) [ 1] 0x031c7000 /Library/MobileSubstrate/MobileSubstrate.dylib(0x00000000031c7000) 看到image list -o -f后面的偏移地址:0x000e7000
历史消息
先看下聊天消息界面时默认加载的历史消息。
hopper中找到BaseMsgContentViewController::preCreateMessageContentNode: 的文件偏移地址:0x0160a444 
计算出真实偏移地址(我比较喜欢拿ipython当计算器):
In [1]: hex(0x000e7000+0x0160a444) Out[1]: '0x16f1444' 下断点:
(lldb) br s -a 0x16f1444 Breakpoint 1: where = WeChat`___lldb_unnamed_function80337$$WeChat, address = 0x016f1444 然后点击一个会话,进入消息界面。此时会命中断点。
这里既然命中断点了,顺带看一下 preCreateMessageContentNode 的参数类型:
(lldb) po $r0 <BaseMsgContentViewController: 0x17127c00> (lldb) po (char*)$r1 "preCreateMessageContentNode:" (lldb) po $r2 <CMessageNodeData: 0x1789bfb0> 回归正题,bt命令查看调用栈:
(lldb) bt * thread #1: tid = 0x214590, 0x016f1444 WeChat`___lldb_unnamed_function80337$$WeChat, queue = 'com.apple.main-thread', stop reason = breakpoint 1.1 * frame #0: 0x016f1444 WeChat`___lldb_unnamed_function80337$$WeChat frame #1: 0x016f2516 WeChat`___lldb_unnamed_function80343$$WeChat + 990 frame #2: 0x016f2bfe WeChat`___lldb_unnamed_function80345$$WeChat + 590 frame #3: 0x016f397e WeChat`___lldb_unnamed_function80355$$WeChat + 690 frame #4: 0x01708ac0 WeChat`___lldb_unnamed_function80565$$WeChat + 1416 frame #5: 0x26c54b8e UIKit`-[UIViewController loadViewIfRequired] + 602 frame #6: 0x26c548fc UIKit`-[UIViewController view] + 24 省略 可见这几个方法都是在主线程调用。frame#0就是preCreateMessageContentNode方法。frame #1就是调用preCreateMessageContentNode的方法。我们找下frame#1的方法。 从内存地址 0x016f2516 减去 偏移地址0x000e7000 就得到文件偏移地址:
In [4]: hex(0x016f2516-0x000e7000) Out[4]: '0x160b516' hopper 中找到这个方法: 
找到方法: 
就是这个方法:
void -[BaseMsgContentViewController addMessageNode:layout:addMoreMsg:](void * self, void * _cmd, void * arg2, char arg3, char arg4) { 下断点到这个方法的首地址 0x16f2138 = 0x000e7000 + 0x0160b138:(先清掉之前的断点)
In [6]: hex(0x000e7000 + 0x0160b138) Out[6]: '0x16f2138' (lldb) br l Current breakpoints: 1: address = WeChat[0x0160a444], locations = 1, resolved = 1, hit count = 1 1.1: where = WeChat`___lldb_unnamed_function80337$$WeChat, address = 0x016f1444, resolved, hit count = 1 (lldb) br delete 1 1 breakpoints deleted; 0 breakpoint locations disabled. (lldb) br s -a 0x16f2138 Breakpoint 3: where = WeChat`___lldb_unnamed_function80343$$WeChat, address = 0x016f2138 看下参数:
(lldb) po $r0 <BaseMsgContentViewController: 0x17127c00> (lldb) po (char*)$r1 "addMessageNode:layout:addMoreMsg:" (lldb) po $r2 {m_uiMesLocalID=384, m_ui64MesSvrID=7606243121581773106, m_nsFromUsr=wxi*h12~19, m_nsToUsr=wxi*t21~19, m_uiStatus=2, type=1, msgSource="(null)"} (lldb) po [$r2 class] CMessageWrap (lldb) p $r3 (unsigned int) $13 = 0 (lldb) p $r4 (unsigned int) $14 = 40 也就是 BaseMsgContentViewController addMessageNode:layout:addMoreMsg 方法的第一个参数是 CMessageWrap,layout是0 , addMoreMsg 是40 。
同样的步骤,看下调用栈中的剩余几个方法,汇总到一起就是:
void -[BaseMsgContentViewController preCreateMessageContentNode:](void * self, void * _cmd, void * arg2) { void -[BaseMsgContentViewController addMessageNode:layout:addMoreMsg:](void * self, void * _cmd, void * arg2, char arg3, char arg4) { void -[BaseMsgContentViewController initHistroyMessageNodeData](void * self, void * _cmd) { void -[BaseMsgContentViewController initData](void * self, void * _cmd) { void -[BaseMsgContentViewController viewDidLoad](void * self, void * _cmd) { 利用hopper的反汇编看下这几个方法,我们又找到了,initView等一系列init开头的函数。比如:initTableView 中初始化tableView,并调用了reloadData。(initData在先,initView在后)
历史消息来源
仔细看
void -[BaseMsgContentViewController initHistroyMessageNodeData](void * self, void * _cmd) { ... arg_1C = r8; r0 = [r5 GetMessageArray]; r7 = r7; 找到 [r5 GetMessageArray] 这句的汇编代码行 0x0160bb20。

断点到这行,然后输出$r0。
(lldb) br s -a 0x163db20 (这里我换了机器,重新启动了Weixin,内存偏移变为0x00032000,因此hex(0x0160BB20 + 0x00032000)=0x163db20) (lldb) po $r0 <WeixinContentLogicController: 0x1582ad20> (lldb) po (char*)$r1 "GetMessageArray" (lldb) n 省略 (lldb) po $r0 <__NSArrayM 0x1584bf30>( {m_uiMesLocalID=382, m_ui64MesSvrID=4946812604026242266, m_nsFromUsr=wxi*h12~19, m_nsToUsr=wxi*t21~19, m_uiStatus=2, type=1, msgSource="(null)"} , {m_uiMesLocalID=383, m_ui64MesSvrID=145730894416135475, m_nsFromUsr=wxi*h12~19, m_nsToUsr=wxi*t21~19, m_uiStatus=2, type=1, msgSource="(null)"} , 省略 ) (lldb) po [[$r0 firstObject]class] CMessageWrap 单步执行后,也可以看返回值$r0,也就是所有消息CMessageWrap。
可知是WeixinContentLogicController类, 看下这个类:
@interface WeixinContentLogicController : BaseMsgContentLogicController hopper看下WeixinContentLogicController的GetMessageArray方法,发现找不到。那就是在父类BaseMsgContentLogicController中。
- BaseMsgContentLogicController GetMessageArray 内部又调用了 WeixinContentLogicController GetMsg:FromID:Limit:LeftCount:LeftUnreadCount:
- WeixinContentLogicController GetMsg:FromID:Limit:LeftCount:LeftUnreadCount: r0 = [MMServiceCenter defaultCenter]; arg_30 = 0xffffffff; r0 = [r0 retain]; arg_24 = r0; arg_30 = 0x2; r2 = [CMessageMgr class]; arg_30 = 0x3; r0 = [arg_24 getService:r2]; arg_30 = 0xffffffff; arg_28 = [r0 retain]; [arg_24 release]; arg_30 = 0x4; asm{ stm.w sp, {r3, r5, r6} }; r0 = [arg_28 GetMsgByCreateTime:arg_20 FromID:arg_1C FromCreateTime:STK1 Limit:STK0 LeftCount:STK-1]; 大概就是 从 MMServiceCenter 获取到CMessageMgr,然后调用 CMessageMgr的GetMsgByCreateTime:arg_20 FromID:arg_1C FromCreateTime:STK1 Limit:STK0 LeftCount:STK-1 方法。
有两个方法:
- (id)GetMsgByCreateTime:(id)arg1 FromID:(unsigned long)arg2 FromCreateTime:(unsigned long)arg3 Limit:(unsigned long)arg4 LeftCount:(unsigned int *)arg5; - (id)GetMsgByCreateTime:(id)arg1 FromID:(unsigned long)arg2 FromCreateTime:(unsigned long)arg3 Limit:(unsigned long)arg4 LeftCount:(unsigned int *)arg5 FromSequence:(unsigned long)arg6; 第一个会调用第二个带FromSequence的方法,hopper看下第二个方法:
r0 = *objc_ivar_offset_CMessageMgr_m_oMsgDB; r2 = *(r7 + 0x14); r0 = *(r6 + r0); arg_C = r2; arg_4 = r5 + 0x5; r5 = *(r7 + 0x10); arg_8 = r5; var_0 = r8; r0 = [r0 GetMsgByCreateTime:r10 FromID:arg_24 FromCreateTime:STK2 Limit:STK1 LeftCount:STK0 FromSequence:STK-1]; r7 = r7; r4 = [r0 retain]; r1 = @selector(HandleMsgList:MsgList:); [r6 HandleMsgList:r2 MsgList:STK3]; objc_ivar_offset_CMessageMgr_m_oMsgDB 就是 CMessageDB *m_oMsgDB; 也就是调用了 CMessageDB的GetMsgByCreateTime:r10
PS:  > 在hopper中能看到不少日志信息,而且写明了当前实现文件的文件名。 后缀是.mm,当然不止这一个,微信好多类都是Objective C++实现的。包括消息主界面的 BaseMsgContentViewController.mm,以及下面CMessageMgr中的很多类。(再次猜测,微信的初期开发人员不少做Windows下C++开发客户端的哈。C开头的类……)
这个CMessageMgr也是Objective C++开发 。不过hopper能看出 GetMsgByCreateTime: 内部调用了
int -[CMessageDB GetMsg:Where:order:Limit:](int arg0) { 内部又调用:
r11 = *objc_ivar_offset_CMessageDB_m_oMMDB; r0 = *(r6 + r11); r3 = *0x26b20d8; asm{ stmeq.w sp, {r4, r10} }; arg_8 = r5; r5 = r8; r0 = [r0 GetMessagesByChatName:r5 onProperty:r3 where:STK1 order:STK0 limit:STK-1]; 调用了成员CMMDB的 GetMessagesByChatName方法。
@interface CMessageDB : NSObject { CMMDB *m_oMMDB; } CMMDB的 GetMessagesByChatName方法内部如下:
res = [arg0 GetMessageTable:r11]; r0 = [res getObjectsWhere:r10 onProperties:r4 orderBy:STK0 limit:STK-1]; 也就是对 CMMDB::GetMessageTable 的返回值调用了getObjectsWhere方法。
void * -[CMMDB GetMessageTable:](void * self, void * _cmd, void * arg2) { r4 = [[CMMDB messageTableName:arg2] retain]; r5 = [[self m_db] retain]; r3 = [DBMessage class]; r6 = [[r5 getTable:r4 withClass:r3] retain]; r0 = loc_215a20c(r6, @selector(getTable:withClass:)); 调用了 m_db( WCDataBase *m_db;) 的 getTable:withClass方法。再看进入 就是返回 WCDataBaseTable类型。
看看CMMDB的头文件
@interface CMMDB : NSObject <WCDataBaseEventDelegate> { NSRecursiveLock *m_lockMMDB; NSMutableSet *m_setMessageCreatedTable; NSMutableSet *m_setMessageExtCreatedTable; OpLogDB *m_oplogWcdb; WCDataBase *m_db; WCDataBaseTable *m_tableContact; WCDataBaseTable *m_tableContactExt; WCDataBaseTable *m_tableContactMeta; WCDataBaseTable *m_tableQQContact; WCDataBaseTable *m_tableSendMsg; WCDataBaseTable *m_tableUploadVoice; WCDataBaseTable *m_tableDownloadVoice; WCDataBaseTable *m_tableRevokeMsg; WCDataBaseTable *m_tableEmoticon; WCDataBaseTable *m_tableEmoticonUpload; WCDataBaseTable *m_tableEmoticonDownload; WCDataBaseTable *m_tableEmoticonPackage; WCDataBaseTable *m_tableBottle; WCDataBaseTable *m_tableBottleContact; WCDataBaseTable *m_tableMassSendContact; } 就是根据要获取的表类型(这里是DBMessage class)获取到对应的WCDataBaseTable实例,用来操作某个表。
PS: WCDataBase 就是对sqlite的封装了。
@interface WCDataBase : NSObject <WCDBCorruptReportInterface, WCDBHandlesPoolProtocol> { WCDBHandlesPool *m_handlesPool; struct sqlite3 *m_dbHandle; NSData *m_dbEncryptKey; BOOL m_isMemoryOnly; NSString *m_nsDBPath; NSString *m_nsDBFilePath; NSString *m_nsDBName; NSRecursiveLock *m_oLock; unsigned int m_databaseID; unsigned int m_initTime; id <WCDataBaseEventDelegate> m_eventDelegate; WCDBCorruptReport *m_corruptReport; } 进一步跟踪调用,会到:
int -[WCDataBase getObjectsOfClass:fromTable:onProperties:where:orderBy:limit:getError:](? arg0) { 这里就是对sqlite的本地查询了。
就到这里吧,知道了大体流程。但貌似有个问题,这一溜下来都是在主线程干的事情,不过看来足够快了。
PS:微信的本地sqlite数据库设计及Objective C++的封装有时间可以学习下。
新消息
上面找到了首次打开聊天界面时加载历史聊天消息的调用栈。
我还想知道,在会话界面时,新消息到来时的调用栈。那就进入聊天界面后,再下载断点,然后用另一个手机给这个账号发消息(自己发也行啊),然后看调用栈。
首先进入聊天消息页面,然后再次下断点到 preCreateMessageContentNode方法。
(lldb) br s -a 0x16f1444 Breakpoint 4: where = WeChat`___lldb_unnamed_function80337$$WeChat, address = 0x016f1444 (lldb) c error: Process is running. Use 'process interrupt' to pause execution. Process 67776 stopped * thread #1: tid = 0x214590, 0x016f1444 WeChat`___lldb_unnamed_function80337$$WeChat, queue = 'com.apple.main-thread', stop reason = breakpoint 4.1 frame #0: 0x016f1444 WeChat`___lldb_unnamed_function80337$$WeChat WeChat`___lldb_unnamed_function80337$$WeChat: -> 0x16f1444 <+0>: push {r4, r5, r6, r7, lr} 0x16f1446 <+2>: add r7, sp, #0xc 0x16f1448 <+4>: push.w {r8, r10, r11} 0x16f144c <+8>: sub.w r4, sp, #0x20 (lldb) bt * thread #1: tid = 0x214590, 0x016f1444 WeChat`___lldb_unnamed_function80337$$WeChat, queue = 'com.apple.main-thread', stop reason = breakpoint 4.1 * frame #0: 0x016f1444 WeChat`___lldb_unnamed_function80337$$WeChat frame #1: 0x016f2516 WeChat`___lldb_unnamed_function80343$$WeChat + 990 frame #2: 0x018df210 WeChat`___lldb_unnamed_function87462$$WeChat + 472 frame #3: 0x018df44e WeChat`___lldb_unnamed_function87463$$WeChat + 398 frame #4: 0x01f6e3a2 WeChat`___lldb_unnamed_function115325$$WeChat + 1242 frame #5: 0x2433e5ce Foundation`__NSThreadPerformPerform + 386 frame #6: 0x235c5fae CoreFoundation`__CFRUNLOOP_IS_CALLING_OUT_TO_A_SOURCE0_PERFORM_FUNCTION__ + 14 采用上面的方法可获得调用栈:
void -[BaseMsgContentViewController preCreateMessageContentNode:](void * self, void * _cmd, void * arg2) { void -[BaseMsgContentViewController addMessageNode:layout:addMoreMsg:](void * self, void * _cmd, void * arg2, char arg3, char arg4) { void -[BaseMsgContentLogicController DidAddMsg:](void * self, void * _cmd, void * arg2) { void -[BaseMsgContentLogicController OnAddMsg:MsgWrap:](void * self, void * _cmd, void * arg2, void * arg3) { void -[CMessageMgr MainThreadNotifyToExt:](void * self, void * _cmd, void * arg2) { __NSThreadPerformPerform __CFRUNLOOP_IS_CALLING_OUT_TO_A_SOURCE0_PERFORM_FUNCTION__ 根据调用栈,大体得知 CMessageMgr MainThreadNotifyToExt 分发出消息。又到了CMessageMgr类。
上一个方法是__NSThreadPerformPerform,可知是从其他线程使用perform过来的。(perform到主线程会加入到主线程的RunLoop中)
看看MainThreadNotifyToExt的参数。断点到第一行代码:

lldb查看:
(lldb) po $r0 po<CMessageMgr: 0x147afbe0> (lldb) po $r0 <CMessageMgr: 0x147afbe0> (lldb) po (char*)$r1 "MainThreadNotifyToExt:" (lldb) po $r2 { 1 = 1; 2 = "wxid_pamzqdzakikt21"; 3 = "{m_uiMesLocalID=394, m_ui64MesSvrID=8508546064571928607, m_nsFromUsr=wxi*t21~19, m_nsToUsr=wxi*h12~19, m_uiStatus=3, type=1, msgSource=/"/"} "; } (lldb) po [$r2 class] __NSDictionaryM (lldb) po [[$r2 objectForKey:@"3"] class] CMessageWrap (lldb) po [[$r2 objectForKey:@"2"] class] __NSCFString (lldb) po [[$r2 objectForKey:@"1"] class] __NSCFString 可知参数是个NSDictionary,key分别为字符串1 2 3,分别是 NSString NSString 以及CMessageWrap。
可知CMessageWrap是后台线程准备好的。
hopper能能看到大体流程:
center = [MMServiceCenter defaultCenter] service = getService:[MMExtensionCenter class] IMsgExt ext = service getExtension:[IMsgExt class] 然后使用IMsgExt分发消息。 IMsgExt协议如下:
@protocol IMsgExt @optional - (void)OnAddMsg:(NSString *)arg1 MsgWrap:(CMessageWrap *)arg2; - (void)OnAddMsgForSpecialSession:(NSString *)arg1 MsgList:(NSArray *)arg2; - (void)OnAddMsgListForSession:(NSDictionary *)arg1 NotifyUsrName:(NSSet *)arg2; - (void)OnBeginDownloadAppData:(CMessageWrap *)arg1; - (void)OnBeginDownloadImage:(CMessageWrap *)arg1; - (void)OnBeginDownloadVideo:(CMessageWrap *)arg1; - (void)OnChangeMsg:(NSString *)arg1 OpCode:(unsigned long)arg2; - (void)OnDelMsg:(NSString *)arg1; - (void)OnDelMsg:(NSString *)arg1 DelAll:(BOOL)arg2; - (void)OnDelMsg:(NSString *)arg1 MsgWrap:(CMessageWrap *)arg2; - (void)OnGetNewXmlMsg:(NSString *)arg1 Type:(NSString *)arg2 MsgWrap:(CMessageWrap *)arg3; - (void)OnModMsg:(NSString *)arg1 MsgWrap:(CMessageWrap *)arg2; - (void)OnMsgDownloadAppAttachExpiredFail:(NSString *)arg1 MsgWrap:(CMessageWrap *)arg2; - (void)OnMsgDownloadThumbFail:(NSString *)arg1 MsgWrap:(CMessageWrap *)arg2; - (void)OnMsgDownloadThumbOK:(NSString *)arg1 MsgWrap:(CMessageWrap *)arg2; - (void)OnMsgDownloadVideoExpiredFail:(NSString *)arg1 MsgWrap:(CMessageWrap *)arg2; - (void)OnMsgNotAddDBNotify:(NSString *)arg1 MsgWrap:(CMessageWrap *)arg2; - (void)OnMsgNotAddDBSession:(NSString *)arg1 MsgList:(NSArray *)arg2; - (void)OnPreAddMsg:(NSString *)arg1 MsgWrap:(CMessageWrap *)arg2; - (void)OnReceiveSight:(CMessageWrap *)arg1; - (void)OnRevokeMsg:(NSString *)arg1 MsgWrap:(CMessageWrap *)arg2 ResultCode:(unsigned long)arg3 ResultMsg:(NSString *)arg4 EducationMsg:(NSString *)arg5; - (void)OnSendSight:(NSString *)arg1; - (void)OnShowPush:(CMessageWrap *)arg1; - (void)OnUnReadCountChange:(NSString *)arg1; - (void)OnUpdateVideoStatus:(NSString *)arg1 MsgWrap:(CMessageWrap *)arg2; @end 具体细节就不继续分析了。大体知道了与UI相关的流程。
其他
内存占用
微信这种把消息的view 预创建到实体中,且不销毁。不销毁的意思是:退出界面会话时不会销毁;不断的下拉消息会不断的创建。一眼感觉不太考虑,看看微信内存占用情况。
首先,把微信进程结束后,重新打开。 
在这种状态下看看内存:

RSIZE=52M
然后,进入聊天界面:

RSIZE=56M
然后,使劲发消息(图片、文字各种消息),400多条,全部下拉下来。

RSIZE=81M
这样看来,由于在一个会话中打开很多消息的概率较少,且内存占用还是可接受的。占用81M感觉还是比较少的。看来这种方案还是比较靠谱的。
这种方案也有效率上的优势,就是不需要
ViewController
微信会对ViewController进行缓存,也就是对同一个用户的消息打开两次,ViewController的地址是相同的。
应该会有个缓存策略,有空研究研究。
QQ等其他实现方案
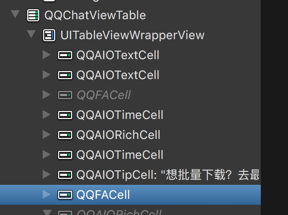
要支持IM界面的多种类型消息展示,首先想到的肯定是使用多种Cell。例如:TextCell, ImageCell 等。经典的QQ,其实就是这种方式。可以用Reveal看看。

cellForRowAtIndexPath中改变frame的问题
如果采用QQ这种使用Cell的方案,有个UI上的细节问题要注意。见这篇文章。
Demo
根据微信上面的消息界面实现,我实现了一个很简单的类似机制的界面Demo https://github.com/everettjf/WeChatLikeMessageDemo 。
实现过程中发现这种机制有个好处,就是在preCreate消息时,可以提前(在heightForRowAtIndexPath之前)知道cell的高度,也就很方便的解决了Cell动态高度这个问题。
总结
逆向可以让我们了解一个App的实现方法(尤其是优秀未开源的App哈),学习这些优秀的App可以辅助正向开发。
推荐《iOS应用逆向工程》这本书,以及 http://iosre.com 论坛。
- 本文标签: windows git cat IDE Apple XML 开源 ACE Property cmd struct 进程 数据 TCP 实例 总结 http queue tab ip 线程 开发者 时间 URLs 开发 ask message 协议 mail 数据库 UI 需求 Select 参数 core IOS 编译 db grep 配置 代码 DOM onchange src SQLite node find sql GitHub Document list lib 下载 root remote apr API App value client 文章 ORM update db2 https expat NSA CTO key Connection python Service ssh
- 版权声明: 本文为互联网转载文章,出处已在文章中说明(部分除外)。如果侵权,请联系本站长删除,谢谢。
- 本文海报: 生成海报一 生成海报二


![[HBLOG]公众号](https://www.liuhaihua.cn/img/qrcode_gzh.jpg)

