通过 Bluemix Mobile 服务提高移动应用程序安全性,第 2 部分
在第 1 部分 中,您在 Bluemix 上创建了一个 Node.js 后端,并将它连接到一个客户端移动应用程序。然后,您使用 Bluemix 的 Mobile Client Access (MCA) 服务,设置了通过 Facebook 执行客户端身份验证。在第 2 部分中,将会扩展您的 Bluemix 移动后端,以便安全地发送广播推送消息。您还将自定义客户端应用程序,使它能够在注册的 Android 和 iOS 设备上接收通知。
需要做的准备工作
如果您尚未设置第 1 部分 中的移动演示应用程序,请从这里开始设置。这里概述了本教程中使用的框架和技术:
基本开发环境:
- 一个 Bluemix 帐户
- 一个 Facebook 应用程序
- Cloud Foundry CLI
iOS 移动客户端应用程序:
- Xcode
- CocoaPods
- 一个 iOS 设备
- 一个启用了 APN 的有效开发环境及其工件(请参阅 配置 iOS 和 APN )
Android 移动客户端应用程序:
- 一个 Android 开发环境(我们推荐 Android Studio )
- 一个 GCM 发送方 ID 和 API 密钥(请参阅 Bluemix 上的说明)
我们提供了针对 Android 和 iOS 的应用程序代码,以演示如何使用移动客户端 SDK 来使用这些移动服务。
获取代码
在后面的步骤中,将为您的移动后端配置一个 Bluemix IBM Push Notifications 实例,使您能够将安全的推送通知发送到注册的移动设备。然后,将会配置注册的移动设备来接收广播通知。
第 1 步. 启用 IBM Push Notifications
备注:为了向 Apple Push Notifications 服务注册,您的 iOS 应用程序必须在物理设备上运行。
您将使用两种现有设备之一来配置您的后端,以便安全地将推送通知发送到 iOS 或 Android 移动设备: Google Cloud Messaging (GCM) for Android 或 Apple Push Notification Service (APNs) for iOS。
每个提供程序都对与其服务的交互有特定的要求。按照下面的详细说明配置您的 Bluemix 后端。
- 配置 iOS 和 APN
- 配置 Android 和 GCM
第 2 步. 从 Bluemix 仪表板发送推送通知
配置后端后,运行该应用程序并通过 Facebook 登录到您的移动客户端。您会注意到向您的 Bluemix 仪表板中的 Push Notification 服务注册成功的日志消息。
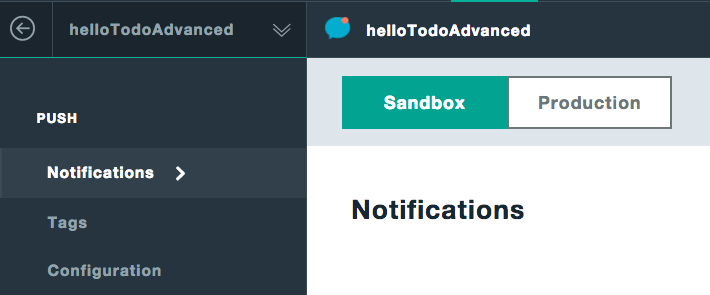
- 转到 IBM Push Notification 仪表板中的 Notifications 选项卡:


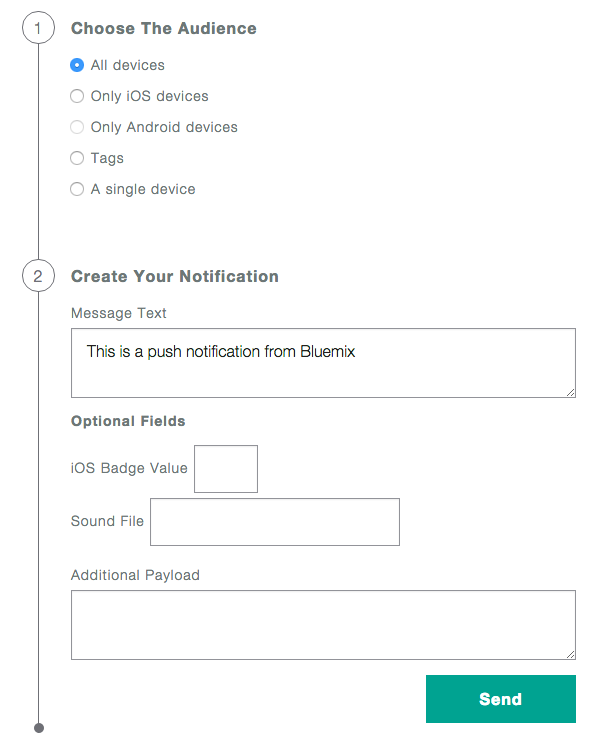
- 为通知的发送填入想要的设置。在本例中,您希望将一条简单消息发送给所有已注册的设备:

- 单击 Send 。您将收到表民该消息已成功发送的确认消息,如下面的屏幕截图所示:


请注意,iOS 允许您在发送推送通知时添加一个可选的 Badge Value 。请参阅 Bluemix 文档,进一步了解如何配置 iOS 徽章、声音、额外的 JSON 有效负载、可操作的通知和持有通知。
阅读: Bluemix:高级推送通知
通知确认和接收
您会收到一条确认消息,表明 Push Notifications 服务已成功将请求传送到您的移动应用程序的 APN 或 GCM 服务。因为不是所有通知都会立即成功或到达,表明消息已发送的确认消息并不意味着该消息已被收到。每个原生服务都有自己的等待时间并 “尽力” 处理。当您的设备收到通知时,您将看到一条包含消息文本的弹出消息。
因为安全性和交付没有保障,所以您绝不应在通知有效负载中发送关键或敏感的数据。通知最好用于更新或触发移动客户端来与外部数据库同步。
可客户端与 IBM Push Notifications 的交互
配置客户端应用程序来接收通知之前,您应该了解 Android 和 iOS 客户端 SDK 如何与 Push Notifications 服务交互。
回想一下在第 1 部分 中,您已成功地登录到 Bluemix 的 Mobile Client Access (MCA) 服务,并获取了 iOS 或 Android 客户端应用程序的正确授权令牌。尽管 Push Notification 服务不依赖于 MCA,但可以注册一个设备,在用户成功通过验证 后 接收推送通知,这是一种最佳实践。这将阻止未通过验证的用户注册和接收推送通知。
iOS 客户端
清单 1 显示了 iOS ViewController.m ,可以通过配置它来处理一个安全推送注册的第一阶段。
清单 1. ViewController.m
清单 1. ViewController.m
-(void)registerForPush{ //Check to see if device is already registered to receive push notifications if(([[UIApplication sharedApplication] isRegisteredForRemoteNotifications])){ NSLog(@"Device is already registered to receive push notifications"); } else{ [[UIApplication sharedApplication] registerUserNotificationSettings:[UIUserNotificationSettings settingsForTypes:(UIUserNotificationTypeSound | UIUserNotificationTypeAlert | UIUserNotificationTypeBadge) categories:nil]]; //call function to register Push [[UIApplication sharedApplication] registerForRemoteNotifications]; }} ViewController 检查设备是否已注册来接收推送通知,以避免重复注册。如果设备未注册,它会调用 AppDelegate.m ,后者将为应用程序和设备启动注册过程。
AppDelegate.m 有两个用来处理注册的函数: didRegisterForRemoteNotifcationsWithDeviceToken 用于成功的注册, didFailToRegisterForRemoteNotifcationsWithError 用于失败的注册。
成功后,应用程序和设备将向 Bluemix 上的 iOS APNs 服务和 Push Notification 服务注册。您将看到有日志消息输出到您的 Xcode 控制台,这些消息表明了注册的状态和 JSON 响应。
最后,当应用程序在前台运行并收到推送通知时,它将发出一条提醒。该提醒通过 AppDelegate 的 didReceiveRemoteNotification 函数中的自定义代码发送:
清单 2. AppDelegate.m
- (void) application:(UIApplication *)application didReceiveRemoteNotification:(NSDictionary *)userInfo { //the notification object NSDictionary *pushNotification = [[userInfo objectForKey:@"aps"] objectForKey:@"alert"]; //the message of the notification NSString *message = [pushNotification objectForKey:@"body"]; //show an alert with the push notification contents [self showAlert:@"Received a Push Notification" :message]; } 您可以根据您的实现的需要来自定义 didReceiveRemoteNotification 。在本例中,我们配置了消息正文来显示本地提醒。
Android 客户端
现在看看 Android 的 MainActivity.java ,您将在其中找到函数 initPush() 和 registerForPush() 。
在您的 Android 客户端成功向 MCA 验证后,会立即调用 registerForPush 函数。同样地,在验证应用程序后注册设备被视为一种最佳实践。IBM Push Notifications 服务检查重复的设备数据,以避免重复注册。然后,响应监听器会告诉 Push Notifications SDK 开始监听 NotificationListener ,后者是在注册成功后在 initPush() 中创建的。
清单 3. registerForPush()
private void registerForPush(){ Log.i(TAG, "Registering for push notifications"); // Creates response listener to handle the response when a device is registered. MFPPushResponseListener registrationResponselistener = new MFPPushResponseListener<String>() { @Override public void onSuccess(String s) { Log.i(TAG, "Successfully registered for push notifications: " + s); // Begin listening push.listen(notificationListener); } @Override public void onFailure(MFPPushException e) { Log.e(TAG,"Failed to register for notifications: " + e.getErrorMessage()); // Set null on failure so the SDK does not need to hold notifications push = null; } }; // Attempt to register device using response listener created above push.register(registrationResponselistener); } 创建了一个通知监听器来以弹出对话框的形式显示推送提醒消息。您可以注意到,该消息是 JSON 字符串,以方便使用,而且会在收到日志后打印出来。解除通知后,从 Node.js 应用程序加载所有数据。
在 onCreate() 方法中调用 notificationListener ,确保只创建和使用了一个实例。一定要管控推送客户端使用哪个监听器。(请注意,您可以同时监听多个通知监听器。)
清单 4. initPush()
清单 4. initPush()
private void initPush(){ // Initialize Push client using this activity as the context push = MFPPush.getInstance(); push.initialize(this); // Create notification listener and enable pop up alert notification when a message is received // Note: You may see some errors in the logs on notification receipt indicating missing values. These are non-fatal and can be ignored. notificationListener = new MFPPushNotificationListener() { @Override public void onReceive(final MFPSimplePushNotification message) { // The entire message is printed in the log for your understanding Log.i(TAG, "Received a Push Notification: " + message.toString()); runOnUiThread(new Runnable() { public void run() { new AlertDialog.Builder(MainActivity.this) .setTitle("Received a Push Notification") .setMessage(message.getAlert()) .setPositiveButton(android.R.string.ok, new DialogInterface.OnClickListener() { public void onClick(DialogInterface dialog, int whichButton) { // Make sure most up to date cloud data is displayed when notification is dismissed. loadList(); } }) .show(); } }); } }; } 推送通知从本地层上升到应用层时, NotificationListener 和 SDK 将包装浮动通知已方便使用。实际上,您可以根据您的实现的需要来自定义 NotificationListener 。
备注:请通过 message.getPayload() API 处理任何额外的有效负载数据。
在客户端上,在收到通知且应用程序在后台运行或关闭后,用户会在其设备上看到一个通知。基于您配置客户端应用程序的方式,该通知将是一个横幅和提醒,或者显示在通知中心内(在 iOS 上)。在用户点击通知后,应用程序将会启动并将显示通知。
阅读: Bluemix:启用通知
针对推送通知来自定义 Node.js
最初的 Node.js StrongLoop 后端基于 MobileFirst 样板代码,但我们已修改了它来启用推送通知。在本节中,我们将介绍这些更新。
首先看看 Node.js server.js 文件。您可以注意到,我们添加了一个受保护的端点,它允许应用程序将广播推送通知消息发送到注册的设备。只要一个待办事项列表项被标记为已完成,客户端应用程序就会向这个受保护的端点发出 REST 请求。
我们向 Node.js 代码添加了两个必要的新函数:一个用于获取 Bluemix 服务凭证,另一个用于通知注册的设备。
获取实例凭证
启动服务器后,会直接从 VCAP_SERVICES 获取服务凭证。这些凭证包括 pushSecret 、 appId 和您的托管 Bluemix 区域代码。您需要这些凭证,然后才能从您的移动后端发送广播通知。
这是获取服务凭证的代码。
清单 5. server.js: 获取实例凭证
清单 5. server.js: 获取实例凭证
var bodyParser = require('body-parser'); try { var vcap = JSON.parse(process.env.VCAP_SERVICES); var pushSecret = vcap.imfpush[0].credentials.appSecret; var appId = vcap.AdvancedMobileAccess[0].credentials.clientId; var url = vcap.AdvancedMobileAccess[0].credentials.serverUrl; url = url.split('.'); }catch (e) { console.error("Error encountered while obtaining Bluemix service credentials." + " Make certain that the Mobile Client Access and imfPush service are bound to this application." + " Error: " + e); } 通知注册的设备
备注:MCA clientId 始终与 appId 相同。我们还拆分了 MCA 服务器 URL 来获取托管的 Bluemix 区域代码。另请注意,MCA 以前称为 Advanced Mobile Access,在我们的一些代码中仍这样称呼它。
清单 6 展示了如何将 REST 请求发送到中央 Push Notifications URL,其中包含后端应用程序的 pushSecret 值作为 appSecret 标头。您需要使用此标头来验证 Push Notifications 实例,并发送请求的通知。 appId 、 pushSecret 和 Bluemix 区域代码会使用来自 VCAP_SERVICES 的值来动态输入。
清单 6. server.js: /notifyAllDevices
清单 6. server.js: /notifyAllDevices
/notifyAllDevices app.post('/notifyAllDevices', passport.authenticate('mca-backend-strategy', {session: false}), function(req, res){ // Create JSON body to include the completed task in push notification. var jsonObject = { "message": { "alert": "The following task has been completed: " + req.body.text } }; // Formulate and send outbound REST request using the request.js library request({ url: "https://mobile." + url[1] + ".bluemix.net/imfpush/v1/apps/" + appId + "/messages", method: "POST", json: true, body: jsonObject, headers: { 'appSecret':pushSecret } }, function (error, response, body){ if(!error && response.statusCode == 202){ console.log(response.statusCode, "Notified all devices successfully: " + body); // on success, respond to mobile app appropriately res.status(response.statusCode).send({result: "Sent notification to all registered devices.", response: body}); }else if(error){ // If an error occurred log and send to mobile app console.log("Error from Push Service: " + error); res.status(response.statusCode).send({reason: "An error occurred while sending the Push notification.", error: error}); }else{ // if no error but something else goes wrong, like no devices are registered, print response and send body to mobile app console.log("An unknown problem occurred, printing response"); console.log(response); res.status(response.statusCode).send({reason: "A problem occurred while sending the Push notification.", message: body}); } }); 备注:请保持您的 pushSecret 是安全的,除非绝对必要,否则不要将它发送到您的客户端设备。
利用清单 6 的 Node.js 端点受到了 mca-backend-strategy 中的护照身份验证的安全保护。它仅在成功验证后才接受来自您应用程序的客户端 SDK 的请求。如果身份验证失败,则不会在请求中发送相应的身份验证标头。然后,MCA 会拒绝请求,您的 Node.js 应用程序将发出一个失败响应。
阅读: Bluemix:使用 MCA 保护云资源
无需配置 Facebook 身份验证,就可以将一条请求成功发送到受保护的对象,只要它包含授权标头。移动客户端 SDK 包含在将出站 REST 请求发送到受保护的端点时所需的标头。如果没有配置 Facebook 身份验证,则会提供该标头。
一种 MCA 身份验证最佳实践
您不能在设备本地验证身份验证标头,而且该标头会在 60 分钟后过期。使用清单 6 中所示的 MCA 护照身份验证机制,以确保任何数据交互都需要有效的身份验证标头。如果标头无效或不存在,MCA 就会开始执行身份验证过程,并在向受保护的端点发出请求时提供有效的标头。要保护本示例应用程序中使用的所有端点,可以将以下代码添加到您的 server/server.js 中:
清单 7. server.js: mca-backend-strategy
app.get('/api/Items', passport.authenticate('mca-backend-strategy', {session: false})); app.post('/api/Items', passport.authenticate('mca-backend-strategy', {session: false})); app.put('/api/Items', passport.authenticate('mca-backend-strategy', {session: false})); 选择性的推送通知
备注:如果您将此代码添加到您的 server.js 中, <your_bluemix_app_name>.mybluemix.net 上的 Web 应用程序会停止正常工作。请求不会从 MCA 客户端 SDK 发起,而且不包含所需的授权标头。
我们的自定义代码会自动将推送通知发送到所有已注册的用户。在某些情况下,您可能希望只通知部分用户,或者向一个新用户发送一次性通知。只需快速对 Node.js 代码进行更新,即可使用客户端应用程序的 deviceId 来发送选择性通知,或者创建标记来将不同类型的用户分组到一起,以下参考资料中详细介绍了具体操作。
阅读: 基于标记的通知
为了通知选定的用户,您需要使用应用程序的 deviceId ,它包含在成功注册后的响应 JSON 中。在注册时,您可以将该 ID 提供给您的 Node.js 后端,或者打印出它,以便在以后通过 Bluemix Push Notifications 仪表板输入。
第 3 步. 更新和部署自定义代码
从下面的链接中获取自定义的 Node.js 代码,并按照说明将它部署到您的 Bluemix 后端应用程序。
获取代码
部署到 Bluemix
现在,更新过的 Node.js 应用程序应已在 Bluemix 环境中运行。
从客户端调用自定义 Node.js 端点
您已将自定义 Node.js 部署到您的 Bluemix 环境。现在让我们看看如何从您的客户端应用程序利用新端点。返回到示例应用程序 helloTodoAdvanced ,我们假设您想在一个列表项标记为已完成时通知注册用户。为此,您将调用 Node.js 端点 /notifyAllDevices 。
当一个列表项标记为完成时,您可向 Node.js 发出一个包含该列表项字符串的 POST 请求。REST API URL 包含 Bluemix 后端路由和在 Node 服务器上创建的 /notifyAllDevices 端点。然后,您将创建一个包含该列表项字符串的 JSON 对象,以便在您的 POST 请求中发送它。最后,使用核心 SDK 的 Request/IMFResourceRequest API,您将发送请求并适当地处理响应。
以下是针对 iOS 的代码:
清单 8. iOS
清单 8. iOS
-(void) notifyAllDevices: (NSString*) itemText { NSString *restAPIURL = [NSString stringWithFormat:@"%@/notifyAllDevices",_backendRoute]; IMFResourceRequest* request = [IMFResourceRequest requestWithPath:restAPIURL]; NSDictionary *jsonDict = [NSDictionary dictionaryWithObjectsAndKeys: itemText, @"text", nil]; NSData *data = [NSJSONSerialization dataWithJSONObject:jsonDict options:NSJSONWritingPrettyPrinted error:nil]; [request setHTTPMethod:@"POST"]; [request setValue:@"application/json" forHTTPHeaderField:@"Content-Type"]; [request setHTTPBody:data]; [request sendWithCompletionHandler:^(IMFResponse *response, NSError *error) { if (error != nil) { NSLog(@"Notifying all devices failed with error: %@",error); } else { NSLog(@"Successfully notified all devices"); } [self listItems]; }]; } 这是针对 Android 的代码:
清单 9. Android
private void notifyAllDevices(String completedItem) { Request request = new Request(bmsClient.getBluemixAppRoute() + "/notifyAllDevices", Request.POST); String json = "{/"text/":/"" + completedItem + "/"}"; HashMap headers = new HashMap(); List<String> contentType = new ArrayList<>(); contentType.add("application/json"); List<String> accept = new ArrayList<>(); accept.add("Application/json"); headers.put("Content-Type", contentType); headers.put("Accept", accept); request.setHeaders(headers); request.send(getApplicationContext(), json, new ResponseListener() { @Override public void onSuccess(Response response) { Log.i(TAG, "All registered devices notified successfully: " + response.getResponseText()); } // On failure, log errors @Override public void onFailure(Response response, Throwable throwable, JSONObject extendedInfo) { String errorMessage = ""; if (response != null) { errorMessage += response.toString() + "/n"; } if (throwable != null) { StringWriter sw = new StringWriter(); PrintWriter pw = new PrintWriter(sw); throwable.printStackTrace(pw); errorMessage += "THROWN" + sw.toString() + "/n"; } if (extendedInfo != null){ errorMessage += "EXTENDED_INFO" + extendedInfo.toString() + "/n"; } if (errorMessage.isEmpty()) errorMessage = "Request Failed With Unknown Error."; Log.e(TAG, "notifyAllDevices failed with error: " + errorMessage); } }); } 第 4 步. 运行示例应用程序
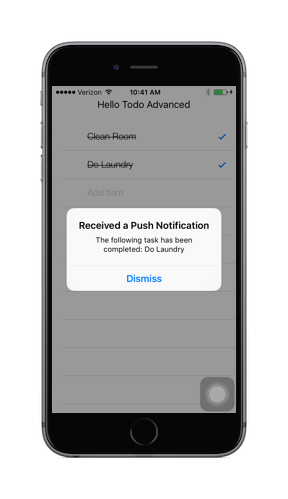
继续在您的设备上运行 helloTodoAdvanced 应用程序。您应能够看到新的自定义 Node.js 代码的影响。当将列表项标记为已完成(通过在设备屏幕中点击它的左侧),该应用程序会向您的 Node.js 应用程序中的 /notifyalldevices 端点发出一个 REST 请求。后端将使用针对所有注册用户的推送通知作为响应:
这是 iOS 上的响应:

结束语
现在您已在 Bluemix 上创建了一个移动应用程序后端。您已配置了该后端来提供 Facebook 身份验证功能,并推送了一个新 Node.js 应用程序来处理安全的广播推送通知。
作为下一步,我们建议您更仔细地查看客户端和服务器端代码。观察我们是如何使用 Android 和 iOS SDK、REST API 和第三方服务,以便使用 IBM 移动服务所提供的功能。您可以在自己的移动应用程序中自由使用所有这些概念,或者可以在 helloTodoAdvanced 源代码之上构建您的应用程序。
推荐的后续步骤:
- 使用应用程序的身份验证 ID 和用户 ID 创建特定的 DBS。
- 向特定的
deviceIds/subscription 标记发送通知。 - 使用 Cloudant 持久保存列表项数据。
- 集成 Mobile Quality Assurance。
- 在本地使用 Bluemix 服务运行 StrongLoop Node.js 应用程序。
如果您对示例应用程序或关联的 IBM 移动服务有任何问题或疑问,请在 StackOverflow 上通过标记 bluemix-mobile-services 来联系我们。
BLUEMIX SERVICES USED IN THIS TUTORIAL:
- Mobile Services Starter 样板 为您轻松开发、部署和扩展服务器端 JavaScript 应用程序提供了有利的开端。
- Mobile Client Access 提供了安全分析、安全的后端通信和用户身份验证服务。
- IBM Push Notifications 允许您向 Android 和 iOS 设备发送推送通知。
相关主题: Bluemix 移动 Node.js
- 本文标签: src map Node.js Service 实例 authenticate CocoaPods tar IDE IOS App list db lib 安全 Google JavaScript parse 服务器 同步 数据 ACE Apple value node client 密钥 API Security google cloud web final js http UI 时间 key remote build cat 移动设备 message Android java 开发 https ask 配置 代码 ORM json IBM Developer 数据库 Facebook 监听器 HTML 云 REST ip
- 版权声明: 本文为互联网转载文章,出处已在文章中说明(部分除外)。如果侵权,请联系本站长删除,谢谢。
- 本文海报: 生成海报一 生成海报二


![[HBLOG]公众号](https://www.liuhaihua.cn/img/qrcode_gzh.jpg)

