SonarQube Plugin Step by Step
插件不好写?!
插件确实不好写,因为插件是插入庞大的系统当中工作的,那也就意味着写插件需要具备一定的领域知识,包括系统架构、扩展点、业务共性及差异、API及其业务模型对应、安装和测试。而对于开发者而言,学习这些知识的代价绝对是昂贵的。在《函数式编程思想》一书中,作者Neal Ford提到开发过程当中的两种抽象方式——composable and contextual abstract. 谈及contextual抽象的时候,他把插件系统列为这一抽象中最经典的例子。
Plugin-based architectures are excellent examples of the contextual abstraction. The plug-in API provides a plethora of data structures and other useful context that developers inherit from or summon via already existing methods. But to use the API, a developer must understand what that context provides, and that understanding is sometimes expensive.
大意是开发者能够借助已存在的方法来使用Plugin API中提供的大量数据结构和有用的上下文信息。但是,理解起这些上下文信息有时是很昂贵的。
基于一个共识:开发者的时间都是宝贵的。知道插件难写之后,我的这篇文章才有价值。
理解领域模型
一说写插件,估计大家都会上官网寻找开发指南或者google大量博客来快速完成开发任务。这里不是说这种方式不好,其实一开始我也是这么做的,但是着手开发以后,很快就遭遇处处掣肘。比如:开发sonar plugin,会用到 Profile、Rule、Language 和 Repository 等概念。单从代码层面上看,我们很难理清这些概念所代表的模型和它们之间的 关系 。所以需要从用户的视角来 感受这些领域知识。
而用户视角大部分情况下就是UI界面。
规则(Rules)
我们先看看 Rules导航栏,左边的单选框是这些规则的过滤条件。说明规则包含或者被包含这些属性之下:
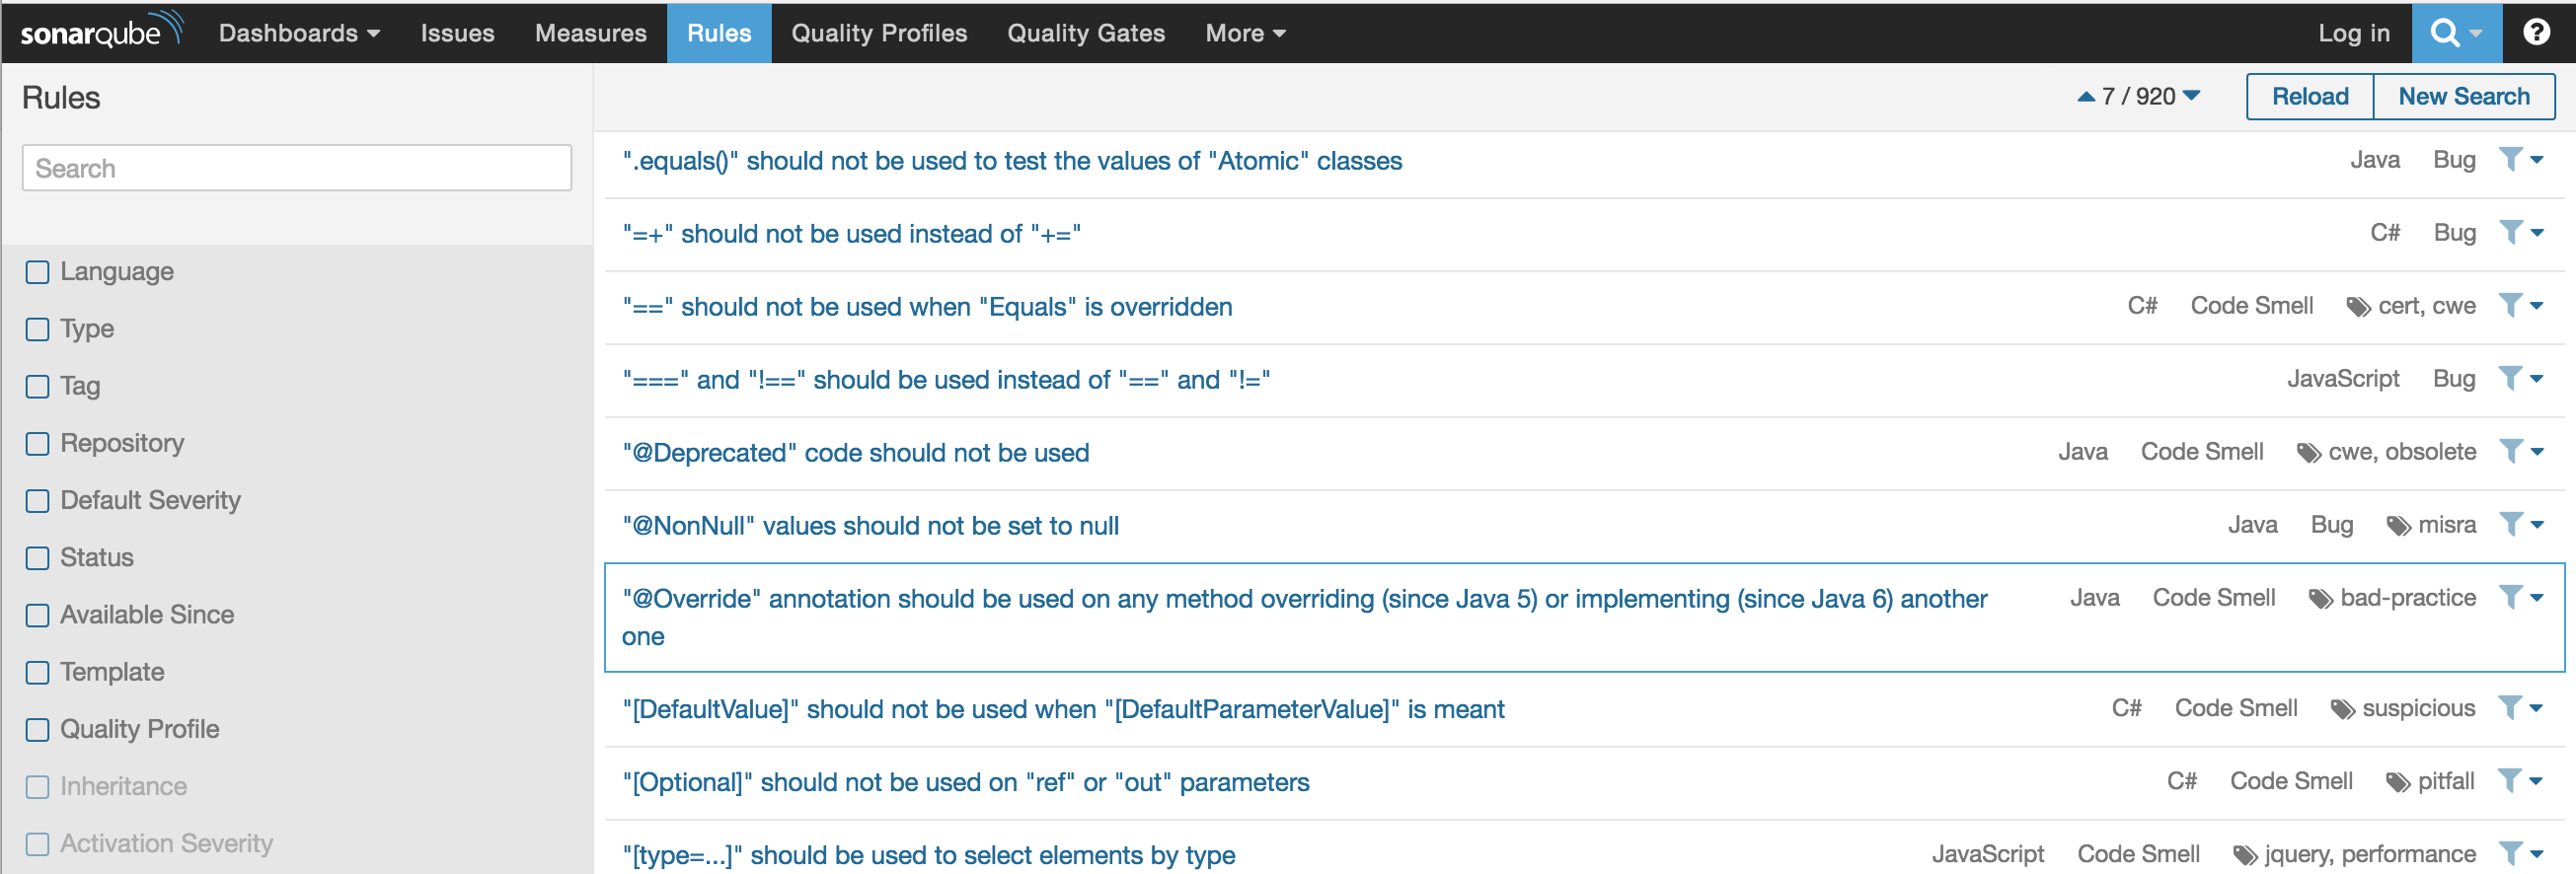
- Language:规则对应的某种编程语言。
- Type:规则的类型,比如:缺陷(Bug)、代码坏味道(Code Smell)、易受攻击(Vulnerability)。
- Tag:规则设置的标签,易于检索。
- Repository:承载特定语言下各种规则的容器;通过它可以通过规则的键值(ruleKey)检索。
- Default Severity:触犯规则的严重程度。
- Blocker:最高等级,阻碍的
- Critical:高等级,极为严重的
- Major:较高等级,主要的;默认级别。
- Minor:较低等级
- Info:低等级
- Status:规则现在的状态,可用、废弃还是实验版(Beta)。
- Avaiable Since:什么时候开始可用。
- Template:规则模板:比如某些参数可以运行时传入。
- Quality Profile:挑选特定语言下各种规则组成的配置;其中可以启用或禁用一部分规则。
质量Profile(Quality Profile)
再看看 Quality Profiles导航栏,左侧栏显示的是某种语言包含的所有Profiles.
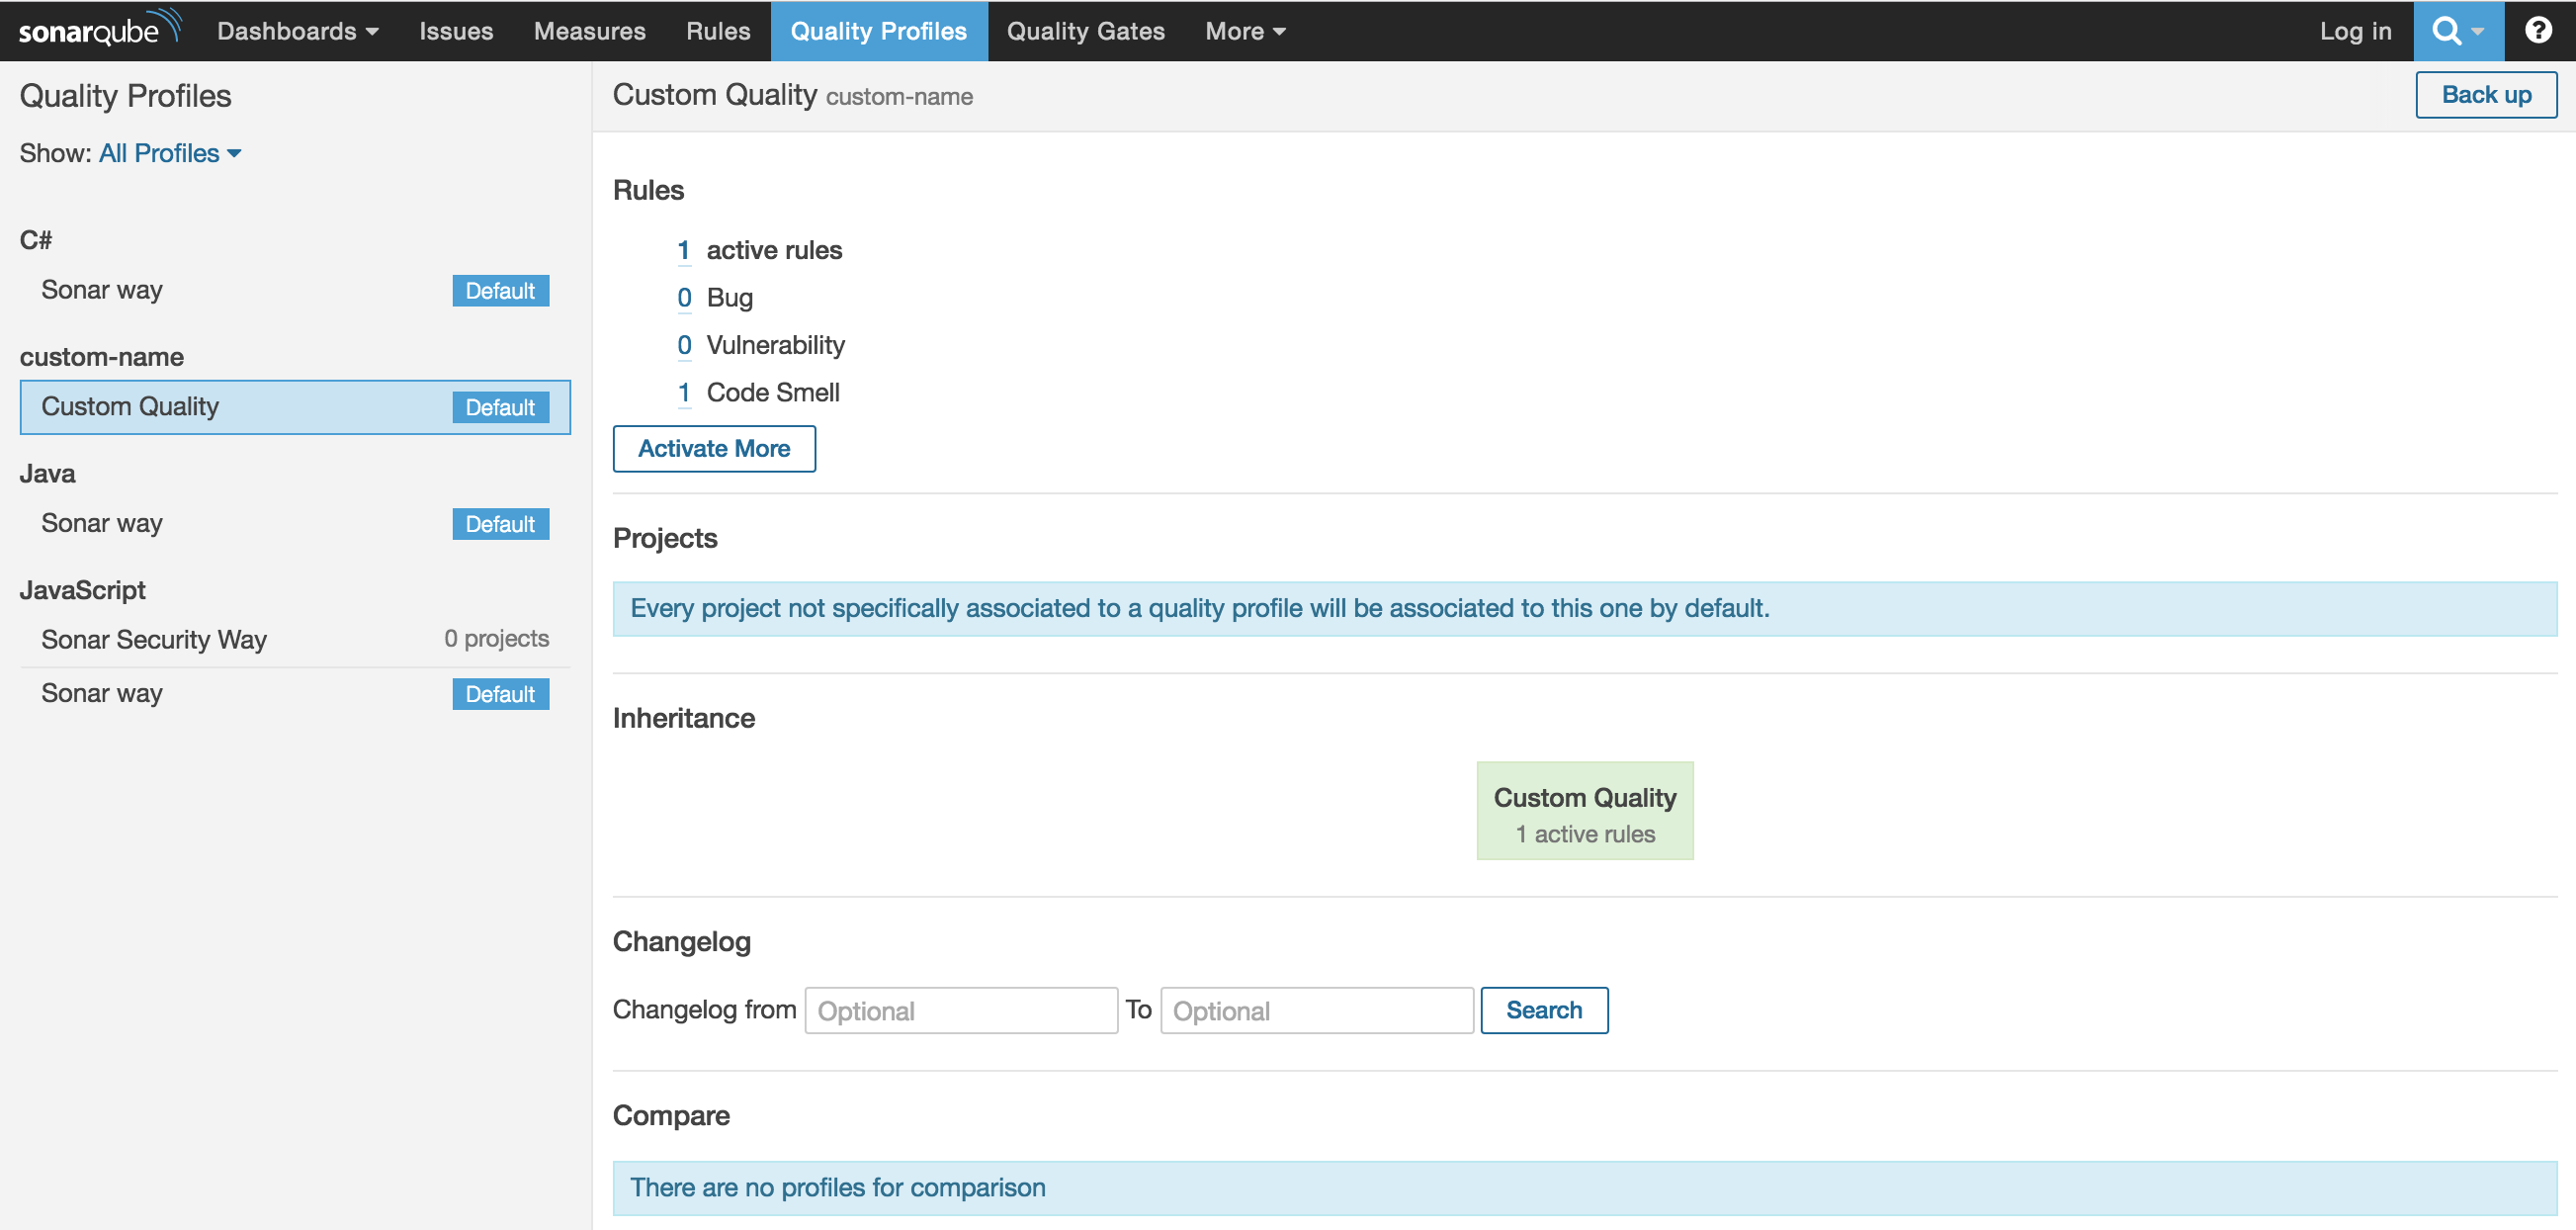
从关系型数据库的角度,Language和Profile是1对多(one-to-many)关系,但是从领域建模的角度,Profile其实和Language是1对1的关系。所以可以是Profile包含Language属性。利用领域建模的思考方式,可以联想到Repository和Rules是1对多的关系,所以Repository包含一个Rules的集合。Repository和Language是1对1的关系,Repository包含Language属性。那么Rules和Profiles的对应关系呢?多对多。但是我们更关心Profile到Rules这一层的关系,所以选择Profile包含一个Rules的集合。
我整理出这样一份对应关系图:
profile - language - [rules] respository - lanuage - [rules] 现在,缺少Profile和Repository的关系。不过既然有了Rule这一层联系,那么就可以这样考虑,Rule和Repository是1对1的关系(为什么呢?因为每个Rule显然只能存在于一个特定的Repository当中)。所以原图可以修改为:
profile - language - [rules] - rule - respository respository - language - [rules] .
扫描特定领域语言(DSL)的SonarQube插件
SonarQube 5.6现在只支持Java 8、Maven 3.1以上。当然也支持Gradle。
第一步 创建一个Maven工程
这里有两种方式。第一种方式就是从头开始写起,包括创建工程;另一种就是拷贝官方的 样例程序。我自然是推荐第二种做法,不过这里我从零开始开发。
$ mvn archetype:create -DgroupId=com.lambeta -DartifactId=sonar-lambeta -DarchetypeArtifactId=maven-archetype-quickstart 依照官方文档将pom.xml修改如下:
<project xmlns="http://maven.apache.org/POM/4.0.0" xmlns:xsi="http://www.w3.org/2001/XMLSchema-instance" xsi:schemaLocation="http://maven.apache.org/POM/4.0.0 http://maven.apache.org/xsd/maven-4.0.0.xsd"> <modelVersion>4.0.0</modelVersion> <groupId>com.lambeta</groupId> <artifactId>sonar-custom</artifactId> <version>1.0-SNAPSHOT</version> <packaging>sonar-plugin</packaging> <name>sonar-custom</name> <url>https://www.lambeta.com</url> <properties> <project.build.sourceEncoding>UTF-8</project.build.sourceEncoding> </properties> <dependencies> <dependency> <groupId>org.sonarsource.sonarqube</groupId> <artifactId>sonar-plugin-api</artifactId> <!-- minimal version of SonarQube to support. Note that the groupId was "org.codehaus.sonar" before version 5.2 --> <version>5.6</version> <!-- mandatory scope --> <scope>provided</scope> </dependency> <dependency> <groupId>net.sourceforge.pmd</groupId> <artifactId>pmd-xml</artifactId> <version>5.4.2</version> </dependency> <dependency> <groupId>dom4j</groupId> <artifactId>dom4j</artifactId> <version>1.6.1</version> </dependency> <dependency> <groupId>junit</groupId> <artifactId>junit</artifactId> <version>3.8.1</version> <scope>test</scope> </dependency> </dependencies> <build> <plugins> <plugin> <groupId>org.sonarsource.sonar-packaging-maven-plugin</groupId> <artifactId>sonar-packaging-maven-plugin</artifactId> <version>1.16</version> <extensions>true</extensions> <configuration> <pluginClass>com.lambeta.CustomPlugin</pluginClass> <pluginDescription>how to write sonar plugin</pluginDescription> </configuration> </plugin> </plugins> </build> </project> 注意:pmd-xml、dom4j会在后面的编程当中使用到。
依据标准的代码结构,新建 CustomPlugin.java 文件。
├── src │ ├── main │ │ ├── java │ │ │ └── com │ │ │ └── lambeta │ │ │ ├── CustomPlugin.java 第二步 识别扩展点
此时,该去查看 API Basics了。不过在写代码之前,还得先了解所谓的扩展点(Extension Points)。
Scanner, which runs the source code analysis Compute Engine, which consolidates the output of scanners, for example bycomputing 2nd-level measures such as ratings aggregating measures (for example number of lines of code of project = sum of lines of code of all files) assigning new issues to developers persisting everything in data stores Web application
翻译如下
- 扫描器:分析源代码
- 计算引擎:聚合扫描器的输出。举例:计算第二轮measures,如打分;聚合measures(举例:工程中所有代码的行数 = 所有文件的代码行的综合);给开发者安排新的问题;持久化。
- Web应用程序。翻译还不如不翻译!一言不合,去看例子程序...的 注释
这三个扩展点,其实对应于API中的三个接口。
扫描器 -> Sensor 计算引擎 -> MeasureComputer Web应用程序 -> Widget 第三步 定义Sensor(Scanner)
基于扫描DSL源码的需求,我们需要扩展Sensor这个接口。新建 CustomSensor.java如下:
public class CustomSensor implements Sensor public void describe(SensorDescriptor descriptor) ... public void execute(SensorContext context) ... 接下来,我们需要定义这门DSL语言的某些属性,以便于识别以及扫描时过滤相关的源文件(通过文件的后缀)。
第四步 定义语言(Language)
新建 CustomLanguage如下:
package com.lambeta; import org.sonar.api.resources.AbstractLanguage; public class CustomLanguage extends AbstractLanguage { public static final String KEY = "custom-key"; public static final String NAME = "custom-name"; public CustomLanguage() { super(KEY, NAME); } public String[] getFileSuffixes() { return new String[] {"csm.xml"}; //custom这门基于xml的内部DSL的文件后缀 } } Language定义出来了,我们还得定义rule、profile和repository. 回到上文提及的language、rule、profile以及repository的关系图:
profile - language - [rules] - rule - respository respository - language - [rules] 第五步 定义规则(Rule)
respository - language - [rules] package com.lambeta; import org.apache.commons.io.Charsets; import org.apache.commons.io.IOUtils; import org.sonar.api.server.rule.RulesDefinition; import org.sonar.api.server.rule.RulesDefinitionXmlLoader; import java.io.InputStream; public class CustomRulesDefinition implements RulesDefinition { public static final String REPOSITORY_KEY = "custom-repo"; private final RulesDefinitionXmlLoader xmlLoader; public CustomRulesDefinition(RulesDefinitionXmlLoader xmlLoader) { this.xmlLoader = xmlLoader; } public void define(Context context) { final InputStream stream = getClass().getResourceAsStream("/rules.xml"); final NewRepository repository = context.createRepository(REPOSITORY_KEY, CustomLanguage.KEY); try { if (stream != null) { xmlLoader.load(repository, stream, Charsets.UTF_8); } repository.done(); } finally { IOUtils.closeQuietly(stream); } } } 宣告加载完成。
定义的 rules.xml 内容如下:
<?xml version="1.0" encoding="UTF-8" ?> <rules> <rule> <key>ComponentsMustNotBeFollowedByComponentsRule</key> <name>Components标签后不能跟随Components标签规则</name> <description> <![CDATA[ Components标签后不能跟随Components标签 ]]> </description> <severity>MINOR</severity> <cardinality>SINGLE</cardinality> <status>READY</status> <tag>custom</tag> <example> <![CDATA[ <components> <!-- Error, components must be here! --> <components/> </components> ]]> </example> </rule> </rules> 包含了rule的key和其他相关的属性。它们最终显示在UI上,会是这样:
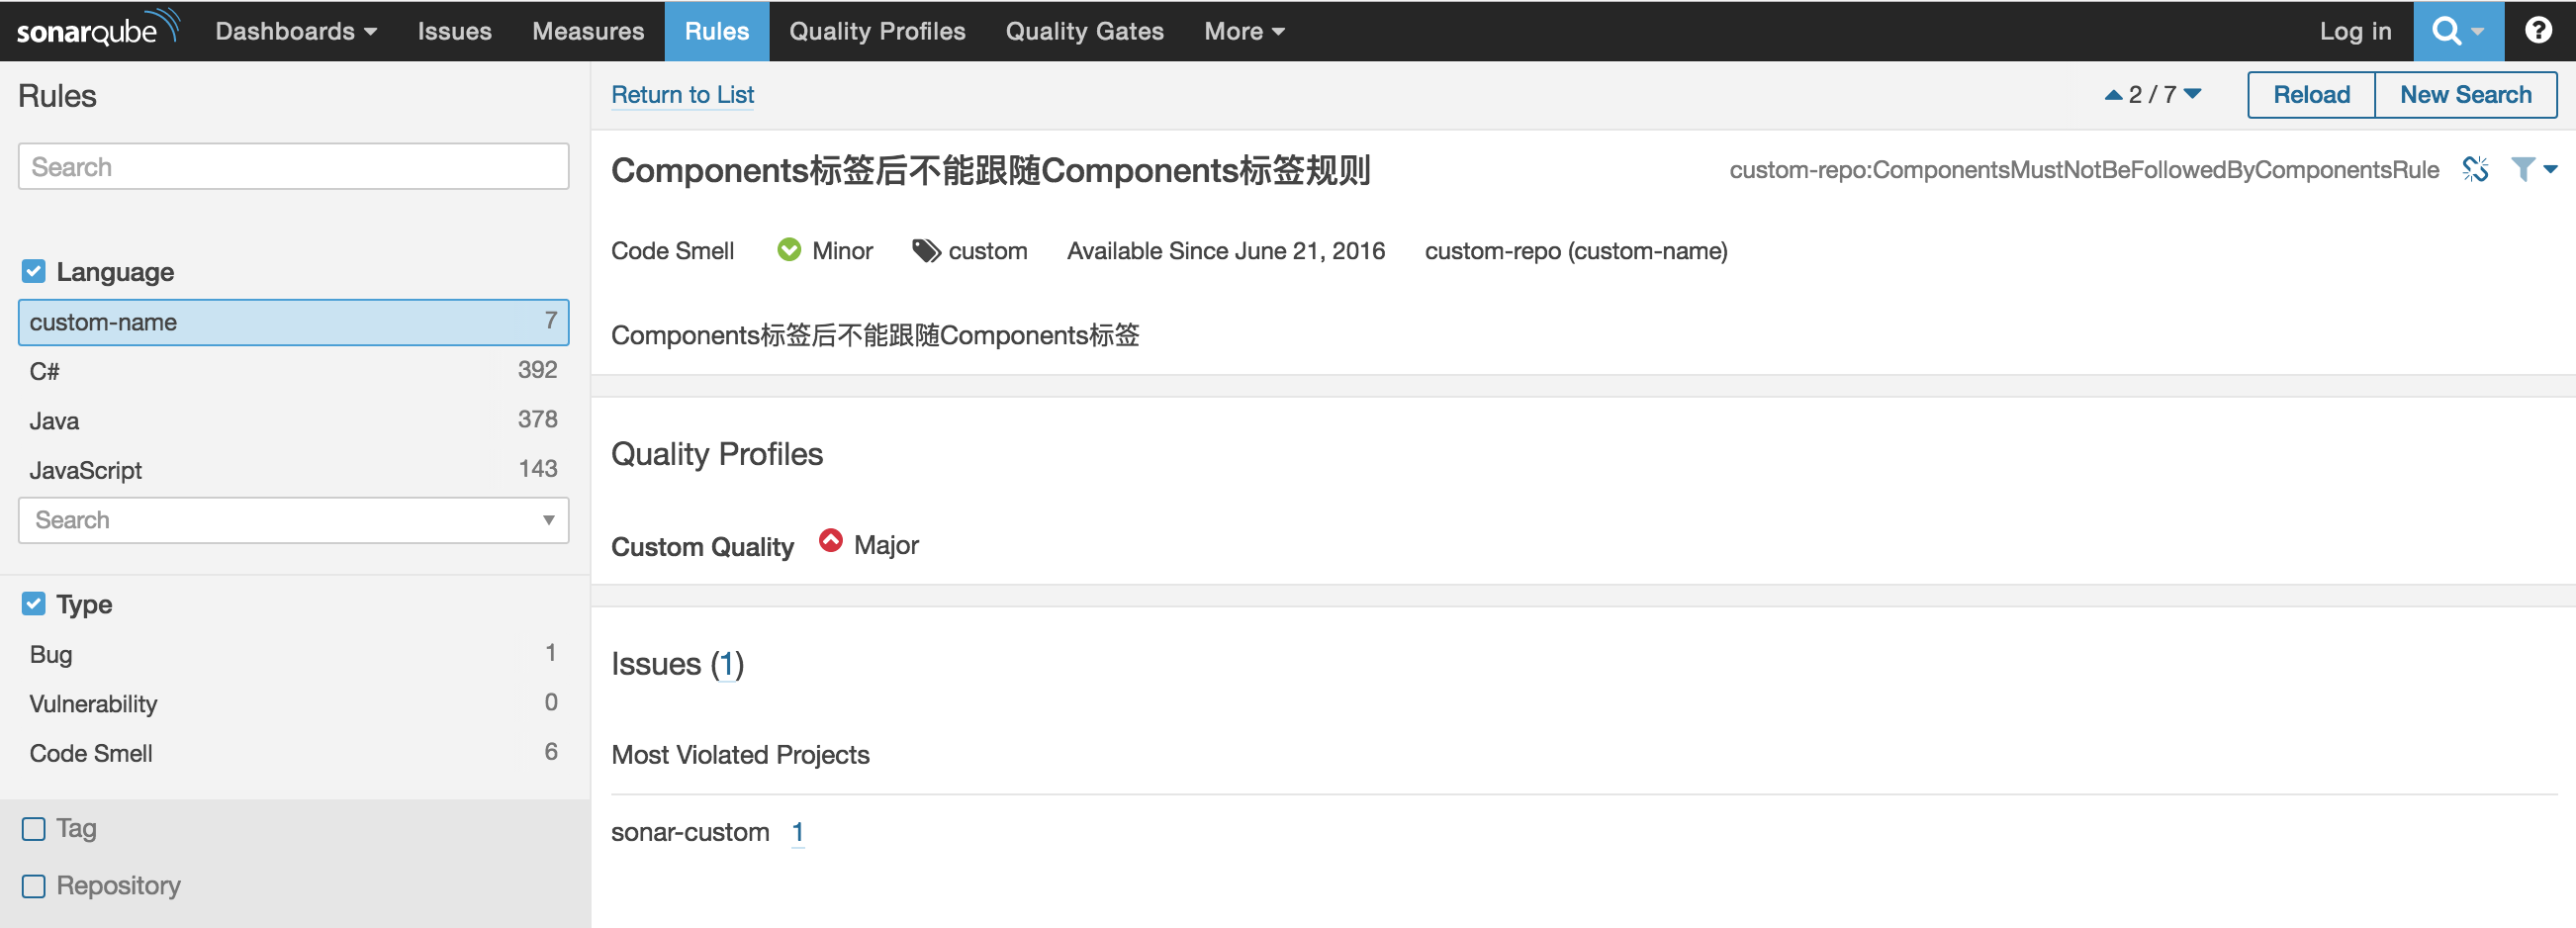
第六步 定义Profile
profile - language - [rules] - rule - respository .
package com.lambeta; import org.apache.commons.io.IOUtils; import org.sonar.api.profiles.ProfileDefinition; import org.sonar.api.profiles.RulesProfile; import org.sonar.api.profiles.XMLProfileParser; import org.sonar.api.utils.ValidationMessages; import java.io.InputStreamReader; public class CustomProfileDefinition extends ProfileDefinition { private final XMLProfileParser xmlProfileParser; public CustomProfileDefinition(XMLProfileParser xmlProfileParser) { this.xmlProfileParser = xmlProfileParser; } @Override public RulesProfile createProfile(ValidationMessages validation) { final InputStreamReader reader = new InputStreamReader(getClass().getResourceAsStream("/profile.xml")); try { return xmlProfileParser.parse(reader, validation); } finally { IOUtils.closeQuietly(reader); } } } 的内容:
<?xml version="1.0" encoding="utf-8" ?> <profile> <language>custom-key</language> <name>Custom Quality</name> <rules> <rule> <repositoryKey>custom-repo</repositoryKey> <key>ComponentsMustNotBeFollowedByComponentsRule</key> <priority>MAJOR</priority> </rule> </rules> </profile> 的profile,它关联CustomLanguage的键值:custom-key. 同时包含了多条rules,每条rule拥有自己的标识key以及其所在的repository(事实上,profile会在repository中通过ruleKey来查找rule)。
写到这里,一个DSL的SonarQube Plugin已经几近完善。但是,我们还缺少至关重要的一环—— 规则的执行!
第七步 运行PMD扫描代码
PMD简介
我们需要一个静态扫描工具来扫描源代码,发现这些代码存在的缺陷和坏味道。PMD就是这么一款好用的工具。
PMD is a source code analyzer. It finds common programming flaws like unused variables, empty catch blocks, unnecessary object creation, and so forth. It supports Java, JavaScript, PLSQL, Apache Velocity, XML, XSL.
翻译: PMD是一款源码分析工具。它会发现编程中的普遍缺陷,如未使用的变量、空的catch块、不必要的对象创建等等。它支持分析Java、Javascript、PLSQL、Apache Velocity、XML、XSL语言。
前面提到我定义的是一门基于XML的DSL,那么理所当然,可以借助PMD,扩展XML的扫描规则来满足自己的需求。
PMD在命令行中执行的方式如下:
pmd -d src/ -f xml -R myrule.xml -r dest/report.xml - -d 代表要扫描的源码目录
- -f 代表报告输出的格式
- -R 代表采用哪些规则来扫描源代码
- -r 代表报告的输出路径
注意:这里PMD的规则和SonarQube中的规则其实没有太大关系,属于两种事物。不过,为方便后续提取PMD输出的报告,需要将PMD规则的名字和Sonar规则的键值保持一致。
我们定义PMD需要使用到的规则集 custom-pmd-rules.xml :
<?xml version="1.0"?> <ruleset name="ExamplePmdRuleset" xmlns="http://pmd.sourceforge.net/ruleset/2.0.0" xmlns:xsi="http://www.w3.org/2001/XMLSchema-instance" xsi:schemaLocation="http://pmd.sourceforge.net/ruleset/2.0.0 http://pmd.sourceforge.net/ruleset_2_0_0.xsd"> <description> Example set of configured PMD rules </description> <rule name="ComponentsMustNotBeFollowedByComponentsRule" message="Components tags followed by components tag found!" language="xml" class="net.sourceforge.pmd.lang.rule.XPathRule"> <description> Tag components must not be followed by components tag. </description> <priority>1</priority> <properties> <property name="xpath"> <value>//components/components</value> </property> </properties> <example> <![CDATA[ <components> <components> </components> ]]> </example> </rule> </ruleset> 这一属性的值来构建各种不同规则。扫描中XML文件一旦匹配这些xpath规则,就会输出错误报告。
以 ComponentsMustNotBeFollowedByComponentsRule 这个自定义的规则为例。顾名思义,Components元素下不能再跟着Components元素。它在PMD扫描过程中如果被匹配上,会输出这样的报告:
<?xml version="1.0" encoding="UTF-8"?> <pmd version="5.4.2" timestamp="2016-06-23T23:06:04.120"> <file name="/Users/qianyan/github/sonar/sonar-custom/src/test/resources/wrong-syntax-but-not-csm.xml"> <violation beginline="4" endline="4" begincolumn="5" endcolumn="17" rule="ComponentsMustNotBeFollowedByComponentsRule" ruleset="ExamplePmdRuleset" priority="1"> Components tags followed by components tag found! </violation> </file> <file name="/Users/qianyan/github/sonar/sonar-custom/src/test/resources/wrong-syntax.csm.xml"> <violation beginline="4" endline="4" begincolumn="5" endcolumn="17" rule="ComponentsMustNotBeFollowedByComponentsRule" ruleset="ExamplePmdRuleset" priority="1"> Components tags followed by components tag found! </violation> </file> </pmd> PMD报告转化为Sonar的Issue
由于PMD是由Java编写的,所以我们可以在代码中调用PMD这个类 net.sourceforge.pmd.PMD根据我们写好的PMD规则,来扫描Sonar指定的目录及其文件。最后,将PMD输出的XML格式的报告转化成Sonar能够理解的Issue。
代码如下:
public void execute(SensorContext context) { File reportFile = new File(context.fileSystem().workDir(), "report.xml"); // 1 runPMD(context, reportFile); // 2 convertToIssues(context, doc(reportFile)); // 3 } - 指定PMD输出文件的路径;
- 运行PMD,输出XML格式的报告到1指定的文件当中;
- 解析报告,并转化为Issue。
下面我们一步步来解释对应的代码:
- runPMD
private void runPMD(SensorContext context, File reportFile) { final String dir = context.settings().getString("sonar.sources"); final File file = new File(dir); String[] pmdArgs = { "-f", "xml", "-R", "custom-pmd-rules.xml", "-d", dir, "-r", reportFile.getAbsolutePath(), "-e", context.settings().getString("sonar.sourceEncoding"), "-language", "xml", "-version", "1.0" }; final ClassLoader loader = Thread.currentThread().getContextClassLoader(); try { Thread.currentThread().setContextClassLoader(getClass().getClassLoader()); PMD.run(pmdArgs); } finally { Thread.currentThread().setContextClassLoader(loader); } }
我们通过PMD这个类运行pmdArgs。这里值得注意的是自SonarQube 5.6之后,我们可以通过context.settings()来获取工程的配置了,而不像以前那样依赖注入Settings对象了。
至于 Thread.currentThread().setContextClassLoader(getClass().getClassLoader()); 这步操作和Sonar使用独立的classLoader加载自己的类有关。
- convertToIssues
private void convertToIssues(SensorContext context, Document doc) { final Element root = doc.getRootElement(); final List<Element> files = root.elements("file"); for (Element file : files) { final List<Element> violations = file.elements("violation"); final String filePath = file.attributeValue("name"); final FileSystem fs = context.fileSystem(); final InputFile inputFile = fs.inputFile(fs.predicates().hasAbsolutePath(filePath)); if (inputFile == null) { LOG.info("fs predicates that there is no {}", filePath); continue; } for (Element violation : violations) { final String rule = violation.attributeValue("rule"); final int beginLine = Integer.parseInt(violation.attributeValue("beginline")); final int endLine = Integer.parseInt(violation.attributeValue("endline")); final int beginColumn = Integer.parseInt(violation.attributeValue("begincolumn")); final int endColumn = Integer.parseInt(violation.attributeValue("endcolumn")); final NewIssue newIssue = context.newIssue() .forRule(RuleKey.of(CustomRulesDefinition.REPOSITORY_KEY, rule)); final NewIssueLocation newIssueLocation = newIssue .newLocation() .on(inputFile) .at(inputFile.newRange(beginLine, beginColumn, endLine, endColumn)) .message(violation.getText()); newIssue.at(newIssueLocation).save(); } } }
这里主要是对PMD生成XML报告的解析和转换。比较需要关注是这块代码:
final InputFile inputFile = fs.inputFile(fs.predicates().hasAbsolutePath(filePath)); if (inputFile == null) { LOG.info("fs predicates that there is no {}", filePath); continue; } InputFile这是Sonar定义的合法的待扫描文件。举个例子:我们定义了一门基于XML的DSL,其文件的后缀是 csm.xml ,那么合法的待扫描文件就只能是这个后缀的文件了。像上述PMD输出的那份报告中出现的
<file name="/Users/qianyan/github/sonar/sonar-custom/src/test/resources/wrong-syntax-but-not-csm.xml"> 就是不合法的。这个文件是以xml作为后缀的,PMD肯定可以扫描它,但是对于Sonar而言,它并不是InputFile(如果不作处理,就会返回null),所以我们需要在转换为Issue之前剔除掉。
最后,不要忘记保存, newIssue.at(newIssueLocation).save(); 。
Issue呈现在UI上,是这样的:

到此,这个插件算是写完了。那么接下来的问题就是如何运行它?
使用插件扫描工程
下载sonarqube docker镜像
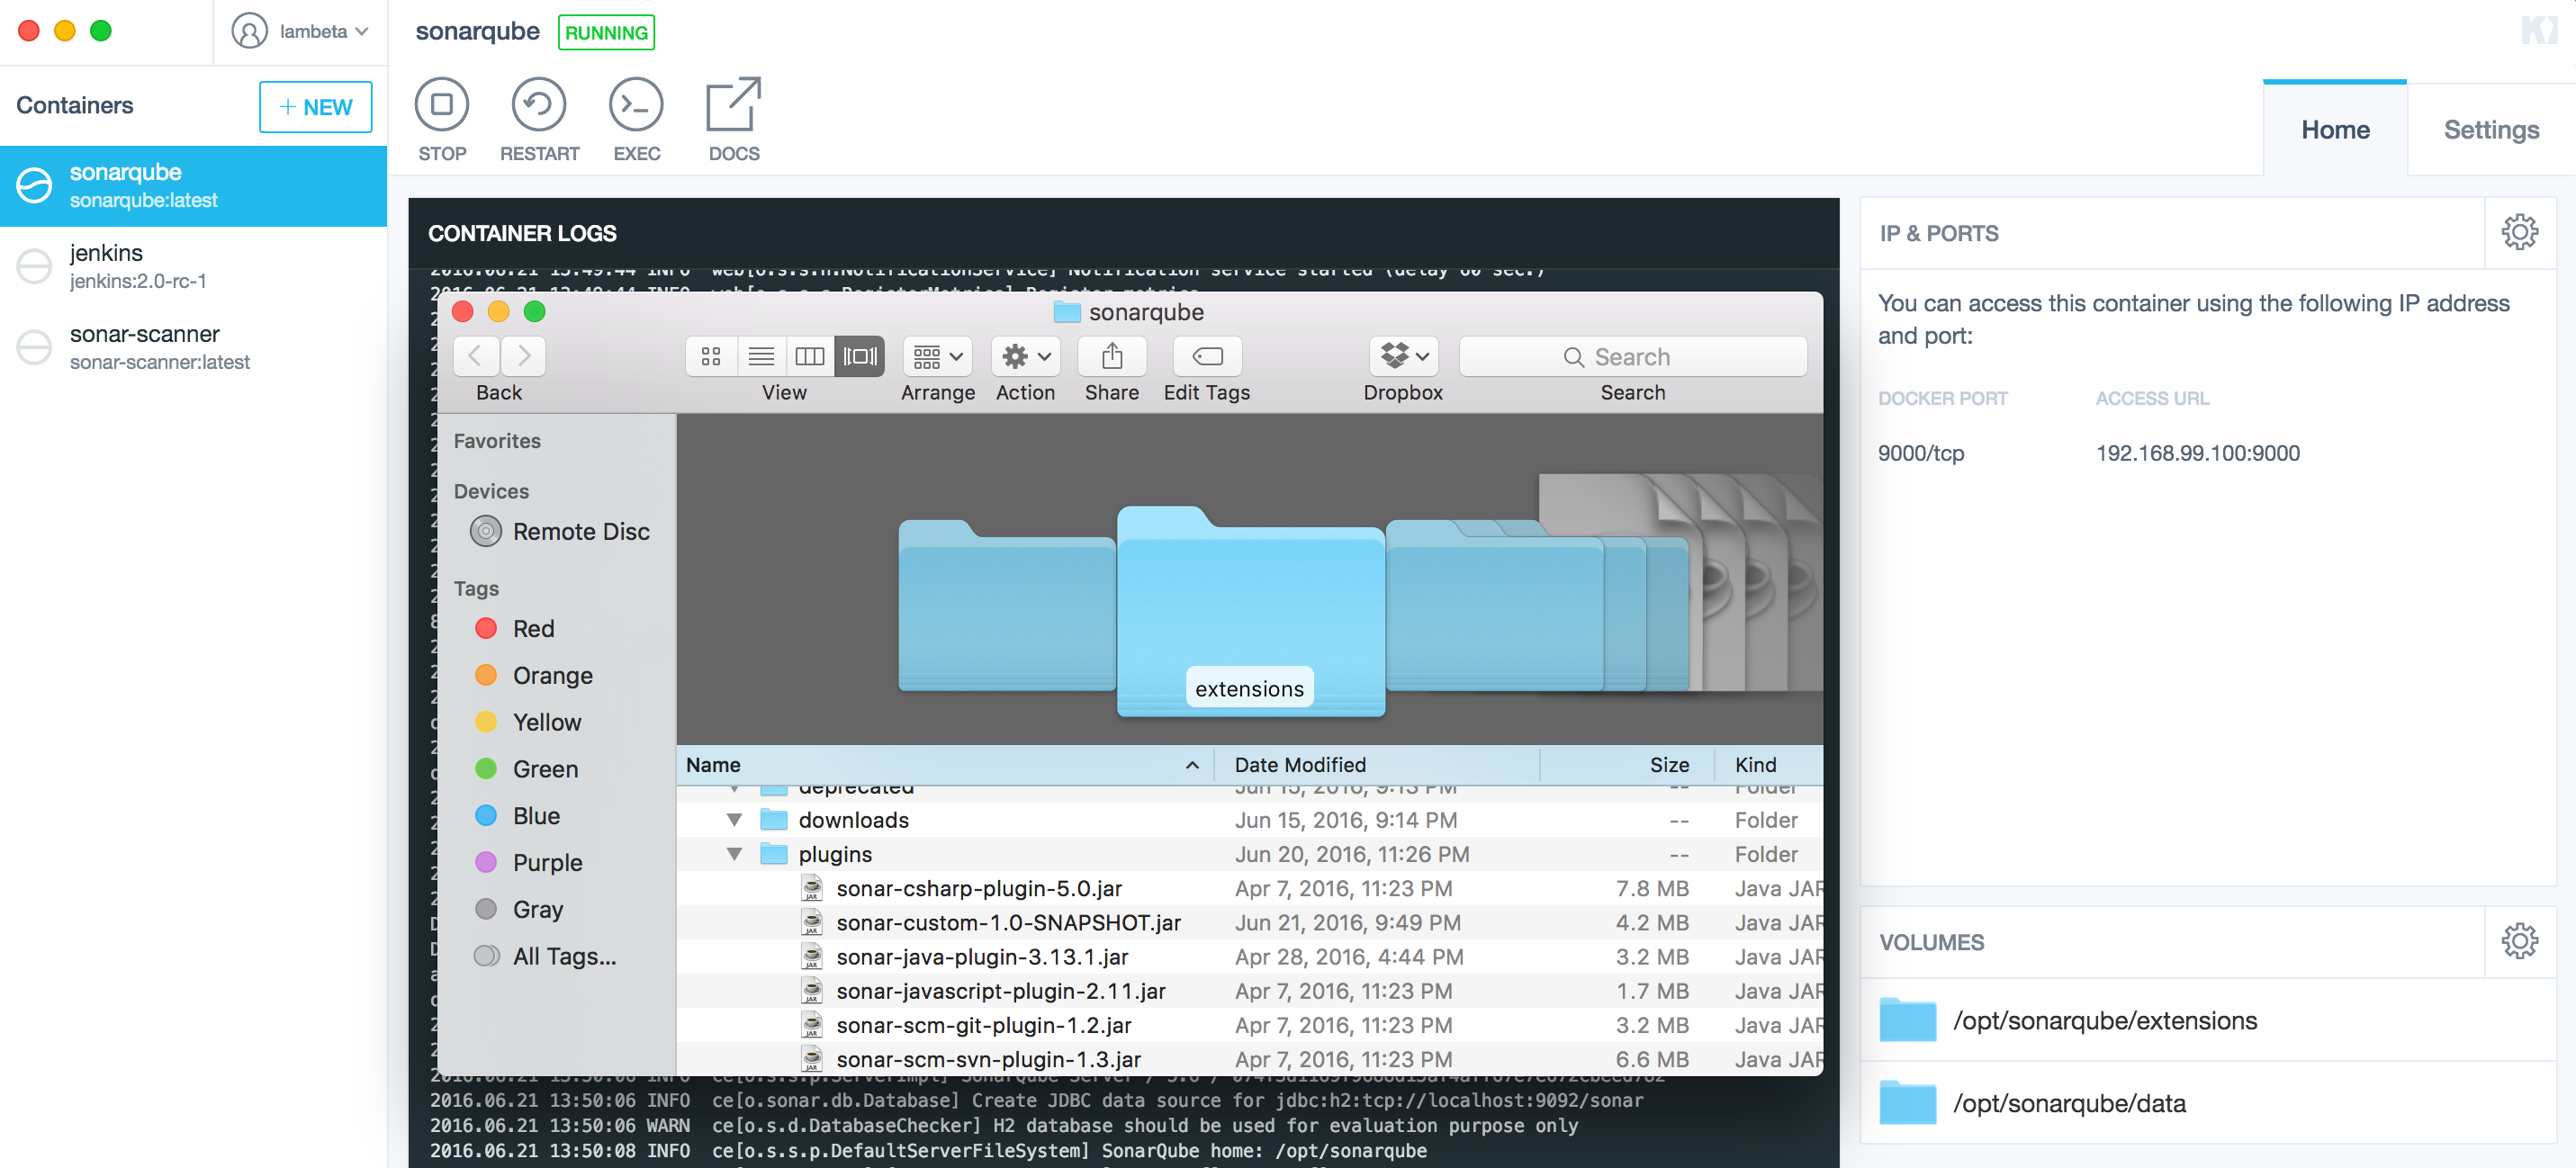
最易于调试的地方莫过于本地了。如果机器是Mac,建议使用Kitematic这个Docker的客户端下载sonarqube的官方镜像,同时将映射的Port定在9000端口上,启动该镜像的容器实例。
构建和Copy插件包
在插件的工程根目录下,运行
mvn clean package 然后执行
cp target/sonar-custom-1.0-SNAPSHOT.jar /Users/your-name/Documents/Kitematic/sonarqube/opt/sonarqube/extensions/plugins 如果plugins目录不存在,可以手动创建。执行完命令之后,重启容器。
安装Maven的sonar插件
<!-- settings.xml --> <settings xmlns="http://maven.apache.org/SETTINGS/1.0.0" xmlns:xsi="http://www.w3.org/2001/XMLSchema-instance" xsi:schemaLocation="http://maven.apache.org/SETTINGS/1.0.0 https://maven.apache.org/xsd/settings-1.0.0.xsd"> <localRepository/> <interactiveMode/> <usePluginRegistry/> <offline/> <pluginGroups> <pluginGroup>org.sonarsource.scanner.maven</pluginGroup> </pluginGroups> <profiles> <profile> <id>sonar</id> <activation> <activeByDefault>true</activeByDefault> </activation> <properties> <!-- Optional URL to server. Default value is http://localhost:9000 --> <sonar.host.url> http://192.168.99.100:9000 </sonar.host.url> </properties> </profile> </profiles> <servers/> <mirrors/> <proxies/> <activeProfiles/> </settings> 将这个settings.xml的文件放到~/.m2下。
运行Maven sonar:sonar
mvn sonar:sonar -Dsonar.sources=src/test/resources/ -Dsonar.language=custom-key -X 目录展开如下:
src/test/resources ├── right-syntax.csm.xml ├── wrong-syntax-but-not-csm.xml └── wrong-syntax.csm.xml 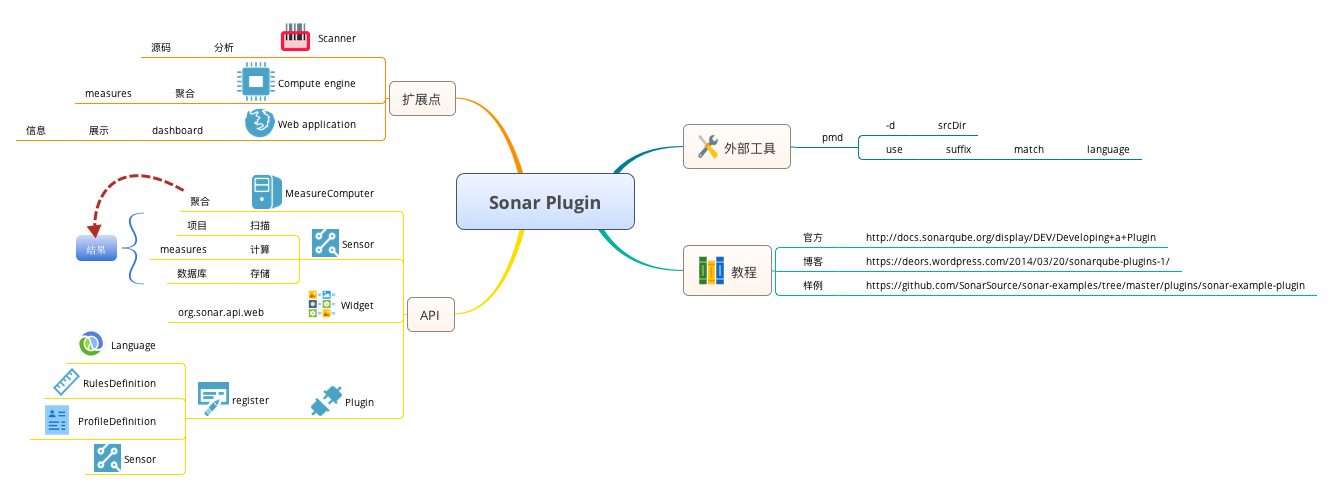

官方教程
博客
官方样例
本文样例
- 本文标签: message root GitHub pom DOM 参数 description http 调试 Action 源码 注释 git Excel Developer 安装 下载 web Google maven Document 插件 find src 开发者 Property 测试 时间 struct XML final sql 文章 apache API db parse list tar build UI 函数式编程 翻译 需求 ip Docker 开发 cat Architect java IDE 端口 解析 value example 系统架构 JavaScript ssl 代码 质量 实例 dependencies 数据库 博客 目录 数据 plugin tab App https key schema 配置
- 版权声明: 本文为互联网转载文章,出处已在文章中说明(部分除外)。如果侵权,请联系本站长删除,谢谢。
- 本文海报: 生成海报一 生成海报二


![[HBLOG]公众号](https://www.liuhaihua.cn/img/qrcode_gzh.jpg)

