用 Spring Boot 架構支援 http/2 的網站以及 Request and Response Multiplexing / Server Push 測試
本文將簡單示範如何在 Spring Boot 上架設支援 http/2 的網站,以及實際測試 http/2 的多路複用(Request and Response Multiplexing),和實作 server push。
若你想更深入了解 http/2 底層及其運作原理,可參考 https://hpbn.co/http2/ 。
環境
- jdk 1.8 以上
- gradle 2.3 以上
embedded container
就目前查到的資料來看, Spring Boot 支援的 embedded container 僅 jetty 和 undertow 可支援 http/2。雖然用 undertow 定比較簡單,但是我在實作 server push 時一直無法成功,因此最後還是採取用 jetty。
http/2 設定主要參考 http/2 with jetty ,若是有興趣了解如何用 undertow,可參考 http/2 with undertow
如何完整實作整個範例
全部原始碼可在 這裡 下載
build with gradle
首先需要設定好 build.gradle
buildscript { repositories { mavenCentral() } dependencies { classpath("org.springframework.boot:spring-boot-gradle-plugin:1.3.5.RELEASE") } } apply plugin: 'java' apply plugin: 'eclipse' apply plugin: 'idea' apply plugin: 'spring-boot' jar { baseName = 'gs-spring-boot' version = '0.1.0' } repositories { mavenCentral() } sourceCompatibility = 1.8 targetCompatibility = 1.8 dependencies { compile("org.springframework.boot:spring-boot-starter-web:1.3.5.RELEASE") compile("org.springframework.boot:spring-boot-starter-jetty:1.3.5.RELEASE") compile("org.eclipse.jetty.http2:http2-server:9.3.10.v20160621") compile("org.eclipse.jetty:jetty-alpn-server:9.3.10.v20160621") //compile("org.springframework.boot:spring-boot-starter-undertow:1.3.5.RELEASE") compile("org.mortbay.jetty.alpn:alpn-boot:8.1.8.v20160420") //因應 buildscript 下列 model 要指定版本 compile("org.eclipse.jetty:jetty-http:9.3.10.v20160621") compile("org.eclipse.jetty:jetty-io:9.3.10.v20160621") compile("org.eclipse.jetty:jetty-jndi:9.3.10.v20160621") compile("org.eclipse.jetty:jetty-plus:9.3.10.v20160621") compile("org.eclipse.jetty:jetty-security:9.3.10.v20160621") compile("org.eclipse.jetty:jetty-server:9.3.10.v20160621") compile("org.eclipse.jetty:jetty-annotations:9.3.10.v20160621") compile("org.eclipse.jetty:jetty-continuation:9.3.10.v20160621") compile("org.eclipse.jetty:jetty-servlet:9.3.10.v20160621") compile("org.eclipse.jetty:jetty-servlets:9.3.10.v20160621") compile("org.eclipse.jetty:jetty-util:9.3.10.v20160621") compile("org.eclipse.jetty:jetty-webapp:9.3.10.v20160621") compile("org.eclipse.jetty:jetty-xml:9.3.10.v20160621") compile("org.eclipse.jetty.websocket:javax-websocket-client-impl:9.3.10.v20160621") compile("org.eclipse.jetty.websocket:javax-websocket-server-impl:9.3.10.v20160621") compile("org.eclipse.jetty.websocket:websocket-api:9.3.10.v20160621") compile("org.eclipse.jetty.websocket:websocket-client:9.3.10.v20160621") compile("org.eclipse.jetty.websocket:websocket-common:9.3.10.v20160621") compile("org.eclipse.jetty.websocket:websocket-server:9.3.10.v20160621") compile("org.eclipse.jetty.websocket:websocket-servlet:9.3.10.v20160621") //lib for http2 client //compile("org.springframework:spring-web:4.3.0.RELEASE") //compile("org.springframework:spring-core:4.3.0.RELEASE") //compile("com.squareup.okhttp3:okhttp:3.3.1") } task wrapper(type: Wrapper) { gradleVersion = '2.3' } 一個簡單 Spring Boot 網站入口
撰寫一個 Application.class
@SpringBootApplication public class Application { public static void main(String[] args) { SpringApplication.run(Application.class); } 實作一個可支援 http/2 的 EmbeddedServletContainerCustomizer
撰寫 JettyHttp2Customizer.class
@Component public class JettyHttp2Customizer implements EmbeddedServletContainerCustomizer { private final ServerProperties serverProperties; @Autowired public JettyHttp2Customizer(ServerProperties serverProperties) { this.serverProperties = serverProperties; } @Override public void customize(ConfigurableEmbeddedServletContainer container) { JettyEmbeddedServletContainerFactory factory = (JettyEmbeddedServletContainerFactory) container; factory.addServerCustomizers(new JettyServerCustomizer() { @Override public void customize(Server server) { if (serverProperties.getSsl() != null && serverProperties.getSsl().isEnabled()) { ServerConnector connector = (ServerConnector) server.getConnectors()[0]; int port = connector.getPort(); SslContextFactory sslContextFactory = connector .getConnectionFactory(SslConnectionFactory.class).getSslContextFactory(); HttpConfiguration httpConfiguration = connector .getConnectionFactory(HttpConnectionFactory.class).getHttpConfiguration(); configureSslContextFactory(sslContextFactory); ConnectionFactory[] connectionFactories = createConnectionFactories(sslContextFactory, httpConfiguration); ServerConnector serverConnector = new ServerConnector(server, connectionFactories); serverConnector.setPort(port); // override existing connectors with new ones server.setConnectors(new Connector[]{serverConnector}); } } private void configureSslContextFactory(SslContextFactory sslContextFactory) { sslContextFactory.setCipherComparator(HTTP2Cipher.COMPARATOR); sslContextFactory.setUseCipherSuitesOrder(true); } private ConnectionFactory[] createConnectionFactories(SslContextFactory sslContextFactory, HttpConfiguration httpConfiguration) { SslConnectionFactory sslConnectionFactory = new SslConnectionFactory(sslContextFactory, "alpn"); ALPNServerConnectionFactory alpnServerConnectionFactory = new ALPNServerConnectionFactory("h2", "h2-17", "h2-16", "h2-15", "h2-14"); HTTP2ServerConnectionFactory http2ServerConnectionFactory = new HTTP2ServerConnectionFactory(httpConfiguration); return new ConnectionFactory[]{sslConnectionFactory, alpnServerConnectionFactory, http2ServerConnectionFactory}; } }); } } 設定 SSL
雖然 http/2 沒規定一定要加密協定(例如 SSL),但目前大部分瀏覽器的 http/2 都需要跑在 https 上面
產生認證
進入專案家目錄底下輸入
Enter keystore password: Re-enter new password: What is your first and last name? [Unknown]: What is the name of your organizational unit? [Unknown]: What is the name of your organization? [Unknown]: What is the name of your City or Locality? [Unknown]: What is the name of your State or Province? [Unknown]: What is the two-letter country code for this unit? [Unknown]: Is CN=Unknown, OU=Unknown, O=Unknown, L=Unknown, ST=Unknown, C=Unknown correct?
會產一個認證檔名為:keystore.p12
設定 Spring Boot
修改 application.properties 如下
server.port = 8443 server.ssl.enable = true server.ssl.key-store = keystore.p12 server.ssl.key-store-password = mypassword server.ssl.keyStoreType = PKCS12 server.ssl.keyAlias = tomcat
修改 jvm 啟動參數
加入下面啟動參數
-Xbootclasspath/p:${USER_HOME_DIR}/.gradle/caches/modules-2/files-2.1/org.mortbay.jetty.alpn/alpn-boot/8.1.8.v20160420/a6414838c42ddfa1110ecfac50a9906e330940fc/alpn-boot-8.1.8.v20160420.jar 這時候啟動你的 web,一個支援 http/2 的網站就完成了。
來驗證吧
先在瀏覽器上安裝 "http 2 and spdy indicator" ( chrome 和 firefox 都有這套件)。
開啟頁面 http://localhost:8443 ,
如果在瀏覽器右上角看到閃電亮起來如下圖,就代表成功啦!

Request and Response Multiplexing 和 server push
http/2 在 TCP/IP 四層中的 Application 層中多塞了一層 Binnary Framing Layer,而這一機制也改變了 server 和 client 交換資料的方式:
Request and Response Multiplexing
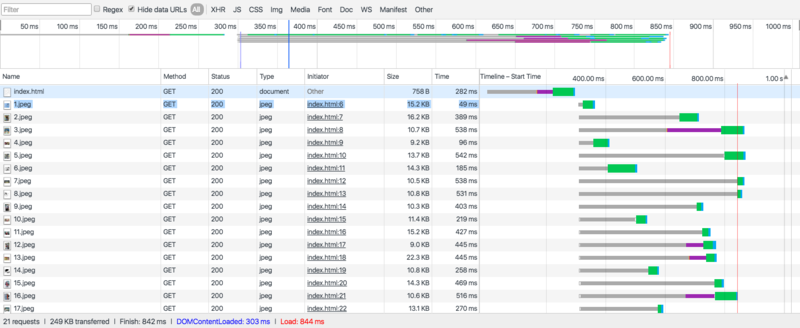
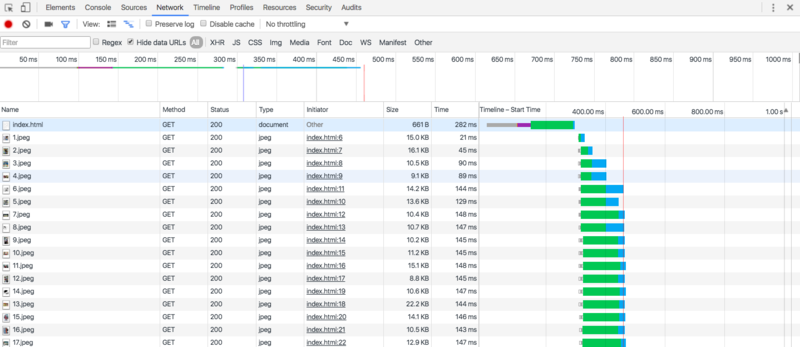
有別於 http/1.x 中一個 request 就佔據一個 connection,http/2 中一個 connection 可以同時提供給多個 request 和 response 交錯傳輸資料。先寫個簡單的 index.html,開場就先跟 server 發出 20 個影像檔請求:
<!DOCTYPE html> <html lang="en"> <head> </head> <body> <img src="1.jpeg"> <img src="2.jpeg"> <img src="3.jpeg"> <img src="4.jpeg"> <img src="5.jpeg"> <img src="6.jpeg"> <img src="7.jpeg"> <img src="8.jpeg"> <img src="9.jpeg"> <img src="10.jpeg"> <img src="11.jpeg"> <img src="12.jpeg"> <img src="13.jpeg"> <img src="14.jpeg"> <img src="15.jpeg"> <img src="16.jpeg"> <img src="17.jpeg"> <img src="18.jpeg"> <img src="19.jpeg"> <img src="20.jpeg"> </body> </html>
若是用 http/1.x ,在 chrome 的開發者工具中可以看到 browser 跟 server 請求資源的時間序如下圖:

而當使用 http/2 以後,變成一次同時發出全部請求:

更棒的是只要你修改設定讓網站支援 http/2,而不用修改到任何程式碼。
測試 server push
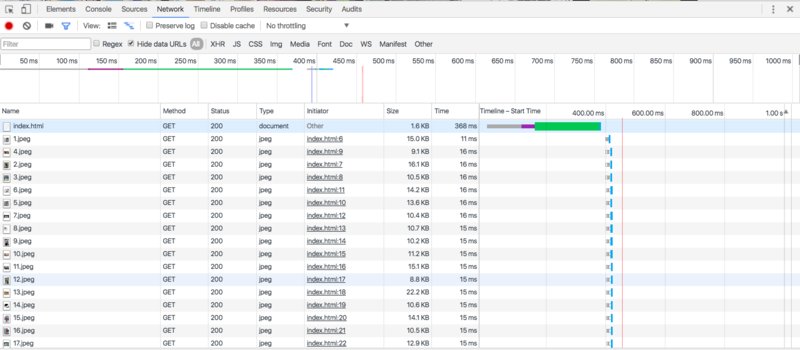
也由於 Binary framing Layer,http/2 也打破了以往一個 request 對應一個 response 的模式,可以達到一個 request,多個 respnse。這就是 server push,允許由 server 主動 push 。
可用來指定某些資源在頁面讀取前先 push 到 client 端 。
實作上也很簡單,下面是一個簡單的 範例,利用 filter 抓取連到 index.html 的請求,透過 jettyRequest push 資源給 client 端。
ServerPushFilter.class
@WebFilter(filterName = "serverPushFilter", urlPatterns = "/index.html") public class ServerPushFilter implements Filter { Logger logger = Logger.getLogger(ServerPushFilter.class); public void init(FilterConfig filterConfig) throws ServletException { } public void doFilter(ServletRequest request, ServletResponse response, FilterChain chain) throws IOException, ServletException { Request jettyRequest = (Request) request; if (jettyRequest.isPushSupported()) { logger.info("server push"); for(int i=1;i<20;i++) { jettyRequest.getPushBuilder() .path("/" + Integer.toString(i) + ".jpeg") .push(); } } else { logger.info("non http2"); } chain.doFilter(request, response); } public void destroy() { } } 再使用開發者工具看一下這次發出請求的狀況:

http/2 其他特色
其他諸如 Stream Prioritization、Flow Control 等,但目前還查不到如和實作,有機會再分享。
結論
本文簡介了如何讓 Spring Boot 架的網站支援 http/2,而不用透過 nginx 或 apache 這樣的 web server,希望能對大家有幫助。
- 本文标签: HTML client Security spring eclipse cat App build connectionFactory maven tar Connection Word classpath CTO final http ssl https TCP dependencies ask Nginx ip HTTP/2 Chrome core web tomcat API key src cache apache servlet IDE XML lib plugin java jetty UI
- 版权声明: 本文为互联网转载文章,出处已在文章中说明(部分除外)。如果侵权,请联系本站长删除,谢谢。
- 本文海报: 生成海报一 生成海报二


![[HBLOG]公众号](https://www.liuhaihua.cn/img/qrcode_gzh.jpg)

