我对Retrofit的认识
Retrofit的想的文章很多,先罗列下 我在看过觉得不错的几篇文章:
- Retrofit分析-漂亮的解耦套路 (配套视频) 特别是课时5 讲的很不错
- Retrofit分析-经典设计模式案例
这两篇文章都是stay写的,觉得真心赞。当然我也不重复他文章里面的内容了,读者们完全可以直接看他的文章。当然我写这篇文章,主要想自我总结下,谈谈自己的认识而已。
首先Retrofit之所以这么火。我觉得他里面设计模式用的好,特别是适配器模式那里。总体来说,我觉得Retrofit精髓就在三点。1、动态代理,用注解来生成请求参数;2、适配器模式的应用,请求返回各种CallAdapter,可扩展到RxJava、Java8,还有任何你自己写的Adapter;3、Converter,你可以把请求的响应用各种Converter转成你的需求上。>
接下来细细说这些东西。
Retrofit一个简单的使用过程是这样的:
Retrofit retrofit = new Retrofit.Builder()
    .baseUrl(API_URL)
    .addConverterFactory(GsonConverterFactory.create())
    .build();

// Create an instance of our GitHub API interface.
GitHub github = retrofit.create(GitHub.class);

// Create a call instance for looking up Retrofit contributors.
Call<List<Contributor>> call = github.contributors("square", "retrofit");

call.enqueue(new Callback<List<Contributor>>() {
  @Override
  public void onResponse(Call<List<Contributor>> call, Response<List<Contributor>> response) {

  }

  @Override
  public void onFailure(Call<List<Contributor>> call, Throwable t) {

  }
});
上面过程可以看成四步,也是接下来要分析的四个步骤。
1、Retrofit.Builder().build()
2、retrofit.create
3、 github.contributors
4、call.enqueue
第一步、Retrofit.Builder().build()
就是用到建造者模式。
   public Retrofit build() {
     if (baseUrl == null) {
       throw new IllegalStateException("Base URL required.");
     }
// 忽略不看 这个工厂模式基本没什么作用了,目前来说Retrofit只支持OkHttp,不能支持URLConnection或者HTTPClient
     okhttp3.Call.Factory callFactory = this.callFactory;
     if (callFactory == null) {
     //这里首先创建了一个OkHttpClient对象
       callFactory = new OkHttpClient();
     }

//然后创建Executor对象
     Executor callbackExecutor = this.callbackExecutor;
     if (callbackExecutor == null) {
       callbackExecutor = platform.defaultCallbackExecutor();
     }

//然后创建 CallAdapter对象
     // Make a defensive copy of the adapters and add the default Call adapter.
     List<CallAdapter.Factory> adapterFactories = new ArrayList<>(this.adapterFactories);
     adapterFactories.add(platform.defaultCallAdapterFactory(callbackExecutor));
// 创建Converter对象
     // Make a defensive copy of the converters.
     List<Converter.Factory> converterFactories = new ArrayList<>(this.converterFactories);

     return new Retrofit(callFactory, baseUrl, converterFactories, adapterFactories,
         callbackExecutor, validateEagerly);
   }
总结这步的步骤就是准备好要用到的东西,callAdapter是请求返回的对象,Converter是转换器,转换请求的响应到对应的实体对象,OkHttpClient是具体的OkHttp的请求客户端。
第二步、Retrofit.create();
public <T> T create(final Class<T> service) {
  Utils.validateServiceInterface(service);
  if (validateEagerly) {
    eagerlyValidateMethods(service);
  }
  return (T) Proxy.newProxyInstance(service.getClassLoader(), new Class<?>[] { service },
      new InvocationHandler() {
        private final Platform platform = Platform.get();

        @Override public Object invoke(Object proxy, Method method, Object... args)
            throws Throwable {
          // If the method is a method from Object then defer to normal invocation.
          if (method.getDeclaringClass() == Object.class) {
            return method.invoke(this, args);
          }
          if (platform.isDefaultMethod(method)) {
            return platform.invokeDefaultMethod(method, service, proxy, args);
          }
          ServiceMethod serviceMethod = loadServiceMethod(method);
          OkHttpCall okHttpCall = new OkHttpCall<>(serviceMethod, args);
          return serviceMethod.callAdapter.adapt(okHttpCall);
        }
      });
}
这里就是动态代理的原理,在使用Retrofit的时候,我们会把网络请求的接口写成这样一个接口方法。第二步只是准备这样一个代理。
第三步、调用这个接口方法
调用的时候才会真正的触发这样一个过程。
public interface GitHub {
  @GET("/repos/{owner}/{repo}/contributors")
  Call<List<Contributor>> contributors(
      @Path("owner") String owner,
      @Path("repo") String repo);
}
动态代理就是拦截GitHub接口方法调用,但接下来主要做两个工作:1、拿到这个方法的各种注解,然后配置OkHttp的网络请求参数。2、把真实的网络请求的OkHttpCall转换成该接口对应的CallAdapter。
3.1、loadServiceMethod()
ServiceMethod loadServiceMethod(Method method) {
  ServiceMethod result;
  synchronized (serviceMethodCache) {
    result = serviceMethodCache.get(method);
    if (result == null) {
      result = new ServiceMethod.Builder(this, method).build();
      serviceMethodCache.put(method, result);
    }
  }
  return result;
}
这里面对每个接口方法的注解解析生成ServiceMethod对象,使用了一个缓存,避免一个网络请求在多次调用的时候频繁的解析注解,毕竟注解解析过程消耗比较大。
这里面主要的工作又在ServiceMethod.Builder().build();
   public ServiceMethod build() {

     callAdapter = createCallAdapter();
//...
     responseConverter = createResponseConverter();

//...
     for (Annotation annotation : methodAnnotations) {
       parseMethodAnnotation(annotation);
     }
这里简单来说就是做三件事,1、找到对应的CallAdapter,2、找到对应的Converter,3、解析注解生成参数
3.1.1 找到对应的CallAdapter
for (int i = start, count = adapterFactories.size(); i < count; i++) {
  CallAdapter<?> adapter = adapterFactories.get(i).get(returnType, annotations, this);
  if (adapter != null) {
    return adapter;
  }
}
在找对应的callAdapter的时候,是根据不同的CallAdapterFactory的返回类型来区分的,比如我们看下默认的ExecutorCallAdapterFactory
public CallAdapter<Call<?>> get(Type returnType, Annotation[] annotations, Retrofit retrofit) {
  if (getRawType(returnType) != Call.class) {
    return null;
  }
  final Type responseType = Utils.getCallResponseType(returnType);
  return new CallAdapter<Call<?>>() {
    @Override public Type responseType() {
      return responseType;
    }

    @Override public <R> Call<R> adapt(Call<R> call) {
      return new ExecutorCallbackCall<>(callbackExecutor, call);
    }
  };
}
这里就是说 返回类型是Call.class,都是使用 ExecutorCallAdapterFactory创建的的ExecutorCallbackCall。
而RxJava对应的返回类型就是Observable.class。
3.1.2 找对应的Converter
 public <T> Converter<ResponseBody, T> nextResponseBodyConverter(Converter.Factory skipPast,
     Type type, Annotation[] annotations) {

   int start = converterFactories.indexOf(skipPast) + 1;
   for (int i = start, count = converterFactories.size(); i < count; i++) {
     Converter<ResponseBody, ?> converter =
         converterFactories.get(i).responseBodyConverter(type, annotations, this);
     if (converter != null) {
       //noinspection unchecked
       return (Converter<ResponseBody, T>) converter;
     }
   }
}
看下GsonConverterFactory,
@Override
public Converter<ResponseBody, ?> responseBodyConverter(Type type, Annotation[] annotations,
    Retrofit retrofit) {
  TypeAdapter<?> adapter = gson.getAdapter(TypeToken.get(type));
  return new GsonResponseBodyConverter<>(gson, adapter);
}
3.1.3 parseMethodAnnotation
最后就是解析请求参数的工作,这部分就是解析注解上配置的网络请求参数。很多,很琐碎。
三步完成之后,ServiceMethod对象就build出来了,然后放到缓存中,避免下次再build。再回到主线的第三步,loadServiceMethod完成之后,就是创建一个OkHttpCall。
3.2、创建OKhttpCall 并adapter对应的call
这个OkHttpCall才是真正OkHttp请求的回调,但是针对我们使用的不同的回调,比如:RxJava的Observable、Call,所以有一层转换的关系,把OkHttpCall转成对应的Observable和Call。就是serviceMethod.callAdapter.adapt(okHttpCall)的工作。
就拿默认的CallAdapter说吧,这里是个匿名类。
return new CallAdapter<Call<?>>() {
      @Override public Type responseType() {
        return responseType;
      }

      @Override public <R> Call<R> adapt(Call<R> call) {
        return new ExecutorCallbackCall<>(callbackExecutor, call);
      }
    }
他的实现就是创建的一个ExecutorCallbackCall作为Call返回了。当然它里面还也持有OkHttpCall的引用。目的是为了上层的回调,下面会讲。
好了至此,主线的第三步完成,一切准备就绪了,就等网络请求了。网络请求分为异步、同步的,这里只讲异步的。同步的更简单。
第四步、call.enqueue
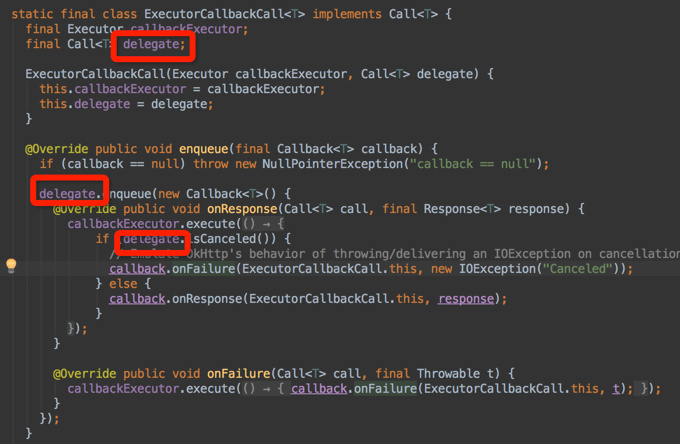
这个Call是对应选择的call,这里讲ExecutorCallbackCall

红色框起来的是,adapte步骤转换的时候,对应的call持有的真正网络请求OkHttp的Call。而这里的callbackExecutor又是运行在主线程的(这里没有跟踪代码,可以自己去查下,是这样的),所以callback的回调就运行在主线程了。
最后补充第五步,从主线上来看是看不出来Converter发挥作用的地方。
第五步、Converter的转换
就在第四步请求的时候,真实的网络请求OkHttpCall在enque的时候,里面有个onResponse,这里面调用了一个parseResponse,
Response<T> parseResponse(okhttp3.Response rawResponse) throws IOException {
  ResponseBody rawBody = rawResponse.body();


  ExceptionCatchingRequestBody catchingBody = new ExceptionCatchingRequestBody(rawBody);
  try {
   T body = serviceMethod.toResponse(catchingBody);
    return Response.success(body, rawResponse);
  } catch (RuntimeException e) {
    // If the underlying source threw an exception, propagate that rather than indicating it was
    // a runtime exception.
    catchingBody.throwIfCaught();
    throw e;
  }
}
这里面关键的又回调了serviceMethod.toResponse,这里毫无疑问的就是找到把之前找出的Converter拿出来,进行convert操作。
T toResponse(ResponseBody body) throws IOException {
  return responseConverter.convert(body);
}
至此一个完整的Retrofit的网络请求就已经完成了!
当然这里只讲了一个CallbackFactory,一个Conveter,Retrofit火就在于它能够扩张各种CallbackFactory,各种Conveter。当然配合 RxJavaCallbackFactory也是它火的一个原因。
自己拿源码走一遍吧!理解会更深刻!!


![[HBLOG]公众号](https://www.liuhaihua.cn/img/qrcode_gzh.jpg)

