Runtime系列3--给category添加属性
Associated Objects的作用
Associated Objects的作用一般有如下三种:
- 为系统类添加私有变量以帮助实现细节;
- 为系统类添加公有属性;
- 为 KVO 创建一个关联的观察者。
我们用的最多的是第二种情况。
那么给系统类添加公共属性是如何做到的呢?我们可以通过category来实现,下面具体讲讲实现过程。
category添加属性的实现原理
我们知道,在 Objective-C 中可以通过 Category 给一个系统类添加属性,但是却不能添加实例变量,这似乎成为了 Objective-C 的一个明显短板。看下面category的结构就知道
Objective-C

struct category_t {
    // 类名
    const char *name;
    // 类
    classref_t cls;
    // 实例方法
    struct method_list_t *instanceMethods;
    // 类方法
    struct method_list_t *classMethods;
    // 协议
    struct protocol_list_t *protocols;
    // 属性
    struct property_list_t *instanceProperties;
};
从以上的分类结构,可以看出,分类中是不能添加成员变量的,也就是Ivar类型。所以,如果想在分类中存储某些数据时,关联对象就是在这种情况下的常用选择。
需要注意的是,关联对象并不是成员变量,关联对象是由一个全局哈希表存储的键值对中的值。
全局哈希表
class AssociationsManager {
    static spinlock_t _lock;
    static AssociationsHashMap *_map;               // associative references:  object pointer -> PtrPtrHashMap.
public:
    AssociationsManager()   { spinlock_lock(&_lock); }
    ~AssociationsManager()  { spinlock_unlock(&_lock); }

    AssociationsHashMap &associations() {
        if (_map == NULL)
            _map = new AssociationsHashMap();
        return *_map;
    }
};
其中的AssociationsHashMap就是那个全局哈希表,而注释中也说明的很清楚了:哈希表中存储的键值对是(源对象指针 : 另一个哈希表)。而这个value,即ObjectAssociationMap对应的哈希表如下:
// hash_map和unordered_map是模版类
// 查看源码后可以看出AssociationsHashMap的key是disguised_ptr_t类型,value是ObjectAssociationMap *类型
// ObjectAssociationMap的key是void *类型,value是ObjcAssociation类型

#if TARGET_OS_WIN32
    typedef hash_map ObjectAssociationMap;
    typedef hash_map AssociationsHashMap;
#else
    typedef ObjcAllocator > ObjectAssociationMapAllocator;
    class ObjectAssociationMap : public std::map {
    public:
        void *operator new(size_t n) { return ::_malloc_internal(n); }
        void operator delete(void *ptr) { ::_free_internal(ptr); }
    };
    typedef ObjcAllocator > AssociationsHashMapAllocator;

    class AssociationsHashMap : public unordered_map {
    public:
        void *operator new(size_t n) { return ::_malloc_internal(n); }
        void operator delete(void *ptr) { ::_free_internal(ptr); }
    };
#endif
AssociationsManager里面是由一个静态AssociationsHashMap来存储所有的关联对象的。这相当于把所有对象的关联对象都存在一个全局map里面。而map的的key是这个对象的指针地址(任意两个不同对象的指针地址一定是不同的),而这个map的value又是另外一个AssociationsHashMap,里面保存了关联对象的key-value对。
实现代码范例
给系统类UIViewController添加一个name属性
#import <UIKit/UIKit.h>
@interface UIViewController (Utilities)
@property(nonatomic,strong)NSString *name;
@end
======================================
#import "UIViewController+Utilities.h"
#import <objc/runtime.h>
@implementation UIViewController (Utilities)
-(void)setName:(NSString *)name
{
    objc_setAssociatedObject(self, @selector(name), name, OBJC_ASSOCIATION_COPY);
}
-(NSString *)name
{
    return objc_getAssociatedObject(self, @selector(name));
}
@end
Associated Objects的使用
相关函数
与 Associated Objects 相关的函数主要有三个,我们可以在 runtime 源码的 runtime.h 文件中找到它们的声明:
void objc_setAssociatedObject(id object, const void *key, id value, objc_AssociationPolicy policy);
id objc_getAssociatedObject(id object, const void *key);
void objc_removeAssociatedObjects(id object);
这三个函数的命名对程序员非常友好,可以让我们一眼就看出函数的作用:
- objc_setAssociatedObject 用于给对象添加关联对象,传入 nil 则可以移除已有的关联对象;
- objc_getAssociatedObject 用于获取关联对象;
- objc_removeAssociatedObjects 用于移除一个对象的所有关联对象。
注:objc removeAssociatedObjects 函数我们一般是用不上的,因为这个函数会移除一个对象的所有关联对象,将该对象恢复成“原始”状态。这样做就很有可能把别人添加的关联对象也一并移除,这并不是我们所希望的。所以一般的做法是通过给 objc setAssociatedObject 函数传入 nil 来移除某个已有的关联对象。
key 值
关于前两个函数中的 key 值是我们需要重点关注的一个点,这个 key 值必须保证是一个对象级别(为什么是对象级别?看完下面的章节你就会明白了)的唯一常量。一般来说,有以下三种推荐的 key 值:
- 声明 static char kAssociatedObjectKey; ,使用 &kAssociatedObjectKey 作为 key 值;
- 声明 static void *kAssociatedObjectKey = &kAssociatedObjectKey; ,使用 kAssociatedObjectKey 作为 key 值;
- 用 selector ,使用 getter 方法的名称作为 key 值。
最推荐第3种方式,因为你不需要去定义一个变量名。
关联策略
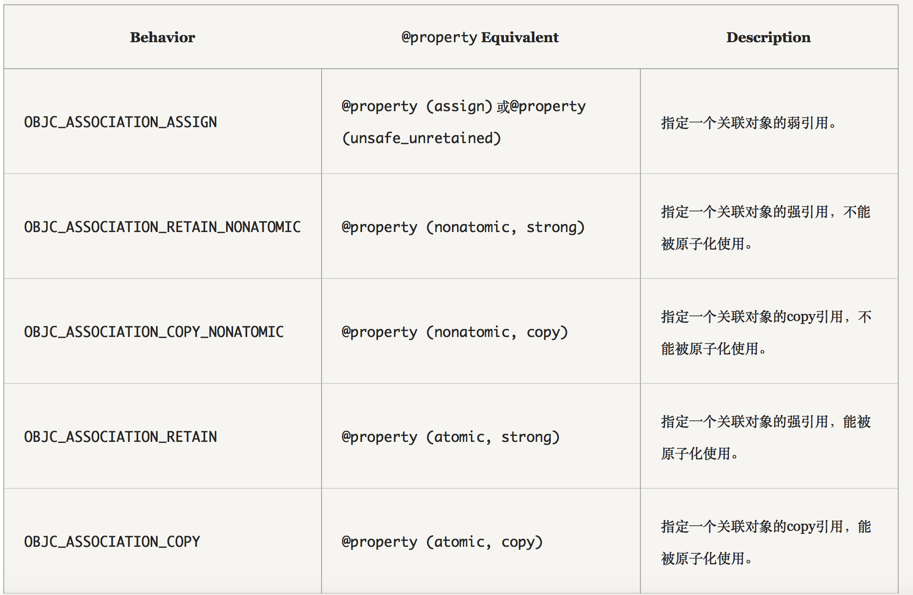
在给一个对象添加关联对象时有五种关联策略可供选择:

大多数场景我们选择OBJC ASSOCIATION RETAIN_NONATOMIC。
场景1、给button关联一个block
一般我们初始化一个UIbutton,然后给他加上点击事件,这个时候点击事件的代码需要去另外一个方法实现,导致代码太分散。我们可以给button关联一个block,把点击事件的代码都移到block里面执行。
实现代码
@interface UIButton ()

@property (nonatomic, copy) void (^callbackBlock)(UIButton * button);

@end

@implementation UIButton (Callback)

- (void (^)(UIButton *))callbackBlock {
    return objc_getAssociatedObject(self, @selector(callbackBlock));
}

- (void)setCallbackBlock:(void (^)(UIButton *))callbackBlock {
    objc_setAssociatedObject(self, @selector(callbackBlock), callbackBlock, OBJC_ASSOCIATION_COPY_NONATOMIC);
}

- (instancetype)initWithFrame:(CGRect)frame{

    if (self = [super initWithFrame:frame]) {
        [self addTarget:self action:@selector(didClickAction:) forControlEvents:UIControlEventTouchUpInside];
    }
    return self;
}

- (void)didClickAction:(UIButton *)button {
    self.callbackBlock(button);
}

@end
调用
UIButton *btn = [[UIButton alloc]initWithFrame:CGRectMake(100,100 , 100, 100)];
    [btn setTitle:@"dsd" forState:UIControlStateNormal];
    btn.backgroundColor = [UIColor redColor];
    [self.view addSubview:btn];
    btn.callbackBlock = ^(UIButton *btn){
        NSLog(@"%@",btn.titleLabel.text);
    };
场景2、给UIAlertView关联一个block
同上面的场景一样,UIAlertView的代理方法里面代码和初始化方法是分开的,我们也可以用block把他们集中到一起实现。
实现代码
#import <objc/runtime.h>

static void *alertViewBlockKey = &alertViewBlockKey;

- (void)function {

    UIAlertView *alertView = [[UIAlertView alloc] initWithTitle:@"Question"
                                                        message:@"What do you want to do?"
                                                       delegate:self
                                              cancelButtonTitle:@"Cancel"
                                              otherButtonTitles:@"Continue", nil];
    void (^block)(NSInteger) = ^(NSInteger buttonIndex) {
        if (buttonIndex == 0) {
            //你的代码;
        } else {
            //你的代码;
        }
    };
    objc_setAssociatedObject(alertView, alertViewBlockKey, block, OBJC_ASSOCIATION_COPY);
    [alertView show];
}

// UIAlertViewDelegate protocol method

- (void)alertView:(UIAlertView *)alertView clickedButtonAtIndex:(NSInteger)buttonIndex {

    void (^block)(NSInteger) = objc_getAssociatedObject(alertView, alertViewBlockKey);
    block(buttonIndex);
}
场景3、AFNetworking给UIImageView添加私有属性
当扩展一个内建类的行为时,保持附加属性的状态可能非常必要。注意以下说的是一种非常教科书式的关联对象的用例:AFNetworking在 UIImageView 的category上用了关联对象来保持一个operation对象,用于从网络上某URL异步地获取一张图片。
@interface UIImageView (_AFNetworking)
@property (readwrite, nonatomic, strong, setter = af_setImageRequestOperation:) AFHTTPRequestOperation *af_imageRequestOperation;
@end

@implementation UIImageView (_AFNetworking)

- (AFHTTPRequestOperation *)af_imageRequestOperation {
    return (AFHTTPRequestOperation *)objc_getAssociatedObject(self, @selector(af_imageRequestOperation));
}

- (void)af_setImageRequestOperation:(AFHTTPRequestOperation *)imageRequestOperation {
    objc_setAssociatedObject(self, @selector(af_imageRequestOperation), imageRequestOperation, OBJC_ASSOCIATION_RETAIN_NONATOMIC);
}

@end
@implementation UIImageView (AFNetworking)

- (void)setImageWithURLRequest:(NSURLRequest *)urlRequest
              placeholderImage:(UIImage *)placeholderImage
                       success:(void (^)(NSURLRequest *request, NSHTTPURLResponse * __nullable response, UIImage *image))success
                       failure:(void (^)(NSURLRequest *request, NSHTTPURLResponse * __nullable response, NSError *error))failure
{
    [self cancelImageRequestOperation];

    UIImage *cachedImage = [[[self class] sharedImageCache] cachedImageForRequest:urlRequest];
    if (cachedImage) {
        if (success) {
            success(urlRequest, nil, cachedImage);
        } else {
            self.image = cachedImage;
        }

        self.af_imageRequestOperation = nil;
    } else {
        if (placeholderImage) {
            self.image = placeholderImage;
        }

        __weak __typeof(self)weakSelf = self;
        self.af_imageRequestOperation = [[AFHTTPRequestOperation alloc] initWithRequest:urlRequest];
        self.af_imageRequestOperation.responseSerializer = self.imageResponseSerializer;
        [self.af_imageRequestOperation setCompletionBlockWithSuccess:^(AFHTTPRequestOperation *operation, id responseObject) {
            __strong __typeof(weakSelf)strongSelf = weakSelf;
            if ([[urlRequest URL] isEqual:[strongSelf.af_imageRequestOperation.request URL]]) {
                if (success) {
                    success(urlRequest, operation.response, responseObject);
                } else if (responseObject) {
                    strongSelf.image = responseObject;
                }

                if (operation == strongSelf.af_imageRequestOperation){
                        strongSelf.af_imageRequestOperation = nil;
                }
            }

            [[[strongSelf class] sharedImageCache] cacheImage:responseObject forRequest:urlRequest];
        } failure:^(AFHTTPRequestOperation *operation, NSError *error) {
            __strong __typeof(weakSelf)strongSelf = weakSelf;
            if ([[urlRequest URL] isEqual:[strongSelf.af_imageRequestOperation.request URL]]) {
                if (failure) {
                    failure(urlRequest, operation.response, error);
                }

                if (operation == strongSelf.af_imageRequestOperation){
                        strongSelf.af_imageRequestOperation = nil;
                }
            }
        }];

        [[[self class] af_sharedImageRequestOperationQueue] addOperation:self.af_imageRequestOperation];
    }
}
不恰当的使用场景
1、 当值不需要的时候建立一个关联对象。
一个常见的例子就是在view上创建一个方便的方法去保存来自model的属性、值或者其他混合的数据。如果那个数据在之后根本用不到,那么这种方法虽然是没什么问题的,但用关联到对象的做法并不可取。
2、当一个值可以被其他值推算出时建立一个关联对象。
例如:在调用cellForRowAtIndexPath: 时存储一个指向view的 UITableViewCell 中accessory view的引用,用于在 tableView:accessoryButtonTappedForRowWithIndexPath: 中使用。
3、 用关联对象替代X,这里的X可以代表下列含义:
- 当继承比扩展原有的类更方便时用子类化。
- 为事件的响应者添加响应动作。
- 当响应动作不方便使用时使用的手势动作捕捉。
- 行为可以在其他对象中被代理实现时要用代理(delegate)。
- 用NSNotification 和 NSNotificationCenter进行松耦合化的跨系统的事件通知。
PS:
比起其他解决问题的方法,关联对象应该被视为最后的选择(事实上category也不应该作为首选方法)。
总结:
关于category的实现细节,大家可以参考这篇文章:
http://tech.meituan.com/DiveIntoCategory.html


![[HBLOG]公众号](https://www.liuhaihua.cn/img/qrcode_gzh.jpg)

