Docker 实践(三):Mac 下构建 Rails 开发环境
rails 开发,最让人头疼的就是环境问题。其本身的理念加上某伟大防御工程的帮助,使得每次环境的配置都的花费很长的时间来解决;同时,与人协作也有诸多不便。所以一直在尝试做一个可以随时复用的开发环境来。
1. 安装 Docker
关于 Mac 下 docker 有了最新的解决方案,就是 Docker for Mac ,直接下载安装就可以了(目前尚在 beta 版本,但是对于开发环境使用足矣)。
2. 编写 Dockerfile
为了实现目的,我做了两个 docker image ,一个 base image ,命名 rails ,主要实现 rails 运行环境的基础配置,为的是以后方便复用,另一个是项目相关的 image ,主要针对特定的项目做一些配置。
rails.Dockerfile(关键部分在注释中有说明)
FROM ubuntu:16.10 # 如果下载的很慢,这里可以改成 Daocloud 的镜像:daocloud.io/library/ubuntu:trusty-XXXXXXX
MAINTAINER Tairy <tairyguo@gmail.com> # 改成你自己的

# Run update
# 为了加快 update 的速度,修改 ubuntu 源为阿里云(目前尝试的最快的,也可以自行选择其他国内的镜像)
RUN sed -i 's/archive.ubuntu.com/mirrors.aliyun.com/g' /etc/apt/sources.list /
    && apt-get update --fix-missing /
    && apt-get -y upgrade

# Install dependencies
RUN apt-get install -y git-core /
    curl zlib1g-dev build-essential /
    libssl-dev libreadline-dev
RUN apt-get update --fix-missing
RUN apt-get install -y libyaml-dev /
    libsqlite3-dev sqlite3 libxml2-dev /
    libxslt1-dev libcurl4-openssl-dev /
    python-software-properties libffi-dev

# Install rbenv
# 这里 clone 的时候可能会有点慢,可以先 clone 到本地,把下面的 clone 操作改成 ADD rbenv /root/.rbenv 操作即可。
RUN git clone git://github.com/sstephenson/rbenv.git /root/.rbenv /
    && echo 'export PATH="$HOME/.rbenv/bin:$PATH"' >> /root/.bashrc /
    && echo 'eval "$(rbenv init -)"' >> /root/.bashrc /
    && git clone git://github.com/sstephenson/ruby-build.git /root/.rbenv/plugins/ruby-build /
    && echo 'export PATH="$HOME/.rbenv/plugins/ruby-build/bin:$PATH"' >> /root/.bashrc

# 为了加速 rbenv 使用 ruby china 的加速插件
RUN git clone https://github.com/andorchen/rbenv-china-mirror.git /root/.rbenv/plugins/rbenv-china-mirror

# Install ruby
RUN /root/.rbenv/bin/rbenv install -v 2.3.1 /
    && /root/.rbenv/bin/rbenv global 2.3.1 /
    && echo "gem: --no-document" > /root/.gemrc /
    && /root/.rbenv/shims/gem sources --add https://ruby.taobao.org/ --remove https://rubygems.org/ /
    && /root/.rbenv/shims/gem install bundler /
    && /root/.rbenv/shims/gem install rails /
    && /root/.rbenv/bin/rbenv rehash
RUN apt-get install -y software-properties-common python-software-properties
# Install nodejs
RUN apt-get -y install nodejs

RUN /root/.rbenv/shims/bundle config --global frozen 1
RUN /root/.rbenv/shims/bundle config --global silence_root_warning 1

# Run project
RUN mkdir -p /working
WORKDIR /working
ONBUILD COPY Gemfile /working
ONBUILD COPY Gemfile.lock /working
ONBUILD RUN /root/.rbenv/shims/bundle install --no-deployment
ONBUILD COPY . /working

# Some tools
RUN apt-get install -y vim inetutils-ping
build
cd /path/to/Dockerfile
docker build rails .
以上,这个image 将会安装 rails 应用运行的基础环境,并且设置了 onbuild 执行的命令,之后自己的 rails 便可依赖该项目创建,例如:
demo.Dockerfile
FROM rails:latest # 这里添加依赖
MAINTAINER Tairy <tairyguo@gmail.com>

# TODO: custom env
EXPOSE 3000
将此 Dockerfile 置于 rails 的项目目录下,即可进行 build:
cd /path/to/rails/app/path
docker build demo .
3. 使用 docker-compose
使用 docker-compose 可以更好的管理容器,可在项目目录下编写 docker-compose.yml 文件(使用时删除#开头的注释内容):
# compose 版本号,选择 2 即可
version: '2'
services:
  # 数据库容器
  db:
    image: mongodb
    # 数据库端口映射
    ports:
      - "4568:27017"
  web:
       # build 路径
    build: .
    # 相当于 Dockerfile 中的 CMD
    command: /root/.rbenv/shims/bundle exec rails s -p 3000 -b 0.0.0.0
    ports:
      - "3000:3000"
    # 共享目录
    volumes:
      - .:/working
    # 依赖容器
    depends_on:
      - db
进而,执行 docker-compose up 命令即可实现容器的构建,等 server 启动完成后,就可以通过 localhost:3000 来访问了。
也可以加参数 docker-compose up -d 让其在后台运行。
4. RubyMine & Docker
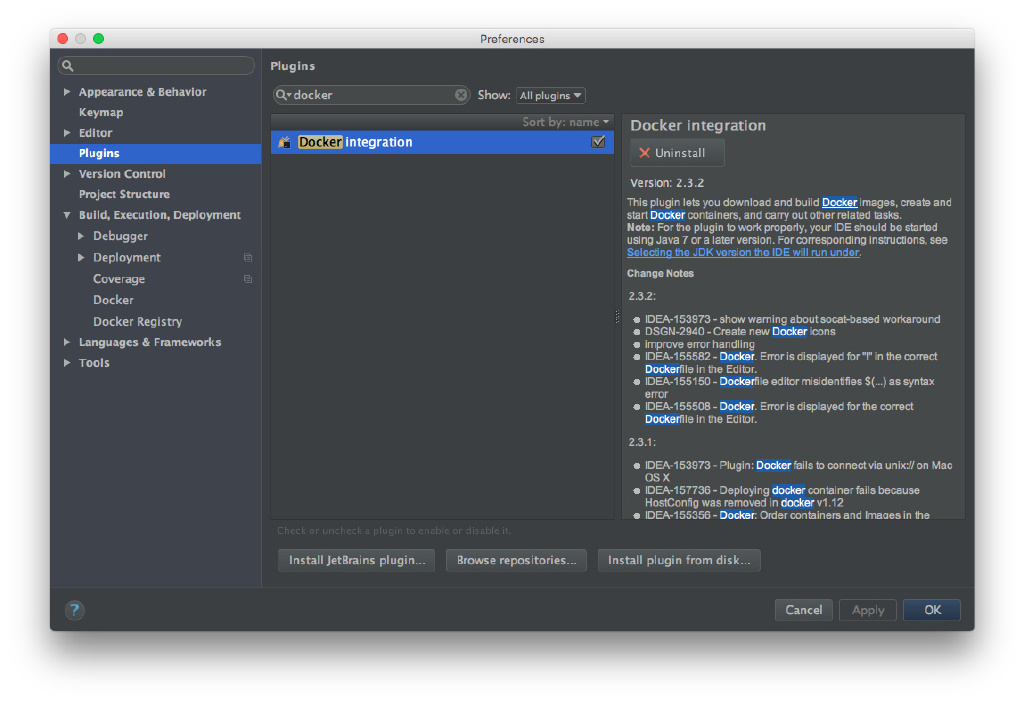
可以在 RubyMine 中安装 Docker Plugin 来直接构建容器。
1. 安装 docker plugin
在 Preferences/Plugins 中搜索安装。

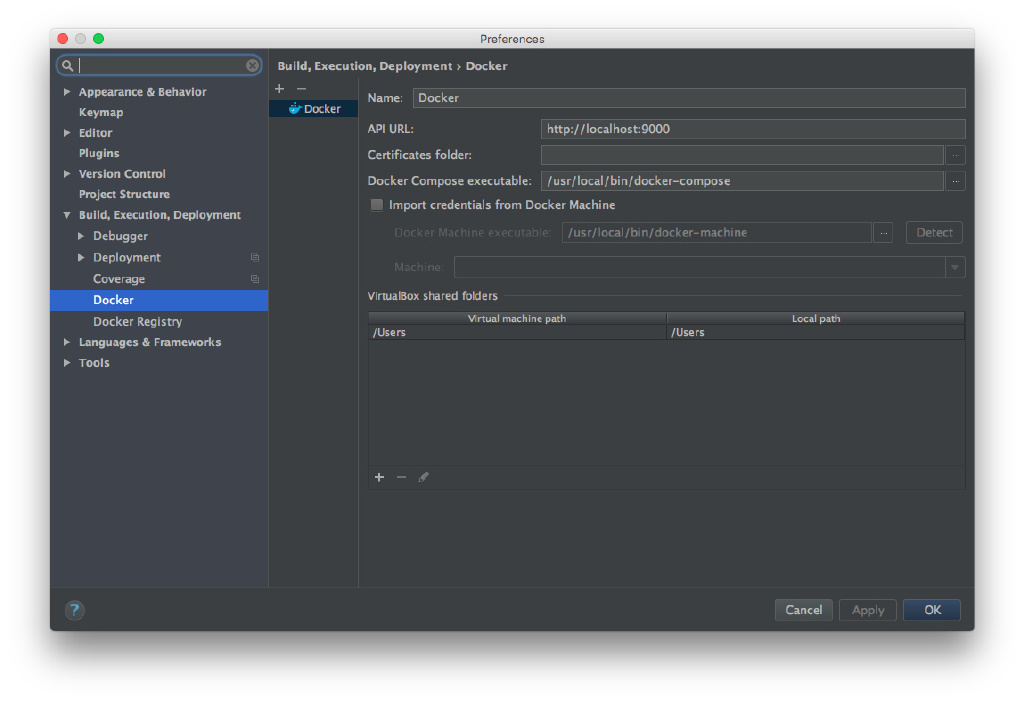
2. 配置 docker plugin
打开 Build, Execution, Deployment/Docker

-
Name: ServerName
-
API URL: [Docker API Url]()
-
Certificates folder: [HTTPS]()
-
Docker Compose executable: 使用
which docker-compose查看。
3. 配置构建方式
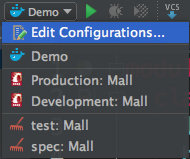
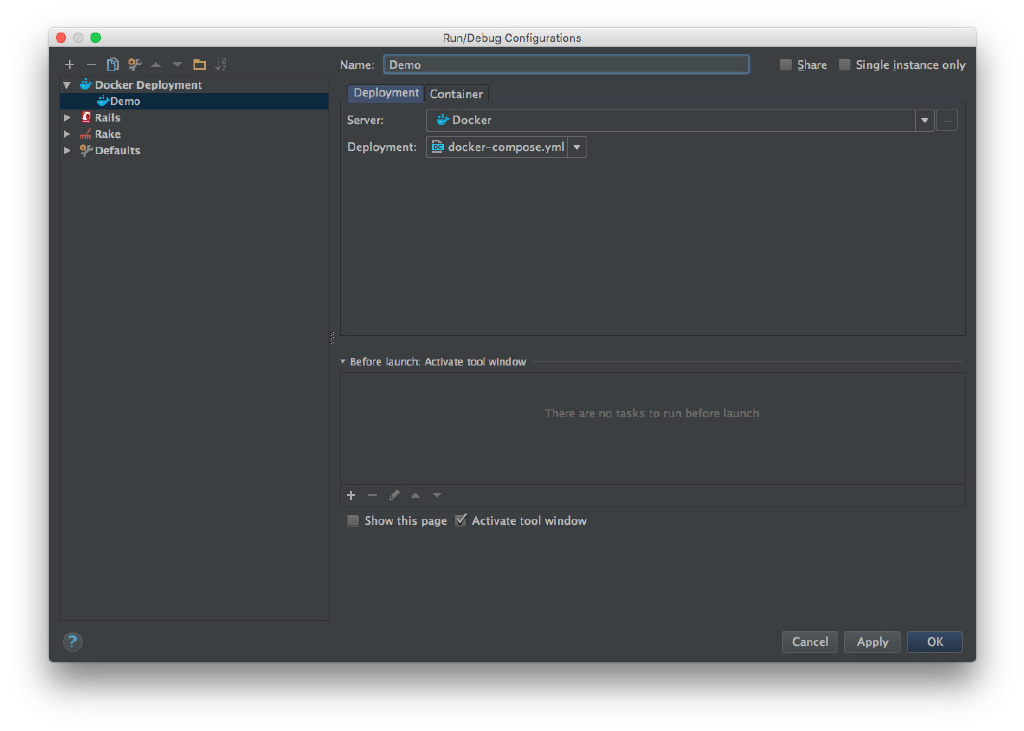
在工具栏中打开 Run/Debug Configurations 窗口:


-
Server: 选择第二步配置的 server
-
Deployment: 选择 docker-compose.yml
至此,便可在 IDE 中直接构建项目容器。
- 本文标签: 数据 MongoDB 参数 删除 云 cmd js UI App 快的 http tab zlib 注释 阿里云 core ssl https 配置 时间 插件 src plugin root git 安装 GitHub list lib Service web mail sql API XML build SQLite update db cat 管理 Docker 开发 下载 Ubuntu node 数据库 IDE Document dependencies python 目录 端口
- 版权声明: 本文为互联网转载文章,出处已在文章中说明(部分除外)。如果侵权,请联系本站长删除,谢谢。
- 本文海报: 生成海报一 生成海报二


![[HBLOG]公众号](https://www.liuhaihua.cn/img/qrcode_gzh.jpg)

