利用phoenix进行Hbase数据访问
一、背景
近期一个 用户画像 的项目,数据量庞大,用MySQL进行存取不太现实,所以采用 Hbase集群 的方案来实施。由于业务层使用的是 PHP ,所以研发同学首先想到的是 PHP-Thrift 来访问 Hbase ,编码实验了几天,效果不是太理想,尤其是编码成本较大,各种 scan、filter 之类的语法,不利于团队进行快速开发;当然,最崩溃的还是想利用 count 进行数据总量计算,是 Thrift 里,这个太难搞。
所以再换一个 phoenix 的方案,模拟 SQL 的形式进行 Hbase 数据访问;不过这东西没有PHP版本的,只有 Hbase 的 jar 包支持,还有一个python版本的 command line console ,开发过程中用来做数据查看还是比较方便的。
二、环境部署
1、phoenix下载
- 官网: http://phoenix.apache.org/
- 下载: http://apache.fayea.com/phoenix/ (当前最新版本: http://apache.fayea.com/phoenix/phoenix-4.7.0-HBase-1.1/bin/phoenix-4.7.0-HBase-1.1-bin.tar.gz )
2、部署jar包到Hbase集群
# 下载phoenix
wget http://apache.fayea.com/phoenix/phoenix-4.7.0-HBase-1.1/bin/phoenix-4.7.0-HBase-1.1-bin.tar.gz
# 解压
tar zxfv phoenix-4.7.0-HBase-1.1-bin.tar.gz > /dev/null
# 部署jar包到hbase
cp -r phoenix-4.7.0-HBase-1.1/*.jar /home/hbase/hbase-1.1.5/lib/
# 重启Hbase
/home/hbase/hbase-1.1.5/bin/stop-hbase.sh
/home/hbase/hbase-1.1.5/bin/start-hbase.sh
3、验证phoenix安装情况
cd /home/hbase/phoenix-4.7.0-HBase-1.1/bin
./sqlline.py localhost:2181
出现下图所示的样子,就算是安装成功了:

敲击 !help 命令,查看内置命令:
0: jdbc:phoenix:localhost:2181> !help
!all                Execute the specified SQL against all the current connections
!autocommit         Set autocommit mode on or off
!batch              Start or execute a batch of statements
!brief              Set verbose mode off
!call               Execute a callable statement
!close              Close the current connection to the database
!closeall           Close all current open connections
!columns            List all the columns for the specified table
!commit             Commit the current transaction (if autocommit is off)
!connect            Open a new connection to the database.
!dbinfo             Give metadata information about the database
!describe           Describe a table
!dropall            Drop all tables in the current database
!exportedkeys       List all the exported keys for the specified table
!go                 Select the current connection
!help               Print a summary of command usage
!history            Display the command history
!importedkeys       List all the imported keys for the specified table
!indexes            List all the indexes for the specified table
!isolation          Set the transaction isolation for this connection
!list               List the current connections
!manual             Display the SQLLine manual
!metadata           Obtain metadata information
!nativesql          Show the native SQL for the specified statement
!outputformat       Set the output format for displaying results
                    (table,vertical,csv,tsv,xmlattrs,xmlelements)
!primarykeys        List all the primary keys for the specified table
!procedures         List all the procedures
!properties         Connect to the database specified in the properties file(s)
!quit               Exits the program
!reconnect          Reconnect to the database
!record             Record all output to the specified file
!rehash             Fetch table and column names for command completion
!rollback           Roll back the current transaction (if autocommit is off)
!run                Run a script from the specified file
!save               Save the current variabes and aliases
!scan               Scan for installed JDBC drivers
!script             Start saving a script to a file
!set                Set a sqlline variable

......
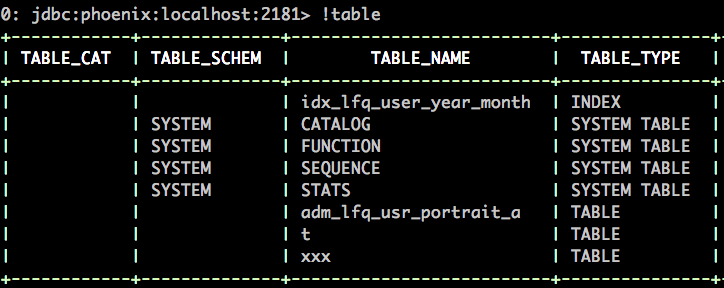
4、查看DB中已经存在的表
0: jdbc:phoenix:localhost:2181> !table

5、查看表结构(隐藏列族名)
0: jdbc:phoenix:localhost:2181> !describe "xxx"

注意:phoenix/hbase对表名、字段名都是大小写敏感,如果直接写小写字母,不加 双引号 ,则默认会被转换成大写字母。
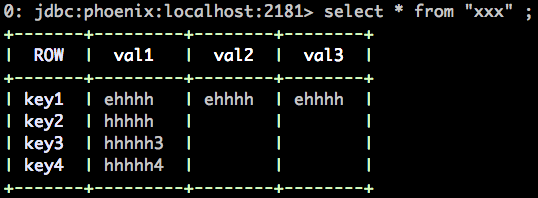
6、查看表内容
0: jdbc:phoenix:localhost:2181> select * from "xxx" ;

PhoenixSQL的语法跟MySQL语法没多大区别,入门成本较低。注意,如果Hbase的表已经有了,则需要手动再在Phoenix中创建同名( 注意双引号括起来的大小写 )的Table。
三、开发
Phoenix 提供的是Hbase的 jar 包支持,所以肯定是创建一个 Java Web Project 来提供 API 服务。
1、设计原则
- 模拟
Python版本Command line Console的操作,直接接受原生Phoenix-SQL作为参数进行处理 - Phoenix DB不支持直接设置连接超时, 所以这里使用线程池的方式来控制数据库连接超时
- SQL处理后的结果存放在一个
PhoenixResultSet中,SQL本身不固定,所以结果字段也不固定;所以这里使用PhoenixResultSet.getMetaData()来获取返回的字段名 - 上层应用一般不要求数据返回的类型,所以全部采用
PhoenixResultSet.getString(index)的形式获取字符串类型字段值 - 最终数据编译成
JSON格式进行返回,借助org.json.jar包来处理
2、编码实现
1)、PhoenixClient.java
package com.qudian.bi;

import java.sql.Connection;
import java.sql.DriverManager;
import java.sql.ResultSetMetaData;
import java.sql.SQLException;
import java.sql.Statement;
import java.util.ArrayList;
import java.util.concurrent.Callable;
import java.util.concurrent.ExecutionException;
import java.util.concurrent.ExecutorService;
import java.util.concurrent.Executors;
import java.util.concurrent.Future;
import java.util.concurrent.TimeUnit;
import java.util.concurrent.TimeoutException;

import org.apache.phoenix.jdbc.PhoenixResultSet;
import org.json.JSONArray;
import org.json.JSONException;
import org.json.JSONObject;

/**
 * 利用Phoenix访问Hbase
 *
 * @author zhaoxianlie
 */
public class PhoenixClient {

           /**
            * 利用静态块的方式初始化Driver,防止Tomcat加载不到(有时候比较诡异)
            */
           static {
               try {
                   Class.forName("org.apache.phoenix.jdbc.PhoenixDriver");
               } catch (ClassNotFoundException e) {
                   e.printStackTrace();
               }
           }

           /**
            * 获取一个Hbase-Phoenix的连接
            *
            * @param host
            *            zookeeper的master-host
            * @param port
            *            zookeeper的master-port
            * @return
            */
           private static Connection getConnection(String host, String port) {
               Connection cc = null;
               final String url = "jdbc:phoenix:" + host + ":" + port;

               if (cc == null) {
                   try {
                       // Phoenix DB不支持直接设置连接超时
                       // 所以这里使用线程池的方式来控制数据库连接超时
                       final ExecutorService exec = Executors.newFixedThreadPool(1);
                       Callable<Connection> call = new Callable<Connection>() {
                           public Connection call() throws Exception {
                               return DriverManager.getConnection(url);
                           }
                       };
                       Future<Connection> future = exec.submit(call);
                       // 如果在5s钟之内,还没得到 Connection 对象,则认为连接超时,不继续阻塞,防止服务夯死
                       cc = future.get(1000 * 5, TimeUnit.MILLISECONDS);
                       exec.shutdownNow();
                   } catch (InterruptedException e) {
                       e.printStackTrace();
                   } catch (ExecutionException e) {
                       e.printStackTrace();
                   } catch (TimeoutException e) {
                       e.printStackTrace();
                   }
               }
               return cc;
           }

           /**
            * 根据host、port,以及sql查询hbase中的内容;根据phoenix支持的SQL格式,查询Hbase的数据,并返回json格式的数据
            *
            * @param host
            *            zookeeper的master-host
            * @param port
            *            zookeeper的master-port
            * @param phoenixSQL
            *            sql语句
            * @return json-string
            * @return
            */
           public static String execSql(String host, String port, String phoenixSQL) {
               if (host == null || port == null || host.trim() == ""
                       || port.trim() == "") {
                   return "必须指定hbase master的IP和端口";
               } else if (phoenixSQL == null || phoenixSQL.trim() == "") {
                   return "请指定合法的Phoenix SQL!";
               }

               String result = "";
               try {
                   // 耗时监控:记录一个开始时间
                   long startTime = System.currentTimeMillis();

                   // 获取一个Phoenix DB连接
                   Connection conn = PhoenixClient.getConnection(host, port);
                   if (conn == null) {
                       return "Phoenix DB连接超时!";
                   }

                   // 准备查询
                   Statement stmt = conn.createStatement();
                   PhoenixResultSet set = (PhoenixResultSet) stmt
                           .executeQuery(phoenixSQL);

                   // 查询出来的列是不固定的,所以这里通过遍历的方式获取列名
                   ResultSetMetaData meta = set.getMetaData();
                   ArrayList<String> cols = new ArrayList<String>();

                   // 把最终数据都转成JSON返回
                   JSONArray jsonArr = new JSONArray();
                   while (set.next()) {
                       if (cols.size() == 0) {
                           for (int i = 1, count = meta.getColumnCount(); i <= count; i++) {
                               cols.add(meta.getColumnName(i));
                           }
                       }

                       JSONObject json = new JSONObject();
                       for (int i = 0, len = cols.size(); i < len; i++) {
                           json.put(cols.get(i), set.getString(cols.get(i)));
                       }
                       jsonArr.put(json);
                   }
                   // 耗时监控:记录一个结束时间
                   long endTime = System.currentTimeMillis();

                   // 结果封装
                   JSONObject data = new JSONObject();
                   data.put("data", jsonArr);
                   data.put("cost", (endTime - startTime) + " ms");
                   result = data.toString();
               } catch (SQLException e) {
                   e.printStackTrace();
                   return "SQL执行出错:" + e.getMessage();
               } catch (JSONException e) {
                   e.printStackTrace();
                   return "JSON转换出错:" + e.getMessage();
               }
               return result;
           }

           /**
            * Just for phoenix test!
            * @param args
            */
           public static void main(String[] args) {
               String pheonixSQL = "select count(1) from /"t/"";
               String host = "localhost";
               if(args.length >= 1) {
                   host = args[0];
               }
               String result = PhoenixClient.execSql(host, "2181", pheonixSQL);
               System.out.println(result);
           }
}
2)、Servlet
public void doGet(HttpServletRequest request, HttpServletResponse response)
               throws ServletException, IOException {

           response.setContentType("application/json;charset=utf-8");
           PrintWriter out = response.getWriter();
           String host = request.getParameter("host");
           String port = request.getParameter("port");

           if (host == null || port == null || host.trim() == ""
                   || port.trim() == "") {
               ServletContext context = getServletContext();
               host = context.getInitParameter("hbase-master-ip");
               port = context.getInitParameter("hbase-master-port");
           }

           String phoenixSQL = request.getParameter("sql");
           String json = PhoenixClient.execSql(host, port, phoenixSQL);
           out.println(json);
           out.flush();
           out.close();
}
四、使用
所有SQL都需要进行 urlencode / encodeURIComponent 处理
1、查询xxx表的记录条数
# phoenix sql、做 url encode 处理
$sql = 'select count(1) from "xxx"';
$sql = urlencode($sql);

# 访问下面接口获取数据
$url = 'http://localhost:8080?host=localhost&port=2181&sql=' . $sql ;
返回的数据格式:
{
    "data": [
        {
            "COUNT(1)": "4"
        }
    ],
    "cost": "199 ms"
}
COUNT(1) 作为字段名感觉很奇怪,对应的SQL也可以改一下,加个别名,如:
$sql = 'select count(1) as "count" from "xxx"';
得到的结果为:
{
    "data": [
        {
            "count": "4"
        }
    ],
    "cost": "93 ms"
}
2、查询表里的所有数据(结果集太大就别这么玩儿了)
$sql = 'select * from "xxx"';
得到的结果为:
{
    "data": [
        {
            "val3": "ehhhh",
            "ROW": "key1",
            "val1": "ehhhh",
            "val2": "ehhhh"
        },
        {
            "ROW": "key2",
            "val1": "hhhhh"
        },
        {
            "ROW": "key3",
            "val1": "hhhhh3"
        },
        {
            "ROW": "key4",
            "val1": "hhhhh4"
        }
    ],
    "cost": "19 ms"
}
3、只获取某个字段,且进行条件过滤
$sql = 'select ROW,"val1" from "xxx" where "val1"=/'hhhhh4/'';
得到结果集:
{
    "data": [
        {
            "ROW": "key3",
            "val1": "hhhhh3"
        }
    ],
    "cost": "24 ms"
}
其他的情况,就不举例了。
五、总结
就完全可以把Phoenix当成MySQL来用,要想速度快,还是建立好索引再使用;在数据量庞大的情况下,有索引和没索引,查询速度是天壤之别的。
如果你也正好在玩儿这个东西,希望对你有帮助。
- 本文标签: 编译 参数 http 业务层 安装 java Select servlet Connection autocommit cat API PHP list ECS js Service sql mysql 遍历 db 总结 下载 线程 executor NSA web key https src Action zookeeper HTML 端口 final python 数据库 SQL执行 数据 apache XML ip lib message HBase App tab 开发 ACE tar ORM UI wget json tomcat client 线程池 集群 时间
- 版权声明: 本文为互联网转载文章,出处已在文章中说明(部分除外)。如果侵权,请联系本站长删除,谢谢。
- 本文海报: 生成海报一 生成海报二


![[HBLOG]公众号](https://www.liuhaihua.cn/img/qrcode_gzh.jpg)

