Core Image 你需要了解的那些事~
前言
最近在研究 Core Image 自定义 Filter 相关内容,重新学习了 Core Image,对 Core Image 的一些优化点也有了一定的了解。故此记录,与君交流~
本文将会介绍逐一介绍 Core Image 相关基础概念、使用方式、注意点以及和其他图像处理方案的对比。也算是下一篇文章: Core Image 自定义 Filter~ 的预备知识,毕竟只有了解了 Core Image 的作用以及它的优势,才有学习自定义 Filter 的动力。
现在,开始吧~
Core Image 概述
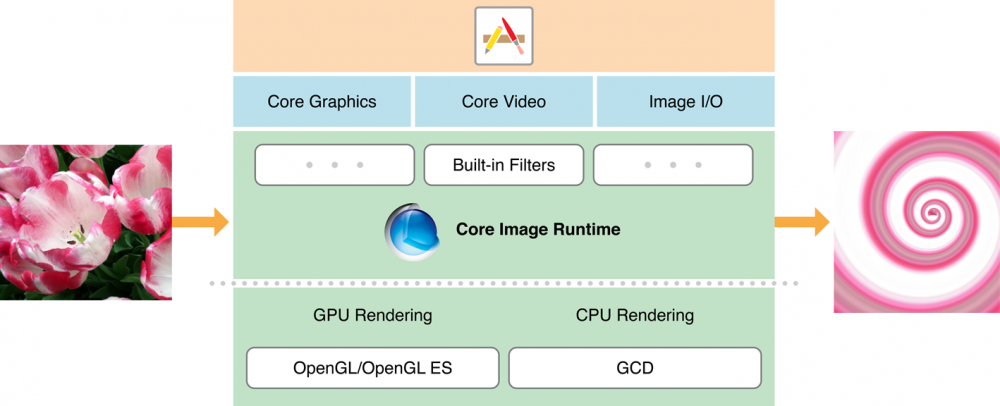
Core Image 是 iOS5 新加入到 iOS 平台的一个图像处理框架,提供了强大高效的图像处理功能, 用来对基于像素的图像进行操作与分析, 内置了很多强大的滤镜(Filter) (目前数量超过了180种), 这些Filter 提供了各种各样的效果, 并且还可以通过 滤镜链 将各种效果的 Filter叠加 起来形成强大的自定义效果。
一个 滤镜 是一个对象,有很多输入和输出,并执行一些变换。例如,模糊滤镜可能需要输入图像和一个模糊半径来产生适当的模糊后的输出图像。
一个 滤镜链 是一个链接在一起的滤镜网络,使得一个滤镜的输出可以是另一个滤镜的输入。以这种方式,可以实现精心制作的效果。
iOS8 之后更是支持自定义 CIFilter,可以定制满足业务需求的复杂效果。
Core Image is an image processing and analysis technology designed to provide near real-time processing for still and video images. It operates on image data types from the Core Graphics, Core Video, and Image I/O frameworks, using either a GPU or CPU rendering path. Core Image hides the details of low-level graphics processing by providing an easy-to-use application programming interface (API). You don’t need to know the details of OpenGL or OpenGL ES to leverage the power of the GPU, nor do you need to know anything about Grand Central Dispatch (GCD) to get the benefit of multicore processing. Core Image handles the details for you.
这是苹果官方文档对于 Core Image 的介绍,大致意思是:Core Image 是一种为静态图像和 Video 提供处理和分析的技术,它可以使用 GPU/CPU 的方式对图像进行处理。Core Image 提供了简洁的 API 给用户,隐藏了图像处理中复杂的底层内容。你可以在不了解 OpenGL、OpenGL ES 甚至是 GCD 的基础上对其进行使用,他已经帮你对这些复杂的内容进行处理了。
废话这么多,苹果就想告诉我们一件事: 所有的底层细节他都帮你做好了,你只需要放心调用API就行了。
这就是 Core Image 的基础概念,比较简短,正如它的使用方式一样简洁。
然而在我个人学习过程中,我有一种强烈的感觉: Apple 很重视 Core Image,Core Image 一定会越来越棒。

- 每年的 WWDC Session 中,都有提及 Core Image 的相关优化。
- 从最初的几十种内置滤镜到如今的180多种。
- 从最初只支持 macOS,到如今也支持 iOS。
- iOS8 之后支持自定义 Filter。
- iOS8 增强 GPU 渲染,在后台也能继续使用 GPU 进行处理。
- 引入 CIDetector,提供一些常用的图片识别功能。包括人脸识别、条形码识别、文本识别等。
- 与越来越多的框架相结合:OpenGLES,PhotoExtension,SceneKit,SpriteKit,Metal。
- iOS 10之后,支持对原生 RAW 格式图片的处理。
So,它真的值得学习!
使用方式

这里我们从它的基础 API 介绍起。
Core Image 的 API 主要就是三类:
- CIImage 保存图像数据的类,可以通过UIImage,图像文件或者像素数据来创建,包括未处理的像素数据。
- CIFilter 表示应用的滤镜,这个框架中对图片属性进行细节处理的类。它对所有的像素进行操作,用一些键-值设置来决定具体操作的程度。
- CIContext 表示上下文,如 Core Graphics 以及 Core Data 中的上下文用于处理绘制渲染以及处理托管对象一样,Core Image 的上下文也是实现对图像处理的具体对象。可以从其中取得图片的信息。
至于使用,相当的方便。

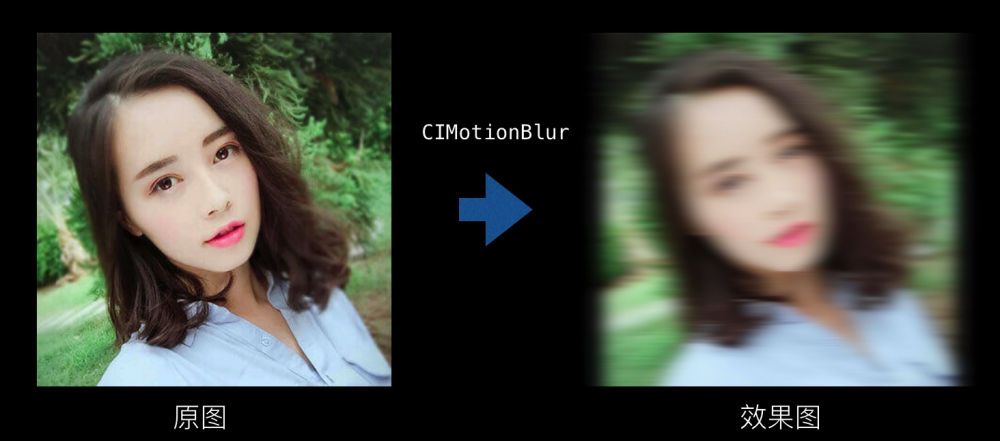
下面以 “动态模糊” 举例,我们使用系统提供的 CIMotionBlur 来实现。
// 传入滤镜名称(e.g. @"CIMotionBlur"), 输出处理后的图片
- (UIImage *)outputImageWithFilterName:(NSString *)filterName {
    // 1. 将UIImage转换成CIImage
    CIImage *ciImage = [[CIImage alloc] initWithImage:self.imageView.image];

    // 2. 创建滤镜
    self.filter = [CIFilter filterWithName:filterName keysAndValues:kCIInputImageKey, ciImage, nil];
    // 设置相关参数
    [self.filter setValue:@(10.f) forKey:@"inputRadius"];

    // 3. 渲染并输出CIImage
    CIImage *outputImage = [self.filter outputImage];

    // 4. 获取绘制上下文
    self.context = [CIContext contextWithOptions:nil];

    // 5. 创建输出CGImage
    CGImageRef cgImage = [self.context createCGImage:outputImage fromRect:[outputImage extent]];
    UIImage *image = [UIImage imageWithCGImage:cgImage];
    // 6. 释放CGImage
    CGImageRelease(cgImage);

    return image;
}
效果如下:
至于滤镜链,则是和普通滤镜的使用没什么差别。只要把前一个滤镜的输出,当作后一个滤镜的输入,即可实现,就不累述了。
另外,如果想查阅 Filter 的属性,可以通过 attributes 属性来获取。比如这个例子中的 CIMotionBlur :
{
    "CIAttributeFilterAvailable_Mac" = "10.4";
    "CIAttributeFilterAvailable_iOS" = "8.3";
    CIAttributeFilterCategories =     (
        CICategoryBlur,
        CICategoryStillImage,
        CICategoryVideo,
        CICategoryBuiltIn
    );
    CIAttributeFilterDisplayName = "Motion Blur";
    CIAttributeFilterName = CIMotionBlur;
    CIAttributeReferenceDocumentation = "http://developer.apple.com/library/ios/documentation/GraphicsImaging/Reference/CoreImageFilterReference/index.html#//apple_ref/doc/filter/ci/CIMotionBlur";
    inputAngle =     {
        CIAttributeClass = NSNumber;
        CIAttributeDefault = 0;
        CIAttributeDescription = "The angle of the motion determines which direction the blur smears.";
        CIAttributeDisplayName = Angle;
        CIAttributeIdentity = 0;
        CIAttributeSliderMax = "3.141592653589793";
        CIAttributeSliderMin = "-3.141592653589793";
        CIAttributeType = CIAttributeTypeAngle;
    };
    inputImage =     {
        CIAttributeClass = CIImage;
        CIAttributeDescription = "The image to use as an input image. For filters that also use a background image, this is the foreground image.";
        CIAttributeDisplayName = Image;
        CIAttributeType = CIAttributeTypeImage;
    };
    inputRadius =     {
        CIAttributeClass = NSNumber;
        CIAttributeDefault = 20;
        CIAttributeDescription = "The radius determines how many pixels are used to create the blur. The larger the radius, the blurrier the result.";
        CIAttributeDisplayName = Radius;
        CIAttributeIdentity = 0;
        CIAttributeMin = 0;
        CIAttributeSliderMax = 100;
        CIAttributeSliderMin = 0;
        CIAttributeType = CIAttributeTypeDistance;
    };
}
以上的介绍,可能偏显苍白,但是我想说的是,使用内置的滤镜,就是这么简单。如果你还想了解更多,可以继续阅读以下这几篇文章,它们对 Core Image 的基础概念介绍的更加详细。
- Core Image 介绍 : ObjC 的文章,值得看看。
- iOS8 Core Image In Swift :这个系列是对官方文档的一个完整实战,讲的比较全面。
- Core Image Filter Reference :内置的所有滤镜及其用法示例。
- Filterpedia :演示了内置滤镜及一些自定义滤镜的效果,基于 Swift 实现的。
下面,才是本文着重想要介绍的,算是 Core Image 的一些高级应用。让我们继续往下看~

注意点
1. image.CIImage == nil
为了获取 CIImage,可能有的同学会直接通 UIImage.CIImage 的方式去获取,但是这样的方式是无法保证获取到 CIImage 对象的。定义如下:
@property(nullable,nonatomic,readonly) CIImage *CIImage NS_AVAILABLE_IOS(5_0);
// returns underlying CIImage or nil if CGImageRef based
这里已经很明确说明了,UIImage 对象可能不是基于 CIImage 创建的(比如它是由 imageWithCIImage: 生成的),这样就无法获取到 CIImage 对象。
正确的姿势应该是:
CIImage *ciImage = [[CIImage alloc] initWithImage:self.originalImage];
2. CIContext
在创建结果 UIImage 的时候,最简单的方式就是通过 imageWithCIImage 来实现。这种情况下,不需要显示的声明 CIContext ,因为 imageWithCIImage 内部自动完成了这个步骤。这使得使用 Core Image 更加的方便。当然,它也引起了另外一个问题,每次都会重新创建一个 CIContext ,然而 CIContext 的代价是非常高的。
并且,CIContext 和 CIImage 对象是不可变的,在线程之间共享这些对象是安全的。所以多个线程可以使用同一个 GPU 或者 CPU CIContext 对象来渲染 CIImage 对象。
所以重用 CIContext 是很有必要的。这意味着,我们不应该使用 imageWithCIImage 来生成 UIImage,而应该自己创建维护 CIContext。
比如:
self.context = [CIContext contextWithOptions:nil];

...

CGImageRef cgImage = [self.context createCGImage:outputImage fromRect:[outputImage extent]];
UIImage *image = [UIImage imageWithCGImage:cgImage];
3. CPU / GPU
Core Image 的另外一个优势,就是可以根据需求选择 CPU 或者 GPU 来处理。
Context 创建的时候,我们可以给它设置为是基于 GPU 还是 CPU。
基于 GPU 的话,处理速度更快,因为利用了 GPU 硬件的并行优势。可以使用 OpenGLES 或者 Metal 来渲染图像,这种方式CPU完全没有负担,应用程序的运行循环不会受到图像渲染的影响。
但是 GPU 受限于硬件纹理尺寸,而且如果你的程序在后台继续处理和保存图片的话,那么需要使用 CPU,因为当 App 切换到后台状态时 GPU 处理会被打断。使用 CPU 渲染的 iOS 会采用 GCD 来对图像进行渲染,这保证了 CPU 渲染在大部分情况下更可靠,比 GPU 渲染更容易使用,可以在后台实现渲染过程。
综上,对于复杂的图像滤镜使用 GPU 更好,但是如果在处理视频并保存文件,或保存照片到照片库中时,为避免程序进入后台对图片保存造成影响,这时应该使用 CPU 进行渲染。
用 Apple 官方的一句话来描述再合适不过了:
CPU is still what will give you the best fidelity where as the GPU will give you the best performance.
具体的设置方式,可以参考下面的例子:
// 创建基于 CPU 的 CIContext 对象 (默认是基于 GPU,CPU 需要额外设置参数)
context = [CIContext contextWithOptions: [NSDictionary dictionaryWithObject:[NSNumber numberWithBool:YES] forKey:kCIContextUseSoftwareRenderer]];

// 创建基于 GPU 的 CIContext 对象
context = [CIContext contextWithOptions: nil];

// 创建基于 GPU 的 CIContext 对象
EAGLContext *eaglctx = [[EAGLContext alloc] initWithAPI:kEAGLRenderingAPIOpenGLES2];
context = [CIContext contextWithEAGLContext:eaglctx];
同样是基于 GPU 的,它们之间也是有区别的。
contextWithOptions创建的 context 并没有实时性能, 虽然渲染是在 GPU 上执行,但是其输出的 image 是不能显示的,只有当其被复制回 CPU 存储器上时,才会被转成一个可被显示的 image 类型,比如 UIImage。
它的渲染过程大致如下:
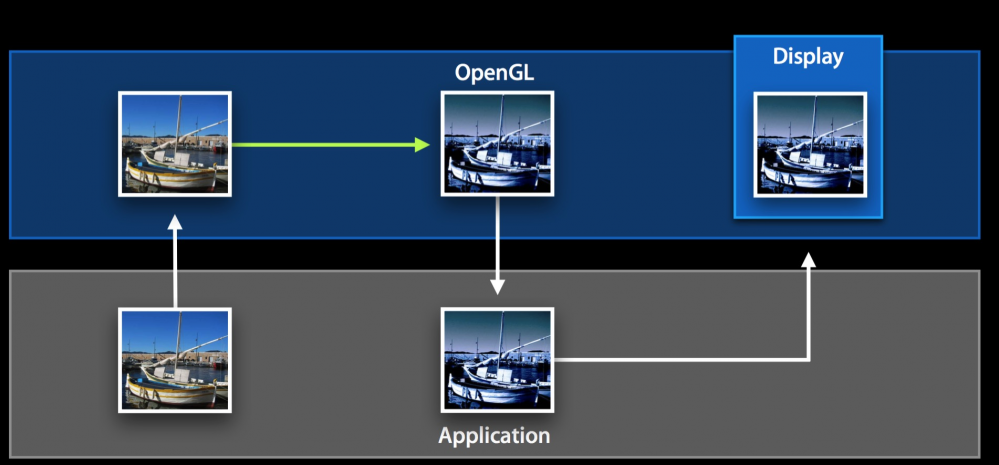
当使用 Core Image 在 GPU 上渲染图片的时候,先是把图像传递到 GPU 上,然后执行滤镜相关操作。但是当需要生成 CGImage 对象的时候,图像又被复制回 CPU 上。最后要在视图上显示的时候,又返回 GPU 进行渲染。这样在 GPU 和 CPU 之前来回切换,会造成很严重的性能损耗。
contextWithEAGLContext创建的 context 支持实时渲染,渲染图像的过程始终在 GPU 上进行,并且永远不会复制回 CPU 存储器上,这就保证了更快的渲染速度和更好的性能。
当然,这个前提是利用实时渲染的特效,而不是每次操作都产生一个 UIImage,然后再设置到视图上。
比如 OpenGLES:
// 设置 OpenGLES 渲染环境
EAGLContext *eaglContext = [[EAGLContext alloc] 	  initWithAPI:kEAGLRenderingAPIOpenGLES2];
self.glkView.context = eaglContext;
self.context = [CIContext contextWithEAGLContext:eaglContext];

...

// 实时渲染
[self.pixellateFilter setValue:@(sender.value) forKey:@"inputRadius"];

[self.context drawImage:_pixellateFilter.outputImage inRect:_targetBounds  fromRect:_inputImage.extent];
[self.glkView.context presentRenderbuffer:GL_RENDERBUFFER];
它的渲染过程大致如下:

并且,iOS8 后增强了 GPU 渲染,在后台也能继续使用 GPU 进行处理。这点会在下文详细说明。
所以应该尽可能的使用 GPU 去做图像处理。
另外,Apple 对 Core Image 内部进行了优化,如果通过
// 创建基于 GPU 的 CIContext 对象
context = [CIContext contextWithOptions: nil];
创建 context ,那么它内部的渲染器会根据设备最优选择。依次为 Metal,OpenGLES,CoreGraphics。
PS:Metal 需要 iOS8 + A7,且模拟器不支持 Metal。OpenGLES3 需要 iOS7 + A7
测试结果:
iPhone 6s, iOS 10, 模拟器:OpenGLES3
iPhone 6s,iOS 10,真机:Metal
iPhone 5,iOS 8, 模拟器:OpenGLES
4. CIFilter
之前提到 CIContext 是线程安全的,然而 CIFilter 并不是线程安全的,这意味着 一个 CIFilter 对象不能在多个线程间共享。如果你的操作是多线程的,每个线程都必须创建自己的 CIFilter 对象。否则,你的 App 将产生不可预期的结果。
Core Image vs GPUImage
其他图像处理方案的对比,这里比较有争议的就是 OpenGLES 和 Core Image 了。
在 OpenGLES 部分,拿主流的 GPUImage 来做对比,分析一下它们各自的优缺点。只有对比了才知道,Core Image 好在哪里,是否值得使用。
PS:以下的优势阐述,撇去了两个框架都具备的,仅保留对比后各自的优势。
另外,GPUImage 我没有深入学习过,对于它的一些优势,主要是总结它的开发者 Brad 描述的,以及简单的 Demo 进行对比。
GPUImage 优势:
- 最低支持 iOS 4.0,iOS 5.0 之后就支持自定义滤镜。
- 在低端机型上,GPUImage 有更好的表现。(这个我没用真正的设备对比过,GPUImage 的主页上是这么说的)
- GPUImage 在视频处理上有更好的表现。
- GPUImage 的代码完成公开,实现透明。
- 可以根据自己的业务需求,定制更加复杂的管线操作。可定制程度高。
Core Image 优势:
- 官方框架,使用放心,维护方便。
- 支持 CPU 渲染,可以在后台继续处理和保存图片。
- 一些滤镜的性能更强劲。例如由 Metal Performance Shaders 支持的模糊滤镜等。
- 支持使用 Metal 渲染图像。而 Metal 在 iOS 平台上有更好的表现。
- 与 Metal,SpriteKit,SceneKit,Core Animation 等更完美的配合。
- 支持图像识别功能。包括人脸识别、条形码识别、文本识别等。
- 支持自动增强图像效果,会分析图像的直方图,图像属性,脸部区域,然后通过一组滤镜来改善图像效果。
- 支持对原生 RAW 格式图片的处理。
- 滤镜链的性能比 GPUImage 高。(没有验证过,GPUImage 的主页上是这么说的)。
- 支持对大图进行处理,超过 GPU 纹理限制 (4096 * 4096)的时候,会自动拆分成几个小块处理(Automatic tiling)。GPUImage 当处理超过纹理限制的图像时候,会先做判断,压缩成最大纹理限制的图像,导致图像质量损失。
至此,我觉得 Core Image 的优势很明显了,尤其是与 Metal 的配合,自动增强图像效果,支持处理大图以及滤镜链的优化。
下面关于这几点优化,做个简单的描述。
1. 滤镜链
if you chain together a sequence of filters, Core Image will automatically concatenate these subroutines into a single program.The idea behind this is to improve performance and quality, by reducing the number of intermediate buffers.
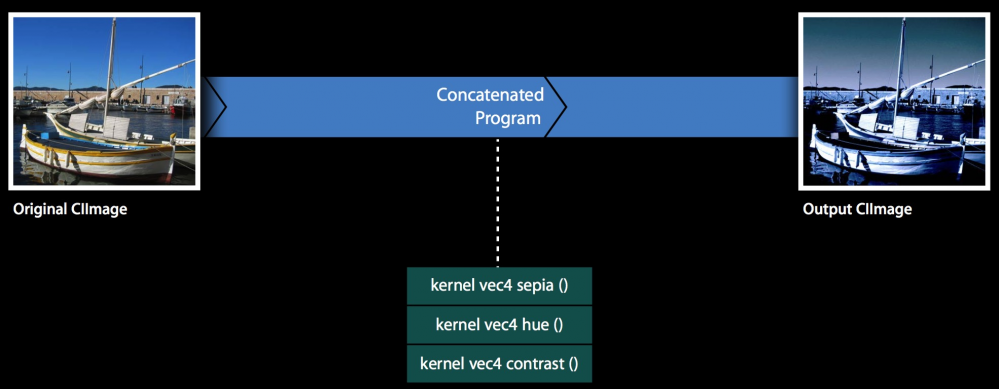
Core Image 会自动把多个滤镜组合成一个新的程序(program),通过减少中间缓冲区的数量,来提高性能和质量。
2. 支持大图
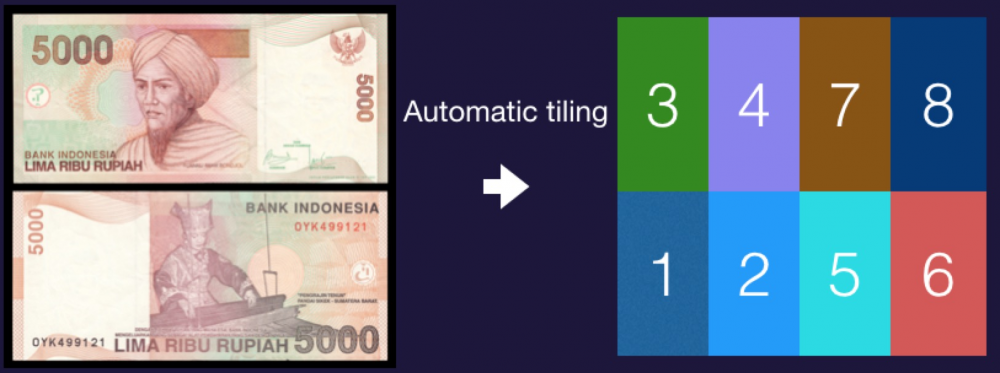
超过 GPU 纹理限制 (4096 * 4096)的时候,会自动拆分成几个小块处理 (Automatic tiling)。
图片大小:(8374,7780),验证结果:
PS: rois 表示当前处理区域。 extent 表示图像实际大小。
这个输出是 Core Image 在处理过程中打印的。
(1) rois=[0 0 2092 3888] extent=[0 0 8374 7780]
(2) rois=[2092 0 2092 3888] extent=[0 0 8374 7780]
(3) rois=[0 3888 2092 3892] extent=[0 0 8374 7780]
(4) rois=[2092 3888 2092 3892] extent=[0 0 8374 7780]
(5) rois=[4184 0 2092 3888] extent=[0 0 8374 7780]
(6) rois=[6276 0 2098 3888] extent=[0 0 8374 7780]
(7) rois=[4184 3888 2092 3892] extent=[0 0 8374 7780]
(8) rois=[6276 3888 2098 3892] extent=[0 0 8374 7780]
如果按序讲每个区域进行拼凑,就是原图的实际区域了。
另外,Core Image 对大图和小图的处理上,也有所不同。 小图提前解码,大图延迟解码 !
当传入的 image 是小图 (size < inputImageMaximumSize)时,在调用 initWithCGImage 获取输入图像 CIImage 的时候,这个 image 就被完全解码了。这是很有必要的。因为小图可能多次被用到,把编码的工作提前并且只做一次,一定程度上优化性能。
而对于大图来说,它的解码操作是尽可能延后的( being lazy ),直到真正需要显示, CIContext 执行 render 相关操作。因为大图的解码代价较大,并且不常用,无脑提前解码,放到内存中是没有必要的。
下面是验证结果,选了两个相差不大的图片,但是介于 4096 左右。
4000 * 4000,小图:

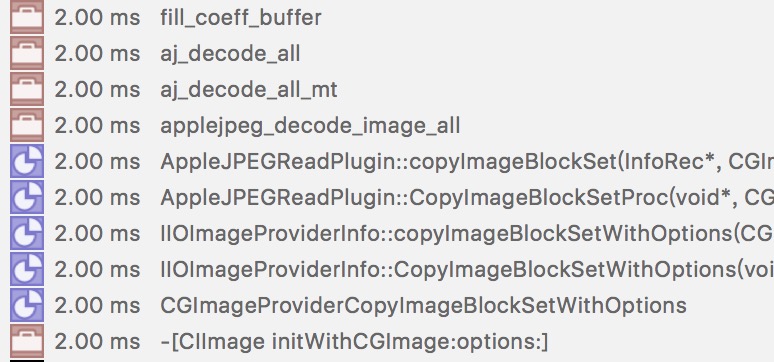
很明显的, Memory 占有率高 ,并且调用了 decode 相关操作。
4100 * 4100,大图:

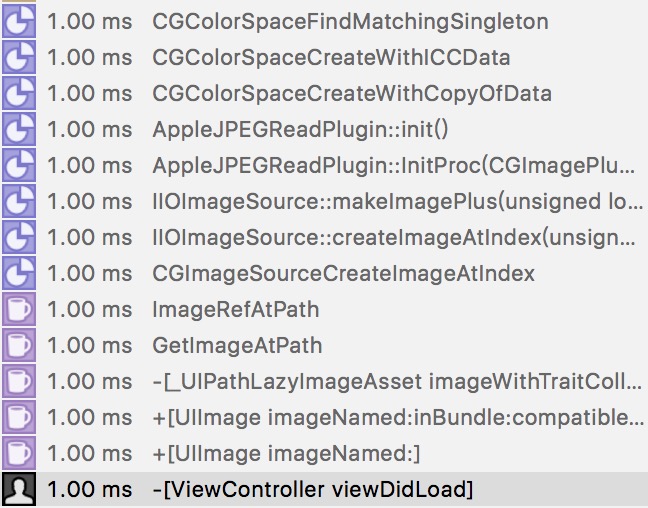
这里的 Memory 占用较低 ,并且没有看到 decode 相关操作。
同样的,当通过 CIImage 获取输出 CGImage 的时候,如果输出 CGImage 是小图的话,那么当 [CIContext createCGImage] 调用的时候,image 就被完全渲染了。而对于大图,要等到 CGImage 真正需要渲染显示的时候,这个 image 才会被渲染。
/* Render the region 'fromRect' of image 'image' into a temporary buffer using
 * the context, then create and return a new CoreGraphics image with
 * the results. The caller is responsible for releasing the returned image.
 * The return value will be null if size is empty or too big. */
#if !defined(SWIFT_CLASS_EXTRA) || (defined(SWIFT_SDK_OVERLAY_COREIMAGE_EPOCH) && SWIFT_SDK_OVERLAY_COREIMAGE_EPOCH >= 2)
- (nullable CGImageRef)createCGImage:(CIImage *)image
                            fromRect:(CGRect)fromRect;
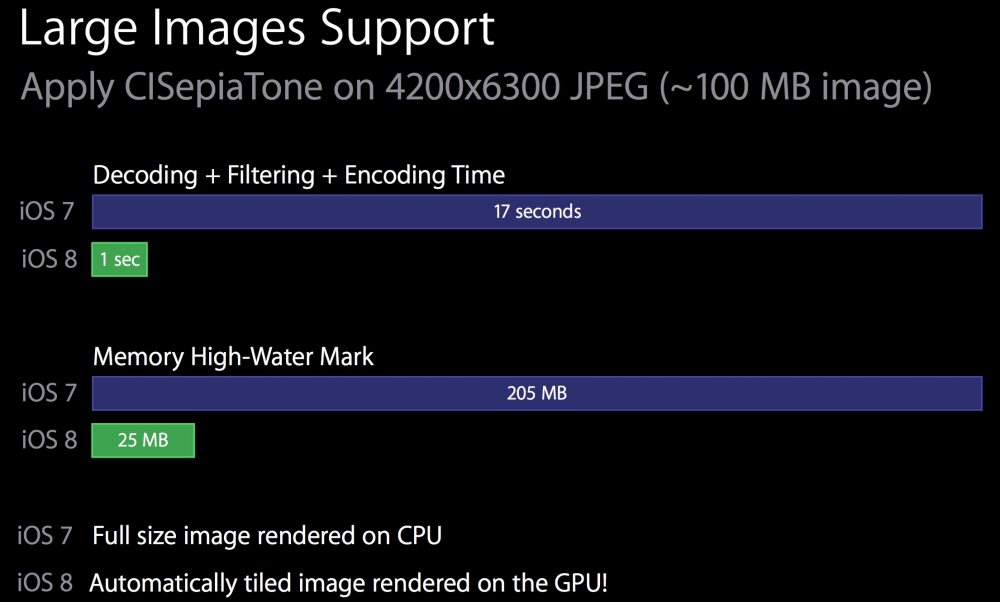
经过这样的优化处理后,对于大图, Session 514 给出了直观的数据对比:
3. GPU 优化
另外一个很重要的优化就是: 提高了 iOS 上 Core Image 使用 GPU 进行渲染的性能
具体体现在:
1.后台操作
- 短时间内,进入后台后会依旧使用高效的 GPU 进行渲染。
- 后台操作的 GPU 优先级低,不会对前台的渲染造成性能影响。
2.多线程
iOS 8之前,如果主线程使用 GPU 做相关操作,次要线程想使用 Core Image 的时候,通常要使用安全的 CPU 来实现,避免引起意想不到的问题。
在 iOS 8之后,可以在次要线程设置 Context 的 kCIContextPriorityRequestLow 值为 YES,这样就标记为当前 Context 在 GPU 上渲染的时候优先级低,从而不会影响到 GPU 上高优先级的渲染。
CIContext *context = [CIContext contextWithOptions: [NSDictionary dictionaryWithObject:[NSNumber numberWithBool:YES] forKey:kCIContextPriorityRequestLow]];
所以,应该尽可能的使用 GPU 进行渲染,来提高性能。
综上,我认为在某需求 Core Image 能实现的时候,使用 Core Image 应该是 iOS 平台上最好的选择。
至此,我所了解的 Core Image 使用上的注意点已经总结完了,希望你能有所获~
当然,如果你还想了解更多,那么我的下一篇文章: Core Image 自定义 Filter~ 值得你期待。
Have fun~
延伸阅读
Core Image Filter Reference
包含了 Core Image 所提供图像滤镜的完整列表以及用法示例。
Core Image 介绍
ObjC 的文章,详细介绍了 Core Image,值得看看。
Core Image Sessions
关于 Core Image 的 Session,内容很全。
Core Image Programming Guide
官方 Core Image 编程指南。
 本作品采用 知识共享署名 2.5 中国大陆许可协议 进行许可,欢迎转载,但转载请注明来自Colin’s Nest,并保持转载后文章内容的完整。本人保留所有版权相关权利。
- 本文标签: HTML Swift ip 文章 UI 需求 快的 rmi src description API ORM App 苹果 质量 ACE Region 代码 希望 value lib tar Property IDE CTO 总结 测试 http 安全 GitHub MQ key dist Atom 数据 Apple 开发 定制 core cat 多线程 IO Document Developer git IOS 开发者 时间 参数 协议 entity 线程 FIT 图片
- 版权声明: 本文为互联网转载文章,出处已在文章中说明(部分除外)。如果侵权,请联系本站长删除,谢谢。
- 本文海报: 生成海报一 生成海报二


![[HBLOG]公众号](https://www.liuhaihua.cn/img/qrcode_gzh.jpg)

