谷歌插件Image downloader开发之popup
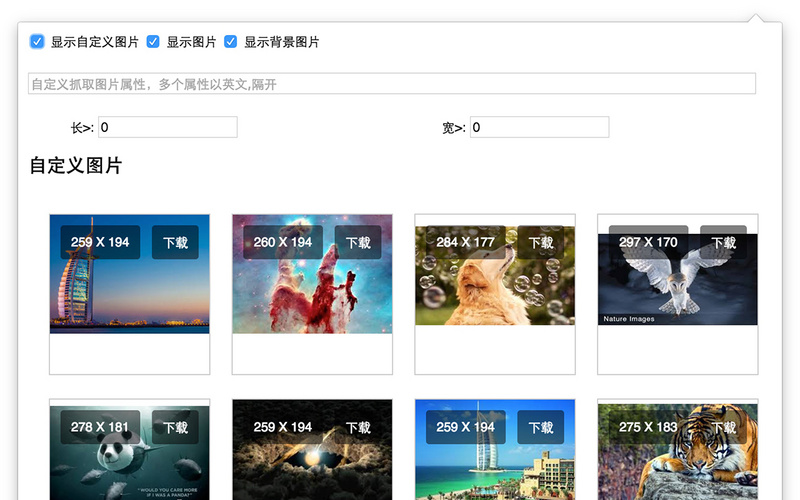
Image downloader 的交互逻辑是这样的:用户点击Image downloader的图标,会向页面(content script,见上一篇文章: 谷歌插件Image downloader开发之 content script )发送收集图片事件,页面收集完图片后,将对应的图片地址数组发送给popup页处理。popup页就是点击谷歌插件图标所弹出来的页面。Image downloader的popup页是长成这样的:

popup页包含的功能
popup页采用了vue1.0来做数据绑定,主要包含了以下功能:
1、显示原始图片大小
2、根据图片大小筛选图片
3、设置是否显示img标签的图片、是否显示背景图片,是否显示自定义属性的图片
4、根据自定义属性规则,收集所配置的自定义属性的值
5、下载图片
popup与content script的交互
图片容器:
imgs: { // 图片容器
    attrImg: [], // 属性图
    bgImg: [], // 背景图
    img: [], // img标签图
},
/**
 * 向tab发送收集图片信息,接收tab返回的图片url列表
 * @param action {string} 值为'all'或'attr',如果为all,则收集所有图片,为attr则只收集属性图
 * @param attr {string} 用;分隔开的属性规则
 */
sendMessage(action, attr) {
    chrome.tabs.query({ active: true, currentWindow: true }, (tabs) => {
        chrome.tabs.sendMessage(tabs[0].id, { action, attr }, (response) => {
            if (action === 'all') {
                const attrImg = response.attrImg
                const bgImg = response.bgImg
                const img = response.img
                    // 重置容器
                this.resetImgContainer('attrImg')
                this.resetImgContainer('bgImg')
                this.resetImgContainer('img')
                    // 获取图片的宽高
                this.mapImg(this.imgs.attrImg, attrImg)
                this.mapImg(this.imgs.bgImg, bgImg)
                this.mapImg(this.imgs.img, img)
            } else {
                this.resetImgContainer('attrImg')
                this.mapImg(this.imgs.attrImg, response.attrImg)
            }
        });
    });
},
popup页用了chrome的tabs的api,query查询当前页签,并用sendMessage向页签发送action和配置的属性值,如果action为'all'则是收集所有图片,如果为'attr',则只收集所配置的属性图片, resetImgContainer 方法只是简单地将容器置空,response是content script所返回的结果,mapImg方法用来获取图片的长和宽,下文会讲到。
而在content script中,则用onMessage来接收popup的信息,并将收集到的图片数组返回给popup
// 接收popup的指令,如果action为all,则获取所有图片url,如果为attr,则获取属性图片
chrome.runtime.onMessage.addListener(({ action, attr }, sender, sendResponse) => {
    if (attr) {
        configAttr = []
        configAttr.push(...initAttr)
        configAttr.push(...attr.split(','))
    } else {
        configAttr = []
        configAttr.push(...initAttr)
    }
    if (action === 'all') {
        sendResponse({
            attrImg: [...new Set(getConfigAttrUrl())],
            bgImg: [...new Set(getBackgroundImage())],
            img: [...new Set(getImgUrl())]
        })
    }
    if (action === 'attr') {
        sendResponse({
            attrImg: [...new Set(getConfigAttrUrl())],
        })
    }
});
上篇文章发在div.io上时,@幾米 提到了图片去重的问题,所有在返回图片是,用es6的Set方法去重,这个只处理同类型图片的去重,不处理如背景图片和图片标签之间的重复图片。
获取属性图片
/**
 * 获取属性图片
 */
getAttrImg() {
    clearTimeout(this.progress)
    this.progress = setTimeout(() => {
        this.sendMessage('attr', this.attr)
    }, 500)
},
配置的属性值发生变化时,向页面发送获取属性图片事件
显示图片原始大小
/**
 * 遍历图片,设置图片的宽高属性
 * @param container {array} 容器
 * @param imgs {array} 图片url列表
 */
mapImg(container, imgs) {
    imgs.forEach((src) => {
        this.imgNatureSize(container, src)
    })
},
/**
 * 获取图片原始宽高,并将图片push进容器
 * @param container {array} 容器
 * @param src {string} 图片url
 */
imgNatureSize(container, src) {
    const size = {
        width: '',
        height: '',
    }
    let image = new Image()
    image.src = src
    image.onload = function() {
        container.push({
            src,
            width: image.width,
            height: image.height,
        })
    }
},
遍历拿到的图片,获取图片的宽和高,并将宽高属性保存起来
下载图片
/**
 * 下载图片
 */
downLoad(url) {
    chrome.downloads.download({ url }, () => {
        console.log('下载成功')
    })
}
调用谷歌插件的download方法来进行图片下载,本来想搞个批量下载的,但是没有发现谷歌插件有提供批量下载的API,如果遍历所选中的图片列表,不断调用download方法,会一下子弹出很多保存窗口,没有什么意义,就作罢了。
最后,所有文章都会同步发送到微信公众号上,欢迎关注,欢迎提意见:


![[HBLOG]公众号](https://www.liuhaihua.cn/img/qrcode_gzh.jpg)

