iOS 10 by Tutorials 笔记(十二)
Chapter 12: What’s New with Photography
iOS 10 针对图片和视频带来两个巨大的改进
- 应用现在可以编辑 live photo 了
- 提供了新的拍摄时间线,允许你在各个时间点进行拍摄和处理图片
本章我们通过创建一个自拍小神器,来对 AVFoundation API 的新特性一探究竟。
Smile, you’re on camera!
首先使用 Xcode 创建一个 Single View Application,在 Info.plist 中添加下面的字典信息:
<key>NSCameraUsageDescription</key>
<string>PhotoMe needs the camera to take photos. Duh!</string>
<key>NSMicrophoneUsageDescription</key>
<string>PhotoMe needs the microphone to record audio with Live Photos.</string>
<key>NSPhotoLibraryUsageDescription</key>
<string>PhotoMe will save photos in the Photo Library.</string>
表明需要访问摄像头,麦克风,以及相册的权限。
AVFoundation 包含一个特殊的 CALayer 子类: AVCaptureVideoPreviewLayer ,它能够展示当前摄像头的画面,目前还不支持通过 Interface Builder 创建。所以我们通过代码的方式来搞定(创建一个 UIView 的子类)
创建一个 CameraPreviewView 类,添加如下代码:
import UIKit
import AVFoundation
import Photos
class CameraPreviewView: UIView {
    //1 指定一个 CALayer 的子类作为 main layer
    override static var layerClass: AnyClass {
        return AVCaptureVideoPreviewLayer.self
    }
    //2 便利方法提供一个 layer
    var cameraPreviewLayer: AVCaptureVideoPreviewLayer {
        return layer as! AVCaptureVideoPreviewLayer
    }
    //3 需要一个 AVCaptureSession 来显示来自摄像头的输入
    var session: AVCaptureSession? {
        get {
            return cameraPreviewLayer.session
        }
        set {
            cameraPreviewLayer.session = newValue
        }
    }
}
在 StoryBoard 里拖一个 View,宽高比例 3:4,类设置为 CameraPreviewView 
回到 ViewController.swift,添加 cameraPreviewView 的 outlet 属性,同时导入加入如下属性:
import AVFoundation

fileprivate let session = AVCaptureSession()
fileprivate let sessionQueue = DispatchQueue(
label: "com.razeware.PhotoMe.session-queue")
var videoDeviceInput: AVCaptureDeviceInput!
AVCaptureSession 对象用来处理从摄像头和麦克风输入的流,大多 capture 和 processing 的操作都是在后台异步进行的,所以你可以创建一个新队列来处理所有与 session 相关的事情。
在 viewDidLoad() 中添加如下代码:
//1 将 session 传递给 view,因此它能显示视图
cameraPreviewView.session = session
//2 暂停 session 队列,因此不会有任何事情发生
sessionQueue.suspend()
//3 请求麦克风和摄像头的权限
AVCaptureDevice.requestAccess(forMediaType: AVMediaTypeVideo) {
    success in
    if !success {
        print("Come on, it's a camera app!")
return
}
//4 一旦请求通过,重新开启 queue
    self.sessionQueue.resume()
}
你几乎已经可以做好自拍准备了,但前提是需要设置好 capture session,添加如下方法:
private func prepareCaptureSession() {
    // 1 告诉 session 你将要添加一系列的配置操作
    session.beginConfiguration()
    session.sessionPreset = AVCaptureSessionPresetPhoto
    do {
        // 2 创建一个前置摄像头设备
        let videoDevice = AVCaptureDevice.defaultDevice(
            withDeviceType: .builtInWideAngleCamera,
            mediaType: AVMediaTypeVideo,
            position: .front)
        // 3 创建一个设备输入表示设备能捕获的数据
        let videoDeviceInput = try
            AVCaptureDeviceInput(device: videoDevice)
        // 4 添加输入到 session 中,并作为属性(先前定义的)存储起来
        if session.canAddInput(videoDeviceInput) {
            session.addInput(videoDeviceInput)
            self.videoDeviceInput = videoDeviceInput
            // 5 返回主线程,只处理垂直方向的情形
            DispatchQueue.main.async {
                self.cameraPreviewView.cameraPreviewLayer
                    .connection.videoOrientation = .portrait
            }
        } else {
            print("Couldn't add device to the session")
            return
        }
    } catch {
        print("Couldn't create video device input: /(error)")
        return
    }
    // 6 一切顺利,确认所以更改
    session.commitConfiguration()
}
在 viewDidLoad() 的末尾,在 session queue 队列上调用上面的方法
sessionQueue.async {
    [unowned self] in
    self.prepareCaptureSession()
}
这就意味着如果没有通过用户鉴权,并不会执行到这一步,并且异步执行该方法也不会阻塞主线程。
最后,你需要在页面将要载入时启动 session, viewWillAppear(_:) 添加下面实现:
override func viewWillAppear(_ animated: Bool) {
    super.viewWillAppear(animated)
    sessionQueue.async {
        self.session.startRunning()
    }
}
startRunning() 会阻塞主线程,因此我们异步执行它。在真机上运行,通过鉴权操作后,你会通过前置摄像头在屏幕上看到自己可爱的小脸。 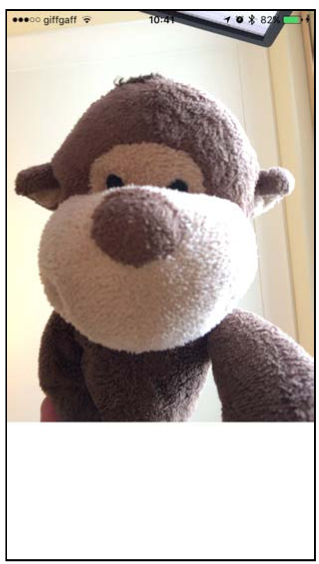
本小节,我们已经创建了一个 input 和一个 session,分别用来代表前置摄像头和处理数据操作。接下来要从 session 里获取处理完的输出结果。说白了就是目前已经能预览了,下面该照相了。
Taking a photo
iOS 10 推出了一个叫做 AVCapturePhotoOutput 的全新类,用于替代旧的 AVCaptureStillImageOutput ,本小节就来学习下此类的新特性。
在 AVCaptureStillImageOutput 中添加一个新属性来引用这个输出对象:
fileprivate let photoOutput = AVCapturePhotoOutput()
输出属性必须配置后添加到 capture session 中,在 prepareCaptureSession() 的 commitConfiguration() 方法调用前,添加如下代码:
if session.canAddOutput(photoOutput) {
    session.addOutput(photoOutput)
    photoOutput.isHighResolutionCaptureEnabled = true
} else {
    print("Unable to add photo output")
    return
}
isHighResolutionCaptureEnabled 决定了输出照片的分辨率,它必须在 session 启动前设置为 ture,不然 session 会在中途重新设置它。
现在输出对象已经创建被配置好了,还需要三个步骤才能真正拍出一张照片:
- 在界面上添加拍照按钮
- 创建 AVCapturePhotoSettings 对象,它负责说明拍照的细节,比如开不开闪光灯等
- 告诉输出(output)对象拍照,在设置和委托对象中传递消息
界面设置起来比较简单 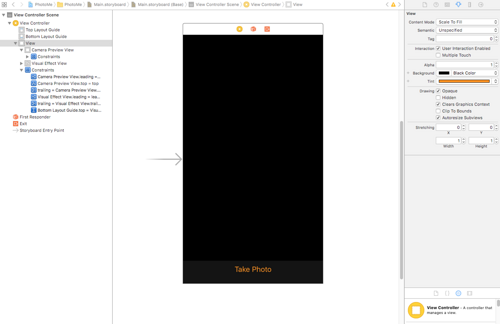 拍照按钮 UI 放置完毕后记得在 ViewController.swift 中添加对应的属性和方法
@IBOutlet weak var shutterButton: UIButton!
@IBAction func handleShutterButtonTap(_ sender: UIButton) {
}
我们把按下照相按钮的拍照逻辑提取出来放到单独一个方法中来:
extension ViewController {
    fileprivate func capturePhoto() {
        // 1 output 对象需要知道相机的方向
        let cameraPreviewLayerOrientation = cameraPreviewView
            .cameraPreviewLayer.connection.videoOrientation
        // 2 所有的工作都在特定的队列中异步完成, connection 表示一条媒体流
        //   这条媒体流来自于 inputs 通过 session 直到 output
        sessionQueue.async {
            if let connection = self.photoOutput
                .connection(withMediaType: AVMediaTypeVideo) {
                connection.videoOrientation =
                cameraPreviewLayerOrientation
            }
            // 3 对于 JPEG 拍摄,并没有太多要设置的
            let photoSettings = AVCapturePhotoSettings()
            photoSettings.flashMode = .off
            photoSettings.isHighResolutionPhotoEnabled = true
        }
    }
}
处理照片是需要时间的,从摄像头捕获到原始的图像数据到处理为 JPEG 或(RAW 格式)的文件(内嵌 EXIF 信息)存储在磁盘上,再到生成缩略图等,整个过程需要做大量的工作。
但用户不想因为等待前一张照片正在处理,而错失抓拍自己的完美时刻。如果是 output 的代理来处理,你需要找出每个代理正在处理的照片。
为了方便管理和理解,我们创建单独的对象来负责协调输出照片的代理方法,这个 view controller 将包含一个字典,该字典将包含一组代理对象。每个 AVCapturePhotoSettings 对象都是唯一标识并且单独使用的。
创建这个管理文件 PhotoCaptureDelegate.swift
import AVFoundation
import Photos
class PhotoCaptureDelegate: NSObject {
    // 1 提供闭包在照相过程中的关键节点执行
    var photoCaptureBegins: (() -> ())? = .none
    var photoCaptured: (() -> ())? = .none
    fileprivate let completionHandler: (PhotoCaptureDelegate, PHAsset?) -> ()
    // 2 用于存储来自输出的数据
    fileprivate var photoData: Data? = .none
    // 3 确保完成 completion 被设置,其他闭包都是可选的
    init(completionHandler: @escaping (PhotoCaptureDelegate, PHAsset?) -> ()) {
        self.completionHandler = completionHandler
    }
    // 4 一旦所有都完成,调用 completion 闭包
    fileprivate func cleanup(asset: PHAsset? = .none) {
        completionHandler(self, asset)
    }
}
下图展示了照片处理的步骤: 
上图每一步都有相关 delegate 方法所对应,下面具体的 delegate 实现会在注释里提到:
extension PhotoCaptureDelegate: AVCapturePhotoCaptureDelegate {
    // Process data completed
    func capture(_ captureOutput: AVCapturePhotoOutput,
                 didFinishProcessingPhotoSampleBuffer
        photoSampleBuffer: CMSampleBuffer?,
                 previewPhotoSampleBuffer: CMSampleBuffer?,
                 resolvedSettings: AVCaptureResolvedPhotoSettings,
                 bracketSettings: AVCaptureBracketedStillImageSettings?,
                 error: Error?) {
        guard let photoSampleBuffer = photoSampleBuffer else {
            print("Error capturing photo /(error)")
            return
        }
        photoData = AVCapturePhotoOutput
            .jpegPhotoDataRepresentation(
                forJPEGSampleBuffer: photoSampleBuffer,
                previewPhotoSampleBuffer: previewPhotoSampleBuffer)
    }
}
当拍摄的传感器数据已经被处理完毕后,上述方法会被调用。我们在这里使用 AVCapturePhotoOutput 的类方法创建了 JPEG 数据,并保存在之前定义的属性中
// Entire process completed
func capture(_ captureOutput: AVCapturePhotoOutput,
             didFinishCaptureForResolvedSettings
    resolvedSettings: AVCaptureResolvedPhotoSettings,
             error: Error?) {
    // 1 检查以确保一切都如预期
    guard error == nil, let photoData = photoData else {
        print("Error /(error) or no data")
        cleanup()
        return
    }
    // 2 申请访问相册的权限,PHAsset用来表示相册中的相片和影片
    PHPhotoLibrary.requestAuthorization {
        [unowned self]
        (status) in
        // 3 鉴权失败的话,执行 completion 闭包
        guard status == .authorized  else {
            print("Need authorisation to write to the photo library")
            self.cleanup()
            return
        }
        // 4 保存照片到相册,并获取 PHAsset
        var assetIdentifier: String?
        PHPhotoLibrary.shared().performChanges({
            let creationRequest = PHAssetCreationRequest.forAsset()
            let placeholder = creationRequest
                .placeholderForCreatedAsset
            creationRequest.addResource(with: .photo,
                                        data: photoData, options: .none)
            assetIdentifier = placeholder?.localIdentifier
            }, completionHandler: { (success, error) in
                if let error = error {
                    print("Error saving to the photo library: /(error)")
                }
                var asset: PHAsset? = .none
                if let assetIdentifier = assetIdentifier {
                    asset = PHAsset.fetchAssets(
                        withLocalIdentifiers: [assetIdentifier],
                        options: .none).firstObject
                }
                self.cleanup(asset: asset)
        })
    }
}
这里注意到 cleanup(asset:) 方法被频繁调用了,切换回 ViewController.swift ,添加一个字典属性来保持对这些 delegate 的引用:
fileprivate var photoCaptureDelegates = [Int64 : PhotoCaptureDelegate]()
然后在拍照方法 capturePhoto() 中 sessionQueue.async 的末尾添加如下代码,这里实现了拍照过程:
// 1 每个 AVCapturePhotoSettings 实例创建时都会被自动分配一个 ID 标识
let uniqueID = photoSettings.uniqueID
// 初始化一个 PhotoCaptureDelegate 对象,传入一个 completion 闭包
let photoCaptureDelegate = PhotoCaptureDelegate() {
    [unowned self] (photoCaptureDelegate, asset) in
    self.sessionQueue.async { [unowned self] in
        self.photoCaptureDelegates[uniqueID] = .none
    }
}
// 2 将 delegate 存入字典中
self.photoCaptureDelegates[uniqueID] = photoCaptureDelegate
// 3 开始拍照,并把 setting 和 delegate 传进去
self.photoOutput.capturePhoto(
    with: photoSettings, delegate: photoCaptureDelegate)
再次运行,除了看到全新的 UI,试着按下拍照按钮,你将会被引导进入系统相册,看到自己的自拍照。目前一切都很顺利,接下来再打磨打磨。 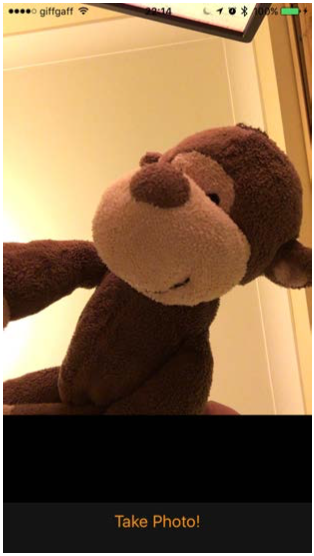
Making it fabulous
按下按钮按钮系统将免费提供一个快门声音,我们可以再给屏幕上加点东西,让其拍照效果看起来更自然些。在 capturePhoto() 方法中创建完 delegate 对象后,添加如下代码:
photoCaptureDelegate.photoCaptureBegins = { [unowned self] in
    DispatchQueue.main.async {
        self.shutterButton.isEnabled = false
        self.cameraPreviewView.cameraPreviewLayer.opacity = 0
        UIView.animate(withDuration: 0.2) {
            self.cameraPreviewView.cameraPreviewLayer.opacity = 1
        }
    }
}

photoCaptureDelegate.photoCaptured = { [unowned self] in
    DispatchQueue.main.async {
        self.shutterButton.isEnabled = true
    }
}
我们定义了两个闭包,分别在开始拍照和结束拍照时执行,当拍照开始时,你让屏幕有个闪白并淡出的效果,再次期间隐藏照相按钮,拍照过程结束再次显示拍照按钮。
打开 PhotoCaptureDelegate.swift 添加两个 delegate 方法
func capture(_ captureOutput: AVCapturePhotoOutput,
             willCapturePhotoForResolvedSettings
    resolvedSettings: AVCaptureResolvedPhotoSettings) {
    photoCaptureBegins?()
}
func capture(_ captureOutput: AVCapturePhotoOutput,
             didCapturePhotoForResolvedSettings
    resolvedSettings: AVCaptureResolvedPhotoSettings) {
    photoCaptured?()
}
我们只需在某些特定时间点执行的 delegate 方法中传入这些闭包就好了。
再次运行,这次按下拍照的效果就有点类似系统相机的动作了。不过细心的同学可能注意到了,系统相机左下角存在一个缩略图,会显示上次拍照的照片。我们也在自己的相机应用上来添加这个特性。
在 photo 的 buffer 处理时系统调用了一个 delegate 方法,它带有一个 previewPhotoSampleBuffer 的参数,它本身用来制作 JPEG 格式的图片预览的,但你也可以用它来制作缩略图。
在 PhotoCaptureDelegate.swift 中添加一个新的闭包,让它在获取一个缩略图(thumbnail)时执行
var thumbnailCaptured: ((UIImage?) -> ())? = .none
接着在 ...didFinishProcessingPhotoSampleBuffer... delegate 方法的默认添加:
if let thumbnailCaptured = thumbnailCaptured,
    let previewPhotoSampleBuffer = previewPhotoSampleBuffer,
    let cvImageBuffer =
CMSampleBufferGetImageBuffer(previewPhotoSampleBuffer) {
    let ciThumbnail = CIImage(cvImageBuffer: cvImageBuffer)
    let context = CIContext(options: [kCIContextUseSoftwareRenderer:
false])
    let thumbnail = UIImage(cgImage: context.createCGImage(ciThumbnail,
from: ciThumbnail.extent)!, scale: 2.0, orientation: .right)
    thumbnailCaptured(thumbnail)
}
上面的代码有点击鼓传花的味道,最终输出了 UIImage,整个转换过程是在后台完成。
接下来配置好 UI 部分 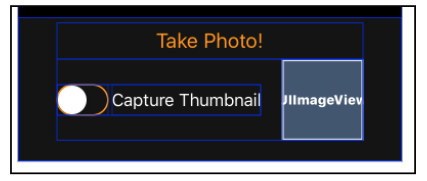
分别添加了一个 UIImageView 和 UISwitch 控件
@IBOutlet weak var previewImageView: UIImageView!
@IBOutlet weak var thumbnailSwitch: UISwitch!
如果用户已经打开了 Switch 开关(默认是关闭的),在 capturePhoto() 的 delegate 对象创建前添加控制逻辑:
if self.thumbnailSwitch.isOn
    && photoSettings.availablePreviewPhotoPixelFormatTypes
        .count > 0 {
    photoSettings.previewPhotoFormat = [
        kCVPixelBufferPixelFormatTypeKey as String :
            photoSettings
                .availablePreviewPhotoPixelFormatTypes.first!,
        kCVPixelBufferWidthKey as String : 160,
        kCVPixelBufferHeightKey as String : 160
    ]
}
这就告诉 photo settings 你想要创建 160x160 的预览图片,格式和主相片相同,还是在 capturePhoto() 方法中,在创建完 delegate 对象后添加:
photoCaptureDelegate.thumbnailCaptured = { [unowned self] image in
    DispatchQueue.main.async {
        self.previewImageView.image = image
    }
}
一旦缩略图被捕获和处理完毕就回主线程设置给 UI,运行,尝试打开显示缩略图开关,看一下效果! 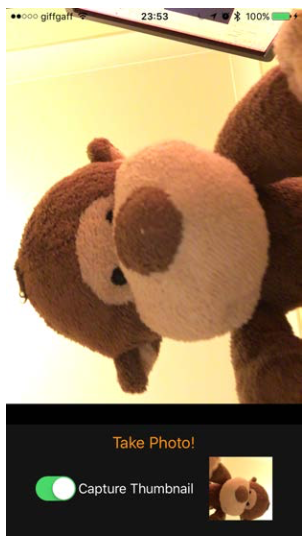
Live photos
接下来两章我们要来拍摄 live photos,然后编辑它们。还是先来打开 Main.storyboard 配置 UI 部分,这次我们在缩略图上面加一个 Live Photo 模式 Switch 开关,以及一个只有在拍摄时才会出现的文字说明(拍摄ing...)
@IBOutlet weak var livePhotoSwitch: UISwitch!
@IBOutlet weak var capturingLabel: UILabel!
打开 ViewController.swift ,在 prepareCaptureSession() 方法的 video device input 创建完后,添加如下代码:
do {
    let audioDevice = AVCaptureDevice.defaultDevice(withMediaType: AVMediaTypeAudio)
    let audioDeviceInput = try AVCaptureDeviceInput(device: audioDevice)
    if session.canAddInput(audioDeviceInput) {
        session.addInput(audioDeviceInput)
    } else {
        print("Couldn't add audio device to the session")
        return
    }
} catch {
    print("Unable to create audio device input: /(error)")
    return
}
一张 live photo 表示一个全尺寸照片大小的视频以及声音。这就意味着你需要添加另一个输入(input)到 session 中。作为一个高分辨率的拍摄行为,你需要设置输出对象来支持 live photo,即使默认不拍摄 live photo。下面我们来启用高分辨率拍摄模式:
photoOutput.isLivePhotoCaptureEnabled =
    photoOutput.isLivePhotoCaptureSupported
DispatchQueue.main.async {
    self.livePhotoSwitch.isEnabled =
}
还是先判断设备支持情况,如果支持再开启。转移到 capturePhoto() 方法中来做一些支持 live photo 拍摄的配置工作,在 delegate 对象创建前添加:
if self.livePhotoSwitch.isOn {
    let movieFileName = UUID().uuidString
    let moviePath = (NSTemporaryDirectory() as NSString)
        .appendingPathComponent("/(movieFileName).mov")
    photoSettings.livePhotoMovieFileURL = URL(
        fileURLWithPath: moviePath)
}
在拍摄 live photo 时,视频文件被记录在一个临时文件夹。
切回 PhotoCaptureDelegate.swift ,添加两个新属性:
var capturingLivePhoto: ((Bool) -> ())? = .none
fileprivate var livePhotoMovieURL: URL? = .none
第一个闭包在拍摄 live photo 时,VC 用来更新 UI,第二个用来存储 live photo 最终完成的 URL 地址。
在 AVCapturePhotoCaptureDelegate extension 下的 ...willCapturePhotoForResolvedSettings... 方法中添加
if resolvedSettings.livePhotoMovieDimensions.width > 0
    && resolvedSettings.livePhotoMovieDimensions.height > 0 {
    capturingLivePhoto?(true)
}
在拍摄结束时关闭,即在 ..didFinishRecordingLivePhotoMovieForEventualFileAt.. 代理方法中再次执行(传入 false):
func capture(_ captureOutput: AVCapturePhotoOutput,
             didFinishRecordingLivePhotoMovieForEventualFileAt
    outputFileURL: URL,
             resolvedSettings: AVCaptureResolvedPhotoSettings) {
    capturingLivePhoto?(false)
}
与拍照一样,处理视频的过程结束后也会调用一个 delegate 方法:
func capture(_ captureOutput: AVCapturePhotoOutput,
            didFinishProcessingLivePhotoToMovieFileAt outputFileURL: URL,
            duration: CMTime,
            photoDisplay photoDisplayTime: CMTime,
            resolvedSettings: AVCaptureResolvedPhotoSettings,
            error: Error?) {
    if let error = error {
        print("Error creating live photo video: /(error)")
        return
    }
    livePhotoMovieURL = outputFileURL
}
紧接着在 capture(_: didFinishCaptureForResolvedSettings:error:) 方法中调用完 addResource 后添加:
if let livePhotoMovieURL = self.livePhotoMovieURL {
    let movieResourceOptions = PHAssetResourceCreationOptions()
    movieResourceOptions.shouldMoveFile = true
    creationRequest.addResource(with: .pairedVideo,
                             fileURL: livePhotoMovieURL,
                             options: movieResourceOptions)
}
以上代码用来向相册里添加 live photo, shouldMoveFile 设为 true 表示将会自动替你移除临时存放视频目录。
现在你已经准备好拍摄 live photo 了,但是第一步需要设置一个整型变量来追踪拍摄状态,1 表示拍摄中,0 表示未拍摄。
fileprivate var currentLivePhotoCaptures: Int = 0
在 capturePhoto() 方法中,在设置闭包环节来处理更新 UI 的闭包
// Live photo UI updates
photoCaptureDelegate.capturingLivePhoto = { (currentlyCapturing) in
    DispatchQueue.main.async { [unowned self] in
        self.currentLivePhotoCaptures += currentlyCapturing ? 1 : -1
        UIView.animate(withDuration: 0.2) {
            self.capturingLabel.isHidden =
                self.currentLivePhotoCaptures == 0
        }
    }
}
根据 currentLivePhotoCaptures 变量的 + 1,- 1 操作来实现 Capturing 的 UI 显示 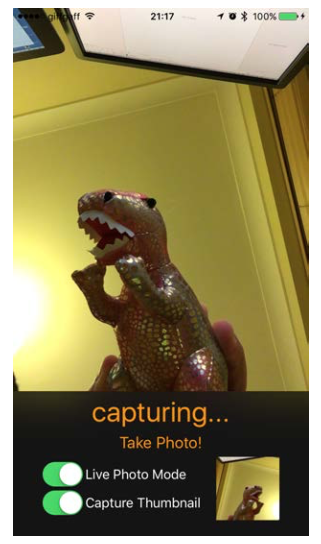
Editing Live Photos
iOS 10 之前编辑 live photo 会把它们变成一张张『死照片』,不过现在你能像编辑视频一样一帧一帧地来编辑它们了。我们下面就在自己的拍照应用上来实现这个 core image filter 新特性。
还是先来设置 UI,增加一个 Edit 按钮,和一个用来处理 live photo 的 ViewControl,它上面放置了一个宽高比为 3:4 的 PHLivePhotoView 视图,底下是两个按钮。 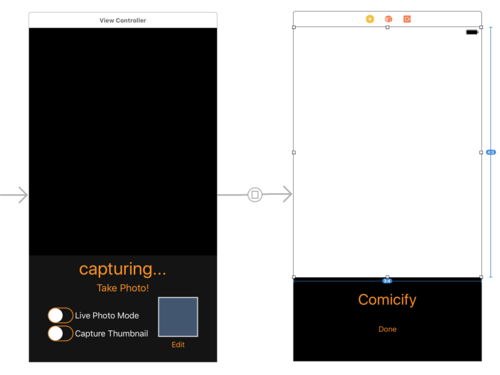
来创建我们处理 live photo 的新 ViewControl --- PhotoEditingViewController
import Photos
import PhotosUI

class PhotoEditingViewController: UIViewController {

  @IBOutlet weak var livePhotoView: PHLivePhotoView!

  @IBAction func handleComicifyTapped(_ sender: UIButton) {
    comicifyImage()
  }

  @IBAction func handleDoneTapped(_ sender: UIButton) {
    dismiss(animated: true)
  }
}
先做点基础工作,接着添加一个 asset 属性用来存放编辑的资源文件
var asset: PHAsset?
载入并显示 live photo:
override func viewDidAppear(_ animated: Bool) {
    super.viewDidAppear(animated)
    if let asset = asset {
        PHImageManager.default().requestLivePhoto(for: asset,
            targetSize: livePhotoView.bounds.size,
            contentMode: .aspectFill,
            options: .none, resultHandler: { (livePhoto, info) in
                DispatchQueue.main.async {
                    self.livePhotoView.livePhoto = livePhoto
            }
        })
    }
}
回到 ViewController.swift 载入头文件
import Photos
然后添加一个新属性来保存我们最后得到的 photo
fileprivate var lastAsset: PHAsset?
我们在 capturePhoto() 方法中,找到创建 PhotoCaptureDelegate 对象的代码,我们初始化它时传入了一个 completion 闭包,在此闭包中末尾设置:
self.lastAsset = asset
最后通过 prepare(for: sender:) 将要处理的资源传递给 PhotoEditingViewController
override func prepare(for segue: UIStoryboardSegue, sender: Any?) {
    if let editor = segue.destination as? PhotoEditingViewController {
        editor.asset = lastAsset
    }
}
运行点击 Edit 按钮,页面转场到编辑模式 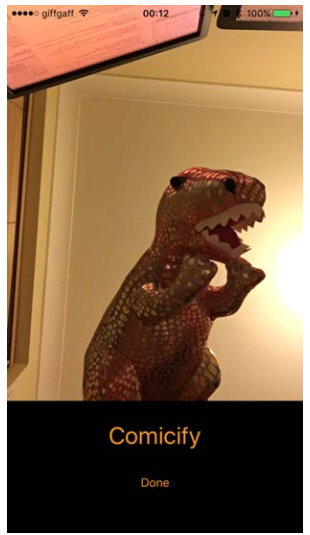
在 PhotoEditingViewController.swift 添加一个私有方法用来处理按下 Comicify 按钮的动作
fileprivate func comicifyImage() {
    guard let asset = asset else { return }
    // 1 从相册载入 asset 数据准备编辑
    asset.requestContentEditingInput(with: .none) {
        [unowned self] (input, info) in
        guard let input = input else {
            print("error: /(info)")
            return
        }
        // 2 检查 photo 是否为 live photo
        guard input.mediaType == .image,
            input.mediaSubtypes.contains(.photoLive) else {
                print("This isn't a live photo")
                return
        }
        // 3 创建一个编辑用的 context,然后设置一个逐帧处理的闭包
        let editingContext =
            PHLivePhotoEditingContext(livePhotoEditingInput: input)
        editingContext?.frameProcessor = {
            (frame, error) in
            // 4 为每一帧都应用相同的 CIFilter
            var image = frame.image
            image = image.applyingFilter("CIComicEffect",
                                          withInputParameters: .none)
            return image
        }
        // 5 处理生成最终的 live photo
        editingContext?.prepareLivePhotoForPlayback(
            withTargetSize: self.livePhotoView.bounds.size,
            options: .none) { (livePhoto, error) in
                guard let livePhoto = livePhoto else {
                    print("Preparation error: /(error)")
                    return
                }
                self.livePhotoView.livePhoto = livePhoto
        }
    }
}
第三步提到的逐帧处理闭包 frameProcessor 声明如下:
(PHLivePhotoFrame, NSErrorPointer) -> CIImage?
在第四步你也可以将多个 core image filters 组合起来使用
最后运行,点击 Comicify,你会看到这个滤镜将 live photo 漫画化了,最重要的是它还是会动的哦。 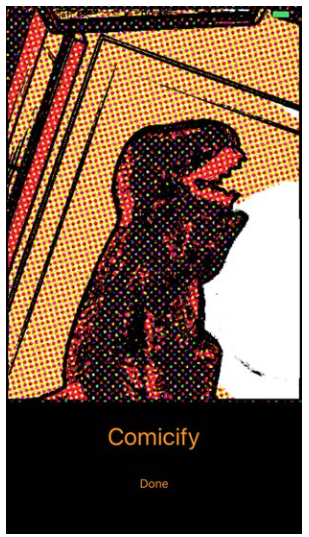
不过 prepareLivePhotoForPlayback 方法在编辑预览时,只能渲染低分辨率的编辑图片,为了编辑原始的 live photo 并存储,你需要多做一点工作。在 comicifyImage() 方法中添加下面的代码,具体位置在最后的闭包内的末尾。之所以要位于 completion block 中是因为它要等待预览渲染出来,否则保存照片将取消渲染。
// 1 PHContentEditingOutput 作为容器存放了要编辑的内容
let output = PHContentEditingOutput(contentEditingInput: input)
// 2 您必须设置它,否则照片无法保存,这步能让你稍后撤销编辑
output.adjustmentData = PHAdjustmentData(
    formatIdentifier: "PhotoMe",
    formatVersion: "1.0",
    data: "Comicify".data(using: .utf8)!)
// 3 重新运行 context 的帧处理器,不过这次是全尺寸,无损质量的的转变
editingContext?.saveLivePhoto(to: output, options: nil) {
    success, error in
    if !success {
        print("Rendering error /(error)")
        return
    }
    // 4 一旦渲染完成,采用在相册库的 changes block 中创建 requests 的方式存储
    PHPhotoLibrary.shared().performChanges({
        let request = PHAssetChangeRequest(for: asset)
        request.contentEditingOutput = output
        }, completionHandler: { (success, error) in
            print("Saved /(success), error /(error)")
    })
}
最终运行,录一段 live photo,编辑模式下点击 Comicify,你将会得到系统弹出的鉴权窗口,点击 Modify 就好啦~ 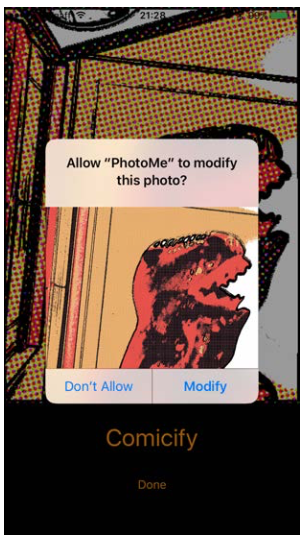
- 本文标签: id 代码 list core ip 处理器 UI CTO Swift 免费 description IO API value src 质量 trait 配置 CEO 缩略图 神器 tar 图片 管理 key lib PHP Authorization apr 注释 参数 ACE ORM IDE 实例 build update queue cat 时间 REST http https Action 数据 App Connection 目录 IOS 线程
- 版权声明: 本文为互联网转载文章,出处已在文章中说明(部分除外)。如果侵权,请联系本站长删除,谢谢。
- 本文海报: 生成海报一 生成海报二


![[HBLOG]公众号](https://www.liuhaihua.cn/img/qrcode_gzh.jpg)

