基于深度学习的自动避障小车_4_视频信号采集与处理
Introduction
本文说明了摄像头模块的加载,motion软件的安装配置,以及如果通过get命令控制motion的http server。
raspberrypi基于深度学习的自动避障智能小车_目录
1. 摄像头驱动加载
1.1 安装摄像头
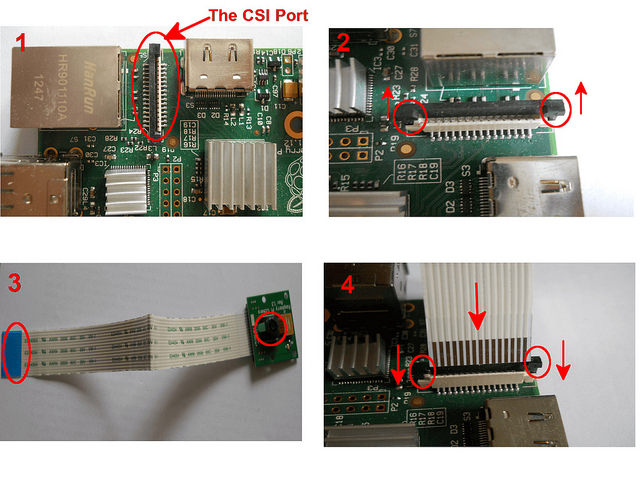
我使用的CSI接口的摄像头,即树莓派板子中间的那排槽。

安装的要点:
- 蓝色胶带插入树莓派上的CSI接口时是面向网口的
- 摄像头端的排线,蓝色胶带是背向摄像头的。
1.2 在树莓派上启用摄像头模块
在安装完摄像头模块之后,首先要确认你已经升级了树莓派系统并应用了最新的固件。可以输入以下命令来操作:
$ sudo apt-get update
$ sudo apt-get upgrade
运行树莓派配置工具来激活摄像头模块:
$ sudo raspi-config
移动光标至菜单中的 “Enable Camera(启用摄像头)”,将其设为Enable(启用状态)。完成之后重启树莓派。
在重启完树莓派后,我们就可以使用Pi Cam了。要用它来拍摄照片的话,可以从命令行运行raspistill:这句命令将在 2000ms 后拍摄一张照片,然后保存为 keychain.jpg
想要用摄像头模块拍一段视频的话,可以从命令行运行 raspivid 工具。下面这句命令会按照默认配置(长度5秒,分辨率1920×1080,比特率 17Mbps)拍摄一段视频。
$ raspivid -o mykeychain.h264
1.3 模块加载
但是由于linux下更常用的是usb摄像头(webcam),而它默认挂载点是 /etc/video0 ,我们将要使用的motion软件在检测的时候,也是默认检测这个挂载点,因此需要:
# to load it and create /dev/video0
sudo modprobe bcm2835-v4l2
modprobe用于智能地向内核中加载模块或者从内核中移除模块。
2. motion软件配置
motion是一个非常强大的软件运动检测模块,也可以做为摄像头的上层管理应用, 官方页面
debian系列直接:
sudo apt-get install motion
安装即可。
2.1 配置motion
安装完成后,默认配置文件在 /etc/motion/ 下,可以通过 motion -c your.conf 来运行自定义的配置文件,但是不知道为什么如果我直接修改默认的配置文件,会出现一些莫名其妙的问题,因此建议在 ~ 下建立 motion 文件夹作为你自己的motion目录,将 /etc/motion/motion.conf 复制一份到它下面,并通过
# 改变目录的所属用户和用户组
sudo chown pi.pi -R ~/motion/
# 给当前 user递归添加写权限
sudo chmod u+w -R ~/motion/
修改好权限设置,运行时通过 -c 来指定你的配置文件。
配置文件很详细,这里主要讲一下几个重点。
# Start in daemon (background) mode and release terminal (default: off)
# 是否开启daemon模式,即后台模式。建议不开启,以便观察输出
daemon off
# Rotate image this number of degrees. The rotation affects all saved images as
# well as movies. Valid values: 0 (default = no rotation), 90, 180 and 270.
# 是否旋转图像,如果你安装摄像头是旋转的,可以用这个来调节下。
rotate 0
# Image width (pixels). Valid range: Camera dependent, default: 352 图像宽度
width 640
# Image height (pixels). Valid range: Camera dependent, default: 288 图像高度
height 480
# Maximum number of frames to be captured per second.
# Valid range: 2-100. Default: 100 (almost no limit). 捕捉图像的帧率。我的默认值是8,改成了30.不然太小了,视频会很卡。
framerate 30
# 当运动被检测到的时候,是否立刻拍照片。一定要关闭,不然会生成超大量的图片。
output_pictures off
# Target base directory for pictures and films
# Recommended to use absolute path. (Default: current working directory)
# 建议改成你的目录,默认是当前执行motion的路径
target_dir /home/pi/motion/
# 实时视频流设置部分
# The mini-http server listens to this port for requests (default: 0 = disabled)
# motion自建的http server,访问的端口是8081,可以实时查看摄像头的数据
stream_port 8081
# Maximum framerate for streams (default: 1)
# stream的最大帧率,这个直接控制了网页上显示视频的流畅度
stream_maxrate 30
# Restrict stream connections to localhost only (default: on)
# 如果需要外网可以访问,即,通过http://your_ip:80801/ 查看摄像头的实时数据,那么这项一定要关闭。
stream_localhost off
# HTTP控制部分
# TCP/IP port for the http server to listen on (default: 0 = disabled)
# 访问 http://your_ip:8080/ 即可看到各种操作功能,当然也可以通过发送get请求到相应的地址实现控制
webcontrol_port 8080
# Restrict control connections to localhost only (default: on)
# 同样的控制是否只在本机访问这个控制部分的开关
webcontrol_localhost off
2.2 运行motion
motion -c ~/motion/motion.conf 来运行你的motion,先查看是否如下输出
[0] [NTC] [ALL] conf_load: Processing thread 0 - config file motion.conf
[0] [NTC] [ALL] motion_startup: Motion 3.2.12+git20140228 Started
[0] [NTC] [ALL] motion_startup: Logging to syslog
[0] [NTC] [ALL] motion_startup: Using log type (ALL) log level (NTC)
[0] [NTC] [ENC] ffmpeg_init: ffmpeg LIBAVCODEC_BUILD 3670016 LIBAVFORMAT_BUILD 3670272
[0] [NTC] [ALL] main: Thread 1 is from motion.conf
[0] [NTC] [ALL] main: Thread 1 is device: /dev/video0 input -1
[0] [NTC] [ALL] main: Stream port 8081
[0] [NTC] [ALL] main: Waiting for threads to finish, pid: 1201
[1] [NTC] [ALL] motion_init: Thread 1 started , motion detection Enabled
[1] [NTC] [VID] vid_v4lx_start: Using videodevice /dev/video0 and input -1
[1] [NTC] [VID] v4l2_get_capability:
------------------------
cap.driver: "bm2835 mmal"
cap.card: "mmal service 16.1"
cap.bus_info: "platform:bcm2835-v4l2"
cap.capabilities=0x85200005
------------------------
[1] [NTC] [VID] v4l2_get_capability: - VIDEO_CAPTURE
[1] [NTC] [VID] v4l2_get_capability: - VIDEO_OVERLAY
[1] [NTC] [VID] v4l2_get_capability: - READWRITE
[1] [NTC] [VID] v4l2_get_capability: - STREAMING
[1] [NTC] [VID] v4l2_select_input: name = "Camera 0", type 0x00000002, status 00000000
[1] [NTC] [VID] v4l2_select_input: - CAMERA
[1] [WRN] [VID] v4l2_select_input: Device doesn't support VIDIOC_G_STD
[1] [NTC] [VID] v4l2_do_set_pix_format: Testing palette YU12 (640x480)
[0] [NTC] [STR] httpd_run: motion-httpd testing : IPV4 addr: 0.0.0.0 port: 8080
[0] [NTC] [STR] httpd_run: motion-httpd Bound : IPV4 addr: 0.0.0.0 port: 8080
[0] [NTC] [STR] httpd_run: motion-httpd/3.2.12+git20140228 running, accepting connections
[0] [NTC] [STR] httpd_run: motion-httpd: waiting for data on 0.0.0.0 port TCP 8080
[1] [NTC] [VID] v4l2_do_set_pix_format: Using palette YU12 (640x480) bytesperlines 640 sizeimage 460800 colorspace 00000001
[1] [NTC] [VID] v4l2_scan_controls: found control 0x00980900, "Brightness", range 0,100
[1] [NTC] [VID] v4l2_scan_controls:     "Brightness", default 50, current 50
[1] [NTC] [VID] v4l2_scan_controls: found control 0x00980901, "Contrast", range -100,100
[1] [NTC] [VID] v4l2_scan_controls:     "Contrast", default 0, current 0
[1] [NTC] [VID] v4l2_scan_controls: found control 0x00980902, "Saturation", range -100,100
[1] [NTC] [VID] v4l2_scan_controls:     "Saturation", default 0, current 0
[1] [NTC] [VID] v4l2_scan_controls: found control 0x0098090e, "Red Balance", range 1,7999
[1] [NTC] [VID] v4l2_scan_controls:     "Red Balance", default 1000, current 1000
[1] [NTC] [VID] v4l2_scan_controls: found control 0x0098090f, "Blue Balance", range 1,7999
[1] [NTC] [VID] v4l2_scan_controls:     "Blue Balance", default 1000, current 1000
[1] [NTC] [VID] vid_v4lx_start: Using V4L2
[1] [NTC] [ALL] image_ring_resize: Resizing pre_capture buffer to 1 items
[1] [NTC] [STR] http_bindsock: motion-stream testing : IPV4 addr: 0.0.0.0 port: 8081
[1] [NTC] [STR] http_bindsock: motion-stream Bound : IPV4 addr: 0.0.0.0 port: 8081
[1] [NTC] [ALL] motion_init: Started motion-stream server in port 8081 auth Disabled
输出如上则表示正常检测到摄像头并运行起了motion,访问你的树莓派ip:8081来查看摄像头监控视频吧。
如果想要将其后台运行,可以使用
nohup motion -c ~/motion/motion.conf &
nohup = no hang up 表示不把进程挂起,即使退出了账户,进程也在运行。当然需要搭配 & 来运行。
或者修改上面说的配置文件,让motion以daemon的守护模式运行。
3. 摄像头类
import requests
import os


class CamMotion:
    def __init__(self, ip, control_port):
        self.ip = ip
        self.control_port = control_port

    def check(self):
        # 这是在小车,所以直接localhost就行
        requests.get("http://%s:%s/0/action/snapshot" % ('127.0.0.1', self.control_port))

    def get_last_snap(self):
        data = None
        file_size = os.path.getsize('/home/pi/motion/lastsnap.jpg')
        with open('/home/pi/motion/lastsnap.jpg', 'rb')as fin:
            data = fin.read()
        return data, file_size
摄像头类在小车端,我的设计里只实现了简单的两个功能:
-
check()通过发送http get给motion的http server实现抓拍.requests库是一个强大而简易的发送http get post数据的库,__init__函数里传入的端口是motion默认的控制端口,而由于cam类是在pi上运行,motion也在pi上,因此ip直接使用127.0.0.1即可。 -
get_last_snap()由于motion在target dir里建立了一个lastsnap.jgp的软连接指向了最后一次snap的图片,这样直接读取它就是最后一次抓拍的图像,省去了很多麻烦的挑选最后一次抓拍图像的步骤。返回了读取的读片内容和图片的大小。
Reference
/dev/video0 missing
如何安装树莓派摄像头模块


![[HBLOG]公众号](https://www.liuhaihua.cn/img/qrcode_gzh.jpg)

