SSM(八)动态切换数据源

在现在开发的过程中应该大多数朋友都有遇到过切换数据源的需求。比如现在常用的数据库读写分离,或者就是有两个数据库的情况,这些都需要用到切换数据源。
手动切换数据源
使用 Spring 的 AbstractRoutingDataSource 类来进行拓展多数据源。
该类就相当于一个 dataSource 的路由,用于根据 key 值来进行切换对应的 dataSource 。
下面简单来看下 AbstractRoutingDataSource 类的几段关键源码:
@Override
publicConnectiongetConnection()throwsSQLException{
	return determineTargetDataSource().getConnection();
}

@Override
publicConnectiongetConnection(String username, String password)throwsSQLException{
	return determineTargetDataSource().getConnection(username, password);
}

/**
 * Retrieve the current target DataSource. Determines the
 * {@link #determineCurrentLookupKey() current lookup key}, performs
 * a lookup in the {@link #setTargetDataSources targetDataSources} map,
 * falls back to the specified
 * {@link #setDefaultTargetDataSource default target DataSource} if necessary.
 * @see #determineCurrentLookupKey()
 */
protectedDataSourcedetermineTargetDataSource(){
	Assert.notNull(this.resolvedDataSources, "DataSource router not initialized");
	Object lookupKey = determineCurrentLookupKey();
	DataSource dataSource = this.resolvedDataSources.get(lookupKey);
	if (dataSource == null && (this.lenientFallback || lookupKey == null)) {
		dataSource = this.resolvedDefaultDataSource;
	}
	if (dataSource == null) {
		throw new IllegalStateException("Cannot determine target DataSource for lookup key [" + lookupKey + "]");
	}
	return dataSource;
}

/**
 * Determine the current lookup key. This will typically be
 * implemented to check a thread-bound transaction context.
 * <p>Allows for arbitrary keys. The returned key needs
 * to match the stored lookup key type, as resolved by the
 * {@link #resolveSpecifiedLookupKey} method.
 */
protectedabstractObjectdetermineCurrentLookupKey();
可以看到其中获取链接的方法 getConnection() 调用的 determineTargetDataSource 则是关键方法。该方法用于返回我们使用的数据源。
其中呢又是 determineCurrentLookupKey() 方法来返回当前数据源的 key 值。
之后通过该key值在 resolvedDataSources 这个map中找到对应的 value (该value就是数据源)。
resolvedDataSources 这个map则是在:
@Override
publicvoidafterPropertiesSet(){
	if (this.targetDataSources == null) {
		throw new IllegalArgumentException("Property 'targetDataSources' is required");
	}
	this.resolvedDataSources = new HashMap<Object, DataSource>(this.targetDataSources.size());
	for (Map.Entry<Object, Object> entry : this.targetDataSources.entrySet()) {
		Object lookupKey = resolveSpecifiedLookupKey(entry.getKey());
		DataSource dataSource = resolveSpecifiedDataSource(entry.getValue());
		this.resolvedDataSources.put(lookupKey, dataSource);
	}
	if (this.defaultTargetDataSource != null) {
		this.resolvedDefaultDataSource = resolveSpecifiedDataSource(this.defaultTargetDataSource);
	}
}
这个方法通过 targetDataSources 这个map来进行赋值的。 targetDataSources 则是我们在配置文件中进行赋值的,下面会讲到。
再来看看 determineCurrentLookupKey() 方法,从 protected 来修饰就可以看出是需要我们来进行重写的。
DynamicDataSource 和 DataSourceHolder
于是我新增了 DynamicDataSource 类,代码如下:
package com.crossoverJie.util;

import org.springframework.jdbc.datasource.lookup.AbstractRoutingDataSource;

/**
 * Function:
 *
 * @author chenjiec
 *         Date: 2017/1/2 上午12:22
 * @since JDK 1.7
 */
public classDynamicDataSourceextendsAbstractRoutingDataSource{
    @Override
    protectedObjectdetermineCurrentLookupKey(){
        return DataSourceHolder.getDataSources();
    }
}
代码很简单,继承了 AbstractRoutingDataSource 类并重写了其中的 determineCurrentLookupKey() 方法。
这里直接用 DataSourceHolder 返回了一个数据源。
DataSourceHolder 代码如下:
package com.crossoverJie.util;

/**
 * Function:动态数据源
 *
 * @author chenjiec
 *         Date: 2017/1/2 上午12:19
 * @since JDK 1.7
 */
public classDataSourceHolder{
    private static final ThreadLocal<String> dataSources = new ThreadLocal<String>();

    publicstaticvoidsetDataSources(String dataSource){
        dataSources.set(dataSource);
    }

    publicstaticStringgetDataSources(){
        return dataSources.get();
    }
}
这里我使用了 ThreadLocal 来保存了数据源,关于 ThreadLocal 的知识点可以查看以下这篇文章:
之后在 Spring 的配置文件中配置我们的数据源,就是上文讲到的 为targetDataSources赋值 :
<beanid="ssm1DataSource"class="com.alibaba.druid.pool.DruidDataSource"
          init-method="init" destroy-method="close">
        <!-- 指定连接数据库的驱动 -->
        <propertyname="driverClassName"value="${jdbc.driverClass}"/>
        <propertyname="url"value="${jdbc.url}"/>
        <propertyname="username"value="${jdbc.user}"/>
        <propertyname="password"value="${jdbc.password}"/>
        <!-- 配置初始化大小、最小、最大 -->
        <propertyname="initialSize"value="3"/>
        <propertyname="minIdle"value="3"/>
        <propertyname="maxActive"value="20"/>
        <!-- 配置获取连接等待超时的时间 -->
        <propertyname="maxWait"value="60000"/>
        <!-- 配置间隔多久才进行一次检测,检测需要关闭的空闲连接,单位是毫秒 -->
        <propertyname="timeBetweenEvictionRunsMillis"value="60000"/>
        <!-- 配置一个连接在池中最小生存的时间,单位是毫秒 -->
        <propertyname="minEvictableIdleTimeMillis"value="300000"/>
        <propertyname="validationQuery"value="SELECT 'x'"/>
        <propertyname="testWhileIdle"value="true"/>
        <propertyname="testOnBorrow"value="false"/>
        <propertyname="testOnReturn"value="false"/>
        <!-- 打开PSCache,并且指定每个连接上PSCache的大小 -->
        <propertyname="poolPreparedStatements"value="true"/>
        <propertyname="maxPoolPreparedStatementPerConnectionSize"
                  value="20" />
        <!-- 配置监控统计拦截的filters,去掉后监控界面sql无法统计 -->
        <propertyname="filters"value="stat"/>
    </bean>

    <beanid="ssm2DataSource"class="com.alibaba.druid.pool.DruidDataSource"
          init-method="init" destroy-method="close">
        <!-- 指定连接数据库的驱动 -->
        <propertyname="driverClassName"value="${jdbc.driverClass}"/>
        <propertyname="url"value="${jdbc.url2}"/>
        <propertyname="username"value="${jdbc.user2}"/>
        <propertyname="password"value="${jdbc.password2}"/>
        <propertyname="initialSize"value="3"/>
        <propertyname="minIdle"value="3"/>
        <propertyname="maxActive"value="20"/>
        <!-- 配置获取连接等待超时的时间 -->
        <propertyname="maxWait"value="60000"/>
        <!-- 配置间隔多久才进行一次检测,检测需要关闭的空闲连接,单位是毫秒 -->
        <propertyname="timeBetweenEvictionRunsMillis"value="60000"/>
        <!-- 配置一个连接在池中最小生存的时间,单位是毫秒 -->
        <propertyname="minEvictableIdleTimeMillis"value="300000"/>
        <propertyname="validationQuery"value="SELECT 'x'"/>
        <propertyname="testWhileIdle"value="true"/>
        <propertyname="testOnBorrow"value="false"/>
        <propertyname="testOnReturn"value="false"/>
        <!-- 打开PSCache,并且指定每个连接上PSCache的大小 -->
        <propertyname="poolPreparedStatements"value="true"/>
        <propertyname="maxPoolPreparedStatementPerConnectionSize"
                  value="20"/>
        <!-- 配置监控统计拦截的filters,去掉后监控界面sql无法统计 -->
        <propertyname="filters"value="stat"/>
    </bean>
    <beanid="dataSource"class="com.crossoverJie.util.DynamicDataSource">
        <propertyname="targetDataSources">
            <mapkey-type="java.lang.String">
                <entrykey="ssm1DataSource"value-ref="ssm1DataSource"/>
                <entrykey="ssm2DataSource"value-ref="ssm2DataSource"/>
            </map>
        </property>
        <!--默认数据源-->
        <propertyname="defaultTargetDataSource"ref="ssm1DataSource"/>
    </bean>
这里分别配置了两个数据源: ssm1DataSource 和 ssm2DataSource 。
之后再通过 Spring 的依赖注入方式将两个数据源设置进 targetDataSources 。
接下来的用法相比大家也应该猜到了。
就是在每次调用数据库之前我们都要先通过 DataSourceHolder 来设置当前的数据源。看下demo:
@Test
publicvoidselectByPrimaryKey()throwsException{
    DataSourceHolder.setDataSources(Constants.DATASOURCE_TWO);
    Datasource datasource = dataSourceService.selectByPrimaryKey(7);
    System.out.println(JSON.toJSONString(datasource));
}
详见我的单测。
使用起来也是非常简单。但是不知道大家注意到没有,这样的做法槽点很多:
- 每次使用需要手动切换,总有一些人会忘记写(比如我)。
- 如果是后期需求变了,查询其他的表了还得一个个改回来。
那有没有什么方法可以自动的帮我们切换呢?
肯定是有的,大家应该也想得到。就是利用 Spring 的 AOP 了。
自动切换数据源
首先要定义好我们的切面类 DataSourceExchange :
package com.crossoverJie.util;

import org.aspectj.lang.JoinPoint;

/**
 * Function:拦截器方法
 *
 * @author chenjiec
 *         Date: 2017/1/3 上午12:34
 * @since JDK 1.7
 */
public classDataSourceExchange{

    /**
     *
     * @param point
     */
    publicvoidbefore(JoinPoint point){

        //获取目标对象的类类型
        Class<?> aClass = point.getTarget().getClass();

        //获取包名用于区分不同数据源
        String whichDataSource = aClass.getName().substring(25, aClass.getName().lastIndexOf("."));
        if ("ssmone".equals(whichDataSource)) {
            DataSourceHolder.setDataSources(Constants.DATASOURCE_ONE);
        } else {
            DataSourceHolder.setDataSources(Constants.DATASOURCE_TWO);
        }

    }


    /**
     * 执行后将数据源置为空
     */
    publicvoidafter(){
        DataSourceHolder.setDataSources(null);
    }

}
逻辑也比较简单,就是在执行数据库操作之前做一个切面。
- 通过
JoinPoint对象获取目标对象。 - 在目标对象中获取包名来区分不同的数据源。
- 根据不同数据源来进行赋值。
- 执行完毕之后将数据源清空。
关于一些 JoinPoint 的API:
package org.aspectj.lang;
import org.aspectj.lang.reflect.SourceLocation;
public interfaceJoinPoint{
    StringtoString();         //连接点所在位置的相关信息
    StringtoShortString();     //连接点所在位置的简短相关信息
    StringtoLongString();     //连接点所在位置的全部相关信息
    ObjectgetThis();         //返回AOP代理对象
    ObjectgetTarget();       //返回目标对象
    Object[] getArgs();       //返回被通知方法参数列表
    SignaturegetSignature();  //返回当前连接点签名
    SourceLocationgetSourceLocation();//返回连接点方法所在类文件中的位置
    StringgetKind();        //连接点类型
    StaticPartgetStaticPart(); //返回连接点静态部分
}
为了通过 包名 来区分不同数据源,我将目录结构稍微调整了下:
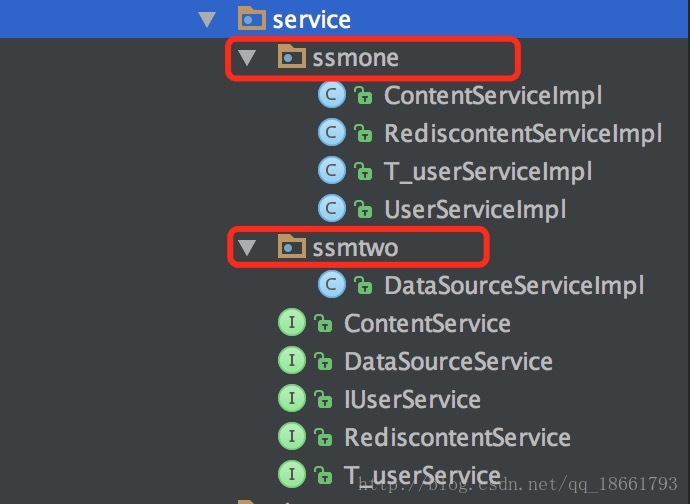
将两个不同的数据源的实现类放到不同的包中,这样今后如果还需要新增其他数据源也可以灵活的切换。
看下 Spring 的配置:
<beanid="dataSourceExchange"class="com.crossoverJie.util.DataSourceExchange"/>
<!--配置切面拦截方法 -->
<aop:configproxy-target-class="false">
    <!--将com.crossoverJie.service包下的所有select开头的方法加入拦截
    去掉select则加入所有方法
    -->
    <aop:pointcutid="controllerMethodPointcut"expression="
    execution(* com.crossoverJie.service.*.select*(..))"/>

    <aop:pointcutid="selectMethodPointcut"expression="
    execution(* com.crossoverJie.dao..*Mapper.select*(..))"/>

    <aop:advisoradvice-ref="methodCacheInterceptor"pointcut-ref="controllerMethodPointcut"/>

    <!--所有数据库操作的方法加入切面-->
    <aop:aspectref="dataSourceExchange">
        <aop:pointcutid="dataSourcePointcut"expression="execution(* com.crossoverJie.service.*.*(..))"/>
        <aop:beforepointcut-ref="dataSourcePointcut"method="before"/>
        <aop:afterpointcut-ref="dataSourcePointcut"method="after"/>
    </aop:aspect>
</aop:config>
这是在我们上一篇整合redis缓存的基础上进行修改的。
这样缓存和多数据源都满足了。
实际使用:
@Test
publicvoidselectByPrimaryKey()throwsException{
    Rediscontent rediscontent = rediscontentService.selectByPrimaryKey(30);
    System.out.println(JSON.toJSONString(rediscontent));
}
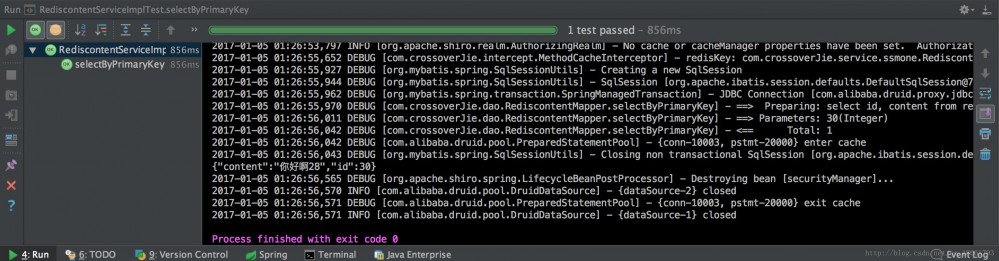 这样看起来就和使用一个数据源这样简单,再也不用关心切换的问题了。
总结
不过按照这样的写法是无法做到在一个事务里控制两个数据源的。这个我还在学习中,有相关经验的大牛不妨指点一下。
项目地址: https://github.com/crossoverJie/SSM.git
个人博客地址: http://crossoverjie.top 。
GitHub地址: https://github.com/crossoverJie 。
正文到此结束
- 本文标签: 代码 AOP 参数 rmi http redis bean App dataSource tab 文章 sql GitHub IO value 目录 统计 js 数据 constant CTO 总结 源码 ACE cat API cache key src https UI Service 时间 final java Word 数据库 NSA mapper json lib git Action 配置 需求 id 开发 spring 博客 tar IDE ORM Select Connection db Property map
- 版权声明: 本文为互联网转载文章,出处已在文章中说明(部分除外)。如果侵权,请联系本站长删除,谢谢。
- 本文海报: 生成海报一 生成海报二
热门推荐


相关文章

近期评论
-
ws0132613@gmail.comhttps://getmacos.com/gopanel/william smith
-
谢谢
-
https://www.newcmy.com/register?aff=HBVX建议您试试草莓云机场,可以流畅观看youtube和tiktok,上reddit/x也没有问题,还有各种ai优化节点。
-
-
-
想购买您这个站,我的联系方式QQ741756694微信同步 能卖联系
-
-
-
-
Loading...
![[HBLOG]公众号](https://www.liuhaihua.cn/img/qrcode_gzh.jpg)

