Tinker接入及源码分析(一)
本文分析基于 Tinker1.7.6 版本
Tinker项目地址:https://github.com/Tencent/tinker
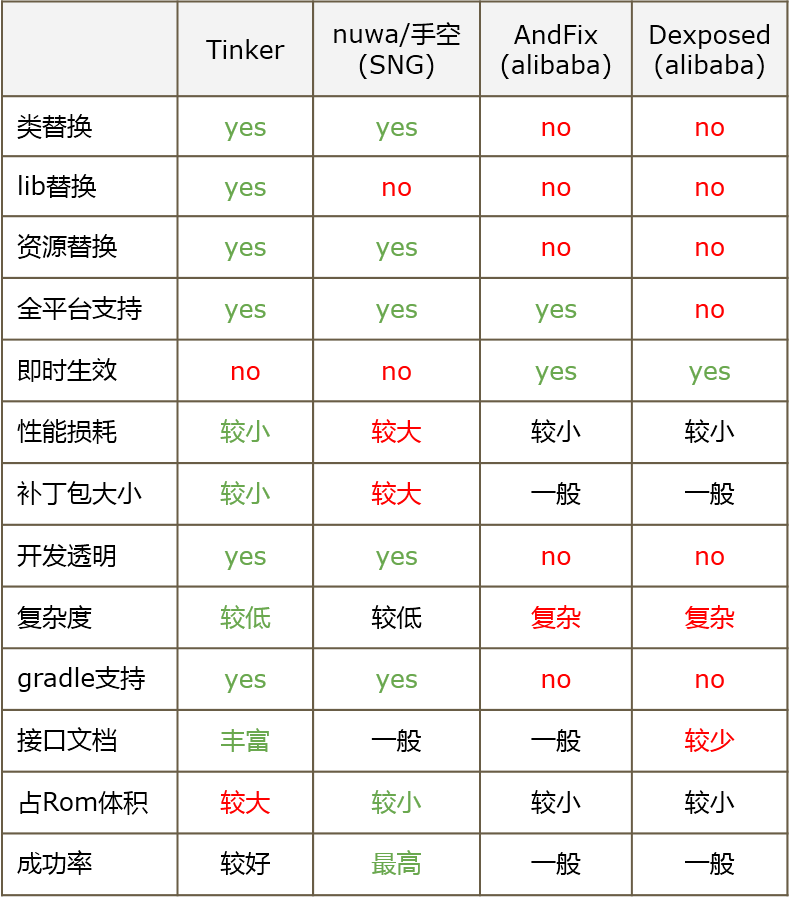
现在市面上有很多Android热修复框架,包括开源的,未开源的和即将开源的。阿里巴巴的AndFix,美团的Robust,Qzone方案的Nuwa,阿里百川的HotFix,微信的Tinker。
下面是几个热修复框架的对比图:

学习一个框架需要从使用入手,在深入其源码,分析其原理。
先简单的说一下Tinker框架热修复的原理,主要是dex文件的修复,不再涉及资源文件以及so文件的修复,通过对比原dex文件(存在bug)与现dex文件(bug已修复)生成差异包,生成的差异包作为补丁包下发给客户端,客户端做一系列校验之后,将下发的差异包与本应用的dex文件合并成成全量的dex文件,并进行opt优化,在应用重启的时候,会在TinkerApplication中加载优化过的全量dex文件,加载过程与QQ空间热修复方案类似,将dex文件插入到DexPathList 中 dexElements的前面。
下面以官方提供的Sample简单的说一下如何使用Tinker做热修复,当然最好的接入文档是官方wiki:https://github.com/Tencent/tinker/wiki
首先将自己的实现的Application改为继承DefaultApplicationLike ,需要注意的是必须先初始化Tinker,后续关于Tinker类的操作才能正常使用,这里在onBaseContextAttached中调用了TinkerInstall.installTinker(this)来初始化Tinker,例如:
@DefaultLifeCycle(application = "tinker.sample.android.app.SampleApplication",
                  flags = ShareConstants.TINKER_ENABLE_ALL,
                  loadVerifyFlag = false)
public class SampleApplicationLike extends DefaultApplicationLike {
    private static final String TAG = "Tinker.SampleApplicationLike";

    public SampleApplicationLike(Application application, int tinkerFlags, boolean tinkerLoadVerifyFlag,
                                 long applicationStartElapsedTime, long applicationStartMillisTime, Intent tinkerResultIntent,
                                 Resources[] resources, ClassLoader[] classLoader, AssetManager[] assetManager) {
        super(application, tinkerFlags, tinkerLoadVerifyFlag, applicationStartElapsedTime, applicationStartMillisTime, tinkerResultIntent, resources, classLoader, assetManager);
    }

    /**
     * install multiDex before install tinker
     * so we don't need to put the tinker lib classes in the main dex
     *
     * @param base
     */
    @TargetApi(Build.VERSION_CODES.ICE_CREAM_SANDWICH)
    @Override
    public void onBaseContextAttached(Context base) {
        super.onBaseContextAttached(base);
        //you must install multiDex whatever tinker is installed!
        MultiDex.install(base);
        TinkerInstaller.installTinker(this);
    }

}
推荐通过注解处理器的方式(DefaultLifeCycle)生成Application:tinker.sample.android.app.SampleApplication;我们需要在Manifest文件中修改为这个Application,当然也可以自己实现这个Application,继承自TinkerApplication,需要传入我们定义的ApplicationLike,这样真实的Application就和我们定义的代理Application(ApplicationLike)相关联起来了。下面是真实的Application实现:
public class SampleApplication extends TinkerApplication {
    public SampleApplication() {
      super(
        //tinkerFlags, tinker支持的类型,dex,library,还是全部都支持!
        ShareConstants.TINKER_ENABLE_ALL,
        //ApplicationLike的实现类,只能传递字符串
        "tinker.sample.android.app.SampleApplicationLike",
        //Tinker的加载器,一般来说用默认的即可
        "com.tencent.tinker.loader.TinkerLoader",
        //tinkerLoadVerifyFlag, 运行加载时是否校验dex与,ib与res的Md5
        false);
    }
}
然后通过调用下面的代码来加载补丁文件,前提是Tinker必须初始化完成,传入的patchLocation就是补丁文件的路径:
TinkerInstaller.onReceiveUpgradePatch(context, patchLocation)
重启应用之后,补丁文件便会生效。
你也可以使用TinkerPatchSdk一键接入Tinker:http://www.tinkerpatch.com/Docs/SDK,其中包括了补丁文件获取的部分,不需要自己再搭建补丁文件下发后台。
这篇文章只是抛砖引玉式简单的介绍了一下Tinker的使用,推荐大家还是好好细读官方提供的文档。
限于篇幅的缘故,将在下一篇文章中分析Tinker的原理。
Tinker接入及源码分析(二)


![[HBLOG]公众号](https://www.liuhaihua.cn/img/qrcode_gzh.jpg)

