从零开始搭建React同构应用(二)
从零开始搭建React同构应用(二)
项目工程化(浏览器端)
在 从零开始React同构开发(一) 中我们已经能实现基本的React配置和编译了。接下来我们需要将编译工程化。
代码
代码在这 ,建议下载后,对照着看,因为文章不方便把所有的代码贴上来
主要内容
-
项目目录结构优化
-
stylus样式文件的处理和打包 -
extract-text-webpack-plugin配置 -
html-webpack-plugin配置 -
配置
browser-sync自动刷新(利用es6的decoratort特性)
项目目录结构优化
先看下整理后的目录结构
src
    ├─config //附加webpack配置文件
    ├─module
    │  ├─common //公共模块
    │  │  └─stylus
    │  ├─index //首页模块
    │  │  ├─component
    │  │  └─stylus
    │  │      └─img
    │  └─TodoDetail //todo详情模块
    │      └─stylus
    └─template //HTML模版
module 文件夹放置了各个模块,我把页面以模块分类,每个模块下第一层的 .jsx 文件就是页面的入口文件(common除外)。
common 模块文件夹放置一些公共组件、公共库、公共样式等。
template 文件夹用于放置 html-webpack-plugin 用到的页面模版。
当然我还在探索更好的目录配置方式,大家如果有想法欢迎@我^_^。
添加 npm script
我们先添加一条 watch 命令,用于开发环境的编译。
"scripts": {
    "watch": "webpack -d -w --progress --colors --bs",
    "test-server": "anywhere -p 18341 -d ./build"
  },
样式文件处理
css、stylus文件的处理
前篇文章我们只编译了jsx,我们还没引入样式,假设现在项目的css使用 stylus 来编写。那么可以参考以下配置。
我们需要3个loader:
-
stylus-loader
-
autoprefixer-loader
-
css-loader
-
vue-style-loader
-
file-loader和url-loader
这些loaders大家肯定耳熟能详啦,可能大家会对 vue-style-loader 会有疑惑,这里解释下:
因为在启用 sourceMap 的情况下, style-loader 对 background-image 属性没有处理好,生成的URL链接开头为 chrome:// urls ,官方库中已经有人提 issue 了,。
后来 尤雨溪 大神fork了官方库后开发了 vue-style-loader ,完美的解决了 background-image 问题,当时发现这个库的时候真的感动的不行啊。。。
下面看一下样式文件loader的配置
loaders: [
            {
                test: //.(png|jpe?g|gif)/,
                loader: 'url?limit=1024&name=img/[name].[ext]'
            }, {
                test: //.(ttf|eot|svg)$/,
                loader: "url?limit=1024&name=fonts/[name].[ext]"
            },
            {
                test: //.jsx?$/,
                exclude: /node_modules/,
                loader: "babel"
            },
            {
                test: //.(styl|css)$/,
                loader: "vue-style!css?sourceMap!autoprefixer!stylus")
            },
        ]
这样就可以愉快的在js中引入CSS啦
extract-text-webpack-plugin 配置
有时候我们需要把CSS提取出来,单独打包成一个文件,这时候需要用到 extract-text-webpack-plugin
修改 webpack.config.js
const ExtractTextPlugin = require("extract-text-webpack-plugin");
然后修改我们原有的 styl-loader 配置
{
    test: //.(styl|css)$/,
    loader: ExtractTextPlugin.extract(["vue-style"], "css?sourceMap!autoprefixer!stylus")
},
我们还要在plugin字段配置输出的CSS文件名称
plugins:[
    new ExtractTextPlugin('css/[name].css'),
]
执行 watch 命令
npm run watch`
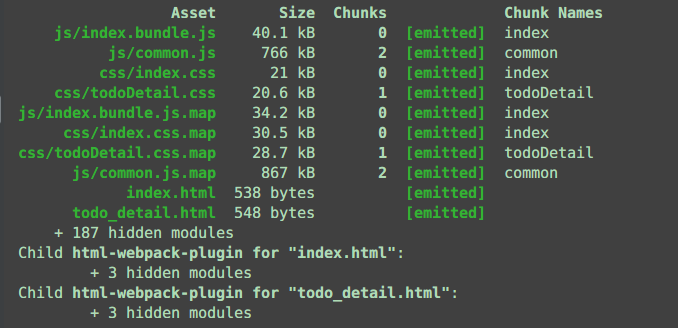
可以看到css都被提取出来成为单独的文件了。
html-webpack-plugin 配置
作用:
-
自动生成HTML
-
自动在HTML引入
js,css。 -
自动添加hash。
我们在 src/config 新建 html-webpack-plugin.config.js 文件,由于配置HTML编译。
//html-webpack-plugin.config.js
const HtmlWebpackPlugin = require('html-webpack-plugin');
const path = require('path');
module.exports = [
    new HtmlWebpackPlugin({
        filename: 'index.html',
        chunks: ['common', 'index'],
        template: path.resolve(__dirname, '../template/base.html'),
        hash: true,
    }),
]
修改 webpack.config.js
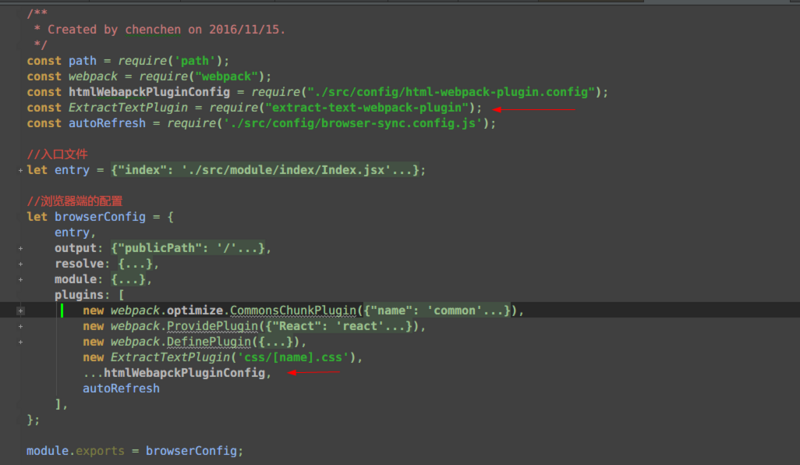
执行 watch 命令
npm run watch

可以看到webpack帮我们自动生成了html文件。
index.html 文件内容如下:
<!DOCTYPE html>
<html lang="en">
<head>
    <meta charset="UTF-8">
    <meta name="viewport"
          content="width=device-width, initial-scale=1.0, minimum-scale=1.0, maximum-scale=1.0, user-scalable=0"/>
    <title>React同构开发Demo</title>
    <link href="/css/index.css?d8b82face5e26195ca7e" rel="stylesheet">
</head>
<body>
<div id="wrap"></div>
<script type="text/javascript" src="/js/common.js?d8b82face5e26195ca7e"></script>
<script type="text/javascript" src="/js/index.bundle.js?d8b82face5e26195ca7e"></script>
</body>
</html>
配置 browser-sync 自动刷新
这里我们用到ES7的 修饰器 特性。目前 transform-decorators 只有第三方的实现。
以Index.jsx为例
-
先修改
babel.rc文件:{ "presets": [ "react", "es2015" ], "plugins": [ "transform-regenerator", "transform-decorators-legacy" //添加这个 ] } -
在config文件夹添加 browser-sync.config.js
-
修改 webpack.config.js
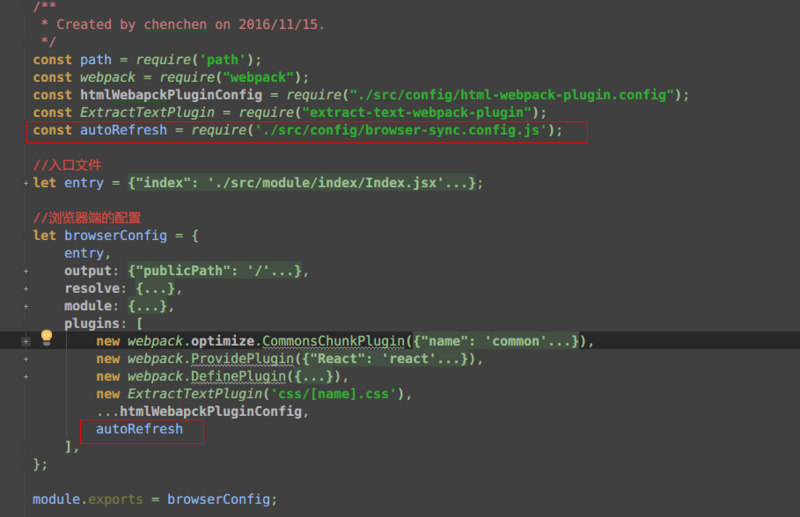
-
在common文件夹添加 bs.js
-
在React组件中引入
bs.js
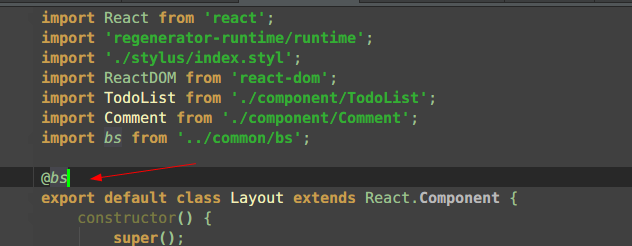
执行 watch 命令
npm run watch`
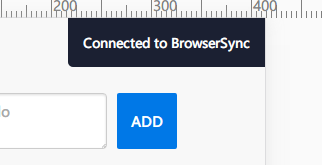
刷新浏览器,看到下图说明自动刷新服务已经成功开启
webapck小技巧
减小路径的书写量
resolve: {
    extensions: ['.jsx', '.js', ''],
    alias: {
        'common': path.join(__dirname, 'module/common')
    }
},
自动引入库,不用每次都写import
new webpack.ProvidePlugin({
            React: 'react',
            ReactDOM: 'react-dom',
            fetch: 'isomorphic-fetch',
            promise: 'promise'
        }),
区分生产和开发环境
new webpack.DefinePlugin({
        'process.env.NODE_ENV': JSON.stringify(process.env.NODE_ENV) || JSON.stringify('development'),
    }),
使用 cross-env 来跨平台设置环境变量
"scripts": {
    "watch": "webpack -d -w --progress --colors --bs",
    "test-server": "anywhere -p 18341 -d ./build",
    "dist": "cross-env NODE_ENV='production' webpack -p"
  }
提取公共js、css
new webpack.optimize.CommonsChunkPlugin({
        name: 'common',
        filename: 'js/common.js',
    }),


![[HBLOG]公众号](https://www.liuhaihua.cn/img/qrcode_gzh.jpg)

