谈谈ConcurrentHashMap1.7和1.8的不同实现
简书占小狼
转载请注明原创出处,谢谢!
知止而后有定,定而后能静,静而后能安,安而后能虑,虑而后能得。
ConcurrentHashMap
在多线程环境下,使用 HashMap 进行 put 操作可能会引起死循环,导致cpu的使用率达到100%,为了避免这种bug的隐患,强烈建议使用 ConcurrentHashMap 代替 HashMap ,为了对 ConcurrentHashMap 有更深入的了解,本文将对 ConcurrentHashMap 1.7和1.8的不同实现进行分析。
1.7实现
数据结构
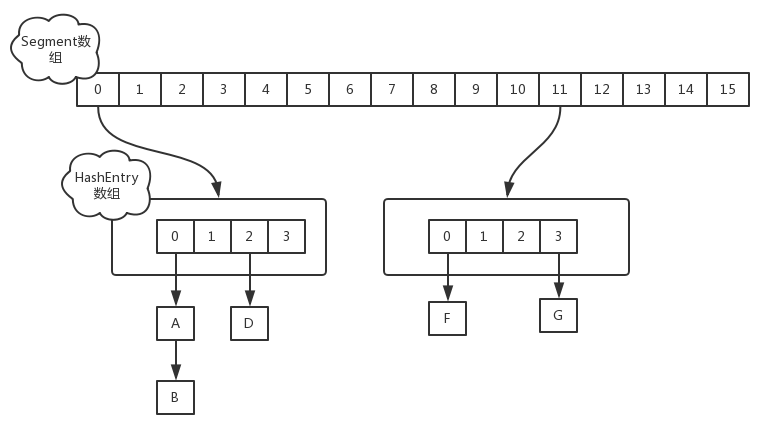
jdk1.7中采用 Segment + HashEntry 的方式进行实现,结构如下:

ConcurrentHashMap 初始化时,计算出 Segment 数组的大小 ssize 和和每个 Segment 中 HashEntry 数组的大小 cap ,并初始化 Segment 数组的第一个元素;其中 ssize 大小为2的幂次方,默认为16, cap 大小也是2的幂次方,最小值为2,最终结果根据根据初始化容量 initialCapacity 进行计算,计算过程如下:
if (c * ssize < initialCapacity)
    ++c;
int cap = MIN_SEGMENT_TABLE_CAPACITY;
while (cap < c)
    cap <<= 1;
其中 Segment 在实现上继承了 ReentrantLock ,这样就自带了锁的功能。
put实现
当执行 put 方法插入数据时,根据key的hash值,在 Segment 数组中找到相应的位置,如果相应位置的 Segment 还未初始化,则通过CAS进行赋值,接着执行 Segment 对象的 put 方法通过加锁机制插入数据,实现如下:
场景:线程A和线程B同时执行相同 Segment 对象的 put 方法
1、线程A执行 tryLock() 方法成功获取锁,则把 HashEntry 对象插入到相应的位置;
2、线程B获取锁失败,则执行 scanAndLockForPut() 方法,在 scanAndLockForPut 方法中,会通过重复执行 `tryLock() 方法尝试获取锁,在多处理器环境下,重复次数为64,单处理器重复次数为1,当执行 tryLock() 方法的次数超过上限时,则执行 lock() 方法挂起线程B;
3、当线程A执行完插入操作时,会通过 unlock() 方法释放锁,接着唤醒线程B继续执行;
size实现
因为 ConcurrentHashMap 是可以并发插入数据的,所以在准确计算元素时存在一定的难度,一般的思路是统计每个 Segment 对象中的元素个数,然后进行累加,但是这种方式计算出来的结果并不一样的准确的,因为在计算后面几个 Segment 的元素个数时,已经计算过的 Segment 同时可能有数据的插入或则删除,在1.7的实现中,采用了如下方式:
try {
    for (;;) {
        if (retries++ == RETRIES_BEFORE_LOCK) {
            for (int j = 0; j < segments.length; ++j)
                ensureSegment(j).lock(); // force creation
        }
        sum = 0L;
        size = 0;
        overflow = false;
        for (int j = 0; j < segments.length; ++j) {
            Segment<K,V> seg = segmentAt(segments, j);
            if (seg != null) {
                sum += seg.modCount;
                int c = seg.count;
                if (c < 0 || (size += c) < 0)
                    overflow = true;
            }
        }
        if (sum == last)
            break;
        last = sum;
    }
} finally {
    if (retries > RETRIES_BEFORE_LOCK) {
        for (int j = 0; j < segments.length; ++j)
            segmentAt(segments, j).unlock();
    }
}
先采用不加锁的方式,连续计算元素的个数,最多计算3次:
1、如果前后两次计算结果相同,则说明计算出来的元素个数是准确的;
2、如果前后两次计算结果都不同,则给每个 Segment 进行加锁,再计算一次元素的个数;
1.8实现
数据结构
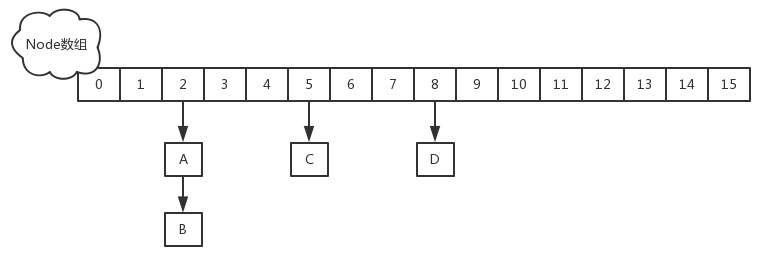
1.8中放弃了 Segment 臃肿的设计,取而代之的是采用 Node + CAS + Synchronized 来保证并发安全进行实现,结构如下:

只有在执行第一次 put 方法时才会调用 initTable() 初始化 Node 数组,实现如下:
private final Node<K,V>[] initTable() {
    Node<K,V>[] tab; int sc;
    while ((tab = table) == null || tab.length == 0) {
        if ((sc = sizeCtl) < 0)
            Thread.yield(); // lost initialization race; just spin
        else if (U.compareAndSwapInt(this, SIZECTL, sc, -1)) {
            try {
                if ((tab = table) == null || tab.length == 0) {
                    int n = (sc > 0) ? sc : DEFAULT_CAPACITY;
                    @SuppressWarnings("unchecked")
                    Node<K,V>[] nt = (Node<K,V>[])new Node<?,?>[n];
                    table = tab = nt;
                    sc = n - (n >>> 2);
                }
            } finally {
                sizeCtl = sc;
            }
            break;
        }
    }
    return tab;
}
put实现
当执行 put 方法插入数据时,根据key的hash值,在 Node 数组中找到相应的位置,实现如下:
1、如果相应位置的 Node 还未初始化,则通过CAS插入相应的数据;
else if ((f = tabAt(tab, i = (n - 1) & hash)) == null) {
    if (casTabAt(tab, i, null, new Node<K,V>(hash, key, value, null)))
        break;                   // no lock when adding to empty bin
}
2、如果相应位置的 Node 不为空,且当前该节点不处于移动状态,则对该节点加 synchronized 锁,如果该节点的 hash 不小于0,则遍历链表更新节点或插入新节点;
if (fh >= 0) {
    binCount = 1;
    for (Node<K,V> e = f;; ++binCount) {
        K ek;
        if (e.hash == hash &&
            ((ek = e.key) == key ||
             (ek != null && key.equals(ek)))) {
            oldVal = e.val;
            if (!onlyIfAbsent)
                e.val = value;
            break;
        }
        Node<K,V> pred = e;
        if ((e = e.next) == null) {
            pred.next = new Node<K,V>(hash, key, value, null);
            break;
        }
    }
}
3、如果该节点是 TreeBin 类型的节点,说明是红黑树结构,则通过 putTreeVal 方法往红黑树中插入节点;
else if (f instanceof TreeBin) {
    Node<K,V> p;
    binCount = 2;
    if ((p = ((TreeBin<K,V>)f).putTreeVal(hash, key, value)) != null) {
        oldVal = p.val;
        if (!onlyIfAbsent)
            p.val = value;
    }
}
4、如果 binCount 不为0,说明 put 操作对数据产生了影响,如果当前链表的个数达到8个,则通过 treeifyBin 方法转化为红黑树,如果 oldVal 不为空,说明是一次更新操作,没有对元素个数产生影响,则直接返回旧值;
if (binCount != 0) {
    if (binCount >= TREEIFY_THRESHOLD)
        treeifyBin(tab, i);
    if (oldVal != null)
        return oldVal;
    break;
}
5、如果插入的是一个新节点,则执行 addCount() 方法尝试更新元素个数 baseCount ;
size实现
1.8中使用一个 volatile 类型的变量 baseCount 记录元素的个数,当插入新数据或则删除数据时,会通过 addCount() 方法更新 baseCount ,实现如下:
if ((as = counterCells) != null ||
    !U.compareAndSwapLong(this, BASECOUNT, b = baseCount, s = b + x)) {
    CounterCell a; long v; int m;
    boolean uncontended = true;
    if (as == null || (m = as.length - 1) < 0 ||
        (a = as[ThreadLocalRandom.getProbe() & m]) == null ||
        !(uncontended =
          U.compareAndSwapLong(a, CELLVALUE, v = a.value, v + x))) {
        fullAddCount(x, uncontended);
        return;
    }
    if (check <= 1)
        return;
    s = sumCount();
}
1、初始化时 counterCells 为空,在并发量很高时,如果存在两个线程同时执行 CAS 修改 baseCount 值,则失败的线程会继续执行方法体中的逻辑,使用 CounterCell 记录元素个数的变化;
2、如果 CounterCell 数组 counterCells 为空,调用 fullAddCount() 方法进行初始化,并插入对应的记录数,通过 CAS 设置cellsBusy字段,只有设置成功的线程才能初始化 CounterCell 数组,实现如下:
else if (cellsBusy == 0 && counterCells == as &&
         U.compareAndSwapInt(this, CELLSBUSY, 0, 1)) {
    boolean init = false;
    try {                           // Initialize table
        if (counterCells == as) {
            CounterCell[] rs = new CounterCell[2];
            rs[h & 1] = new CounterCell(x);
            counterCells = rs;
            init = true;
        }
    } finally {
        cellsBusy = 0;
    }
    if (init)
        break;
}
3、如果通过 CAS 设置cellsBusy字段失败的话,则继续尝试通过 CAS 修改 baseCount 字段,如果修改 baseCount 字段成功的话,就退出循环,否则继续循环插入 CounterCell 对象;
else if (U.compareAndSwapLong(this, BASECOUNT, v = baseCount, v + x))
    break;
所以在1.8中的 size 实现比1.7简单多,因为元素个数保存 baseCount 中,部分元素的变化个数保存在 CounterCell 数组中,实现如下:
public int size() {
    long n = sumCount();
    return ((n < 0L) ? 0 :
            (n > (long)Integer.MAX_VALUE) ? Integer.MAX_VALUE :
            (int)n);
}

final long sumCount() {
    CounterCell[] as = counterCells; CounterCell a;
    long sum = baseCount;
    if (as != null) {
        for (int i = 0; i < as.length; ++i) {
            if ((a = as[i]) != null)
                sum += a.value;
        }
    }
    return sum;
}
通过累加 baseCount 和 CounterCell 数组中的数量,即可得到元素的总个数;
我是占小狼,如果读完觉得有收获的话,欢迎点赞加关注


![[HBLOG]公众号](https://www.liuhaihua.cn/img/qrcode_gzh.jpg)

