关于科学上网两三事-续
在上篇文章中我们介绍了市面上几种番羽土啬的方式,以及如何搭建一套属于自己SS服务端,但是考虑到多种原因,很多小伙伴应该也不会那么做。
为啥咧?你们都去打农药了吗?你们都去约会了吗?说的跟你们真的有女朋友似得。
今天我们不聊这个,我们今天就是要帮懒人做件事,话说懒人番羽土啬要干嘛?
那我猜肯定是倒数第三种。
第三种是什么
有什么问题吗?
上篇文章问题提到如何搭建自己的ss服务器,很多小伙伴提到自己搭建太麻烦,费用也是个问题

但是,你还记得上一篇文章的最后,提到一个免费的代理账号的网站,但是周围很多小伙伴还是说使用起来太不方便了。
纳尼?
- 网站上有多个账号数据,有很多个不能使用,一次次填写账号密码数据太繁琐。
- 代理账号密码数据每6个小时更新一次,更新后原账号密码数据不可用,难道我要每6个小时再重复上面的动作?
仔细想了想,确实是这个样子,每次都要做重复的操作确实太不软件工程了,那么,那么就让我们洗洗睡吧。
开什么玩笑,问题肯定要解决啊。
唠唠这些问题
上一节我们提到要实现这么一个工具(软件)来获取网站上的账号和密码数据到保存到本地并配置给代理软件。
1.咦,账号的获取
首先我们说说怎么获取这些账号和密码数据,肯定不能再一次次手动打开这个网站去抄这些数据吧,爬虫在这个时候就显得非常好用了。
那么,该用什么来实现这个爬虫呢?
这里我采用了Jsoup来显示这个爬虫,主要是因为python的定时调度不好用(下面具体说明)
使用jsoup爬去这个页面的数据和python一样,写起来很简单
public List<SSBean> getSSAccount() {

    Document document = null;
    try {
        document = Jsoup.connect("http://ss.ishadowx.com/").get();

        Element firstElement = document.getElementsByClass("portfolio-items").first();
        Elements ssElements = firstElement.getElementsByClass("hover-text");
        for (Element element : ssElements) {
            SSBean ssBean = new SSBean();
            String address = element.getElementsByTag("h4").first().getElementsByTag("span").text();
            String password = element.getElementsByTag("h4").get(2).getElementsByTag("span").first().text();
            String portString = element.getElementsByTag("h4").get(1).text();
            String port = portString.split(":")[1];
            String methodString = element.getElementsByTag("h4").get(3).text();
            String method = methodString.split(":")[1];
            ssBean.setAddress(address);
            ssBean.setPort(port);
            ssBean.setPassword(password);
            ssBean.setMethod(method);
            if (ssBean.getPassword() == null || ssBean.getPassword().isEmpty()) {
                continue;
            }
            ssBeanList.add(ssBean);
        }
    } catch (IOException e) {
        e.printStackTrace();
    }
    return ssBeanList;
}
运行程序,我们便得到了这个List的账号数据

是的,我们通过很简单的代码便获取到了这些账号数据,但是这些数据我们该怎么用呢?直接生成文件保存本地?每次使用都需要从网站去爬去这些数据?这些数据如何配置到SS?
停,停……
我已经不敢往下继续想了。

2.啊,我的思路呢
别闹,问题还是需要解决的。刚才我们使用很简单的代码获取到了网站上的账号数据,但是……

需要我给翻译吗?

相信我,这不是网站自带的功能,真的是我翻译的,才怪。。。
也就是说,网站上的数据每6个小时更新一次,我们一次性抓取保存时没有用的,因为你下次用的时候他说不定已经过期了,你肯定回想那我就不存了啊,我有空了就去启动我的软件,或者我就在上面的时间段后去运行这段代码,好吧你真的不懒,是很闲啊。
- 第一,我们的爬取代码肯定不能放在客户端,网站页面有访问限制,多次访问会被封ip(又是防抓取套路……)
- 第二,抓取代码需要定期执行,去自动抓取
- 第三,程序放在服务端将爬取的数据放在数据库,需要提供接口支持
在上面提到我们没有使用python,因为python定时调度不好管理,而且接口部署没有java的spring boot这么简单。
下面就讲讲服务端的实现。
3.呀,服务端
既然服务端只是简单的接口实现和数据库存取操作,那么Spring boot肯定是首选啊,Spring boot在做微服务方面还是很方便的。
页面爬去入库
在model层实现对页面的爬去,在Controller层调用爬去方法定期执行,并提数据库查询接口。
@Component
public class ScheduledTasks {
@Autowired
private SSRespository ssRespository;
private static final Logger log = LoggerFactory.getLogger(ScheduledTasks.class);

private static final SimpleDateFormat dateFormat = new SimpleDateFormat("HH:mm:ss");
SSAccountModel ssAccountModel;

@Scheduled(cron = "0 0/15 0,6,12,18 * * *" )
public void reportCurrentTime() {
    log.info("The time is now {}", dateFormat.format(new Date()));
    ssAccountModel = new SSAccountModelImpl();
    List<SSBean> ssAccount = ssAccountModel.getSSAccount();
    if (ssAccount == null || ssAccount.size() == 0) {
        log.info("爬取得信息:{}", "爬取失败");
    } else {
        log.info("爬取得信息:{}", ssAccount.toString());
        ssRespository.deleteAll();
        ssRespository.save(ssAccount);
    }


}


}
使用@Scheduled(cron = “0 0/15 0,6,12,18 *” )注解实现程序在每天的0:15,6:15,12:15,18:15定期执行。
ssRespository.deleteAll();
ssRespository.save(ssAccount);
如上代码,在插入数据库前清空数据库并插入,这样就实现了定期对网站页面的爬去和入库操作
接口映射
有了数据给客户端提供接口就显得很简单了,直接从数据库查询数据返回给调用者即可,当然这里没有对调用者做限制,主要演示实现。
@RestController
public class SSCountController {
@Autowired
private SSRespository ssRespository;
@RequestMapping("/getAccount")
public Iterable<SSBean> getSSAccount() {
    Iterable<SSBean> all = ssRespository.findAll();
    return all;
    }
}
运行程序,在浏览器访问 http://localhost:8080/getAccount 即可。

点我下载源码
4.嗨,客户端
由于考虑到在客户端(window)运行,考虑到没有安装jdk环境的,所以不能使用java打jar包实现,由于客户端的业务很简单,主要就是调用接口生成配置文件,打开SS客户端完成配置文件的加载。
考虑到生成exe文件,这里客户端就直接使用python来实现了
#!/usr/bin/python
# -*- coding: UTF-8 -*-
# --------------------------
# Author fzl
# Date 2017/7/20 15:13
# EMAIL fangjalylong@qq.com
# Desc
# --------------------------
import json
import requests
import sys

from ExeUtil import ExeUtil

type = sys.getfilesystemencoding()

print( "***************************************************************")
print( "*                                                             *").decode('utf-8').encode(type)
print( "*******************欢迎使用免费代理更新程序********************").decode('utf-8').encode(type)
print( "*                                                             *").decode('utf-8').encode(type)
print( "*******************正在更新配置文件,请稍后********************").decode('utf-8').encode(type)
print( "*                                                             *").decode('utf-8').encode(type)
print( "***************************************************************")

url = 'http://121.42.170.72:8080/Shadowsocks/getAccount'
data = requests.get(url)
beans=json.loads(data.text)
file=open("gui-config.json","w+")
file.write('''{
  "configs": ['''+'/n')
for index in range(len(beans)):
file.writelines('{')
file.write('''"server": "'''+beans[index]['address'].strip()+'''"'''+',/n')
file.write('''"server_port": "'''+beans[index]['port'].strip()+'''"'''+',/n')
file.write('''"password": "'''+beans[index]['password'].strip()+'''"'''+',/n')
file.write('''"method": "'''+beans[index]['method'].strip()+'''"'''+',/n')
file.write('''"remarks": "'''+beans[index]['address'].strip()+'''"'''+',/n')
file.write('''"timeout": "'''+'5'+'''"'''+'/n')
if index==len(beans)-1:
    file.writelines('}')
else:
    file.writelines('},')

file.write(''' ],
  "strategy": null,
  "index": 0,
  "global": true,
  "enabled": false,
  "shareOverLan": true,
  "isDefault": false,
  "localPort": 1080,
  "pacUrl": null,
  "useOnlinePac": false,
  "secureLocalPac": true,
  "availabilityStatistics": false,
  "autoCheckUpdate": true,
  "checkPreRelease": false,
  "isVerboseLogging": true,
  "logViewer": {
"topMost": false,
"wrapText": true,
"toolbarShown": false,
"Font": "Consolas, 8pt",
"BackgroundColor": "Black",
"TextColor": "White"
  },
  "proxy": {
    "useProxy": false,
       "proxyType": 0,
    "proxyServer": "",
    "proxyPort": 0,
    "proxyTimeout": 3
  },
  "hotkey": {
"SwitchSystemProxy": "",
"SwitchSystemProxyMode": "",
"SwitchAllowLan": "",
"ShowLogs": "",
"ServerMoveUp": "",
"ServerMoveDown": ""
  }
}''')
file.close()
print( "*                                                             *").decode('utf-8').encode(type)
print( "*    SS默认选中第一个代理账号,如不可用请尝试切换其他账号     *").decode('utf-8').encode(type)
print( "*                                                             *").decode('utf-8').encode(type)
print( "*                                                             *").decode('utf-8').encode(type)
print( "*             配置文件已经更新,Shadowsocks已经启动            *").decode('utf-8').encode(type)
print( "*                                                             *").decode('utf-8').encode(type)
print( "*                                                             *").decode('utf-8').encode(type)
print( "*                                               by:flyou     *").decode('utf-8').encode(type)
print( "*                                                             *").decode('utf-8').encode(type)
print( "*                                    http://www.flyou.ren     *").decode('utf-8').encode(type)
print( "*                                                             *").decode('utf-8').encode(type)
print( "***************************************************************")
exeUtil=ExeUtil('.','Shadowsocks.exe')
exeUtil.openExe()
打开exe工具类
class ExeUtil:
def __init__(self, filePath, fileName):
    self.filePath = filePath
    self.fileName = fileName

def openExe(self):
    try :
        handle = win32process.CreateProcess(os.path.join(self.filePath, self.fileName),
            '', None, None, 0,
            win32process.CREATE_NO_WINDOW,
            None ,
            self.filePath,
            win32process.STARTUPINFO())
        running = True
    except Exception, e:

        print "Create Error!"
        handle = None
        running = False

    while running :
     rc = win32event.WaitForSingleObject(handle[0], 1000)
     if rc == win32event.WAIT_OBJECT_0:
            running = False
#end while
            print "GoodBye"
点我下载源码
5.哈 ,试一试效果
执行代码,即可完成配置文件的生成和装载

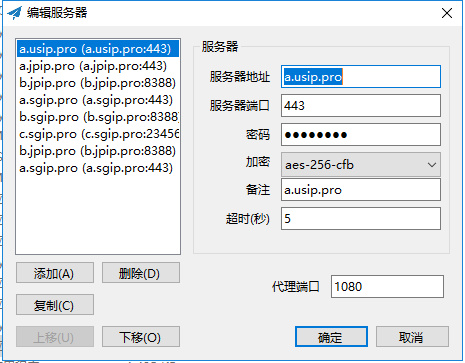
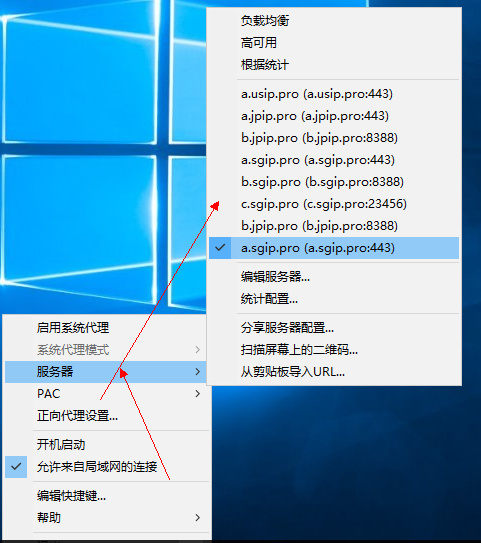
此时,Shadowsocks应用就会已经启动(目录下需要有Shadowsocks)并成功加载相应的账号配置,如下图

浏览器如何配置代理请参照上一篇文章
关于科学上网两三事
注意,抓取的账号不是每一个都可以用,但是至少有3、4个是很快的,右键点击ss尝试切换不同的账号吧。

NOW,DO WHAT YOU WANT TO DO


最后还要唠叨几句
说了这么多,你的安装文件呢?哎呀,只顾着学习(装逼)忘记留种了%^……^%

点我下载
关于软件的使用说明:
1.解压FreeShadowsocks.rar到任意目录
2.点击FreeShadowsocks.exe邮件发送到桌面快捷方式
3.点击桌面快捷方式即可打开程序。
备注:
本软件只是定时获取网络上可用的SS账号数据并下发配置文件到本地
如果发现账号不可用请切换到其他代理账号重试或者退出SS重新打开本软件
原则上账号数据会每6个小时更新一次
服务器会在每天的0:15,6:15,12:15和18:15去重新生成相应账号
请务必在此时段重新打开本软件已获取最新的账号数据,以保证正常使用代理


![[HBLOG]公众号](https://www.liuhaihua.cn/img/qrcode_gzh.jpg)

