一起来学SpringCloud之 - 分布式配置中心(Native - Config)
Spring Cloud Config为分布式系统中的外部配置,提供了服务器和客户端支持。使用Config Server,您可以在所有环境中管理应用程序的外部属性。客户端和服务器映射的概念与Spring Environment和PropertySource抽象相同,因此它们与Spring应用程序非常契合,但可以与任何以任何语言运行的应用程序一起使用。随着应用程序通过从开发人员到测试和生产的部署流程,您可以管理这些环境之间的配置,并确定应用程序具有迁移时需要运行的一切。服务器存储后端的默认实现使用git,因此它轻松支持标签版本的配置环境,以及可用于管理内容的各种工具。可以轻松添加替代实现,并使用Spring配置将其插入
官方文档: http://cloud.spring.io/spring-cloud-static/Dalston.SR2/#_spring_cloud_config
- 服务架构图
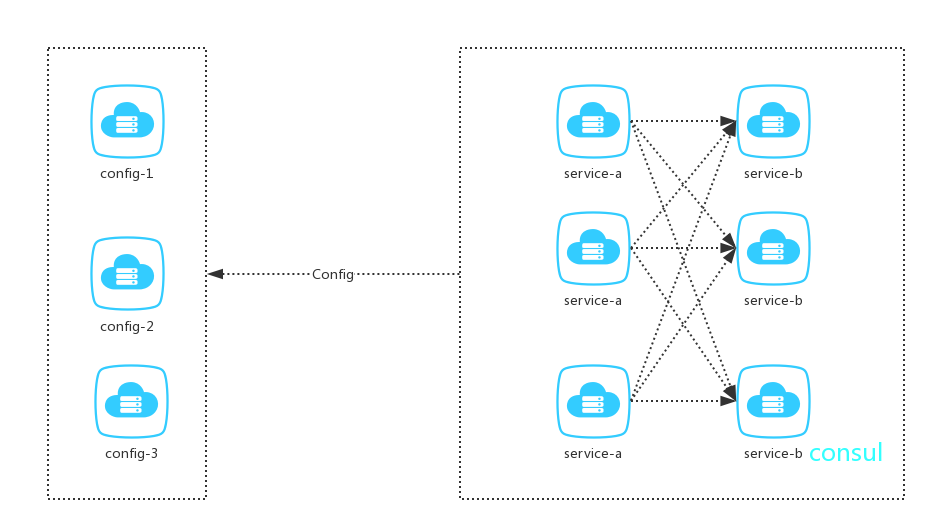
画图工具: https://www.processon.com/
- 准备工作
1.创建 battcn-config-server 和 battcn-config-client ,如果已经从第一章看到这里的朋友们应该都知道pom.xml的一些基本配置了,本节开始只贴关键部分代码,完整的直接看GIT 就行了,不然每次都导致内容太多让人没有看的欲望了…
- battcn-config-server
2.导入 config-server 包,目前只需要这一个就够了
<dependencies>
    <dependency>
        <groupId>org.springframework.cloud</groupId>
        <artifactId>spring-cloud-config-server</artifactId>
    </dependency>
</dependencies>
3.创建启动APP.java程序,添加 @EnableConfigServer 注解即可
@SpringBootApplication
@EnableConfigServer
public class ConfigServerApplication {

    public static void main(String[] args) {
        SpringApplication.run(ConfigServerApplication.class, args);
    }
}
4.application.yml
server:
  port: 9000
spring:
  application:
    name: battcn-config-server
  profiles:
    active:
    - native
  cloud:
    config:
      name: config-server     #{application}
      enabled: false
      server:
        health:
          enabled: false
5.最后创建一个 config-server-order-default.yml 这个就是给到其它项目使用的,使用方式也极其简单
order:
  name: My Name's Order Service,Are you Afraid?
- 测试一把
http请求地址和资源文件映射如下:
- /{application}-{profile}.yml
- /{label}/{application}-{profile}.yml
- /{application}-{profile}.properties
- /{label}/{application}-{profile}.properties
- /{application}/{profile}[/{label}]
其中 application 是在常规Spring Boot应用程序中注入 spring.cloud.config.name 的 SpringApplication(即通常是”application”), application 是活动配置文件(或逗号分隔的属性列表), label 是可选的git标签(默认为 master )。
所以捏,我们这快 地址应该写成 http://localhost:9000/config-server/order-default 其中 config-server 就是我们配置的 spring.cloud.config.name 也就是 {application} 然后 order-default 就是我们的 {profile}
结果: {"name":"config-server","profiles":["order-default"],"label":null,"version":null,"state":null,"propertySources":[{"name":"classpath:/config-server-order-default.yml","source":{"order.name":"My Name's Order Service,Are you Afraid?"}}]} 表示OK了,服务端配置完毕,接下来配置需要调用的客户端
- battcn-config-client
1.导出以下包,一个是consul的服务发现包,如果不知道的请参考 一起来学SpringCloud之-注册中心(Eureka/Consul) ,第二个就是Client需要依赖的包,第三个是心跳检测需要依赖的,cloud中很多都会使用到,有兴趣的可以百度了解
<dependencies>
    <dependency>
        <groupId>org.springframework.cloud</groupId>
        <artifactId>spring-cloud-starter-consul-discovery</artifactId>
    </dependency>
    <dependency>
        <groupId>org.springframework.cloud</groupId>
        <artifactId>spring-cloud-config-client</artifactId>
    </dependency>
    <dependency>
        <groupId>org.springframework.boot</groupId>
        <artifactId>spring-boot-starter-actuator</artifactId>
    </dependency>
</dependencies>
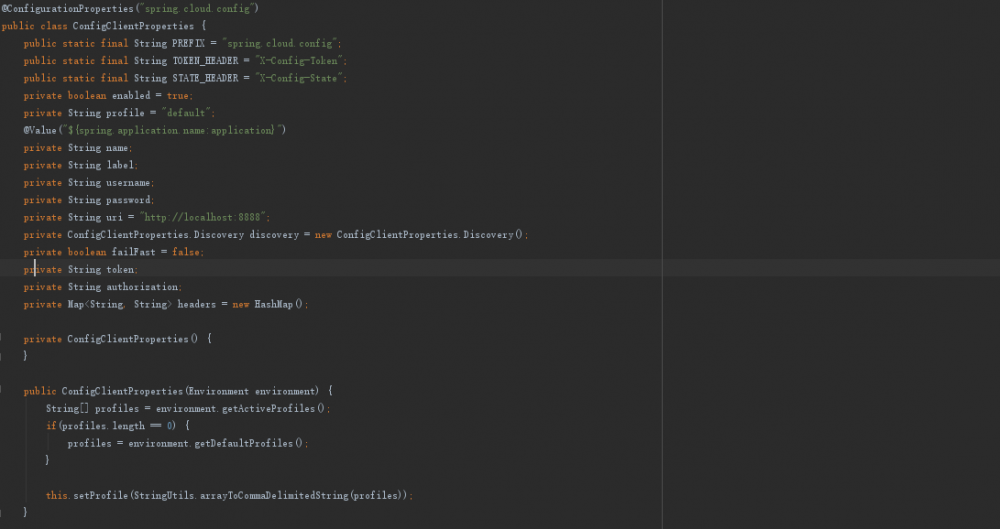
2.我们 battcn-config-client 是没有配置 order.name 属性的,因此是从 config-server 中读取
@SpringBootApplication
@EnableDiscoveryClient
@RestController
public class ConfigClientApplication {

    @Value("${order.name}")
    String orderName;

    @RequestMapping("/test")
    public String test() {
        return "client ====>>> " + orderName;
    }

    public static void main(String[] args) {
        SpringApplication.run(ConfigClientApplication.class, args);
    }
}
3.创建 bootstrap.yml ,不能是 application.yml 具体原因请看注意事项
server:
  port: 9001
spring:
  application:
    name: battcn-config-client
  cloud:
    config:
      name: config-server
      profile: order-default
      uri: http://localhost:9000
- 注意事项
创建 bootstrap.yml ,这里需要注意一下的是,SpringCloud Config是不认 application.yml 的配置,这也是Cloud官方有说明的,不然配置的 uri属性是无效的
参考链接: http://cloud.spring.io/spring-cloud-static/Dalston.SR2/#_the_bootstrap_application_context 因此有的配置只能通过 bootstrap.yml ,否则就会被覆盖(附源码)
- 测试一把
启动: consul agent -dev 启动consul
启动: battcn-config-server 和 battcn-config-client
访问: http://localhost:9001/test
client ====>>> My Name's Order Service,Are you Afraid? #表示成功
- 说点什么
画图工具: https://www.processon.com/
本章代码(battcn-config-server/client): https://git.oschina.net/battcn/battcn-cloud/tree/master/battcn-cloud-config
如有问题请及时与我联系
- 个人QQ:1837307557
- Spring Cloud中国社区①:415028731
- Spring For All 社区⑤:157525002
转载标明出处,thanks
正文到此结束
热门推荐


相关文章

近期评论
-
ws0132613@gmail.comhttps://getmacos.com/gopanel/william smith
-
谢谢
-
https://www.newcmy.com/register?aff=HBVX建议您试试草莓云机场,可以流畅观看youtube和tiktok,上reddit/x也没有问题,还有各种ai优化节点。
-
-
-
想购买您这个站,我的联系方式QQ741756694微信同步 能卖联系
-
-
-
-
Loading...
![[HBLOG]公众号](https://www.liuhaihua.cn/img/qrcode_gzh.jpg)

