Spring定时任务源码分析
之前在深入浅出spring task详细介绍了spring task的用法与使用示例,这篇文章更近一步,我们从源码的角度看看内部的实现机制。之所以写这篇文章是因为最近因为spring task的误用引发了一次线上的故障。本着一探究竟的精神,源码撸起。
先还原下spring task是如何误用的,示例代码如下:
package com.rhwayfun.springboot.task;

import org.slf4j.Logger;
import org.slf4j.LoggerFactory;
import org.springframework.context.annotation.AnnotationConfigApplicationContext;
import org.springframework.context.annotation.Configuration;
import org.springframework.scheduling.annotation.EnableScheduling;
import org.springframework.scheduling.annotation.Scheduled;
import org.springframework.stereotype.Component;

import java.util.ArrayList;
import java.util.Date;
import java.util.List;
import java.util.concurrent.LinkedBlockingQueue;
import java.util.concurrent.ThreadLocalRandom;
import java.util.concurrent.TimeUnit;

/**
 * Created by rhwayfun on 2017/8/12.
 */

@Configuration
@Component
@EnableScheduling
public class SpringScheduledTaskExample {

    /** Logger */
    private static Logger log = LoggerFactory.getLogger(SpringScheduledTaskExample.class);

    private LinkedBlockingQueue<Long> q = new LinkedBlockingQueue<>(1024);

    public SpringScheduledTaskExample() {
        List<JobThread> threads = new ArrayList<>();
        for (int i = 0; i < 100; i++) {
            threads.add(new JobThread(i, q));
        }
        for (JobThread jobThread : threads) {
            jobThread.start();
        }
    }

    @Scheduled(cron = "3/10 * * * * ?")
    public void execute() throws InterruptedException {
        log.info("check schedule task!");
        for (int i = 0; i < 5; i++) {
            long time = System.currentTimeMillis() - i * 1000;
            q.offer(time, 10, TimeUnit.MILLISECONDS);
        }
        //模拟耗时操作
        Thread.sleep(ThreadLocalRandom.current().nextInt(10000));
    }

    @Scheduled(cron = "0/20 * * * * ?")
    public void execute2() throws InterruptedException {
        log.info("check schedule task2!");
        for (int i = 0; i < 5; i++) {
            long time = System.currentTimeMillis() + i * 1000;
            q.offer(time, 10, TimeUnit.MILLISECONDS);
        }
        //模拟耗时操作
        Thread.sleep(ThreadLocalRandom.current().nextInt(10000));
    }

    private class JobThread extends Thread {

        private int threadNo;
        private LinkedBlockingQueue<Long> q;

        JobThread(int threadNo, LinkedBlockingQueue<Long> q) {
            this.threadNo = threadNo;
            this.q = q;
        }

        @Override
        public void run() {
            while (true) {

                Long time = null;
                try {
                    time = q.poll(50, TimeUnit.MILLISECONDS);
                } catch (InterruptedException e) {
                    log.error("poll timestamp error, ", e);
                }

                if (time == null) {
                    continue;
                }

                log.info("queue size:{}, poll time: {}", q.size(), new Date(time));

            }
        }
    }

    public static void main(String[] args) {
        AnnotationConfigApplicationContext configApplicationContext =
                new AnnotationConfigApplicationContext(SpringScheduledTaskExample.class);
        try {
            Thread.sleep(600000);
        } catch (InterruptedException e) {
            e.printStackTrace();
        } finally {
            configApplicationContext.close();
        }
    }

}

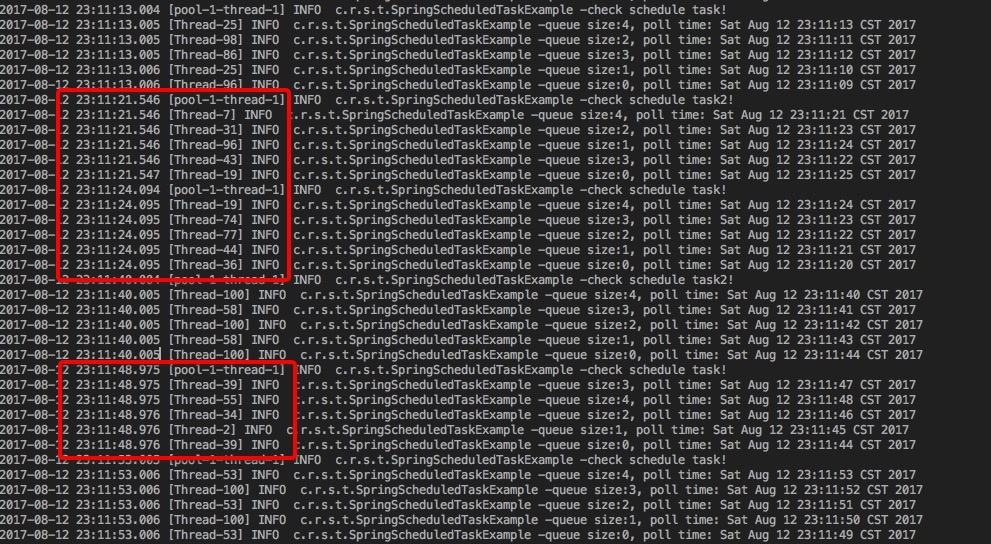
注意到刚开始的输出还符合预期,但是随后打印的时间戳却出现了错乱,后面甚至还出现了过了几分钟才开始执行下一次定时任务的情况。
要解释这个现象,我们先来看看spring定时任务是怎么启动的:首先启动一个线程池,默认实现是 ThreadPoolTaskExecutor ,初始化的时候会先创建一个LinkedBlockingQueue阻塞队列,把需要执行定时的任务Runnable提交到线程池,由线程池执行具体的操作。说到线程池,大家应该不陌生,在并发编程系列就详细介绍了线程池的启动过程和参数说明,这里不再赘述。这里有一个关键的信息是,默认情况下创建的线程池大小 coreSize 是1。意味着如果有多个定时任务需要执行,只会先执行一个,后面的任务会排队等待。
ThreadPoolTaskExecutor 初始化:
@Override
    protected ExecutorService initializeExecutor(
            ThreadFactory threadFactory, RejectedExecutionHandler rejectedExecutionHandler) {

        BlockingQueue<Runnable> queue = createQueue(this.queueCapacity);

        ThreadPoolExecutor executor;
        if (this.taskDecorator != null) {
            executor = new ThreadPoolExecutor(
                    //this.keepAliveSeconds=60,表示线程池大小大于coreSize的时候,多余
                    //线程最多等待的时间,如果超过60s都没有处理会自行销毁
                    this.corePoolSize, this.maxPoolSize, this.keepAliveSeconds, TimeUnit.SECONDS,
                    queue, threadFactory, rejectedExecutionHandler) {
                @Override
                public void execute(Runnable command) {
                    super.execute(taskDecorator.decorate(command));
                }
            };
        }
        else {
            executor = new ThreadPoolExecutor(
                    this.corePoolSize, this.maxPoolSize, this.keepAliveSeconds, TimeUnit.SECONDS,
                    queue, threadFactory, rejectedExecutionHandler);

        }

        if (this.allowCoreThreadTimeOut) {
            executor.allowCoreThreadTimeOut(true);
        }

        this.threadPoolExecutor = executor;
        return executor;
    }


    protected BlockingQueue<Runnable> createQueue(int queueCapacity) {
        if (queueCapacity > 0) {
            return new LinkedBlockingQueue<Runnable>(queueCapacity);
        }
        else {
            return new SynchronousQueue<Runnable>();
        }
    }
继续追踪创建 ThreadPoolExecuter 的构造方法:
public ThreadPoolExecutor(int corePoolSize,
                              int maximumPoolSize,
                              long keepAliveTime,
                              TimeUnit unit,
                              BlockingQueue<Runnable> workQueue,
                              ThreadFactory threadFactory,
                              RejectedExecutionHandler handler) {
        if (corePoolSize < 0 ||
            maximumPoolSize <= 0 ||
            maximumPoolSize < corePoolSize ||
            keepAliveTime < 0)
            throw new IllegalArgumentException();
        if (workQueue == null || threadFactory == null || handler == null)
            throw new NullPointerException();
        this.corePoolSize = corePoolSize;
        this.maximumPoolSize = maximumPoolSize;
        this.workQueue = workQueue;
        this.keepAliveTime = unit.toNanos(keepAliveTime);
        this.threadFactory = threadFactory;
        this.handler = handler;
    }
看看 ThreadPoolTaskExecutor 执行定时任务的方法:
@Override
    public void execute(Runnable task) {
        Executor executor = getThreadPoolExecutor();
        try {
            executor.execute(task);
        }
        catch (RejectedExecutionException ex) {
            throw new TaskRejectedException("Executor [" + executor + "] did not accept task: " + task, ex);
        }
    }


    public void execute(Runnable command) {
        if (command == null)
            throw new NullPointerException();
        int c = ctl.get();
        if (workerCountOf(c) < corePoolSize) {
            if (addWorker(command, true))
                return;
            c = ctl.get();
        }
        if (isRunning(c) && workQueue.offer(command)) {
            int recheck = ctl.get();
            if (! isRunning(recheck) && remove(command))
                reject(command);
            else if (workerCountOf(recheck) == 0)
                addWorker(null, false);
        }
        else if (!addWorker(command, false))
            reject(command);
    }
这里要做的其实就3件事:
- 当线程池大小小于coreSize,就创建线程处理请求
- 如果等于coreSize就放入队列,由空闲线程从队列拉取请求进行处理
- 当队列放不下新入的任务时,新建线程处理请求,如果池子大小撑到了maximumPoolSize就用RejectedExecutionHandler拒绝处理
现在我们回到刚开始的示例中,我们创建了两个定时任务,执行的时长也不同,并设置了不同的定时策略。
注意的是我们此时整个上下文线程池的coreSize是1,keepAliveSeconds是60秒。
加载上下文后,会有两个任务提交到线程池,先提交到线程池会首先创建线程立即处理,而第二个因为超过coreSize=1,所以会被放入阻塞队列等待空闲线程去执行。而且如果任务本身的时间超过定时任务本身的定时间隔,那么下次执行的时间也会相应拉长,目前这个例子是超过10s的话,下次执行定时任务的间隔会延长到20s。
那假设某次任务执行的时间大大超过了定时任务的间隔,比如5分钟,那么下次执行定时任务的时间也会在5分钟后,而且如果有新的请求在这个慢请求之后进来,那么会被放入队列,且会后于满请求执行,回到设置的keepAliveSeconds=60s,那么5分钟后这个请求已经自行销毁了,不会有日志输出。这点正好解释了几分钟后才执行的情况,而且几分钟后输出的日志肯定是新的请求进来导致的。
那么正确的用法已经很清楚了,增大线程池的大小就好了。
@Bean
    public TaskScheduler taskScheduler() {
        ThreadPoolTaskScheduler poolTaskScheduler = new ThreadPoolTaskScheduler();
        poolTaskScheduler.setThreadNamePrefix("poolTaskScheduler");
        poolTaskScheduler.setPoolSize(100);
        return poolTaskScheduler;
    }


![[HBLOG]公众号](https://www.liuhaihua.cn/img/qrcode_gzh.jpg)

