每日一博 | Spring Cloud 之负载均衡框架 Ribbon 介绍
6 负载均衡框架Ribbon介绍
本文节选自《疯狂Spring Cloud微服务架构实战》,本书将于2017年11月出版。
本书代码共享地址: https://gitee.com/yangenxiong/SpringCloud
本文要点
认识Ribbon
第一个Ribbon程序
负载均衡是分布式架构的重点,负载均衡机制将决定着整个服务集群的性能与稳定。根据前面章节可知,Eureka服务实例可以进行集群部署,每个实例都均衡处理服务请求,那么这些请求是如何被分摊到各个服务实例中的?本章将讲解Netflix的负载均衡项目Ribbon。
6.1 Ribbon介绍
6.1.1 Ribbon简介
Ribbon是Netflix下的负载均衡项目,它在集群中为各个客户端的通信提供了支持,它主要实现中间层应用程序的负载均衡。Ribbon提供以下特性:
负载均衡器,可支持插拔式的负载均衡规则。
对多种协议提供支持,例如HTTP、TCP、UDP。
集成了负载均衡功能的客户端。
同为Netflix项目,Ribbon可以与Eureka整合使用,Ribbon同样被集成到Spring Cloud中,作为spring-cloud-netflix项目中的子模块。Spring Cloud将Ribbon的API进行了封装,使用者可以使用封装后的API来实现负载均衡,也可以直接使用Ribbon的原生API。
6.1.2 Ribbon子模块
Ribbon主要有以下三大子模块:
ribbon-core:该模块为Ribbon项目的核心,主要包括负载均衡器接口定义、客户端接口定义,内置的负载均衡实现等API。
ribbon-eureka:为Eureka客户端提供的负载均衡实现类。
ribbon-httpclient:对Apache的HttpClient进行封装,该模块提供了含有负载均衡功能的REST客户端。
6.1.3 负载均衡器组件
Ribbon的负载均衡器主要与集群中的各个服务器进行通信,负载均衡器需要提供以下基础功能:
维护服务器的IP、DNS名称等信息。
根据特定的逻辑在服务器列表中循环。
为了实现负载均衡的基础功能,Ribbon的负载均衡器有以下三大子模块:
Rule:一个逻辑组件,这些逻辑将会决定,从服务器列表中返回哪个服务器实例。
Ping:该组件主要使用定时器,来确保服务器网络可以连接。
ServerList:服务器列表,可以通过静态的配置确定负载的服务器,也可以动态指定服务器列表。如果动态指定服务器列表,则会有后台的线程来刷新该列表。
本章关于Ribbon的知识,主要围绕负载均衡器组件进行。接下来,先编写一个Ribbon程序,让大家对Ribbon有一个初步的认识。
6.2第一个Ribbon程序
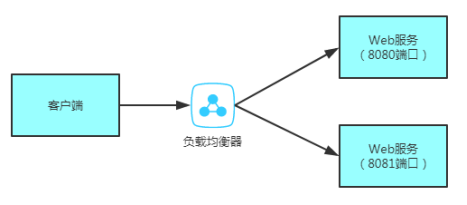
关于整合Spring Cloud的内容,会在后面章节讲述。本小节将以一个简单的Hello World程序,来展示Ribbon API的使用。本例的程序结构如图4-1所示。

图4-1 本例程序结构
本书所使用的Spring Cloud,默认集成的Ribbon版本为2.2.2,因此本书也使用该版本的Ribbon。
6.2.1 编写服务
为了能查看负载均衡效果,先编写一个简单的REST服务,通过指定不同的端口,让服务可以启动多个实例。本例的请求服务器,仅仅是一个基于Spring Boot的Web应用,与书2.3章节的应用类似,如果读者熟悉建立过程,可跳过部分创建过程,本小节最终目的是发布两个REST服务。
新建名称为“first-ribbon-server”的Maven项目,加入以下依赖:
<dependency>
    <groupId>org.springframework.boot</groupId>
    <artifactId>spring-boot-starter-web</artifactId>
    <version>1.5.4.RELEASE</version>
</dependency>
建立Spring Boot启动类,如代码清单4-1所示。
代码清单4-1:
codes/04/4.2/first-ribbon-server/src/main/java/org/crazyit/cloud/FirstServerApplication.java
@SpringBootApplication
public class FirstServerApplication {

	public static void main(String[] args) {
		// 读取控制台输入作为端口参数
		Scanner scan = new Scanner(System.in);
		String port = scan.nextLine();
		// 设置启动的服务器端口
		new SpringApplicationBuilder(FirstServerApplication.class).properties(
				"server.port=" + port).run(args);
	}
}
运行main方法,并在控制台输入端口号,即可启动Web服务器。接下来编写控制器,添加一个REST服务,请见代码清单4-2。
代码清单4-2:
codes/04/4.2/first-ribbon-server/src/main/java/org/crazyit/cloud/MyController.java
@RestController
public class MyController {

	@RequestMapping(value = "/person/{personId}", method = RequestMethod.GET,
			produces = MediaType.APPLICATION_JSON_VALUE)
	public Person findPerson(@PathVariable("personId") Integer personId,
			HttpServletRequest request) {
		Person p = new Person();
		p.setId(personId);
		p.setName("Crazyit");
		p.setAge(30);
		p.setMessage(request.getRequestURL().toString());
		return p;
	}

	@RequestMapping(value = "/", method = RequestMethod.GET)
	public String hello() {
		return "hello";
	}
}
在控制器中,发布了两个的REST服务。其中,调用地址为“/person/personId”的服务后,会返回一个Person实例的JSON字符串,为了看到请求的URL,为Person的message属性设置了请求的URL。
6.2.2 编写请求客户端
新建名称为“first-ribbon-client”的Maven项目,加入以下依赖:
<dependency>
    <groupId>com.netflix.ribbon</groupId>
    <artifactId>ribbon</artifactId>
    <version>2.2.2</version>
</dependency>
<dependency>
    <groupId>com.netflix.ribbon</groupId>
    <artifactId>ribbon-httpclient</artifactId>
    <version>2.2.2</version>
</dependency>
接下来,使用Ribbon的客户端发送请求,请见代码清单4-3。
代码清单4-3:
codes/04/4.2/first-ribbon-client/src/main/java/org/crazyit/cloud/TestRestClient.java
public class TestRestClient {

	public static void main(String[] args) throws Exception {
		// 设置请求的服务器
		ConfigurationManager.getConfigInstance().setProperty(
				"my-client.ribbon.listOfServers",
				"localhost:8080,localhost:8081");
		// 获取REST请求客户端
		RestClient client = (RestClient) ClientFactory
				.getNamedClient("my-client");
		// 创建请求实例
		HttpRequest request = HttpRequest.newBuilder().uri("/person/1").build();
		// 发 送10次请求到服务器中
		for (int i = 0; i < 6; i++) {
			HttpResponse response = client.executeWithLoadBalancer(request);
			String result = response.getEntity(String.class);
			System.out.println(result);
		}
	}
}
代码清单4-3中,使用了ConfigurationManager类来配置了请求的服务器列表,为“localhost:8080”与“localhost:8081”,再使用RestClient对象,向“/person/1”地址发送6次请求。
启动两次服务器类FirstServerApplication,并在控制台分别输入8080和8081端口。启动服务器后,运行客户端,输出结果如下:
{"id":1,"name":"Crazyit","age":30,"message":"http://localhost:8081/person/1"}
{"id":1,"name":"Crazyit","age":30,"message":"http://localhost:8080/person/1"}
{"id":1,"name":"Crazyit","age":30,"message":"http://localhost:8081/person/1"}
{"id":1,"name":"Crazyit","age":30,"message":"http://localhost:8080/person/1"}
{"id":1,"name":"Crazyit","age":30,"message":"http://localhost:8081/person/1"}
{"id":1,"name":"Crazyit","age":30,"message":"http://localhost:8080/person/1"}
根据输出结果可知,RestClient轮流向8080与8081端口发送请求,可见RestClient中已经帮我们实现了负载均衡的功能。
6.2.3 Ribbon配置
在编写客户端时,使用了ConfigurationManager来设置配置项,除了在代码中指定配置项外,还可以将配置放到“.properties”文件中,ConfigurationManager的loadPropertiesFromResources方法可以指定properties文件的位置,配置格式如下:
<client>.<nameSpace>.<property>=<value>
其中<client>为客户的名称,声明该配置属于哪一个客户端,在使用ClientFactory时可传入客户端的名称,即可返回对应的“请求客户端”实例。<nameSpace>为该配置的命名空间,默认为“ribbon”,<property>为属性名,<value>为属性值。如果想对全部的客户端生效,可以将客户端名称去掉,直接以“<namespace>.<property>”的格式进行配置。以下的配置,为客户端指定服务器列表:
my-client.ribbon.listOfServers=localhost:8080,localhost:8081
Ribbon的配置,同样可以使用在Spring Cloud的配置文件(即application.yml)中使用。
本文节选自《疯狂Spring Cloud微服务架构实战》,本书将于2017年11月出版。
- 本文标签: TCP 协议 Eureka js ACE map spring App client tar id 代码 服务器 list https http 集群 CTO maven build IO API web value git core cat springboot 空间 db 参数 负载均衡 Property UI apache json ip entity 线程 分布式 UDP 端口 REST DNS message 配置 java 实例 servlet src find Spring Boot
- 版权声明: 本文为互联网转载文章,出处已在文章中说明(部分除外)。如果侵权,请联系本站长删除,谢谢。
- 本文海报: 生成海报一 生成海报二


![[HBLOG]公众号](https://www.liuhaihua.cn/img/qrcode_gzh.jpg)

