SpringCloud Eureka 源码解析 —— 调试环境搭建
摘要: 原创出处 http://www.iocoder.cn/Eureka/build-debugging-environment/ 「芋道源码」欢迎转载,保留摘要,谢谢!
本文主要基于 Eureka 1.8.X 版本
- 1. 依赖工具
- 2. 源码拉取
- 3. Eureka-Server 启动
- 3.1 MockRemoteEurekaServer
- 3.2 Eureka-Server war 包
- 3.3 Eureka-Server 直接启动
- 4. Eureka-Client 启动
- 666. 彩蛋

������关注 微信公众号:【芋道源码】 有福利:
- RocketMQ / MyCAT / Sharding-JDBC 所有 源码分析文章列表
- RocketMQ / MyCAT / Sharding-JDBC 中文注释源码 GitHub 地址
- 您对于源码的疑问每条留言 都 将得到 认真 回复。 甚至不知道如何读源码也可以请教噢 。
- 新的 源码解析文章 实时 收到通知。 每周更新一篇左右 。
- 认真的 源码交流微信群。
1. 依赖工具
- Gradle
- JDK
- IntelliJ IDEA
推荐 Spring Cloud 书籍:
- 请支持正版。下载盗版, 等于主动编写低级 BUG 。
- 程序猿DD —— 《Spring Cloud微服务实战》
- 周立 —— 《Spring Cloud与Docker微服务架构实战》
- 两书齐买,京东包邮。
2. 源码拉取
从官方仓库 https://github.com/Netflix/eureka.git Fork 出属于自己的仓库。为什么要 Fork ?既然开始阅读、调试源码,我们可能会写一些注释,有了自己的仓库,可以进行自由的提交。:smiling_imp:
使用 IntelliJ IDEA 从 Fork 出来的仓库拉取代码。拉取完成后, Gradle 会下载依赖包,可能会花费一些时间,耐心等待下。
本文基于 master 分支。
3. Eureka-Server 启动
Eureka-Server 启动调试方式,有三种方式,我们来尝试每一种。
3.1 MockRemoteEurekaServer
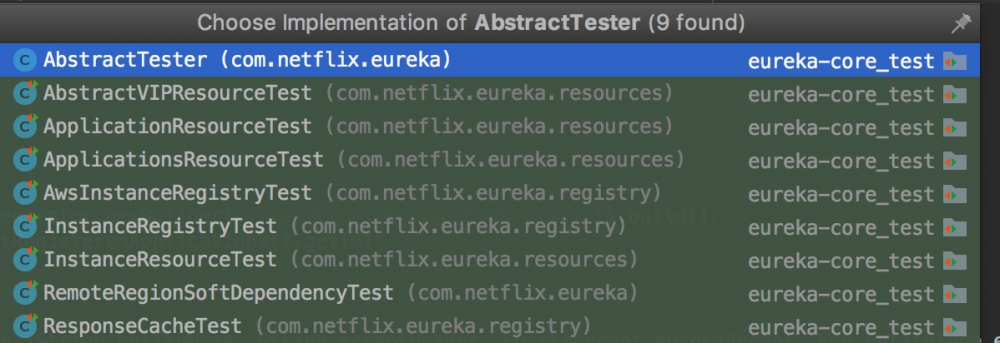
com.netflix.eureka.AbstractTester ,测试抽象类,有如下实现子类:

使用任意一个子类的单元测试执行即可执行 Eureka-Server 逻辑的调试,这里以 com.netflix.eureka.resources.ApplicationsResourceTest 作为例子。
Debug 运行 ApplicationsResourceTest#testFullAppsGetJson() 单元测试。在方法执行前, ApplicationsResourceTest#setUp() 会运行,初始化 Eureka-Server 模拟环境 ,例如:
com.netflix.eureka.mock.MockRemoteEurekaServer ( 模拟 Eureka-Server )。
因为是 模拟环境 ,对 Eureka-Server 的操作不是 Eureka-Client 请求 Eureka-Server 的方式,而是直接调用单元测试对应的方法。例如:
// ApplicationsResourceTest.java
@Test
public void testFullAppsGetJson() throws Exception{
 Response response = applicationsResource.getContainers(
 Version.V2.name(),
 MediaType.APPLICATION_JSON,
 null, // encoding
 EurekaAccept.full.name(),
 null, // uriInfo
 null // remote regions
 );

 String json = String.valueOf(response.getEntity());
 DecoderWrapper decoder = CodecWrappers.getDecoder(CodecWrappers.LegacyJacksonJson.class);

 Applications decoded = decoder.decode(json, Applications.class);
 // test per app as the full apps list include the mock server that is not part of the test apps
 for (Application application : testApplications.getRegisteredApplications()) {
 Application decodedApp = decoded.getRegisteredApplications(application.getName());
 assertThat(EurekaEntityComparators.equal(application, decodedApp), is(true));
 }
}
- 直接调用
ApplicationsResource#getContainers(...)方法。
总结:这种方式,简单粗暴,容易上手。当然,它的缺点是 模拟 。刚开始调试 Eureka-Server 可以尝试这种方式。
3.2 Eureka-Server war 包
第一步,编译 Eureka-Server war 包。该步骤可能消耗漫长的时间,如果执行失败,请不断重试。命令如下:
cd eureka
./gradlew clean build
第二步,Debug 运行 com.netflix.eureka.resources.EurekaClientServerRestIntegrationTest 任意单元测试方法。
总结:这种方式,编译的过程比较痛苦,不排除失败的可能性。每次增加对代码的注册后,都需要重新编译打包。因此不建议采用。那咋办呢?见第三种。良心如博主,赶紧关注博主的微信公众号:【 芋道源码 】。
3.3 Eureka-Server 直接启动
第一步,修改 EurekaClientServerRestIntegrationTest#startServer() 方法,解决第二种方式使用 war 包运行每次修改代码都需要重新编译的问题,实现代码如下:
// EurekaClientServerRestIntegrationTest.java
private static void startServer() throws Exception{
 server = new Server(8080);

 // TODO Thread.currentThread().getContextClassLoader() 获取不到路径,先暂时这样;
 WebAppContext webAppCtx = new WebAppContext(new File("./eureka-server/src/main/webapp").getAbsolutePath(), "/");
 webAppCtx.setDescriptor(new File("./eureka-server/src/main/webapp/WEB-INF/web.xml").getAbsolutePath());
 webAppCtx.setResourceBase(new File("./eureka-server/src/main/resources").getAbsolutePath());
 webAppCtx.setClassLoader(Thread.currentThread().getContextClassLoader());
 server.setHandler(webAppCtx);
 server.start();

 eurekaServiceUrl = "http://localhost:8080/v2";
}
- 笔者不太熟悉 Gradle 的打包方式,使用
Thread.currentThread().getContextClassLoader().getResource()方法,一直无法拿到路径,有知道的同学麻烦告知下。
第二步,Debug 运行 com.netflix.eureka.resources.EurekaClientServerRestIntegrationTest 任意单元测试方法。TODO[0003]:Thread.currentThread().getContextClassLoader() 获取不到路径,先暂时这样;
总结:这种方式,完美。建议使用该方式调试。
4. Eureka-Client 启动
我们以 com.netflix.eureka.ExampleEurekaClient 为例子。
第一步,在 EurekaClientServerRestIntegrationTest#setUp() 方法末尾添加 Thread.sleep(Long.MAX_VALUE) 代码。
第二步,按照「 3.3 Eureka-Server 直接启动」方法启动 Eureka-Server。
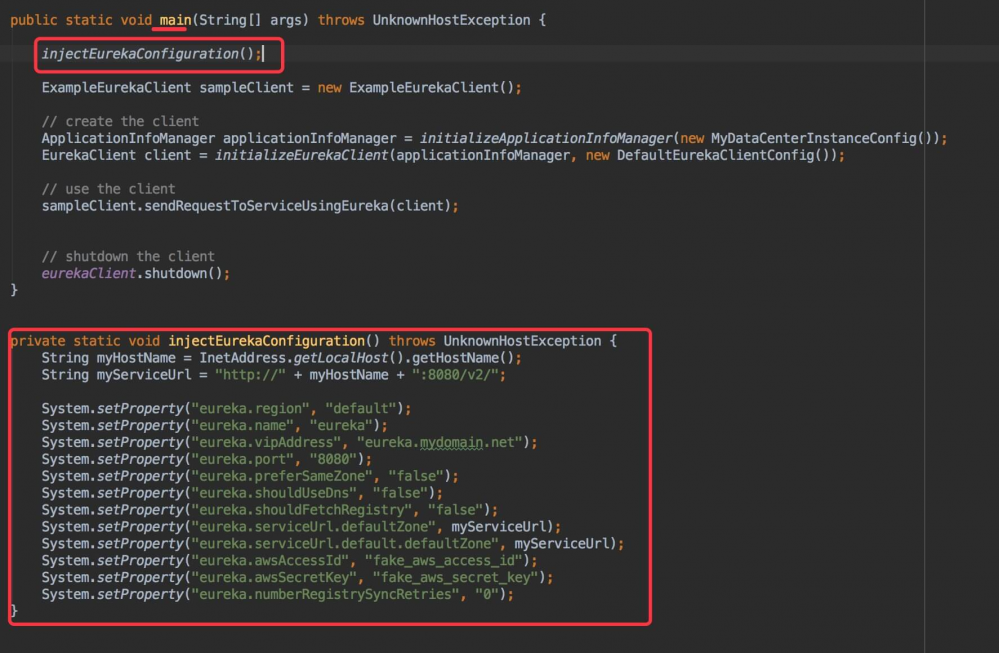
第三步,将 EurekaClientServerRestIntegrationTest#injectEurekaConfiguration 复制到 ExampleEurekaClient 类里。
第四步,在 ExampleEurekaClient#main() 方法的第一行,添加 injectEurekaConfiguration() 代码。
第五步,Debug 运行 ExampleEurekaClient#main() 方法。

eureka-examples 模块还提供别的例子,可以逐个调试。
666. 彩蛋
本文写的,相对比较简洁,如果有任何疑问,可以给我公众号留言。
下一篇更新?恩,我还没想好,整理整个系列的目录ing。
胖友,分享一波朋友圈可好!
- 本文标签: client db IO 京东 注释 编译 REST 文章 https RocketMQ IDE 目录 Docker remote build ioc cat 时间 ssl Eureka http git id 调试 json tab example Service tar 代码 web list entity ip Master UI 解析 源码 总结 微信公众号 GitHub java value src MQ Region App 测试 程序猿 下载 js bug SDN spring XML
- 版权声明: 本文为互联网转载文章,出处已在文章中说明(部分除外)。如果侵权,请联系本站长删除,谢谢。
- 本文海报: 生成海报一 生成海报二


![[HBLOG]公众号](https://www.liuhaihua.cn/img/qrcode_gzh.jpg)

