每日一博 | SpringCloud 服务的注册与发现(Eureka)
Spring Cloud是一个基于Spring Boot实现的云应用开发工具,它为基于JVM的云应用开发中涉及的配置管理、服务发现、断路器、智能路由、微代理、控制总线、全局锁、决策竞选、分布式会话和集群状态管理等操作提供了一种简单的开发方式。
Spring Cloud简介
Spring Cloud包含了多个子项目(针对分布式系统中涉及的多个不同开源产品),比如:Spring Cloud Config、Spring Cloud Netflix、Spring Cloud0 CloudFoundry、Spring Cloud AWS、Spring Cloud Security、Spring Cloud Commons、Spring Cloud Zookeeper、Spring Cloud CLI等项目。
微服务架构
微服务(Microservices Architecture)是一种架构风格,一个大型复杂软件应用由一个或多个微服务组成。系统中的各个微服务可被独立部署,各个微服务之间是松耦合的。每个微服务仅关注于完成一件任务并很好地完成该任务。在所有情况下,每个任务代表着一个小的业务能力。
微服务的概念源于2014年3月Martin Fowler所写的章“Microservices” http://martinfowler.com/articles/microservices.html
微服务架构(Microservices Architecture)
微服务架构的核心思想是,一个应用是由多个小的、相互独立的、微服务组成,这些服务运行在自己的进程中,开发和发布都没有依赖。不同服务通过一些轻量级交互机制来通信,例如 RPC、HTTP 等,服务可独立扩展伸缩,每个服务定义了明确的边界,不同的服务甚至可以采用不同的编程语言来实现,由独立的团队来维护。简单的来说,一个系统的不同模块转变成不同的服务!而且服务可以使用不同的技术加以实现!
微服务设计
那我们在微服务中应该怎样设计呢。以下是微服务的设计指南:
-
职责单一原则(Single Responsibility Principle):把某一个微服务的功能聚焦在特定业务或者有限的范围内会有助于敏捷开发和服务的发布。
-
设计阶段就需要把业务范围进行界定。
-
需要关心微服务的业务范围,而不是服务的数量和规模尽量小。数量和规模需要依照业务功能而定。
-
于SOA不同,某个微服务的功能、操作和消息协议尽量简单。
-
项目初期把服务的范围制定相对宽泛,随着深入,进一步重构服务,细分微服务是个很好的做法。
关于微服务架构的取舍
-
在合适的项目,合适的团队,采用微服务架构收益会大于成本。
-
微服务架构有很多吸引人的地方,但在拥抱微服务之前,也需要认清它所带来的挑战。
-
需要避免为了“微服务”而“微服务”。
-
微服务架构引入策略 – 对传统企业而言,开始时可以考虑引入部分合适的微服务架构原则对已有系统进行改造或新建微服务应用,逐步探索及积累微服务架构经验,而非全盘实施微服务架构。
更多关于微服务架构内容-请参考我的另一篇文章:《什什么是微服务架构?》
服务治理
由于Spring Cloud为服务治理做了一层抽象接口,所以在Spring Cloud应用中可以支持多种不同的服务治理框架,比如:Netflix Eureka、Consul、Zookeeper。在Spring Cloud服务治理抽象层的作用下,我们可以无缝地切换服务治理实现,并且不影响任何其他的服务注册、服务发现、服务调用等逻辑。
Spring Cloud Eureka
Spring Cloud Eureka来实现服务治理。
Spring Cloud Eureka是Spring Cloud Netflix项目下的服务治理模块。而Spring Cloud Netflix项目是Spring Cloud的子项目之一,主要内容是对Netflix公司一系列开源产品的包装,它为Spring Boot应用提供了自配置的Netflix OSS整合。通过一些简单的注解,开发者就可以快速的在应用中配置一下常用模块并构建庞大的分布式系统。它主要提供的模块包括:服务发现(Eureka),断路器(Hystrix),智能路由(Zuul),客户端负载均衡(Ribbon)等。
Eureka Server (eureka server)
提供服务注册和发现
添加依赖
在项目 spring-cloud-eureka pom.xml 中引入需要的依赖内容:
<parent>
	<groupId>org.springframework.boot</groupId>
	<artifactId>spring-boot-starter-parent</artifactId>
	<version>1.5.8.RELEASE</version>
	<relativePath/> <!-- lookup parent from repository -->
</parent>

<dependencies>
	<!--eureka server -->

	<dependency>
		<groupId>org.springframework.cloud</groupId>
		<artifactId>spring-cloud-starter-eureka-server</artifactId>
	</dependency>

	<!-- spring boot test-->

	<dependency>
		<groupId>org.springframework.boot</groupId>
		<artifactId>spring-boot-starter-test</artifactId>
		<scope>test</scope>
	</dependency>
</dependencies>
开启服务注册
通过 @EnableEurekaServer 注解启动一个服务注册中心提供给其他应用进行对话,这个注解需要在springboot工程的启动application类上加
package io.ymq.example.eureka;

import org.springframework.boot.SpringApplication;
import org.springframework.boot.autoconfigure.SpringBootApplication;
import org.springframework.cloud.netflix.eureka.server.EnableEurekaServer;

@SpringBootApplication
@EnableEurekaServer
public class EurekaApplication {

	public static void main(String[] args) {
		SpringApplication.run(EurekaApplication.class, args);
	}
}
配置 Eureka 服务
在默认设置下,该服务注册中心也会将自己作为客户端来尝试注册它自己,所以我们需要禁用它的客户端注册行为,只需要在 application.yml 配置文件中增加如下信息:
registerWithEureka: false
fetchRegistry: false
完整配置
server:
  port: 8761

eureka:
  instance:
    hostname: localhost
  client:
    registerWithEureka: false
    fetchRegistry: false
    serviceUrl:
      defaultZone: http://${eureka.instance.hostname}:${server.port}/eureka/
访问服务
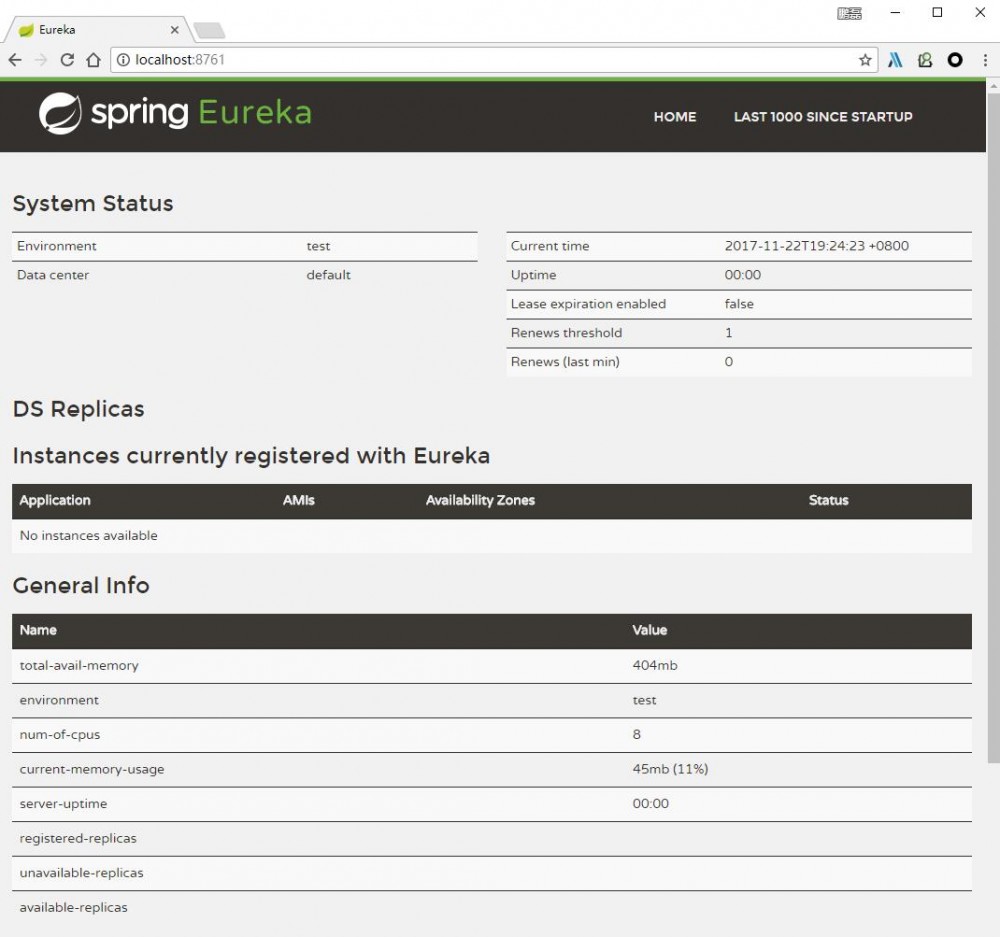
启动工程后,访问: http://localhost:8761/
可以看到下面的页面,其中还没有发现任何服务。

Service Provider (eureka client)
-
服务提供方
-
将自身服务注册到 Eureka,从而使服务消费方能够找到
添加依赖
在项目 spring-cloud-eureka-client pom.xml 中引入需要的依赖内容:
<parent>
	<groupId>org.springframework.boot</groupId>
	<artifactId>spring-boot-starter-parent</artifactId>
	<version>1.5.8.RELEASE</version>
	<relativePath/> <!-- lookup parent from repository -->
</parent>

<dependencies>

	<!-- spring boot eureka server -->
	<dependency>
		<groupId>org.springframework.cloud</groupId>
		<artifactId>spring-cloud-starter-eureka-server</artifactId>
	</dependency>

	<!-- spring boot web-->
	<dependency>
		<groupId>org.springframework.boot</groupId>
		<artifactId>spring-boot-starter-web</artifactId>
	</dependency>

	<!-- spring boot test-->
	<dependency>
		<groupId>org.springframework.boot</groupId>
		<artifactId>spring-boot-starter-test</artifactId>
		<scope>test</scope>
	</dependency>

</dependencies>
开启服务注册
在应用主类中通过加上 @EnableEurekaClient,但只有Eureka可用,你也可以使用@EnableDiscoveryClient。需要配置才能找到Eureka服务器
package io.ymq.example.eureka.client;

import org.springframework.boot.SpringApplication;
import org.springframework.boot.autoconfigure.SpringBootApplication;
import org.springframework.cloud.netflix.eureka.EnableEurekaClient;
import org.springframework.web.bind.annotation.RequestMapping;
import org.springframework.web.bind.annotation.RestController;

@SpringBootApplication
@EnableEurekaClient
@RestController
public class EurekaClientApplication {

    @RequestMapping("/")
    public String home() {
        return "Hello world";
    }

	public static void main(String[] args) {
		SpringApplication.run(EurekaClientApplication.class, args);
	}
}
配置 Eureka 服务
需要配置才能找到Eureka服务器。例:
完整配置
eureka:
  instance:
    hostname: localhost
  client:
    serviceUrl:
      defaultZone: http://localhost:8761/eureka/

spring:
  application:
    name: Eureka-Service
其中 defaultZone 是一个魔术字符串后备值,为任何不表示首选项的客户端提供服务URL(即它是有用的默认值)。 通过 spring.application.name 属性,我们可以指定微服务的名称后续在调用的时候只需要使用该名称就可以进行服务的访问
使用 EurekaClient
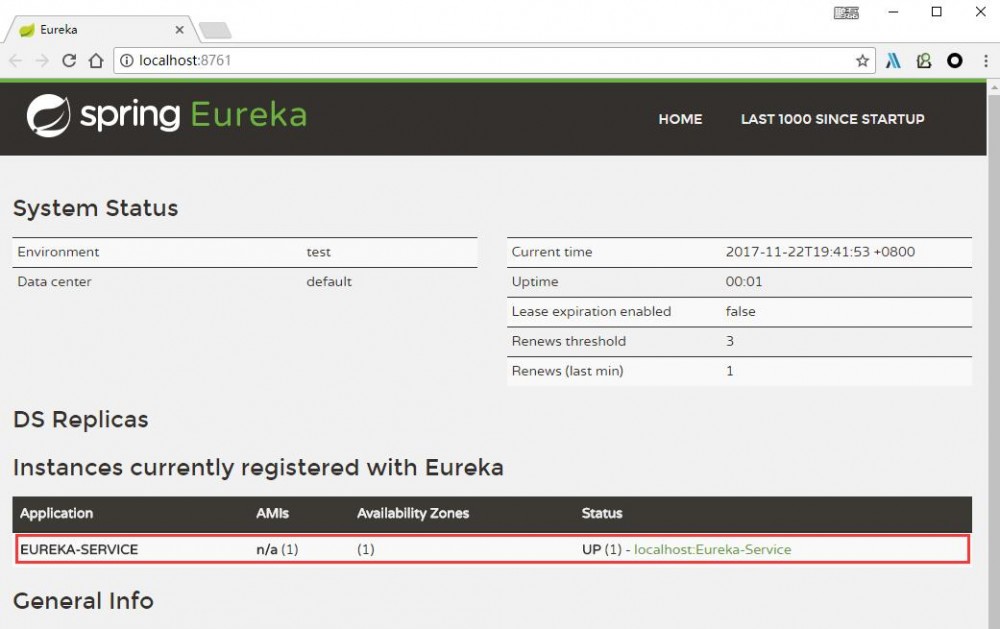
启动该工程后,再次访问启动工程后: http://localhost:8761/
可以如下图内容,我们定义的服务被成功注册了。

源码下载
- 本文标签: map id HTML 协议 开源 进程 下载 IDE 分布式系统 Eureka ip client zookeeper MQ App 服务器 锁 tar 文章 开发者 springboot 软件 example 集群 IO 智能 web 开发 Architect UI 分布式 敏捷 pom 企业 cat Service SOA spring dependencies 负载均衡 http 配置 Spring Boot XML 源码 provider 产品 Security 管理 Hystrix 云 REST https src
- 版权声明: 本文为互联网转载文章,出处已在文章中说明(部分除外)。如果侵权,请联系本站长删除,谢谢。
- 本文海报: 生成海报一 生成海报二


![[HBLOG]公众号](https://www.liuhaihua.cn/img/qrcode_gzh.jpg)

